ElasticSearch 学习笔记
ElasticSearch (狂神说学习笔记)
1、ES 概述
es是一个开源的高扩展的分布式全文检索引擎,
2、环境安装
环境准备:jdk,你得先安装一个jdk。
ES官网: https://www.elastic.co
ES官网下载地址: https://www.elastic.co/cn/start,然后在选择对应操作系统的版本。
window下安装ElasticSearch
1、直接解压即可,建议解压到自定义的一个专门装环境的文件夹下。
2、得到如下目录,挑一些目录说一下
-
bin目录:存放一些可执行文件,里面有个elasticsearch.bat 批处理文件,双击即可运行ElasticSearch
-
config目录:es的配置文件目录
-
lib目录:相关的一些jar包
-
modules目录:功能模块目录
-
plugins目录:插件目录,我们之后的插件都是放在这个目录下就会生效。比如之后的ik分词器。
3、双击elasticsearch.bat 文件, 运行es,得到

可以得到es的默认端口是9200
4、访问测试 localhost:9200
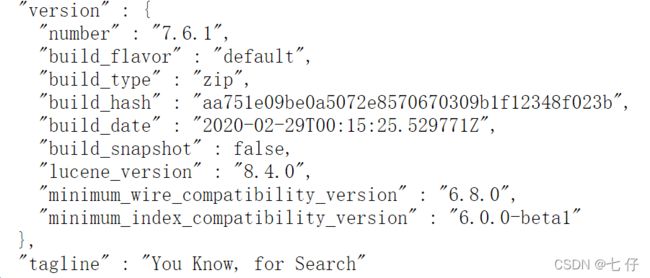
得到经典的 “You Know,for Search”
安装可视化界面 es head
下载地址:https://github.com/mobz/elasticsearch-head/releases
我们主要用于显示数据,一些请求发送还是使用kibana的好。
-
下载完成后解压到本地,翻看一下是一个node.js项目,查看package.json,发现start命令,cmd到当前文件夹里面去,执行npm run start,所以你可能要安装node.js 环境。
-
执行命令过后,
-
访问前运行es服务,访问localhost:9100
-
发现并没有连接到我们的es服务中,是因为跨域了,跨域了要进行配置
-
# 在es解压的文件夹中寻找config目录,修改elasticsearch.yml,在末尾添加如下配置,注意yml的空格格式!!!
# 开启跨域
http.cors.enabled: true
# 所有人访问
http.cors.allow-origin: "*"
-
-
基本使用
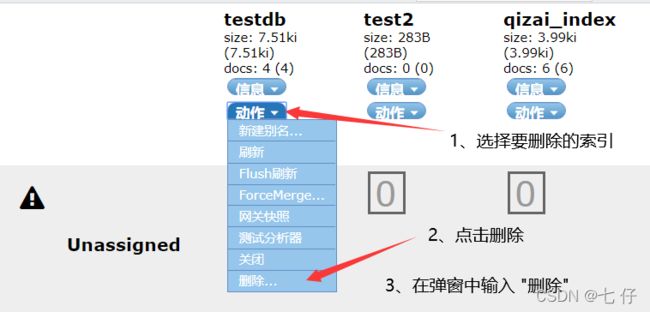
- 删除索引
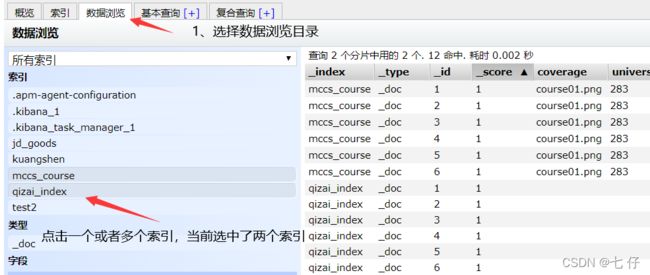
- 数据浏览(操作过后,查看右侧出现数据即可)
3、安装kibana
1、下载安装kibana
ES官网下载地址: https://www.elastic.co/cn/start,然后在选择对应操作系统的版本。
注意 : 要选择与es版本对应的kibana版本,另外推荐7.6.1版本,新版本我电脑不知怎么在一直加载,就是不进去,好像是要进行配置。
2、启动测试
同es,运行kibana.bat
得出kibana默认端口是5601
3、访问测试localhost:5601
4、设置中文(根据自身情况选择设置)
还是同es一样,在config目录中,修改kibana.yml, 在最后面添加如下配置
i18n.locale: "zh-CN"
4、es基本核心概念
要了解的几个es术语
1、索引
2、字段类型(mapping)
3、文档
4、分片(倒排索引!)
ElasticSearch是面向文档,关系型数据库和ElasticSearch客观对比!一切都是JSON!
| Relational DB | ElasticSearch |
|---|---|
| 数据库(database) | 索引(indices) |
| 表(tables) | types <慢慢会被弃用!> |
| 行(rows) | documents |
| 字段(columns) | fields |
物理设计
elasticsearch在后台把每个索引划分成多个分片,每分分片可以在集群中的不同服务器间迁移
一个人就是一个集群! ,即启动的ElasticSearch服务,默认就是一个集群,且默认集群名为elasticsearch
文档
ES是面向文档的,那么就意味着索引和搜索数据的最小单位是文档,es里面的文档数据都是json数据类型的,你从后台传输到数据库中也需要使用json数据类型
-
自我包含,一篇文档同时包含字段和对应的值,也就是同时包含key:value !
-
可以是层次型的,一个文档中包含自文档,复杂的逻辑实体就是这么来的! {就是一个json对象 ! fastjson进行自动转换 !}
-
灵活的结构,文档不依赖预先定义的模式,我们知道关系型数据库中,要提前定义字段才能使用,在elasticsearch中,对于字段是非常灵活的,有时候,我们可以忽略该字段,或者动态的添加一个新的字段。
类型(“表”)
类型是文档的逻辑容器,就像关系型数据库一样,表格是行的容器。类型中对于字段的定义称为映射,比如name映射为字符串类型。我们说文档是无模式的,它们不需要拥有映射中所定义的所有字段,比如新增一个字段,那么elasticsearch是怎么做的呢?
- elasticsearch会自动的将新字段加入映射,但是这个字段的不确定它是什么类型,elasticsearch就开始猜,如果这个值是18,那么elasticsearch会认为它是整形。但是elasticsearch也可能猜不对,所以最安全的方式就是提前定义好所需要的映射,这点跟关系型数据库殊途同归了,先定义好字段,然后再使用,别整什么幺蛾子。
- 现在一般类型都要求设置为_doc类型
索引(“库”)
索引是映射类型的容器, elasticsearch中的索引是一个非常大的文档集合。 索引存储了映射类型的字段和其他设置。然后它们被存储到了各个分片上了。我们来研究下分片是如何工作的。
一个集群至少有一个节点,而一个节点就是一个elasticsearch进程,节点可以有多个索引默认的,如果你创建索引,那么索引将会有个5个分片(primary shard ,又称主分片)构成的,每一个主分片会有一个副本(replica shard,又称复制分片),一个分片就是一个Lucene索引
上面的p 是同属于一个索引里面的,比如说上图p0,p1,p2,p3,p4 存储的是相同的内容,我们可以将这个分片搭到不同的服务器上。就算节点3挂了,其他节点1,节点2还是可用的。
倒排索引(Lucene索引底层)
优化查询速率的
简单说就是 按(文章关键字,对应的文档(0个或多个)形式建立索引,根据关键字就可直接查询对应的文档(含关键字的),无需查询每一个文档,如下图
举个例子:
倒排倒排,反着排,一般的数据库是通过一个唯一的id确定里面的内容,而倒排索引则是通过内容分词,然后再去确定出Id。这样可以过滤掉无关的所有数据,来提高效率。
一个ElasticSearch 索引有多个分片,每个分片就是一个Lucene索引,也就是说一个ElasticSearch索引就是多个Lucene索引组成的。Lucene索引底层使用的是倒排索引。
5、ik分词器(对中文进行分词的)
首先安装ik分词器,里面的ik分词器jar包的版本一定要对应你的es版本,
如何安装,将这个包放在es下的plugins目录下即可。
ik_smart 和 ik_max_word
ik_smart 为 最少切分,你输入的词在它的词典中的情况下以最少次数切分。每个词只会出现1次。
ik_max_word 为 最细粒度划分,就是你输入的词在它的词典中以最多次数划分。
1、演示1
2、演示2
6、Rest风格操作
基本Rest命令说明:
| method | url地址 | 描述 |
|---|---|---|
| PUT(创建,覆盖) | localhost:9200/索引名称/类型名称/文档id | 创建文档(指定文档id) |
| POST(创建) | localhost:9200/索引名称/类型名称 | 创建文档(随机文档id) |
| POST(修改) | localhost:9200/索引名称/类型名称/文档id/_update | 修改文档 |
| DELETE(删除) | localhost:9200/索引名称/类型名称/文档id | 删除文档 |
| GET(查询) | localhost:9200/索引名称/类型名称/文档id | 查询文档通过文档ID |
| POST(查询) | localhost:9200/索引名称/类型名称/文档id/_search | 查询所有数据 |
索引值类型:
-
字符串类型
-
text、
keyword
- text:支持分词,全文检索,支持模糊、精确查询,不支持聚合,排序操作;text类型的最大支持的字符长度无限制,适合大字段存储;
- keyword:不进行分词,直接索引、支持模糊、支持精确匹配,支持聚合、排序操作。keyword类型的最大支持的长度为——32766个UTF-8类型的字符,可以通过设置ignore_above指定自持字符长度,超过给定长度后的数据将不被索引,无法通过term精确匹配检索返回结果。
-
-
数值型
- long、Integer、short、byte、double、float、half float、scaled float
-
日期类型
- date
-
te布尔类型
- boolean
-
二进制类型
- binary
-
等等…
1、创建(修改) 一条记录
没有记录的时候,是创建,有记录的时候是修改。上面的是修改,可以看右边返回的json中result属性为updated
2、创建索引规则
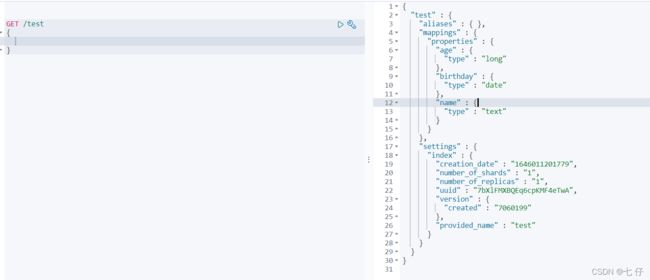
3、获得索引信息
4、修改索引
-
使用PUT 进行覆盖
-
# 如果还有其他字段,你这里没有设置的话是为空
PUT /test2/_doc/1
{
  "name" : "李四",
  "age": "10"
}
-
-
使用post局部修改
-
POST /test2/_doc/1/_update
{
  "doc" :{
      "name" : "李四"
  }
}
-
5、删除文档
DELETE /test2/_doc/1
6、删除索引
DELETE /test2
7、搜索
搜索出来的json结果我们要关注的是hits里面的hits字段,其中的source属性包含文档具体信息
1、条件查询 (如果文档中的name字段类型是text类型的话,会使用分词器,keyword则不会)但是英文的却不会进行分词,要精确匹配。
# 这个不会进行分词在查询
GET /qizai_index/_doc/_search?q=name:qizai2
# 这个会进行分词再查询,而且是模糊查询.
GET /qizai_index/_doc/_search?q=name:七仔
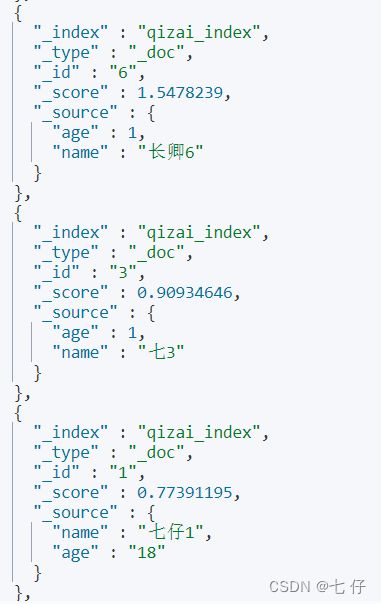
注意看七3的也被筛选出来了
2、条件查询 (效果同上)
GET /qizai_index/_doc/_search
{
  "query":{
    "match":{
      "name" : "长卿"
      # 这里面不能写多个属性字段
    }
  }
}
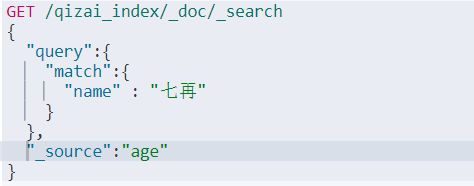
3、按照指定列输出 (就好比于数据库中查询指定字段)
结果输出
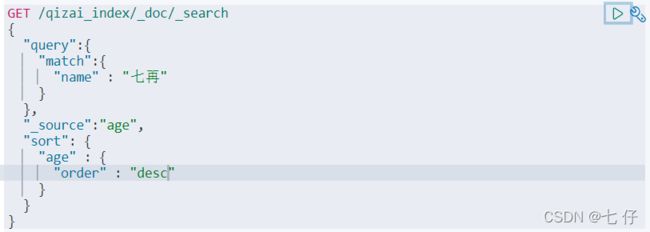
4、排序
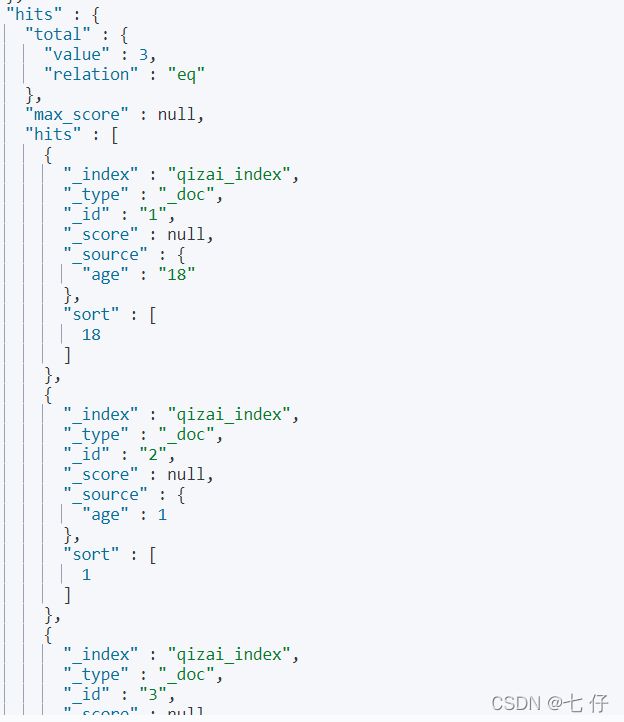
结果输出
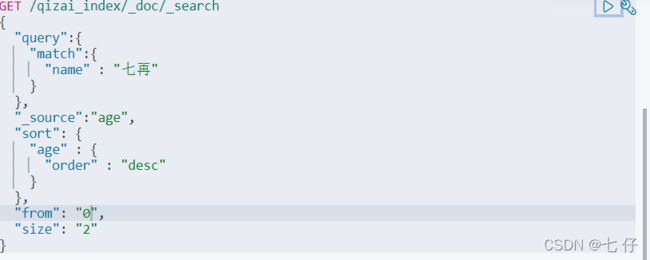
5、分页 (下面的代表的含义是从下标为0的开始,页面大小为2)
结果输出
7、布尔值查询(多条件查询) 以下几种都是在bool值之下的
must: 所有条件都要满足
GET /qizai_index/_doc/_search
{
  "query" : {
    "bool" : {
      "must" : [
        {
          "match" : {
            "name" : "七仔2"
          }
        },
        {
          "match" : {
            "age" : "1"
          }
        }
      ]
    }
  }
}
should: 只要有一个条件符合就好了
GET /qizai_index/_doc/_search
{
  "query" : {
    "bool" : {
      "must" : [
        {
          "match" : {
            "name" : "七仔2"
          }
        },
        {
          "match" : {
            "age" : "1"
          }
        }
      ]
    }
  }
}
must_not 不能是xxx条件
GET /qizai_index/_doc/_search
{
  "query" : {
    "bool" : {
      "should" : [
        {
          "match" : {
            "name" : "七仔2"
          }
        }
      ],
      "must_not" : {
          "match" : {
            "age" : 1
        }
      }
    }
  }
}
filter (相当于where子句) 过滤器
GET /qizai_index/_doc/_search
{
  "query" : {
    "bool" : {
      "should" : [
        {
          "match" : {
            "name" : "七仔2"
          }
        },
        {
          "match" : {
            "age" : 1
          }
        }
      ],
      "filter" : {
        "range" : {
          "age" : {
            "gte" :  1,
            "lte" : 18
          }
        }
      }
    }
  }
}
8、单字段匹配多个条件
# 使用空格隔开
GET /qizai_index/_doc/_search
{
  "query" : {
    "match" : {
      "name" : "七 长卿"
    }
  }
}
结果演示:
9、精确查询 (对于text类型中分词后的结果和keyword类型不分词的结果在进行精确匹配)所以对于精准匹配,建议使用keyword类型。
结果展示:
10、高亮查询
GET /qizai_index2/_doc/_search
{
  "query" : {
    "match": {
      "name" : "七仔长卿"
    }
  },
  "highlight" : {
    "fields" : {
      "name" : {}
    }
  }
}
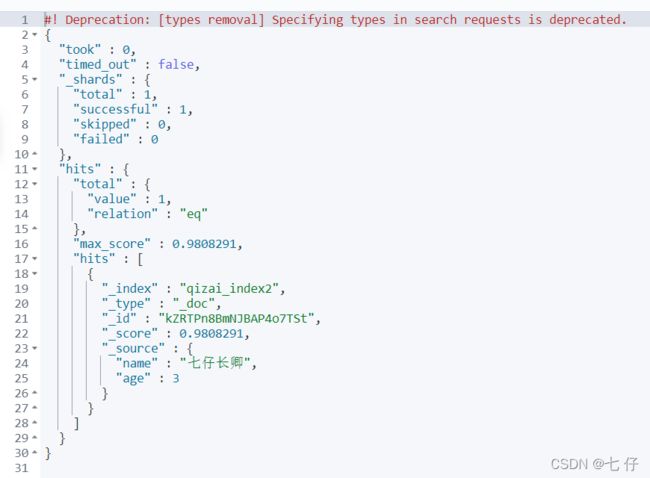
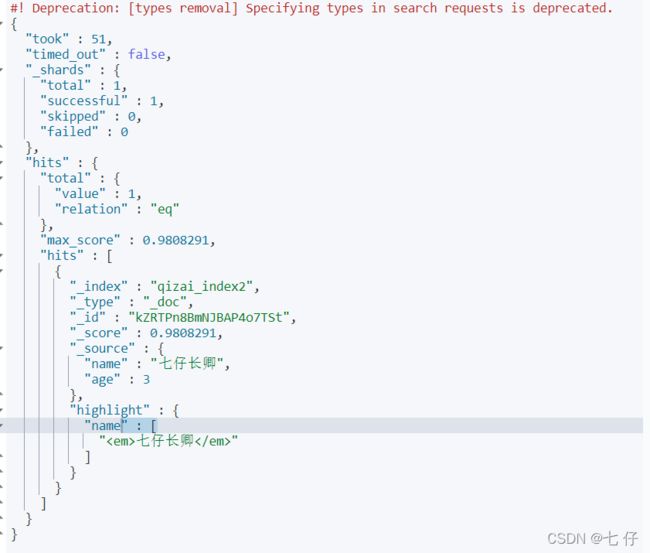
结果展示 (hits中的hits中的highlight展示为高亮后的字段):
11、高亮样式修改
GET /qizai_index2/_doc/_search
{
"query" : {
"match": {
"name" : "七仔长卿"
}
},
"highlight" : {
"pre_tags" : ""
,
"post_tags": "",
"fields" : {
"name" : {}
}
}
}
8、Springboot 集成 es
1、导入依赖,有两种方式
-
第一种,在创建的项目的时候,就勾选上es的场景依赖(在那个地方中一般我们都会勾选springboot web的场景依赖)
-
第二种,导入es的启动器,导入了启动器,关于es的所有配置基本上都给你弄好了
-
<dependency>
    <groupId>com.alibabagroupId>
    <artifactId>fastjsonartifactId>
    <version>1.2.70version>
dependency>

<dependency>
    <groupId>org.springframework.bootgroupId>
    <artifactId>spring-boot-starter-data-elasticsearchartifactId>
dependency>
-
2、修改配置,使得springboot中es的依赖版本和我们安装的es版本保持一致
<properties>
    <java.version>1.8java.version>

    <elasticsearch.version>7.6.1elasticsearch.version>
properties>
3、创建我们的配置文件,创建bean,我们这里使用的是restful 风格的api
package com.company.config;

import org.apache.http.HttpHost;
import org.elasticsearch.client.RestClient;
import org.elasticsearch.client.RestHighLevelClient;
import org.springframework.context.annotation.Bean;
import org.springframework.context.annotation.Configuration;

@Configuration
public class ESConfig {

    @Bean
    public RestHighLevelClient restHighLevelClient() {
        return new RestHighLevelClient(
                RestClient.builder(
                        new HttpHost("localhost", 9200, "http")));
    }

}
4、编写java service层代码
9、Java RestFul Api 使用
package com.company;
import com.alibaba.fastjson.JSON;
import com.company.pojo.User;
import com.fasterxml.jackson.core.JsonProcessingException;
import com.fasterxml.jackson.databind.ObjectMapper;
import org.elasticsearch.action.admin.indices.delete.DeleteIndexRequest;
import org.elasticsearch.action.bulk.BulkRequest;
import org.elasticsearch.action.bulk.BulkResponse;
import org.elasticsearch.action.delete.DeleteRequest;
import org.elasticsearch.action.delete.DeleteResponse;
import org.elasticsearch.action.get.GetRequest;
import org.elasticsearch.action.get.GetResponse;
import org.elasticsearch.action.index.IndexRequest;
import org.elasticsearch.action.index.IndexResponse;
import org.elasticsearch.action.search.SearchRequest;
import org.elasticsearch.action.search.SearchResponse;
import org.elasticsearch.action.support.master.AcknowledgedResponse;
import org.elasticsearch.action.update.UpdateRequest;
import org.elasticsearch.action.update.UpdateResponse;
import org.elasticsearch.client.RequestOptions;
import org.elasticsearch.client.RestHighLevelClient;
import org.elasticsearch.client.indices.CreateIndexRequest;
import org.elasticsearch.client.indices.CreateIndexResponse;
import org.elasticsearch.client.indices.GetIndexRequest;
import org.elasticsearch.client.indices.GetIndexResponse;
import org.elasticsearch.common.text.Text;
import org.elasticsearch.common.unit.TimeValue;
import org.elasticsearch.common.xcontent.XContentType;
import org.elasticsearch.index.query.*;
import org.elasticsearch.search.SearchHit;
import org.elasticsearch.search.builder.SearchSourceBuilder;
import org.elasticsearch.search.fetch.subphase.FetchSourceContext;
import org.elasticsearch.search.fetch.subphase.highlight.HighlightBuilder;
import org.elasticsearch.search.fetch.subphase.highlight.HighlightField;
import org.junit.jupiter.api.Test;
import org.springframework.beans.factory.annotation.Autowired;
import org.springframework.beans.factory.annotation.Qualifier;
import org.springframework.boot.test.context.SpringBootTest;
import org.springframework.mail.SimpleMailMessage;
import org.springframework.mail.javamail.JavaMailSenderImpl;
import javax.swing.text.Highlighter;
import java.io.IOException;
import java.util.ArrayList;
import java.util.List;
import java.util.Map;
import java.util.concurrent.TimeUnit;
@SpringBootTest
class SpringbootTestApplicationTests {
@Autowired
@Qualifier("restHighLevelClient")
private RestHighLevelClient client;
// 基于索引API操作详解, 都是基于请求的
// 1、创建索引
@Test
void contextLoads1() throws IOException {
CreateIndexRequest indexRequest = new CreateIndexRequest("qizai_index");
// 第二个参数填写默认的即可
CreateIndexResponse createIndexResponse = client.indices().create(indexRequest, RequestOptions.DEFAULT);
}
// 2、获取索引
@Test
void contextLoads2() throws IOException {
GetIndexRequest test2 = new GetIndexRequest("test2");
GetIndexResponse getIndexResponse = client.indices().get(test2, RequestOptions.DEFAULT);
// 判断当前索引是否存在
boolean exists = client.indices().exists(test2, RequestOptions.DEFAULT);
System.out.println(exists);
}
// 3、删除索引
@Test
void contextLoads3() throws IOException {
DeleteIndexRequest test2 = new DeleteIndexRequest("test2");
AcknowledgedResponse delete = client.indices().delete(test2, RequestOptions.DEFAULT);
// 查看返回的删除状态
System.out.println(delete.isAcknowledged());
}
// 关于文档的API详解, 都是基于请求的, 所以是xxxRequest对象
// 4、创建文档
@Test
void contextLoads4() throws IOException {
IndexRequest request = new IndexRequest("qizai_index");
// request.id 设置文档id 不设置es会自动填充一个id
request.id("1");
// 设置查询超时时间
request.timeout("1s");
// 将我们的数据放入请求, es是只支持json数据的
// 之前我们在图形化界面发送请求的时候,返回的数据是存在于hits中的_source中的
request.source(JSON.toJSONString(new User("七仔2",1)), XContentType.JSON);
IndexResponse index = client.index(request, RequestOptions.DEFAULT);
// 返回状态
System.out.println(index.status());
}
//5、获取文档
@Test
void contextLoads5() throws IOException {
GetRequest getRequest = new GetRequest("qizai_index", "1");
// 添加这两句话,这个_source就不会返回, 效率更高
// getRequest.fetchSourceContext(new FetchSourceContext(false));
// getRequest.storedFields("_none_");
GetResponse documentFields = client.get(getRequest, RequestOptions.DEFAULT);
// 数据存在于hits中的_Source中
System.out.println(documentFields.getSourceAsString());
}
// 修改文档
@Test
void contextLoads6() throws IOException {
UpdateRequest updateRequest = new UpdateRequest("qizai_index", "1");
updateRequest.timeout("1s");
User user = new User("七仔22", 18);
// 与执行请求是一样的, 使用doc进行修改
UpdateRequest doc = updateRequest.doc(JSON.toJSONString(user), XContentType.JSON);
UpdateResponse update = client.update(updateRequest, RequestOptions.DEFAULT);
System.out.println(update.status());
}
// 删除文档
@Test
void contextLoads7() throws IOException {
DeleteRequest deleteRequest = new DeleteRequest("qizai_index", "1");
DeleteResponse delete = client.delete(deleteRequest, RequestOptions.DEFAULT);
System.out.println(delete.status());
}
// 批量操作
@Test
void contextLoads8() throws IOException {
BulkRequest bulkRequest = new BulkRequest();
BulkRequest timeout = bulkRequest.timeout("10s");
ArrayList<User> userList = new ArrayList<>();
userList.add(new User("qizai1",1));
userList.add(new User("qizai2",1));
userList.add(new User("qizai3",1));
userList.add(new User("changqing1",1));
userList.add(new User("changqing2",1));
userList.add(new User("changqing3",1));
for (int i = 0; i < userList.size(); i++) {
bulkRequest.add(
new IndexRequest("qizai_index")
.id("" + (i + 1))
.source(JSON.toJSONString(userList.get(i)),XContentType.JSON));
}
BulkResponse bulk = client.bulk(bulkRequest, RequestOptions.DEFAULT);
System.out.println(bulk.hasFailures());
}
// 条件查询
@Test
void contextLoads10() throws IOException {
SearchRequest searchRequest = new SearchRequest("qizai_index");
// 这里就是在补充使用命令的式
SearchSourceBuilder sourceBuilder = new SearchSourceBuilder();
TermQueryBuilder termQueryBuilder = QueryBuilders.termQuery("name", "七");
sourceBuilder.timeout(new TimeValue(60,TimeUnit.SECONDS));
sourceBuilder.query(termQueryBuilder);
searchRequest.source(sourceBuilder);
SearchResponse search = client.search(searchRequest, RequestOptions.DEFAULT);
for (SearchHit hit : search.getHits().getHits()) {
System.out.println(hit.getSourceAsString());
}
}
@Test
void contextLoads11() throws IOException {
SearchRequest searchRequest = new SearchRequest("qizai_index");
SearchSourceBuilder sourceBuilder = new SearchSourceBuilder();
TermQueryBuilder termQueryBuilder = QueryBuilders.termQuery("name", "七");
sourceBuilder.timeout(new TimeValue(60,TimeUnit.SECONDS));
sourceBuilder.query(termQueryBuilder);
HighlightBuilder highlightBuilder = new HighlightBuilder();
highlightBuilder.field("name");
// 设置为false,支持分词
highlightBuilder.requireFieldMatch(false);
highlightBuilder.preTags("");
highlightBuilder.postTags("");
sourceBuilder.highlighter(highlightBuilder);
searchRequest.source(sourceBuilder);
SearchResponse search = client.search(searchRequest, RequestOptions.DEFAULT);
// 高亮的原理就是将筛选出来的高亮的内容放入到_source中去
for (SearchHit hit : search.getHits().getHits()) {
// 获取_source内容
Map<String, Object> sourceAsMap = hit.getSourceAsMap();
// 获取高亮的内容
Map<String, HighlightField> highlightFields = hit.getHighlightFields();
HighlightField name = highlightFields.get("name");
for (Text fragment : name.fragments()) {
String newTitle = "";
if(fragment != null) {
newTitle += fragment;
}
sourceAsMap.put("title",newTitle);
}
System.out.println(sourceAsMap);
}
}
// 执行bool查询并高亮 下面是我学校中做的一个项目使用到的
/**
* 对应Kibana中的请求
* GET /mccs_course/_search
* {
* "query" : {
* "bool":{
* "should": [
* {
* // 因为课程较少的原因使用的是match,使用term的话就是一条数据了
* "match": {
* "courseName": "计网"
* }
* },
* {
* "match": {
* "teacherIntroduction": "计网"
* }
* }
* ]
* }
* },
* "highlight" : {
* "pre_tags" : "",
* "post_tags": "
",
* "fields" : {
* "courseName": {},
* "teacherIntroduction": {}
* }
* }
* }
* */
@Test
void contextLoads9() throws IOException {
SearchRequest searchRequest = new SearchRequest("mccs_course");
// 构建搜索条件
SearchSourceBuilder sourceBuilder = new SearchSourceBuilder();
// 查询条件
BoolQueryBuilder boolQueryBuilder = QueryBuilders.boolQuery();
MatchQueryBuilder matchQueryBuilderByCN = QueryBuilders.matchQuery("courseName", "计网");
MatchQueryBuilder matchQueryBuilderByTI = QueryBuilders.matchQuery("teacherIntroduction", "计网");
boolQueryBuilder.should(matchQueryBuilderByCN);
boolQueryBuilder.should(matchQueryBuilderByTI);
sourceBuilder.timeout(new TimeValue(60, TimeUnit.SECONDS));
sourceBuilder.query(boolQueryBuilder);
// highlight
HighlightBuilder highlightBuilder = new HighlightBuilder();
highlightBuilder.field("courseName");
highlightBuilder.field("teacherIntroduction");
highlightBuilder.requireFieldMatch(false);
highlightBuilder.preTags("");
highlightBuilder.postTags("");
sourceBuilder.highlighter(highlightBuilder);
// 执行搜索
searchRequest.source(sourceBuilder);
List<Map<String,Object>> resultList = new ArrayList<>();
SearchResponse search = client.search(searchRequest, RequestOptions.DEFAULT);
for (SearchHit hit : search.getHits().getHits()) {
// 获取hit中的_source数据
Map<String, Object> sourceAsMap = hit.getSourceAsMap();
// 获取HightLight字段
Map<String, HighlightField> highlightFields = hit.getHighlightFields();
HighlightField courseName = highlightFields.get("courseName");
HighlightField teacherIntroduction = highlightFields.get("teacherIntroduction");
if(courseName != null) {
Text[] fragments = courseName.fragments();
String newContent = "";
for (Text fragment : fragments) {
newContent += fragment;
}
sourceAsMap.put("courseName",newContent);
}
if(teacherIntroduction != null) {
Text[] fragments = teacherIntroduction.fragments();
String newContent = "";
for (Text fragment : fragments) {
newContent += fragment;
}
sourceAsMap.put("teacherIntroduction",newContent);
}
resultList.add(sourceAsMap);
}
resultList.forEach((res)->{
System.out.println(res);
});
}
}
10、es总结
- es是一个开源的高扩展的分布式全文检索引擎
- 而Elasticsearch仅支持json文件格式。
- 核心概念
- 索引 (可以理解为数据库)
- 类型 (之后会被启用,默认为_doc)
- 文档 (可以理解为数据库中的每一行一行的记录)
- es是基于文档的,那么就意味着索引和搜索数据的最小单位是文档,
- 文档
- 倒排索引
- 倒排倒排,倒着排,与传统数据库相反,不使用id确定内容,而将内容细分,用于匹配其id。
- 请求命令
- 多看,多用,
- java restful api


![[外链图片转存失败,源站可能有防盗链机制,建议将图片保存下来直接上传(img-Auz5YcUN-1646051419377)(G:\PrtSc\image-20220227211737723.png)]](http://img.e-com-net.com/image/info8/b545da49a29d40c7963fa3063834f34e.jpg)

