Python 如何实现桥接设计模式?什么是桥接(Bridge)设计模式?
什么是桥接(Bridge)设计模式?
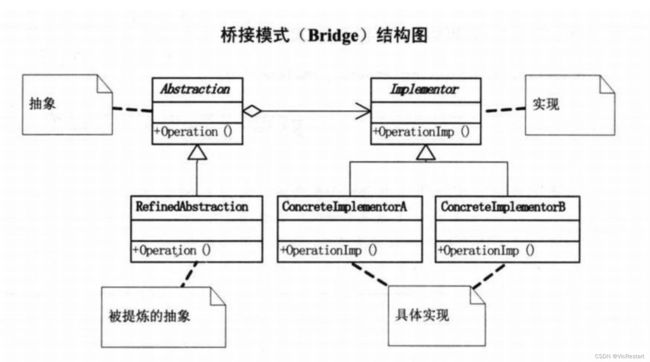
桥接(Bridge)设计模式是一种结构型设计模式,它的主要目的是将抽象部分与实现部分分离,以便它们可以独立地变化。这种模式通过创建一个桥接接口,连接抽象类和实现类,使得它们可以独立演化而不相互影响。
在桥接模式中,抽象部分包含一个抽象类和一个抽象接口,而实现部分也包含一个实现类和一个实现接口。抽象部分和实现部分之间通过桥接接口进行连接。
主要角色:
-
抽象部分(Abstraction): 定义抽象类和抽象接口,并包含对实现部分的引用。
-
扩展抽象部分(Refined Abstraction): 继承自抽象部分,扩展其功能。
-
实现部分(Implementor): 定义实现类和实现接口。
-
具体实现部分(Concrete Implementor): 实现实现接口,并提供具体的实现。
工作流程:
-
抽象部分包含一个抽象类,其中包含对实现部分的引用(通常是一个实现接口)。
-
扩展抽象部分继承自抽象部分,可以扩展其功能。
-
实现部分包含一个实现类和一个实现接口。
-
具体实现部分实现实现接口,并提供具体的实现。
-
抽象部分和实现部分通过桥接接口进行连接。
Python实现迭代器设计模式示例代码(一):
假设我们要绘制不同形状的图形,可以使用桥接模式将形状(抽象部分)与绘制方式(实现部分)分离。
from abc import ABC, abstractmethod

# 实现部分的接口
class DrawingAPI(ABC):
    @abstractmethod
    def draw_circle(self, x, y, radius):
        pass

    @abstractmethod
    def draw_square(self, x, y, side_length):
        pass

# 具体实现部分
class DrawingAPI1(DrawingAPI):
    def draw_circle(self, x, y, radius):
        print(f"API1: Drawing circle at ({x}, {y}) with radius {radius}")

    def draw_square(self, x, y, side_length):
        print(f"API1: Drawing square at ({x}, {y}) with side length {side_length}")

class DrawingAPI2(DrawingAPI):
    def draw_circle(self, x, y, radius):
        print(f"API2: Drawing circle at ({x}, {y}) with radius {radius}")

    def draw_square(self, x, y, side_length):
        print(f"API2: Drawing square at ({x}, {y}) with side length {side_length}")

# 抽象部分
class Shape(ABC):
    def __init__(self, drawing_api):
        self.drawing_api = drawing_api

    @abstractmethod
    def draw(self):
        pass

# 扩展抽象部分
class CircleShape(Shape):
    def __init__(self, x, y, radius, drawing_api):
        super().__init__(drawing_api)
        self.x = x
        self.y = y
        self.radius = radius

    def draw(self):
        self.drawing_api.draw_circle(self.x, self.y, self.radius)

# 扩展抽象部分
class SquareShape(Shape):
    def __init__(self, x, y, side_length, drawing_api):
        super().__init__(drawing_api)
        self.x = x
        self.y = y
        self.side_length = side_length

    def draw(self):
        self.drawing_api.draw_square(self.x, self.y, self.side_length)

# 客户端
api1 = DrawingAPI1()
api2 = DrawingAPI2()

circle = CircleShape(1, 2, 3, api1)
circle.draw()

square = SquareShape(4, 5, 6, api2)
square.draw()
在这个示例中,DrawingAPI 是实现部分的接口,DrawingAPI1 和 DrawingAPI2 是具体实现部分。Shape 是抽象部分的抽象类,而 CircleShape 和 SquareShape 是扩展抽象部分。通过桥接模式,可以将绘制方式与形状分离,使得它们可以独立变化。
Python实现迭代器设计模式示例代码(二):
假设我们有一个图形用户界面(GUI)库,其中有不同的 UI 元素(按钮、文本框等),同时也有不同的平台(Windows、Linux)。我们希望这两个维度能够独立变化,即每个 UI 元素都可以在不同的平台上绘制。
from abc import ABC, abstractmethod

# 实现部分的接口
class PlatformAPI(ABC):
    @abstractmethod
    def draw_button(self, text):
        pass

    @abstractmethod
    def draw_text_box(self, text):
        pass

# 具体实现部分 - Windows
class WindowsAPI(PlatformAPI):
    def draw_button(self, text):
        print(f"Windows: Drawing button with text '{text}'")

    def draw_text_box(self, text):
        print(f"Windows: Drawing text box with text '{text}'")

# 具体实现部分 - Linux
class LinuxAPI(PlatformAPI):
    def draw_button(self, text):
        print(f"Linux: Drawing button with text '{text}'")

    def draw_text_box(self, text):
        print(f"Linux: Drawing text box with text '{text}'")

# 抽象部分
class UIElement(ABC):
    def __init__(self, platform_api):
        self.platform_api = platform_api

    @abstractmethod
    def draw(self):
        pass

# 扩展抽象部分 - 按钮
class Button(UIElement):
    def __init__(self, text, platform_api):
        super().__init__(platform_api)
        self.text = text

    def draw(self):
        self.platform_api.draw_button(self.text)

# 扩展抽象部分 - 文本框
class TextBox(UIElement):
    def __init__(self, text, platform_api):
        super().__init__(platform_api)
        self.text = text

    def draw(self):
        self.platform_api.draw_text_box(self.text)

# 客户端
windows_api = WindowsAPI()
linux_api = LinuxAPI()

button_windows = Button("Click me", windows_api)
button_linux = Button("Click me", linux_api)

text_box_windows = TextBox("Type here", windows_api)
text_box_linux = TextBox("Type here", linux_api)

# 绘制按钮和文本框,它们的绘制方式与平台独立
button_windows.draw()
button_linux.draw()

text_box_windows.draw()
text_box_linux.draw()
在这个示例中,PlatformAPI 是实现部分的接口,WindowsAPI 和 LinuxAPI 是具体实现部分。UIElement 是抽象部分的抽象类,而 Button 和 TextBox 是扩展抽象部分。通过桥接模式,我们实现了 UI 元素与平台之间的解耦,使得它们可以独立变化。客户端代码可以轻松地切换不同的平台,而不需要修改 UI 元素的代码。
在实现桥接设计模式时,有哪些需要注意的地方?
在实现桥接设计模式时,有一些需要注意的地方,以确保模式的有效实施和系统的可维护性:
-
抽象部分和实现部分的分离: 确保抽象部分和实现部分之间的清晰分离。这是桥接模式的核心概念,确保它们可以独立演化。
-
接口的稳定性: 抽象部分和实现部分的接口应该相对稳定,以便它们可以独立变化而不会频繁影响到对方。
-
合适的桥接接口: 选择合适的桥接接口,确保它能够连接抽象部分和实现部分。这可能涉及到对系统需求的深刻理解。
-
实现部分的多样性: 实现部分可以有多个不同的具体实现,而不仅仅局限于一个。这使得系统更加灵活。
-
对扩展的支持: 桥接模式应该支持对抽象部分和实现部分的扩展,以便在系统变化时能够轻松添加新的功能。
-
合理的层次结构: 确保抽象部分和实现部分的层次结构是合理的,以便支持复杂的系统。
-
适当的组合方式: 实现部分可以通过组合或继承方式与抽象部分连接。选择适当的方式取决于系统的需求。
-
合适的命名规范: 对类和接口的命名应该清晰明了,反映出它们的角色和关系,以方便其他开发人员理解。
-
兼容性考虑: 在设计桥接接口时,考虑到实现部分可能在未来进行的变化,以确保接口的兼容性。
-
文档和注释: 提供清晰的文档和注释,解释桥接模式的设计、使用方法和注意事项,以便其他开发人员更容易理解和使用你的代码。
-
测试: 编写充分的测试来验证桥接模式的正确性。测试应该覆盖各种不同的实现部分和抽象部分的组合情况。
通过关注这些方面,可以确保实现的桥接模式在系统中的有效应用,并具有良好的灵活性和可维护性。
本文就到这里了,感谢您的阅读 。别忘了点赞、收藏~ Thanks♪(・ω・)ノ
