repmgr构建PostgreSQL高可用集群
repmgr构建PostgreSQL高可用集群
1、repmgr初识
repmgr 是一套开源的 PostgreSQL 集群管理工具,具有非常轻量级的使用特性。具体表现有以下特点:
- 配置操作简单,可一键式完成相关部署操作;
- 支持 Auto Failover 和 Manual Switchover;
- 分布式管理集群节点,易扩展,可在线增删集群节点;
1.1 repmgr简介
repmgr 是一套开源工具,用于管理 PostgreSQL 服务器集群内的复制和故障转移。repmgr 支持并增强了
PostgreSQL 的内置流复制,它提供了一个单一的读/写主服务器和一个或多个只读备用服务器。
repmgr 流复制管理工具对 PostgreSQL 集群节点的管理是基于分布式的管理方式,集群每个节点都具备一个
repmgr.conf 配置文件,用来记录本节点的 ID、节点名称、连接信息、数据库的 PGDATA 目录等配置参数。在完
成参数配置后,就可以通过 repmgr 命令实现对集群节点的一键式部署。
repmgr 架构图如下图所示:

集群节点部署完成后,每个节点都可通过 repmgrd 守护进程来监控节点数据库状态;每个节点元数据表可独立维
护,这些元数据表将记录所有集群节点的信息。
1.2 repmgr专业术语解释
-
replication cluster:复制集群,指的 repmgr 管理的通过流复制搭建的 PostgreSQL 数据库集群。 -
node:在复制集群中,一个 pg 数据库节点称为一个 node 节点。 -
upstream node:备用服务器的流复制链接的上游节点。 -
failover:当主服务器节点不可用时,repmgr 可将备用服务器自动提升为主服务器节点的过程成为failover。
-
switchover:通过 repmgr 工具手动将备用服务器提升为主服务器节点的过程称之为 switchover。 -
fencing:当发生 failover 后,确保旧的主服务器节点不会被意外重新链接上来,造成脑裂。 -
witness server:见证服务器,在多个备服务器的情况下若发生 failover,见证服务器可用来决策选出新的主服务器节点。
-
primary节点:流复制中可用于业务读写的节点。 -
standby节点:流复制中数据均从 master 节点进行复制,至允许业务查询。
1.3 repmgr选举原理
在发生 Auto Failover 时,备节点在尝试多次连接主节点失败后(尝试次数及尝试间隔可以通过 repmgr.conf 配置
文件修改),repmgrd 会在所有备节点中选举一个候选备节点(选举机制参考下面)提升为新主节点,其他备节点去
Follow 到该新主上,形成一个新的集群。
repmgr 选举候选备节点按照以下顺序选举:LSN > Priority > Node_ID
-
系统将优先选举一个 LSN 较大的节点,作为候选备节点。
-
若 LSN 一样,会根据 Priority 优先级进行比较(该优先级是在配置文件中进行参数配置,如果 Priority 为 0,
则代表该节点被禁止提升为主节点)。
-
若优先级也一样,会比较节点的 Node ID,小者会优先选举。
1.4 repmgr组件组成及功能
repmgr 主要提供了 repmgr 和 repmgrd 两个工具。
-
repmgr: 是一个执行管理任务的命令行工具,方便进行 PostgreSQL 服务器集群的管理。包括设置备用服务器、promote 备、主动切换服务器、查看复制集群中服务器的状态。
-
repmgrd: 是一个守护程序,它主动监视复制集群中的服务器,用于监控和记录复制集群信息、故障检测、故障转移,用户可以自定义脚本进行集群中时间的通知。
1.5 用户与元数据
为了有效地管理复制集群,repmgr 需要将集群中节点的相关信息存储在 repmgr 专用数据库表中。此架构由
repmgr 扩展自动创建,该扩展在初始化由 repmgr 管理的集群 (repmgr primary register) 的第一步中安装,并
包含以下对象:
Tables:
-
repmgr.events:记录感兴趣的事件 -
repmgr.nodes:复制集群中每个节点的连接和状态信息 -
repmgr.monitoring_history:repmgrd 写入的历史备用监控信息
Views:
-
repmgr.show_nodes:基于 repmgr.nodes 表,另外显示服务器上游节点的名称 -
repmgr.replication_status:当启用 repmgrd 的监控时,显示每个 standby 的监控状态,repmgr 元数据信息可以存储在已有的数据库或在自己的专用数据库。
注意:repmgr 元数据信息不能存储在不属于 repmgr 管理的复制集群的 PostgreSQL 服务器上。repmgr 需要一
个可以访问数据库和执行必要的更改的用户,该用户可以不是超级用户,但是某些操作(例如 repmgr 扩展的初始
安装)将需要超级用户连接(可以在需要时使用命令行选项指定 --superuser)。
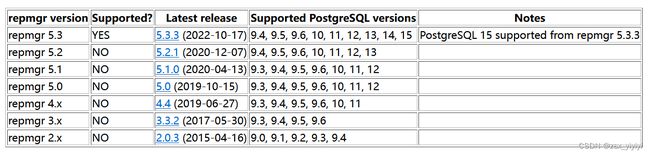
1.6 repmgr版本说明
1.7 使用 repmgr
repmgr 工具的基本语法:
repmgr [OPTIONS] primary {register|unregister}
repmgr [OPTIONS] standby {register|unregister|clone|promote|follow|switchover}
repmgr [OPTIONS] node    {status|check|rejoin|service}
repmgr [OPTIONS] cluster {show|event|matrix|crosscheck|cleanup}
repmgr [OPTIONS] witness {register|unregister}
repmgr [OPTIONS] service {status|pause|unpause}
repmgr [OPTIONS] daemon  {start|stop}
一般配置选项:
-b, --pg_bindir=PATH    => PostgreSQL二进制文件的路径(可选)
-f, --config-file=PATH  => repmgr配置文件的路径
-F, --force             => 强制执行有潜在危险的操作
数据库连接选项:
-d, --dbname=DBNAME     => 要连接的数据库(默认:"postgres")
-h, --host=HOSTNAME     => 数据库服务器主机
-p, --port=PORT         => 数据库服务器端口(默认:"5432")
-U, --username=USERNAME => 要连接的数据库用户名(默认:"postgres")
特定于节点的选项:
-D, --pgdata=DIR => 节点数据目录的位置
--node-id        => 通过id指定节点(仅适用于部分操作)
--node-name      => 按名称指定节点(仅适用于部分操作)
记录选项:
--dry-run       => 显示动作会发生什么,但不执行它
-L, --log-level => 设置日志级别(覆盖配置文件,默认值:NOTICE)
--log-to-file   => 记录到repmgr.conf中定义的文件(或记录工具)
-q, --quiet     => 禁止除错误之外的所有日志输出
-t, --terse     => 不显示细节、提示和其他非关键输出
-v, --verbose   => 显示额外的日志输出(用于调试)
1.8 repmgr常用命令
| 命令 | 功能 |
|---|---|
| repmgr primary register | 注册对应服务器的primary节点为主服务器节点 |
| repmgr primary unregister | 注销不活动的主服务器节点 |
| repmgr standby clone | 从主节点复制数据到standby节点(当前节点使用pg_basebackup从primary主节点复制数据目录) |
| repmgr standby register | 注册对应节点standby节点为备用服务器节点 |
| repmgr standby unregister | 注销备用服务器节点 |
| repmgr standby promote | 将备服务器节点提升为主服务器节点 |
| repmgr standby follow | 将一主多从架构中,其余的standby被服务器节点重新指向新的primary主服务器节点 |
| repmgr standby switchover | 将指定备服务器节点提升为主服务器节点,并将primary主服务器降级为备服务器节点 |
| repmgr witness register | 注册指定节点为见证服务器节点 |
| repmgr witness unregister | 注销见证服务器节点 |
| repmgr node status | 查看各节点的基本信息和复制状态 |
| repmgr node check | 高可用集群节点状态信息检查 |
| repmgr node rejoin | 重新加入一个失效节点到集群 |
| repmgr cluster show | 查看集群中已注册的节点基本信息与状态 |
| repmgr cluster matrix | 查看集群中所有节点的 matrix 信息 |
| repmgr cluster crosscheck | 查看集群中所有节点间两两交叉连接检测 |
| repmgr cluster event | 查看集群事件记录信息 |
| repmgr cluster cleanup | 清理集群监控历史 |
| repmgr service status | 节点状态 |
1.9 参考
https://repmgr.org/docs/5.2/
https://github.com/EnterpriseDB/repmgr
2、PostgreSQL + repmgr高可用集群软件安装
2.1 部署规划
2.1.1 服务器角色
| 主机名 | 主机IP | 角色 |
|---|---|---|
| node1 | 192.168.64.170 | 主服务器 |
| node2 | 192.168.64.171 | 备用服务器 |
| node3 | 192.168.64.172 | 备用服务器 |
| node4 | 192.168.64.173 | 见证服务器 |
2.1.2 服务部署
| 主机名 | 主机IP | PostgreSQL服务 | repmgr |
|---|---|---|---|
| node1 | 192.168.64.170 | PostgreSQL-12.2 | repmgr 5.2.1 |
| node2 | 192.168.64.171 | PostgreSQL-12.2 | repmgr 5.2.1 |
| node3 | 192.168.64.172 | PostgreSQL-12.2 | repmgr 5.2.1 |
| node4 | 192.168.64.173 | PostgreSQL-12.2 | repmgr 5.2.1 |
2.2 基本环境配置
2.2.1 hosts文件配置(所有节点)
$ vim /etc/hosts
192.168.64.170 node1
192.168.64.171 node2
192.168.64.172 node3
192.168.64.173 node4
2.2.2 高可用集群服务器免密登陆(所有节点和用户)
复制集群之间各个服务器之间免密连接并安装 rsync,笔者在 root 和 postgres 用户下都做了免密,高可用集群中
每台服务器均需要进行以下操作:
# root用户下的免密登陆设置
# 192.168.64.170
ssh-keygen
ssh-copy-id 192.168.64.171
ssh-copy-id 192.168.64.172
ssh-copy-id 192.168.64.173


# 192.168.64.171
ssh-keygen
ssh-copy-id 192.168.64.170
ssh-copy-id 192.168.64.172
ssh-copy-id 192.168.64.173

# 192.168.64.172
ssh-keygen
ssh-copy-id 192.168.64.170
ssh-copy-id 192.168.64.171
ssh-copy-id 192.168.64.173

# 192.168.64.173
ssh-keygen
ssh-copy-id 192.168.64.170
ssh-copy-id 192.168.64.171
ssh-copy-id 192.168.64.172
# postgres用户下免密登陆设置
# PostgreSQL需要postgres用户
# 192.168.64.170
groupadd postgres
useradd -g postgres postgres
passwd postgres
su - postgres
ssh-keygen
ssh-copy-id 192.168.64.171
ssh-copy-id 192.168.64.172
ssh-copy-id 192.168.64.173

# 192.168.64.171
groupadd postgres
useradd -g postgres postgres
passwd postgres
su - postgres
ssh-keygen
ssh-copy-id 192.168.64.170
ssh-copy-id 192.168.64.172
ssh-copy-id 192.168.64.173

# 192.168.64.172
groupadd postgres
useradd -g postgres postgres
passwd postgres
su - postgres
ssh-keygen
ssh-copy-id 192.168.64.170
ssh-copy-id 192.168.64.171
ssh-copy-id 192.168.64.173

# 192.168.64.173
groupadd postgres
useradd -g postgres postgres
passwd postgres
su - postgres
ssh-keygen
ssh-copy-id 192.168.64.170
ssh-copy-id 192.168.64.171
ssh-copy-id 192.168.64.172
# 测试
ssh 192.168.64.170
ssh 192.168.64.171
ssh 192.168.64.172
ssh 192.168.64.173
2.2.3 关闭防火墙(所有节点)
systemctl stop firewalld
systemctl disable firewalld
2.2.4 设置hostname(所有节点)
hostnamectl set-hostname node1
hostnamectl set-hostname node2
hostnamectl set-hostname node3
hostnamectl set-hostname node4
2.3 PostgreSQL数据库服务安装
在一个全新的 PostgreSQL + repmgr 高可用集群搭建部署的过程中,只需要在主数据库服务器上对 PostgreSQL
数据库服务进行初始化并且正常启动即可,其余备服务器数据库可利用 repmgr 工具进行初始化搭建部署。
2.3.1 主服务器(node1)数据库安装
1、安装源码软件包
# 如果缺少工具请先安装
$ yum install wget
$ yum install bzip2
[root@node1 ~]# wget --no-check-certificate https://ftp.postgresql.org/pub/source/v12.2/postgresql-12.2.tar.bz2
[root@node1 ~]# tar -jxvf postgresql-12.2.tar.bz2 -C /usr/local/
2、安装依赖包
[root@node1 ~]# yum install gcc gcc-c++ readline-devel readline readline-dev zlib-devel
3、编译安装
[root@node1 ~]# cd /usr/local/postgresql-12.2/
[root@node1 postgresql-12.2]# ./configure --prefix=/usr/local/pgsql
[root@node1 postgresql-12.2]# make && make install
4、添加用户
# 前面已经执行过了
[root@node1 postgresql-12.2]# groupadd postgres
[root@node1 postgresql-12.2]# useradd -g postgres postgres
[root@node1 postgresql-12.2]# passwd postgres
5、配置数据、日志目录
[root@node1 postgresql-12.2]# cd ~
[root@node1 ~]# mkdir -p /data/pgsql12/{data,logs}
[root@node1 ~]# chown -R postgres:postgres /data/pgsql12/
6、初始化数据库
[root@node1 ~]# su - postgres
[postgres@node1 ~]$ ls /usr/local/pgsql/
bin  include  lib  share
[postgres@node1 ~]$ /usr/local/pgsql/bin/initdb -D /data/pgsql12/data/
The files belonging to this database system will be owned by user "postgres".
This user must also own the server process.

The database cluster will be initialized with locale "zh_CN.UTF-8".
The default database encoding has accordingly been set to "UTF8".
initdb: could not find suitable text search configuration for locale "zh_CN.UTF-8"
The default text search configuration will be set to "simple".

Data page checksums are disabled.

fixing permissions on existing directory /data/pgsql12/data ... ok
creating subdirectories ... ok
selecting dynamic shared memory implementation ... posix
selecting default max_connections ... 100
selecting default shared_buffers ... 128MB
selecting default time zone ... Asia/Shanghai
creating configuration files ... ok
running bootstrap script ... ok
performing post-bootstrap initialization ... ok
syncing data to disk ... ok

initdb: warning: enabling "trust" authentication for local connections
You can change this by editing pg_hba.conf or using the option -A, or
--auth-local and --auth-host, the next time you run initdb.

Success. You can now start the database server using:

    /usr/local/pgsql/bin/pg_ctl -D /data/pgsql12/data/ -l logfile start
7、启动数据库
[postgres@node1 ~]$ /usr/local/pgsql/bin/pg_ctl -D /data/pgsql12/data/ -l logfile start
waiting for server to start.... done
server started
8、验证测试
[postgres@node1 ~]$ /usr/local/pgsql/bin/psql -U postgres -d postgres
psql (12.2)
Type "help" for help.

postgres=# select version();
                                                 version

-------------------------------------------------------------------------------------------------------
--
 PostgreSQL 12.2 on x86_64-pc-linux-gnu, compiled by gcc (GCC) 4.8.5 20150623 (Red Hat 4.8.5-44), 64-bi
t
(1 row)

postgres=# exit
9、环境变量配置
[root@node1 ~]# vim /etc/profile
# 新增如下内容
# 软件安装目录
export PGHOME=/usr/local/pgsql
# PG数据目录
export PGDATA=/data/pgsql12/data
export PATH=$PGHOME/bin:$PATH
# 更新环境变量
[root@node1 ~]# source /etc/profile
3个重要的目录:
/usr/local/pgsql:pg 软件的安装目录/data/pgsql12/data:pg 的数据目录/data/pgsql12/logs:pg 的日志目录
2.3.2 备用服务器(node2和node3)和见证服务器(node4)数据库安装
node2、node3 和 node4 的安装一样,这里只展示 node2 的安装。
1、安装源码软件包
# 如果缺少工具请先安装
$ yum install wget
$ yum install bzip2
[root@node2 ~]# wget --no-check-certificate https://ftp.postgresql.org/pub/source/v12.2/postgresql-12.2.tar.bz2

[root@node2 ~]# tar -jxvf postgresql-12.2.tar.bz2 -C /usr/local/
2、安装依赖包
[root@node2 ~]# yum install gcc gcc-c++ readline-devel readline readline-dev zlib-devel
3、编译安装
[root@node2 ~]# cd /usr/local/postgresql-12.2/
[root@node2 postgresql-12.2]# ./configure --prefix=/usr/local/pgsql
[root@node2 postgresql-12.2]# make && make install
4、添加用户
# 前面已经执行过了
[root@node2 postgresql-12.2]# groupadd postgres
[root@node2 postgresql-12.2]# useradd -g postgres postgres
[root@node2 postgresql-12.2]# passwd postgres
5、配置数据、日志目录
[root@node2 postgresql-12.2]# cd ~
[root@node2 ~]# mkdir -p /data/pgsql12/{data,logs}
[root@node2 ~]# chown -R postgres:postgres /data/pgsql12/
6、环境变量配置
[root@node2 ~]# vim /etc/profile
# 新增如下内容
# 软件安装目录
export PGHOME=/usr/local/pgsql
# PG数据目录
export PGDATA=/data/pgsql12/data
export PATH=$PGHOME/bin:$PATH
# 更新环境变量
[root@node2 ~]# source /etc/profile
3个重要的目录:
/usr/local/pgsql:pg 软件的安装目录/data/pgsql12/data:pg 的数据目录/data/pgsql12/logs:pg 的日志目录
2.4 repmgr安装部署(所有节点)
node1、node2、node3 和 node4 都需要安装,这里只展示 node1 的安装。
[root@node1 ~]# yum install flex
[root@node1 ~]# wget --no-check-certificate -c https://repmgr.org/download/repmgr-5.2.1.tar.gz
[root@node1 ~]# tar xf repmgr-5.2.1.tar.gz -C /usr/local
[root@node1 ~]# cd /usr/local/repmgr-5.2.1
[root@node1 ~]# ./configure && make install
make install 成功后,pg_bin_path 里会有 repmgr、repmgrd 两个可执行文件。
2.5 PostgreSQL配置文件修改(操作node1的主库)
1、修改 postgresql.conf 配置文件
[root@node1 ~]# vim /data/pgsql12/data/postgresql.conf
listen_addresses = '*'
max_wal_senders = 10
max_replication_slots = 10
wal_level = 'hot_standby'
hot_standby = on
archive_mode = on
archive_command = '/bin/true'
repmgr本身不需要WAL文件归档。
在 PG9.6 之前的版本中,wal_level 允许设置为 archive 和 hot_standby。新版本中,仍然接受这些值,但是它
们会被映射成 replica。
2、修改 pg_hba.conf 配置文件
repmgr 用户为 repmgr 工具默认使用和创建的数据库用户。
# 覆盖以前的内容
[root@node1 ~]# vim /data/pgsql12/data/pg_hba.conf
local   replication   repmgr                              trust
host    replication   repmgr      127.0.0.1/32            trust
host    replication   repmgr      0.0.0.0/0               trust

local   repmgr        repmgr                              trust
host    repmgr        repmgr      127.0.0.1/32            trust
host    repmgr        repmgr      0.0.0.0/0               trust
3、创建 repmgr 用户和库
为 repmgr 元数据信息创建 PostgreSQL 超级用户和数据库。
[root@node1 ~]# su - postgres
[postgres@node1 ~]$ createuser -s repmgr
[postgres@node1 ~]$ createdb repmgr -O repmgr
[postgres@node1 ~]$ psql -U repmgr -d repmgr
psql (12.2)
Type "help" for help.

repmgr=# alter user repmgr with password 'test1234';
ALTER ROLE
repmgr=# exit
或者是连接到 PostgreSQL 并执行以下命令来创建一个用于管理 repmgr 的用户和数据库:
create user repmgr with password 'test1234' superuser replication;
create database repmgr owner repmgr;
4、配置用户登录数据库免密
[postgres@node1 ~]$ su - root
# 添加以下内容到~/.pgpass文件,用户、数据库和密码修改为自己的即可
[root@node1 ~]# vim /home/postgres/.pgpass
# ip:port:repmgr:repmgr:repmgr
*:*:repmgr:repmgr:test1234
# 修改 ~/.pgpass 文件权限
[root@node1 ~]# chmod 600 /home/postgres/.pgpass
注意该配置必须有,否则在执行 switchover 的时候,standby 可以正常提升为 primary,但旧 primary 无法自动
跟随新主,每台主机上都要进行配置,node2 和 node3 也要进行配置。
[root@node2 ~]# vim /home/postgres/.pgpass
*:*:repmgr:repmgr:test1234
[root@node2 ~]# chmod 600 /home/postgres/.pgpass
[root@node3 ~]# vim /home/postgres/.pgpass
*:*:repmgr:repmgr:test1234
[root@node3 ~]# chmod 600 /home/postgres/.pgpass
[root@node4 ~]# vim /home/postgres/.pgpass
*:*:repmgr:repmgr:test1234
[root@node4 ~]# chmod 600 /home/postgres/.pgpass
5、重启生效
[root@node1 ~]# su - postgres -c "pg_ctl -D /data/pgsql12/data/ -l logfile stop"
waiting for server to shut down.... done
server stopped
[root@node1 ~]# su - postgres -c "pg_ctl -D /data/pgsql12/data/ -l logfile start"
waiting for server to start.... done
server started
2.6 创建 repmgr.conf 文件(node1)
在主服务器上创建一个 repmgr.conf 文件。
[root@node1 ~]# mkdir -p /data/repmgr/{log,conf}
[root@node1 ~]# chown -R postgres:postgres /data/repmgr
/data/repmgr/conf/repmgr.conf 配置文件内容:
[root@node1 ~]# vim /data/repmgr/conf/repmgr.conf
# 基本信息
# node_id、node_name、conninfo需要与从库不同
# 节点ID,高可用集群各节点标识
node_id=1
# 节点名称,高可用集群各节点名称
# 对应集群中select * from pg_stat_replication;中查到的application_name
node_name='node1'
# 本节点数据库连接信息
# 集群中的所有服务器都必须能够使用此字符串连接到本地节点
conninfo='host=node1 user=repmgr dbname=repmgr connect_timeout=2'
# pg数据目录
data_directory='/data/pgsql12/data'
# 流复制数据库用户,默认使用repmgr
replication_user='repmgr'
# repmgr软件目录
repmgr_bindir='/usr/local/pgsql/bin'
# pg软件目录
pg_bindir='/usr/local/pgsql/bin'

# 日志管理
log_level=INFO
# log文件需要提前创建
log_file='/data/repmgr/log/repmgrd.log'
# 此设置导致repmgrd以指定的时间间隔(以秒为单位,默认为300)发出状态日志行,描述repmgrd的当前状态
log_status_interval=10

# pg、repmgr服务管理命令
service_start_command='pg_ctl -D /data/pgsql12/data/ start -o \'-c config_file=/data/pgsql12/data/postgresql.conf\' -l /data/pgsql12/logs/start.log'
service_stop_command='pg_ctl -D /data/pgsql12/data/ stop -o \'-c config_file=/data/pgsql12/data/postgresql.conf\' -l /data/pgsql12/logs/start.log'
service_restart_command='pg_ctl -D /data/pgsql12/data/ restart -o \'-c config_file=/data/pgsql12/data/postgresql.conf\' -l /data/pgsql12/logs/start.log'
service_reload_command='pg_ctl reload'
# repmgrd运行时的pid文件
repmgrd_pid_file='/data/repmgr/log/repmgrd.pid'
repmgrd_service_start_command='repmgrd -f /data/repmgr/conf/repmgr.conf start'
repmgrd_service_stop_command='kill -9 `cat /data/repmgr/log/repmgrd.pid`'

# failover设置
failover='automatic'
# 当repmgrd确定当前节点将成为新的主节点时,将在故障转移情况下执行promote_command中定义的程序或脚本
promote_command='repmgr standby promote -f /data/repmgr/conf/repmgr.conf --log-to-file'
# %n将被替换repmgrd与新的主节点的ID,如果没有提供,repmgr standby follow将尝试自行确定新的主repmgr standby follow节点,但如果在新主节点提升后原主节点重新上线,则存在导致节点继续跟随原主节点的风险
follow_command='repmgr standby follow -f /data/repmgr/conf/repmgr.conf --log-to-file --upstream-node-id=%n'

# 高可用参数设置
# 定义节点位置的任意字符串,在故障转移期间用于检查当前主节点的可见性
location='location1'
# 节点优先级,选主时可能使用到(lsn > priority > node_id),0代表该节点不会被提升为主节点
priority=100
# 是否将监控数据写入monitoring_history表
monitoring_history=yes
# 故障转移之前,尝试重新连接的间隔(以秒为单位)
reconnect_interval=5
# 故障转移之前,尝试重新连接的次数
reconnect_attempts=3
# ping: repmg使用PQPing()方法测试连接
# connection: 尝试与节点建立新的连接
# query:通过现有连接在节点上执行SQL语句
connection_check_type=ping
# 写入监控数据的间隔
monitor_interval_secs=5
use_replication_slots=true
repmgr.conf 不应存储在 PostgreSQL 数据目录中,因为在设置或重新初始化 PostgreSQL 服务器时它可能会被
覆盖。
如果将 repmgr 二进制文件放置在 PostgreSQL 安装目录以外的位置,指定 repmgr_bindir 以启用 repmgr 在其
它节点上执行操作(例如:repmgr cluster crosscheck)。
到目前为止:
- 高可用集群的各个服务器上安装部署好了 repmgr 软件。
- 主服务器提前安装 PostgreSQL 数据库并初始化完成并正常启动数据库(primary)。
3、PostgreSQL + repmgr高可用集群集群部署
【使用注意】
repmgr 不能以 root 用户运行。
3.1 repmgr注册主服务器节点(node1)
要使 repmgr 支持复制集群,必须使用 repmgr 注册主节点(repmgr primary register)。这将安装 repmgr
扩展和元数据对象,并为主服务器添加元数据记录。
3.1.1 注册本地服务器为主服务器节点
[postgres@node1 ~]$ repmgr -f /data/repmgr/conf/repmgr.conf primary register
INFO: connecting to primary database...
NOTICE: attempting to install extension "repmgr"
NOTICE: "repmgr" extension successfully installed
NOTICE: primary node record (ID: 1) registered
3.1.2 查看集群信息
可以看到目前集群中已经添加 host1 为主服务器节点。
[postgres@node1 ~]$ repmgr -f /data/repmgr/conf/repmgr.conf cluster show
 ID | Name  | Role    | Status    | Upstream | Location  | Priority | Timeline | Connection string
----+-------+---------+-----------+----------+-----------+----------+----------+--------------------------------------------------------
 1  | node1 | primary | * running |          | location1 | 100      | 1        | host=node1 user=repmgr dbname=repmgr connect_timeout=2
3.1.3 数据库查看集群基础信息
[postgres@node1 ~]$ psql -U repmgr -d repmgr
psql (12.2)
Type "help" for help.

repmgr=# \x 1
Expanded display is on.
repmgr=# SELECT * FROM repmgr.nodes;
-[ RECORD 1 ]----+-------------------------------------------------------
node_id          | 1
upstream_node_id |
active           | t
node_name        | node1
type             | primary
location         | location1
priority         | 100
conninfo         | host=node1 user=repmgr dbname=repmgr connect_timeout=2
repluser         | repmgr
slot_name        | repmgr_slot_1
config_file      | /data/repmgr/conf/repmgr.conf

repmgr=# exit
配置文件发生改变,需要在每个节点执行:
$ repmgr primary register --force -f /data/repmgr/conf/repmgr.conf
$ repmgr standby register --force -f /data/repmgr/conf/repmgr.conf
$ repmgr witness register --force -f /data/repmgr/conf/repmgr.conf -h primary_host
3.2 启动 repmgrd(node1)
3.2.1 修改 postgresql.conf 文件
加入 repmgr 共享库(在之前的共享库中在加入 repmgr 即可)。
[postgres@node1 ~]$ su - root
[root@node1 ~]# vim /data/pgsql12/data/postgresql.conf
# 添加如下内容
shared_preload_libraries = 'repmgr'
3.2.2 重启数据库
[root@node1 ~]# su - postgres
[postgres@node1 ~]$ pg_ctl -D /data/pgsql12/data/ -l logfile restart
waiting for server to shut down.... done
server stopped
waiting for server to start.... stopped waiting
pg_ctl: could not start server
Examine the log output.
3.2.3 启动 repmgrd 服务
# 创建日志文件,repmgrd的日志文件需要手动创建
# /data/repmgr/log/repmgrd.log和/data/repmgr/conf/repmgr.conf配置文件中的log_file匹配
[postgres@node1 ~]$ touch /data/repmgr/log/repmgrd.log

# 启动 repmgrd 服务
[postgres@node1 ~]$ repmgrd -f /data/repmgr/conf/repmgr.conf start
[2023-04-18 11:00:16] [NOTICE] redirecting logging output to "/data/repmgr/log/repmgrd.log"
3.2.4 repmgrd 日志轮换
为确保当前的 repmgrd 日志文件( repmgr.conf 配置文件中用参数 log_file 指定的文件)不会无限增长,请将
您的系统配置 logrotate 为定期轮换它。
$ vim /etc/logrotate.d/repmgr
    /data/repmgr/log/repmgrd.log {
        missingok
        compress
        rotate 52
        maxsize 100M
        weekly
        create 0600 postgres postgres
        postrotate
            /usr/bin/killall -HUP repmgrd
        endscript
    }
3.2.5 repmgrd 重载配置
# 1、kill 旧进程
kill -9 `cat /data/repmgr/log/repmgrd.pid`

# 2、start
repmgrd -f /data/repmgr/conf/repmgr.conf start
3.3 备库部分(node2)
【使用注意】
在备用数据库上,不要创建 PostgreSQL 实例(即不要执行 initdb 或任何包提供的数据库创建脚本),但要确保
目标数据目录(以及您希望 PostgreSQL 使用的任何其他目录)存在并归其所有 postgres 系统用户。权限必须设
置为 0700 (drwx------)。
3.3.1 创建 repmgr.com 文件
在备用服务器上创建一个 repmgr.conf 文件,repmgr 配置文件与主库相同,注意修改其中的 node_id、
node_name、conninfo 为本节点即可。
[root@node2 ~]# mkdir -p /data/repmgr/{log,conf}
[root@node2 ~]# chown -R postgres:postgres /data/repmgr
/data/repmgr/conf/repmgr.conf 配置文件内容:
[root@node2 ~]# vim /data/repmgr/conf/repmgr.conf
# 基本信息
# node_id、node_name、conninfo需要与从库不同
# 节点ID,高可用集群各节点标识
node_id=2
# 节点名称,高可用集群各节点名称
node_name='node2'
# 本节点数据库连接信息
conninfo='host=node2 user=repmgr dbname=repmgr connect_timeout=2'
# pg数据目录
data_directory='/data/pgsql12/data'
# 流复制数据库用户,默认使用repmgr
replication_user='repmgr'
# repmgr软件目录
repmgr_bindir='/usr/local/pgsql/bin'
# pg软件目录
pg_bindir='/usr/local/pgsql/bin'

# 日志管理
log_level=INFO
log_file='/data/repmgr/log/repmgrd.log'
log_status_interval=10

# pg、repmgr服务管理命令
service_start_command='pg_ctl -D /data/pgsql12/data/ start -o \'-c config_file=/data/pgsql12/data/postgresql.conf\' -l /data/pgsql12/logs/start.log'
service_stop_command='pg_ctl -D /data/pgsql12/data/ stop -o \'-c config_file=/data/pgsql12/data/postgresql.conf\' -l /data/pgsql12/logs/start.log'
service_restart_command='pg_ctl -D /data/pgsql12/data/ restart -o \'-c config_file=/data/pgsql12/data/postgresql.conf\' -l /data/pgsql12/logs/start.log'
service_reload_command='pg_ctl reload'
# repmgrd运行时的pid文件
repmgrd_pid_file='/data/repmgr/log/repmgrd.pid'
repmgrd_service_start_command='repmgrd -f /data/repmgr/conf/repmgr.conf start'
repmgrd_service_stop_command='kill -9 `cat /data/repmgr/log/repmgrd.pid`'

# failover设置
failover='automatic'
promote_command='repmgr standby promote -f /data/repmgr/conf/repmgr.conf --log-to-file'
follow_command='repmgr standby follow -f /data/repmgr/conf/repmgr.conf --log-to-file --upstream-node-id=%n'

# 高可用参数设置
location='location1'
priority=100
monitoring_history=yes
reconnect_interval=5
reconnect_attempts=3
connection_check_type=ping
monitor_interval_secs=5
use_replication_slots=true
3.3.2 检查备库是否可克隆
备服务器节点注册前,不需要对 PostgreSQL 数据库进行初始化,可通过 repmgr 工具一键式部署。在对备用服务
器进行克隆前,可以使用以下命令测试是否可以克隆。
使用 --dry-run 选项来检查备库是否可以克隆:
命令说明:
# --dry-run表示命令测试,并不会实际执行,可用于验证是否会出现一些基本错误
$ repmgr -h ${主服务器ip} -U repmgr -d repmgr -f /data/repmgr/conf/repmgr.conf standby clone --dry-run

# 实际执行pg的克隆操作
$ repmgr -h ${主服务器ip} -U repmgr -d repmgr -f /data/repmgr/conf/repmgr.conf standby clone
执行测试:
[root@node2 ~]# su - postgres
[postgres@node2 ~]$ repmgr -h 192.168.64.170 -U repmgr -d repmgr -f /data/repmgr/conf/repmgr.conf standby clone --dry-run
NOTICE: destination directory "/data/pgsql12/data" provided
INFO: connecting to source node
DETAIL: connection string is: host=192.168.64.170 user=repmgr dbname=repmgr
DETAIL: current installation size is 31 MB
INFO: "repmgr" extension is installed in database "repmgr"
INFO: parameter "max_replication_slots" set to 10
INFO: parameter "max_wal_senders" set to 10
NOTICE: checking for available walsenders on the source node (2 required)
INFO: sufficient walsenders available on the source node
DETAIL: 2 required, 10 available
NOTICE: checking replication connections can be made to the source server (2 required)
INFO: required number of replication connections could be made to the source server
DETAIL: 2 replication connections required
WARNING: data checksums are not enabled and "wal_log_hints" is "off"
DETAIL: pg_rewind requires "wal_log_hints" to be enabled
INFO: replication slots will be created by user "repmgr"
NOTICE: standby will attach to upstream node 1
HINT: consider using the -c/--fast-checkpoint option
INFO: all prerequisites for "standby clone" are met
如果出现以下报错证明:primary 节点的免密登录未配置好。
NOTICE: destination directory "/data/pgsql12/data" provided
INFO: connecting to source node
DETAIL: connection string is: host=192.168.64.170 user=repmgr dbname=repmgr
ERROR: connection to database failed
DETAIL:
fe_sendauth: no password supplied
3.3.3 克隆备库
备用服务器节点数据克隆
[postgres@node2 ~]$ repmgr -h 192.168.64.170 -U repmgr -d repmgr -f /data/repmgr/conf/repmgr.conf standby clone
NOTICE: destination directory "/data/pgsql12/data" provided
INFO: connecting to source node
DETAIL: connection string is: host=192.168.64.170 user=repmgr dbname=repmgr
DETAIL: current installation size is 31 MB
NOTICE: checking for available walsenders on the source node (2 required)
NOTICE: checking replication connections can be made to the source server (2 required)
WARNING: data checksums are not enabled and "wal_log_hints" is "off"
DETAIL: pg_rewind requires "wal_log_hints" to be enabled
INFO: checking and correcting permissions on existing directory "/data/pgsql12/data"
INFO: creating replication slot as user "repmgr"
NOTICE: starting backup (using pg_basebackup)...
HINT: this may take some time; consider using the -c/--fast-checkpoint option
INFO: executing:
  /usr/local/pgsql/bin/pg_basebackup -l "repmgr base backup"  -D /data/pgsql12/data -h 192.168.64.170 -p 5432 -U repmgr -X stream -S repmgr_slot_2
NOTICE: standby clone (using pg_basebackup) complete
NOTICE: you can now start your PostgreSQL server
HINT: for example: pg_ctl -D /data/pgsql12/data/ start -o '-c config_file=/data/pgsql12/data/postgresql.conf' -l /data/pgsql12/logs/start.log
HINT: after starting the server, you need to register this standby with "repmgr standby register"
这里代表使用的是 PostgreSQL 的 pg_basebackup,工具从 192.168.64.170 克隆了PostgreSQL 数据目录文件。
将自动创建包含从该主服务器开始流式传输的正确参数的 recovery.conf 文件。默认情况下,主数据目录中的任
何配置文件都将复制到备用。通常这些将是 postgresql.conf、postgresql.auto.conf、pg_hba.conf 和
pg_ident.conf,这些可能需要在待机启动之前进行修改。
3.3.4 修改配置文件
根据实际情况的需要修改 postgresql.conf、pg_hba.conf 配置文件,然后重启数据库。
3.3.5 启动备库
启动备用服务器节点 standby 数据库:
[postgres@node2 ~]$ pg_ctl -D /data/pgsql12/data/ -o '-c config_file=/data/pgsql12/data/postgresql.conf' -l /data/pgsql12/logs/start.log start
waiting for server to start.... done
server started
3.3.6 注册从库为备用服务器
1、将 standby 数据库所在的服务器注册为集群的备用服务器节点。
[postgres@node2 ~]$ repmgr -f /data/repmgr/conf/repmgr.conf --upstream-node-id=1 standby register
INFO: connecting to local node "node2" (ID: 2)
INFO: connecting to primary database
INFO: standby registration complete
NOTICE: standby node "node2" (ID: 2) successfully registered
2、查看当前集群信息
[postgres@node2 ~]$ repmgr -f /data/repmgr/conf/repmgr.conf cluster show
 ID | Name  | Role    | Status    | Upstream | Location  | Priority | Timeline | Connection string
----+-------+---------+-----------+----------+-----------+----------+----------+--------------------------------------------------------
 1  | node1 | primary | * running |          | location1 | 100      | 1        | host=node1 user=repmgr dbname=repmgr connect_timeout=2
 2  | node2 | standby |   running | node1    | location1 | 100      | 1        | host=node2 user=repmgr dbname=repmgr connect_timeout=2
node1 下查看:
[postgres@node1 ~]$ repmgr -f /data/repmgr/conf/repmgr.conf cluster show
 ID | Name  | Role    | Status    | Upstream | Location  | Priority | Timeline | Connection string
----+-------+---------+-----------+----------+-----------+----------+----------+--------------------------------------------------------
 1  | node1 | primary | * running |          | location1 | 100      | 1        | host=node1 user=repmgr dbname=repmgr connect_timeout=2
 2  | node2 | standby |   running | node1    | location1 | 100      | 1        | host=node2 user=repmgr dbname=repmgr connect_timeout=2
到此,我们 pg+repmgr 的高可用集群基本完成一半,他们基本拥有了手动 switchover 的能力。
3.4 启动 repmgrd(node2)
3.4.1 修改 postgresql.conf 文件
加入 repmgr 共享库(在之前的共享库中在加入 repmgr 即可)。
[postgres@node2 ~]$ su - root
[root@node2 ~]# vim /data/pgsql12/data/postgresql.conf
# 添加如下内容
shared_preload_libraries = 'repmgr'
# node2节点的配置文件都是从node1复制过来的,因此配置文件不需要修改
3.4.2 重启数据库
# node2节点的配置文件都是从node1复制过来的,因此配置文件不需要修改,数据库不需要重启
[root@node2 ~]# su - postgres
[postgres@node2 ~]$ pg_ctl -D /data/pgsql12/data/ -o '-c config_file=/data/pgsql12/data/postgresql.conf' -l /data/pgsql12/logs/start.log restart
3.4.3 启动 repmgrd 服务
# 创建日志文件,repmgrd的日志文件需要手动创建
# /data/repmgr/log/repmgrd.log和/data/repmgr/conf/repmgr.conf配置文件中的log_file匹配
[postgres@node2 ~]$ touch /data/repmgr/log/repmgrd.log

# 启动 repmgrd 服务
[postgres@node2 ~]$ repmgrd -f /data/repmgr/conf/repmgr.conf start
[2023-04-18 13:51:36] [NOTICE] redirecting logging output to "/data/repmgr/log/repmgrd.log"
3.4.4 repmgrd 日志轮换
为确保当前的 repmgrd 日志文件( repmgr.conf 配置文件中用参数 log_file 指定的文件)不会无限增长,请将
您的系统配置 logrotate 为定期轮换它。
$ vim /etc/logrotate.d/repmgr
    /etc/logrotate.d/repmgr {
        missingok
        compress
        rotate 52
        maxsize 100M
        weekly
        create 0600 postgres postgres
        postrotate
            /usr/bin/killall -HUP repmgrd
        endscript
    }
3.4.5 repmgrd 重载配置
# 1、kill 旧进程
kill -9 `cat /data/repmgr/log/repmgrd.pid`

# 2、start
repmgrd -f /data/repmgr/conf/repmgr.conf start
3.5 备库部分(node3)
【使用注意】
在备用数据库上,不要创建 PostgreSQL 实例(即不要执行 initdb 或任何包提供的数据库创建脚本),但要确保
目标数据目录(以及您希望 PostgreSQL 使用的任何其他目录)存在并归其所有 postgres 系统用户。权限必须设
置为 0700 (drwx------)。
3.5.1 创建 repmgr.com 文件
在备用服务器上创建一个 repmgr.conf 文件,repmgr 配置文件与主库相同,注意修改其中的 node_id、
node_name、conninfo 为本节点即可。
[root@node3 ~]# mkdir -p /data/repmgr/{log,conf}
[root@node3 ~]# chown -R postgres:postgres /data/repmgr
/data/repmgr/conf/repmgr.conf 配置文件内容:
[root@node3 ~]# vim /data/repmgr/conf/repmgr.conf
# 基本信息
# node_id、node_name、conninfo需要与从库不同
# 节点ID,高可用集群各节点标识
node_id=3
# 节点名称,高可用集群各节点名称
node_name='node3'
# 本节点数据库连接信息
conninfo='host=node3 user=repmgr dbname=repmgr connect_timeout=2'
# pg数据目录
data_directory='/data/pgsql12/data'
# 流复制数据库用户,默认使用repmgr
replication_user='repmgr'
# repmgr软件目录
repmgr_bindir='/usr/local/pgsql/bin'
# pg软件目录
pg_bindir='/usr/local/pgsql/bin'

# 日志管理
log_level=INFO
log_file='/data/repmgr/log/repmgrd.log'
log_status_interval=10

# pg、repmgr服务管理命令
service_start_command='pg_ctl -D /data/pgsql12/data/ start -o \'-c config_file=/data/pgsql12/data/postgresql.conf\' -l /data/pgsql12/logs/start.log'
service_stop_command='pg_ctl -D /data/pgsql12/data/ stop -o \'-c config_file=/data/pgsql12/data/postgresql.conf\' -l /data/pgsql12/logs/start.log'
service_restart_command='pg_ctl -D /data/pgsql12/data/ restart -o \'-c config_file=/data/pgsql12/data/postgresql.conf\' -l /data/pgsql12/logs/start.log'
service_reload_command='pg_ctl reload'
# repmgrd运行时的pid文件
repmgrd_pid_file='/data/repmgr/log/repmgrd.pid'
repmgrd_service_start_command='repmgrd -f /data/repmgr/conf/repmgr.conf start'
repmgrd_service_stop_command='kill -9 `cat /data/repmgr/log/repmgrd.pid`'

# failover设置
failover='automatic'
promote_command='repmgr standby promote -f /data/repmgr/conf/repmgr.conf --log-to-file'
follow_command='repmgr standby follow -f /data/repmgr/conf/repmgr.conf --log-to-file --upstream-node-id=%n'

# 高可用参数设置
location='location1'
priority=100
monitoring_history=yes
reconnect_interval=5
reconnect_attempts=3
connection_check_type=ping
monitor_interval_secs=5
use_replication_slots=true
3.5.2 检查备库是否可克隆
备服务器节点注册前,不需要对 PostgreSQL 数据库进行初始化,可通过 repmgr 工具一键式部署。在对备用服务
器进行克隆前,可以使用以下命令测试是否可以克隆。
使用 --dry-run 选项来检查备库是否可以克隆:
命令说明:
# --dry-run表示命令测试,并不会实际执行,可用于验证是否会出现一些基本错误
$ repmgr -h ${主服务器ip} -U repmgr -d repmgr -f /data/repmgr/conf/repmgr.conf standby clone --dry-run

# 实际执行pg的克隆操作
$ repmgr -h ${主服务器ip} -U repmgr -d repmgr -f /data/repmgr/conf/repmgr.conf standby clone
执行测试:
[root@node3 ~]# su - postgres
[postgres@node3 ~]$ repmgr -h 192.168.64.170 -U repmgr -d repmgr -f /data/repmgr/conf/repmgr.conf standby clone --dry-run
NOTICE: destination directory "/data/pgsql12/data" provided
INFO: connecting to source node
DETAIL: connection string is: host=192.168.64.170 user=repmgr dbname=repmgr
DETAIL: current installation size is 31 MB
INFO: "repmgr" extension is installed in database "repmgr"
INFO: parameter "max_replication_slots" set to 10
INFO: parameter "max_wal_senders" set to 10
NOTICE: checking for available walsenders on the source node (2 required)
INFO: sufficient walsenders available on the source node
DETAIL: 2 required, 9 available
NOTICE: checking replication connections can be made to the source server (2 required)
INFO: required number of replication connections could be made to the source server
DETAIL: 2 replication connections required
WARNING: data checksums are not enabled and "wal_log_hints" is "off"
DETAIL: pg_rewind requires "wal_log_hints" to be enabled
INFO: replication slots will be created by user "repmgr"
NOTICE: standby will attach to upstream node 1
HINT: consider using the -c/--fast-checkpoint option
INFO: all prerequisites for "standby clone" are met
如果出现以下报错证明:primary 节点的免密登录未配置好。
NOTICE: destination directory "/data/pgsql12/data" provided
INFO: connecting to source node
DETAIL: connection string is: host=192.168.64.170 user=repmgr dbname=repmgr
ERROR: connection to database failed
DETAIL:
fe_sendauth: no password supplied
3.5.3 克隆备库
备用服务器节点数据克隆
[postgres@node3 ~]$ repmgr -h 192.168.64.170 -U repmgr -d repmgr -f /data/repmgr/conf/repmgr.conf standby clone
NOTICE: destination directory "/data/pgsql12/data" provided
INFO: connecting to source node
DETAIL: connection string is: host=192.168.64.170 user=repmgr dbname=repmgr
DETAIL: current installation size is 31 MB
NOTICE: checking for available walsenders on the source node (2 required)
NOTICE: checking replication connections can be made to the source server (2 required)
WARNING: data checksums are not enabled and "wal_log_hints" is "off"
DETAIL: pg_rewind requires "wal_log_hints" to be enabled
INFO: checking and correcting permissions on existing directory "/data/pgsql12/data"
INFO: creating replication slot as user "repmgr"
NOTICE: starting backup (using pg_basebackup)...
HINT: this may take some time; consider using the -c/--fast-checkpoint option
INFO: executing:
  /usr/local/pgsql/bin/pg_basebackup -l "repmgr base backup"  -D /data/pgsql12/data -h 192.168.64.170 -p 5432 -U repmgr -X stream -S repmgr_slot_3
NOTICE: standby clone (using pg_basebackup) complete
NOTICE: you can now start your PostgreSQL server
HINT: for example: pg_ctl -D /data/pgsql12/data/ start -o '-c config_file=/data/pgsql12/data/postgresql.conf' -l /data/pgsql12/logs/start.log
HINT: after starting the server, you need to register this standby with "repmgr standby register"
这里代表使用的是 PostgreSQL 的 pg_basebackup,工具从 192.168.64.170 克隆了PostgreSQL 数据目录文件。
将自动创建包含从该主服务器开始流式传输的正确参数的 recovery.conf 文件。默认情况下,主数据目录中的任
何配置文件都将复制到备用。通常这些将是 postgresql.conf、postgresql.auto.conf、pg_hba.conf 和
pg_ident.conf,这些可能需要在待机启动之前进行修改。
3.5.4 修改配置文件
根据实际情况的需要修改 postgresql.conf、pg_hba.conf 配置文件,然后重启数据库。
3.5.5 启动备库
启动备用服务器节点 standby 数据库:
[postgres@node3 ~]$ pg_ctl -D /data/pgsql12/data/ -o '-c config_file=/data/pgsql12/data/postgresql.conf' -l /data/pgsql12/logs/start.log start
waiting for server to start.... done
server started
3.5.6 注册从库为备用服务器
1、将 standby 数据库所在的服务器注册为集群的备用服务器节点。
[postgres@node3 ~]$ repmgr -f /data/repmgr/conf/repmgr.conf --upstream-node-id=1 standby register
INFO: connecting to local node "node3" (ID: 3)
INFO: connecting to primary database
INFO: standby registration complete
NOTICE: standby node "node3" (ID: 3) successfully registered
2、查看当前集群信息
[postgres@node3 ~]$ repmgr -f /data/repmgr/conf/repmgr.conf cluster show
 ID | Name  | Role    | Status    | Upstream | Location  | Priority | Timeline | Connection string
----+-------+---------+-----------+----------+-----------+----------+----------+--------------------------------------------------------
 1  | node1 | primary | * running |          | location1 | 100      | 1        | host=node1 user=repmgr dbname=repmgr connect_timeout=2
 2  | node2 | standby |   running | node1    | location1 | 100      | 1        | host=node2 user=repmgr dbname=repmgr connect_timeout=2
 3  | node3 | standby |   running | node1    | location1 | 100      | 1        | host=node3 user=repmgr dbname=repmgr connect_timeout=2
node1 下查看:
[postgres@node1 ~]$ repmgr -f /data/repmgr/conf/repmgr.conf cluster show
 ID | Name  | Role    | Status    | Upstream | Location  | Priority | Timeline | Connection string
----+-------+---------+-----------+----------+-----------+----------+----------+--------------------------------------------------------
 1  | node1 | primary | * running |          | location1 | 100      | 1        | host=node1 user=repmgr dbname=repmgr connect_timeout=2
 2  | node2 | standby |   running | node1    | location1 | 100      | 1        | host=node2 user=repmgr dbname=repmgr connect_timeout=2
 3  | node3 | standby |   running | node1    | location1 | 100      | 1        | host=node3 user=repmgr dbname=repmgr connect_timeout=2
node2 下查看:
[postgres@node2 ~]$ repmgr -f /data/repmgr/conf/repmgr.conf cluster show
 ID | Name  | Role    | Status    | Upstream | Location  | Priority | Timeline | Connection string
----+-------+---------+-----------+----------+-----------+----------+----------+--------------------------------------------------------
 1  | node1 | primary | * running |          | location1 | 100      | 1        | host=node1 user=repmgr dbname=repmgr connect_timeout=2
 2  | node2 | standby |   running | node1    | location1 | 100      | 1        | host=node2 user=repmgr dbname=repmgr connect_timeout=2
 3  | node3 | standby |   running | node1    | location1 | 100      | 1        | host=node3 user=repmgr dbname=repmgr connect_timeout=2
3.6 启动 repmgrd(node3)
3.6.1 修改 postgresql.conf 文件
加入 repmgr 共享库(在之前的共享库中在加入 repmgr 即可)。
[postgres@node3 ~]$ su - root
[root@node3 ~]# vim /data/pgsql12/data/postgresql.conf
# 添加如下内容
shared_preload_libraries = 'repmgr'
# node3节点的配置文件都是从node1复制过来的,因此配置文件不需要修改
3.6.2 重启数据库
# node3节点的配置文件都是从node1复制过来的,因此配置文件不需要修改,数据库不需要重启
[root@node3 ~]# su - postgres
[postgres@node3 ~]$ pg_ctl -D /data/pgsql12/data/ -o '-c config_file=/data/pgsql12/data/postgresql.conf' -l /data/pgsql12/logs/start.log restart
3.6.3 启动 repmgrd 服务
# 创建日志文件,repmgrd的日志文件需要手动创建
# /data/repmgr/log/repmgrd.log和/data/repmgr/conf/repmgr.conf配置文件中的log_file匹配
[postgres@node3 ~]$ touch /data/repmgr/log/repmgrd.log

# 启动 repmgrd 服务
[postgres@node3 ~]$ repmgrd -f /data/repmgr/conf/repmgr.conf start
[2023-04-18 15:47:27] [NOTICE] redirecting logging output to "/data/repmgr/log/repmgrd.log"
3.6.4 repmgrd 日志轮换
为确保当前的 repmgrd 日志文件( repmgr.conf 配置文件中用参数 log_file 指定的文件)不会无限增长,请将
您的系统配置 logrotate 为定期轮换它。
$ vim /etc/logrotate.d/repmgr
    /etc/logrotate.d/repmgr {
        missingok
        compress
        rotate 52
        maxsize 100M
        weekly
        create 0600 postgres postgres
        postrotate
            /usr/bin/killall -HUP repmgrd
        endscript
    }
3.6.5 repmgrd 重载配置
# 1、kill 旧进程
kill -9 `cat /data/repmgr/log/repmgrd.pid`

# 2、start
repmgrd -f /data/repmgr/conf/repmgr.conf start
3.7 见证服务器(witness)(node4)
【使用注意】
-
只有在使用 repmgrd 时,见证服务器才有用;
-
发生故障转移的情况下,见证服务器提供证据表明是主服务器本身是不可用的,而不是例如不同的物理位置之
间的网络分离(防止脑裂问题出现);
-
请在与集群主服务器位于同一网段的服务器上设置一个普通 PostgreSQL 实例,并安装 repmgr、repmgrd,
注册该实例为 witness(repmgr witness register)(见证服务器 Database system identifier 不能与集群主服务
器相同)。
3.7.1 启动节点 postgres 服务
见证服务器的部署可参考单实例部署,需要手动进行初始化并正常启动。
[root@node4 ~]# su - postgres

[postgres@node4 ~]$ initdb -D /data/pgsql12/data/
The files belonging to this database system will be owned by user "postgres".
This user must also own the server process.

The database cluster will be initialized with locale "zh_CN.UTF-8".
The default database encoding has accordingly been set to "UTF8".
initdb: could not find suitable text search configuration for locale "zh_CN.UTF-8"
The default text search configuration will be set to "simple".

Data page checksums are disabled.

fixing permissions on existing directory /data/pgsql12/data ... ok
creating subdirectories ... ok
selecting dynamic shared memory implementation ... posix
selecting default max_connections ... 100
selecting default shared_buffers ... 128MB
selecting default time zone ... Asia/Shanghai
creating configuration files ... ok
running bootstrap script ... ok
performing post-bootstrap initialization ... ok
syncing data to disk ... ok

initdb: warning: enabling "trust" authentication for local connections
You can change this by editing pg_hba.conf or using the option -A, or
--auth-local and --auth-host, the next time you run initdb.

Success. You can now start the database server using:

    pg_ctl -D /data/pgsql12/data/ -l logfile start

[postgres@node4 ~]$ pg_ctl -D /data/pgsql12/data/ -l logfile start
waiting for server to start.... done
server started
3.7.2 添加 repmgr.conf 配置
基本配置与主库相同,保持 node_id、node_name、conninfo 与主库不同即可。
[postgres@node4 ~]$ su - root
[root@node4 ~]# mkdir -p /data/repmgr/{log,conf}
[root@node4 ~]# chown -R postgres:postgres /data/repmgr
/data/repmgr/conf/repmgr.conf 配置文件内容:
[root@node4 ~]# vim /data/repmgr/conf/repmgr.conf
# 基本信息
# node_id、node_name、conninfo需要与从库不同
# 节点ID,高可用集群各节点标识
node_id=4
# 节点名称,高可用集群各节点名称
node_name='node4'
# 本节点数据库连接信息
conninfo='host=node4 user=repmgr dbname=repmgr connect_timeout=2'
# pg数据目录
data_directory='/data/pgsql12/data'
# 流复制数据库用户,默认使用repmgr
replication_user='repmgr'
# repmgr软件目录
repmgr_bindir='/usr/local/pgsql/bin'
# pg软件目录
pg_bindir='/usr/local/pgsql/bin'

# 日志管理
log_level=INFO
log_file='/data/repmgr/log/repmgrd.log'
log_status_interval=10

# pg、repmgr服务管理命令
service_start_command='pg_ctl -D /data/pgsql12/data/ start -o \'-c config_file=/data/pgsql12/data/postgresql.conf\' -l /data/pgsql12/logs/start.log'
service_stop_command='pg_ctl -D /data/pgsql12/data/ stop -o \'-c config_file=/data/pgsql12/data/postgresql.conf\' -l /data/pgsql12/logs/start.log'
service_restart_command='pg_ctl -D /data/pgsql12/data/ restart -o \'-c config_file=/data/pgsql12/data/postgresql.conf\' -l /data/pgsql12/logs/start.log'
service_reload_command='pg_ctl reload'
# repmgrd运行时的pid文件
repmgrd_pid_file='/data/repmgr/log/repmgrd.pid'
repmgrd_service_start_command='repmgrd -f /data/repmgr/conf/repmgr.conf start'
repmgrd_service_stop_command='kill -9 `cat /data/repmgr/log/repmgrd.pid`'

# failover设置
failover='automatic'
promote_command='repmgr standby promote -f /data/repmgr/conf/repmgr.conf --log-to-file'
follow_command='repmgr standby follow -f /data/repmgr/conf/repmgr.conf --log-to-file --upstream-node-id=%n'

# 高可用参数设置
location='location1'
priority=100
monitoring_history=yes
reconnect_interval=5
reconnect_attempts=3
connection_check_type=ping
monitor_interval_secs=5
use_replication_slots=true
3.7.3 启动 repmgrd
1、修改 postgresql.conf 文件,加入repmgr 共享库
[root@node4 ~]# vim /data/pgsql12/data/postgresql.conf
# 添加如下内容
listen_addresses = '*'
shared_preload_libraries = 'repmgr'
2、修改 pg_hba.conf 文件
[root@node4 ~]# vim /data/pgsql12/data/pg_hba.conf
# 添加如下内容
host    repmgr        repmgr      0.0.0.0/0               trust
3.7.4 重启数据库
[root@node4 ~]# su - postgres
[postgres@node4 ~]$ pg_ctl -D /data/pgsql12/data/ -l logfile restart
waiting for server to shut down.... done
server stopped
waiting for server to start.... done
server started
[postgres@node4 ~]$ psql -U postgres -d postgres
psql (12.2)
Type "help" for help.

postgres=# create user repmgr with password 'test1234' superuser replication;
CREATE ROLE
postgres=# create database repmgr owner repmgr;
CREATE DATABASE
postgres=# exit
3.7.5 启动 repmgrd 服务
# 创建日志文件,repmgrd的日志文件需要手动创建
# /data/repmgr/log/repmgrd.log和/data/repmgr/conf/repmgr.conf配置文件中的log_file匹配
[postgres@node4 ~]$ touch /data/repmgr/log/repmgrd.log

# 启动 repmgrd 服务
[postgres@node4 ~]$ repmgrd -f /data/repmgr/conf/repmgr.conf start
[2023-04-18 17:19:42] [NOTICE] redirecting logging output to "/data/repmgr/log/repmgrd.log"
3.7.6 repmgrd 日志轮换
为确保当前的 repmgrd 日志文件( repmgr.conf 配置文件中用参数 log_file 指定的文件)不会无限增长,请将
您的系统配置 logrotate 为定期轮换它。
$ vim /etc/logrotate.d/repmgr
    /etc/logrotate.d/repmgr {
        missingok
        compress
        rotate 52
        maxsize 100M
        weekly
        create 0600 postgres postgres
        postrotate
            /usr/bin/killall -HUP repmgrd
        endscript
    }
3.7.7 repmgrd 重载配置
# 1、kill 旧进程
kill -9 `cat /data/repmgr/log/repmgrd.pid`

# 2、start
repmgrd -f /data/repmgr/conf/repmgr.conf start
3.7.8 注册 witness
[postgres@node4 ~]$ repmgr -f /data/repmgr/conf/repmgr.conf witness register -h 192.168.64.170 -U repmgr -d repmgr
INFO: connecting to witness node "node4" (ID: 4)
INFO: connecting to primary node
NOTICE: attempting to install extension "repmgr"
NOTICE: "repmgr" extension successfully installed
INFO: witness registration complete
NOTICE: witness node "node4" (ID: 4) successfully registered
最终的集群:
[postgres@node1 ~]$ repmgr -f /data/repmgr/conf/repmgr.conf cluster show
 ID | Name  | Role    | Status    | Upstream | Location  | Priority | Timeline | Connection string
----+-------+---------+-----------+----------+-----------+----------+----------+--------------------------------------------------------
 1  | node1 | primary | * running |          | location1 | 100      | 1        | host=node1 user=repmgr dbname=repmgr connect_timeout=2
 2  | node2 | standby |   running | node1    | location1 | 100      | 1        | host=node2 user=repmgr dbname=repmgr connect_timeout=2
 3  | node3 | standby |   running | node1    | location1 | 100      | 1        | host=node3 user=repmgr dbname=repmgr connect_timeout=2
 4  | node4 | witness | * running | node1    | location1 | 0        | n/a      | host=node4 user=repmgr dbname=repmgr connect_timeout=2
到此,我们 postgresql + repmgr 的高可用集群已经搭建完毕。