华为云influxdb+grafana+ prometheus安装和如何外网访问华为云+java环境安装配置+jmeter安装配置+Jmeter后端监听器+非GUI执行jmeter脚本
华为云influxdb+grafana+prometheus安装
首先声明:我的云主机是全新的,所以都得从头来
docker安装
yum包更新到最新
sudo yum update
安装需要的软件包,yum-utils提供yum-config-manager功能,另外两个是devicemapper驱动依赖的
sudo yum install -y yum-utils device-mapper-persistent-data lvm2
设置yum源为阿里云
sudo yum-config-manager --add-repo http://mirrors.aliyun.com/docker-ce/linux/centos/docker-ce.repo
安装docker
sudo yum install docker-ce
安装后查看docker版本
docker -v
安装influxdb
[root@hecs-82454 ~]# docker pull tutum/influxdb
Using default tag: latest
Cannot connect to the Docker daemon at unix:///var/run/docker.sock. Is the docker daemon running?
甚至docker version都报错了
[root@hecs-82454 ~]# docker version
Client: Docker Engine - Community
 Version:           20.10.8
 API version:       1.41
 Go version:        go1.16.6
 Git commit:        3967b7d
 Built:             Fri Jul 30 19:55:49 2021
 OS/Arch:           linux/amd64
 Context:           default
 Experimental:      true
Cannot connect to the Docker daemon at unix:///var/run/docker.sock. Is the docker daemon running?
解决办法
[root@hecs-82454 ~]# systemctl daemon-reload
[root@hecs-82454 ~]# sudo service docker restart
Redirecting to /bin/systemctl restart docker.service
[root@hecs-82454 ~]# sudo service docker status
Redirecting to /bin/systemctl status docker.service
● docker.service - Docker Application Container Engine
   Loaded: loaded (/usr/lib/systemd/system/docker.service; disabled; vendor preset: disabled)
   Active: active (running) since Thu 2021-09-02 11:30:32 CST; 14s ago
     Docs: https://docs.docker.com
 Main PID: 11916 (dockerd)
    Tasks: 7
   Memory: 33.4M
   CGroup: /system.slice/docker.service
           └─11916 /usr/bin/dockerd -H fd:// --containerd=/run/containerd/containerd.sock

Sep 02 11:30:32 hecs-82454 dockerd[11916]: time="2021-09-02T11:30:32.175923899+08:00" level=info msg="scheme \"unix\" not registered, fallback to default scheme" module=grpc
Sep 02 11:30:32 hecs-82454 dockerd[11916]: time="2021-09-02T11:30:32.175963491+08:00" level=info msg="ccResolverWrapper: sending update to cc: {[{unix:///run/conta...module=grpc
Sep 02 11:30:32 hecs-82454 dockerd[11916]: time="2021-09-02T11:30:32.175981193+08:00" level=info msg="ClientConn switching balancer to \"pick_first\"" module=grpc
Sep 02 11:30:32 hecs-82454 dockerd[11916]: time="2021-09-02T11:30:32.244393917+08:00" level=info msg="Loading containers: start."
Sep 02 11:30:32 hecs-82454 dockerd[11916]: time="2021-09-02T11:30:32.805291197+08:00" level=info msg="Default bridge (docker0) is assigned with an IP address 172.1...IP address"
Sep 02 11:30:32 hecs-82454 dockerd[11916]: time="2021-09-02T11:30:32.886770439+08:00" level=info msg="Loading containers: done."
Sep 02 11:30:32 hecs-82454 dockerd[11916]: time="2021-09-02T11:30:32.934918709+08:00" level=info msg="Docker daemon" commit=75249d8 graphdriver(s)=overlay2 version=20.10.8
Sep 02 11:30:32 hecs-82454 dockerd[11916]: time="2021-09-02T11:30:32.935093095+08:00" level=info msg="Daemon has completed initialization"
Sep 02 11:30:32 hecs-82454 systemd[1]: Started Docker Application Container Engine.
Sep 02 11:30:32 hecs-82454 dockerd[11916]: time="2021-09-02T11:30:32.979416206+08:00" level=info msg="API listen on /var/run/docker.sock"
Hint: Some lines were ellipsized, use -l to show in full.
再次执行通过
[root@hecs-82454 ~]# docker pull tutum/influxdb
Using default tag: latest
latest: Pulling from tutum/influxdb
a3ed95caeb02: Pull complete
23efb549476f: Pull complete
aa2f8df21433: Pull complete
ef072d3c9b41: Pull complete
c9f371853f28: Pull complete
a248b0871c3c: Pull complete
749db6d368d0: Pull complete
db2492acfcc3: Pull complete
b7e7d2e12d53: Pull complete
4272a53eef10: Pull complete
9b2fefdb5321: Pull complete
Digest: sha256:5b7c5e318303ad059f3d1a73d084c12cb39ae4f35f7391b79b0ff2c0ba45304b
Status: Downloaded newer image for tutum/influxdb:latest
docker.io/tutum/influxdb:latest
[root@hecs-82454 ~]# docker images
REPOSITORY       TAG       IMAGE ID       CREATED       SIZE
tutum/influxdb   latest    c061e5808198   4 years ago   290MB
启动
[root@hecs-82454 ~]# docker run -d -p 8086:8086 -p 8083:8083 --name=jmeterdb tutum/influxdb
89c8b5ed53b25f1302354cd218c7970c536c2a4b776ccea498e192848bd86cb2
进入容器并设置数据库
[root@hecs-82454 ~]# docker ps
CONTAINER ID   IMAGE            COMMAND     CREATED          STATUS          PORTS                                                                                  NAMES
89c8b5ed53b2   tutum/influxdb   "/run.sh"   37 seconds ago   Up 36 seconds   0.0.0.0:8083->8083/tcp, :::8083->8083/tcp, 0.0.0.0:8086->8086/tcp, :::8086->8086/tcp   jmeterdb
[root@hecs-82454 ~]# docker exec -it 89c8b5ed53b2 sh
# cd /usr/bin
# ./influx
Visit https://enterprise.influxdata.com to register for updates, InfluxDB server management, and monitoring.
Connected to http://localhost:8086 version 1.0.0
InfluxDB shell version: 1.0.0
> show databases
name: databases
---------------
name
_internal

> create database jmeter
> show databases
name: databases
---------------
name
_internal
jmeter
> exit
# exit
[root@hecs-82454 ~]#
安装Prometheus
node_exporter安装
监控服务器CPU、内存、磁盘、I/O等信息,首先需要安装node_exporter。node_exporter的作用是用于机器系统数据收集。
[root@hecs-82454 ~]# docker pull prom/node-exporter
Using default tag: latest
latest: Pulling from prom/node-exporter
aa2a8d90b84c: Already exists
b45d31ee2d7f: Already exists
6c8262c5af55: Pull complete
Digest: sha256:a990408ed288669bbad5b5b374fe1584e54825cde4a911c1a3d6301a907a030c
Status: Downloaded newer image for prom/node-exporter:latest
docker.io/prom/node-exporter:latest
启动容器
docker run -d -p 9100:9100 \
  -v "/proc:/host/proc:ro" \
  -v "/sys:/host/sys:ro" \
  -v "/:/rootfs:ro" \
  --net="host" \
  prom/node-exporter
[root@hecs-82454 ~]# docker run -d -p 9100:9100 \
>   -v "/proc:/host/proc:ro" \
>   -v "/sys:/host/sys:ro" \
>   -v "/:/rootfs:ro" \
>   --net="host" \
>   prom/node-exporter
WARNING: Published ports are discarded when using host network mode
2eafca27d44d26b1515eaf3d44d4dbb8155ab9fa0464c56be3851c39671d4ed6
[root@hecs-82454 ~]# docker ps
CONTAINER ID   IMAGE                COMMAND                CREATED          STATUS          PORTS                                                                                  NAMES
2eafca27d44d   prom/node-exporter   "/bin/node_exporter"   57 seconds ago   Up 56 seconds                                                                                          youthful_carson
1d65cb2ad57a   grafana/grafana      "/run.sh"              2 hours ago      Up 2 hours      0.0.0.0:3000->3000/tcp, :::3000->3000/tcp                                              jmeterGraf
89c8b5ed53b2   tutum/influxdb       "/run.sh"              3 hours ago      Up 3 hours      0.0.0.0:8083->8083/tcp, :::8083->8083/tcp, 0.0.0.0:8086->8086/tcp, :::8086->8086/tcp   jmeterdb
查看端口是否起来了9100
[root@hecs-82454 ~]# netstat -anpt
Active Internet connections (servers and established)
Proto Recv-Q Send-Q Local Address           Foreign Address         State       PID/Program name
tcp        0      0 0.0.0.0:8083            0.0.0.0:*               LISTEN      13629/docker-proxy
tcp        0      0 0.0.0.0:8086            0.0.0.0:*               LISTEN      13613/docker-proxy
tcp        0      0 0.0.0.0:22              0.0.0.0:*               LISTEN      1297/sshd
tcp        0      0 0.0.0.0:3000            0.0.0.0:*               LISTEN      13830/docker-proxy
tcp        0      0 127.0.0.1:25            0.0.0.0:*               LISTEN      911/master
tcp        1    126 192.168.0.28:54686      13.250.177.223:443      CLOSE_WAIT  14850/wget
tcp        0      0 192.168.0.28:22         121.36.59.153:47387     ESTABLISHED 14524/sshd: root
tcp        0      0 192.168.0.28:22         121.36.59.153:50887     ESTABLISHED 14668/sshd: root@pt
tcp        0      0 192.168.0.28:22         121.36.59.153:17464     ESTABLISHED 14781/sshd: root
tcp        0      0 192.168.0.28:22         121.36.59.153:43550     ESTABLISHED 13346/sshd: root@pt
tcp        0      0 192.168.0.28:22         121.36.59.153:58198     ESTABLISHED 14802/sshd: root@no
tcp        0      0 192.168.0.28:22         121.36.59.153:17465     ESTABLISHED 14783/sshd: root@pt
tcp6       0      0 :::9100                 :::*                    LISTEN      14898/node_exporter
tcp6       0      0 :::8083                 :::*                    LISTEN      13633/docker-proxy
tcp6       0      0 :::8086                 :::*                    LISTEN      13617/docker-proxy
tcp6       0      0 :::22                   :::*                    LISTEN      1297/sshd
tcp6       0      0 :::3000                 :::*                    LISTEN      13834/docker-proxy
tcp6       0      0 ::1:25                  :::*                    LISTEN      911/master
然后再将9100端口配置到安全组里(配置方法详见下面的【配置grafana】)

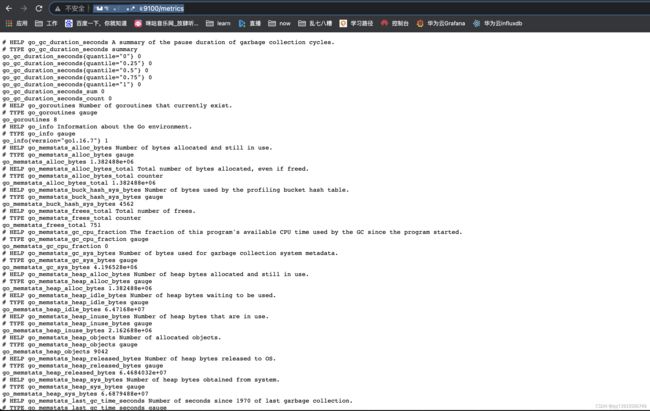
然后打开,发现已经开始监控系统性能了,这些都是收集到数据,有了它就可以做数据展示了
http://xxx.xxx.xxx.xxx:9100/metrics
安装Prometheus
下载镜像
docker pull prom/prometheus
在云主机上配置prometheus的配置文件,/etc/prometheus下的prometheus.yml应该是一个文件而不是一个文件夹,但是不知道问什么这里是文件夹,所以我们删除这个文件夹,再新建一个同名的文件,并添加配置信息
[root@hecs-82454 ~]# cd /etc/prometheus
[root@hecs-82454 prometheus]# ls
prometheus.yml
[root@hecs-82454 prometheus]# rm -rf prometheus.yml/
[root@hecs-82454 prometheus]# touch prometheus.yml
[root@hecs-82454 prometheus]# ls
prometheus.yml
修改prometheus.yml内容,targets: [‘xxx.xxx.xxx.xxx:9100’]中的xxx即为云主机的地址
[root@hecs-82454 prometheus]# vim prometheus.yml
[root@hecs-82454 prometheus]# cat prometheus.yml
 global:
  scrape_interval:     15s #默认采集监控数据时间间隔
  evaluation_interval: 15s

scrape_configs:  #监控对象设置
  - job_name: 'prometheus'  #任务名称
    static_configs:  #监控对象地址
      - targets: ['localhost:9090']   # 将自己加入到监控对象中


  - job_name: 'MyHuaWeiYun'
    static_configs:
      - targets: ['xxx.xxx.xxx.xxx:9100']
启动Prometheus
[root@hecs-82454 prometheus]# docker run -d -p 9090:9090 -v /etc/prometheus/prometheus.yml:/etc/prometheus/prometheus.yml prom/prometheus
f5b7de206e4f5d6b79e89508acf69dd082a5997bd06b9412f21a942d0751422a
自己的电脑访问
http://xxx.xxx.xxx.xxx:9090/graph
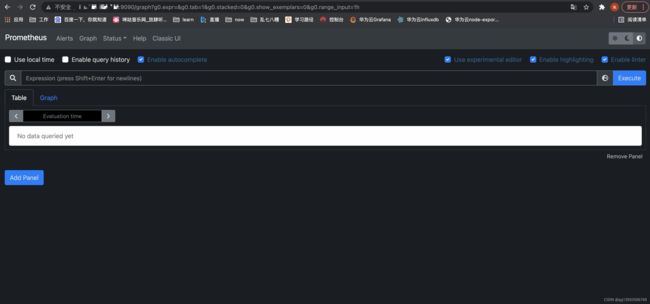
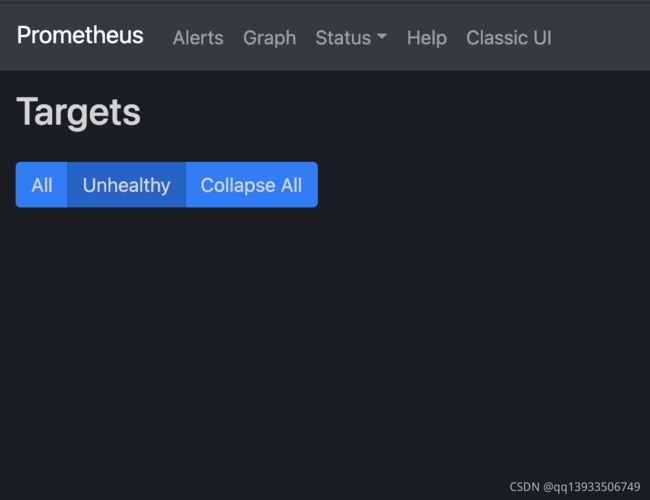
但是我们进去之后发现不太对劲,根本没有监控到的内容
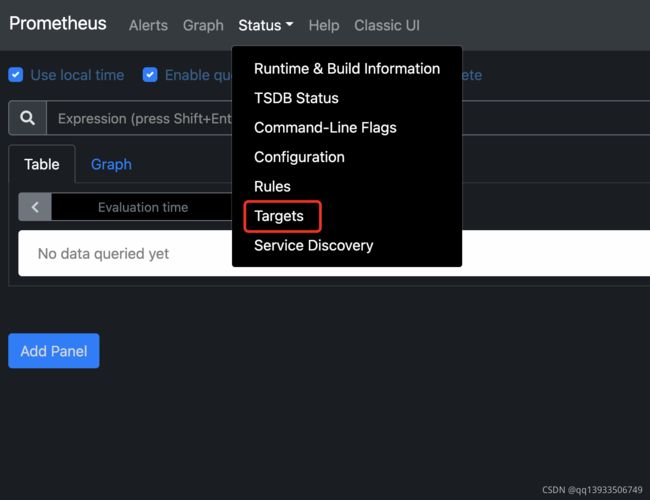
选择targets后是这样的
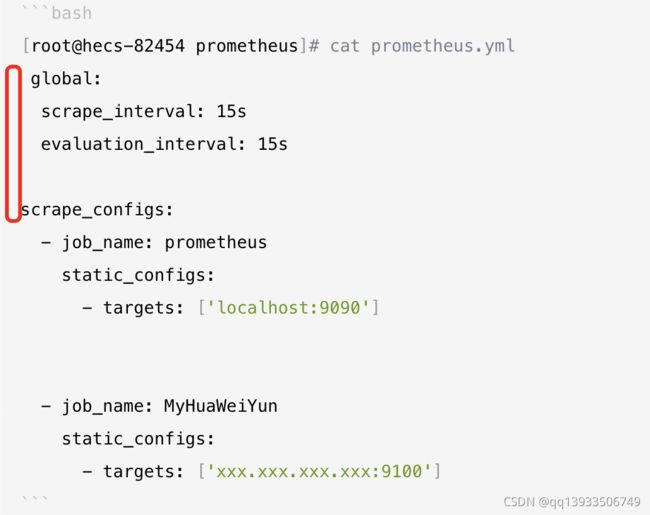
重新修改了配置文件为下面的样子
[root@hecs-82454 prometheus]# cat prometheus.yml
 global:
  scrape_interval: 15s
  evaluation_interval: 15s

scrape_configs:
  - job_name: prometheus
    static_configs:
      - targets: ['localhost:9090']


  - job_name: MyHuaWeiYun
    static_configs:
      - targets: ['xxx.xxx.xxx.xxx:9100']
然后重启了prometheus的docker,还是不行啊,最后的最后,辗转反侧,发现是自己的配置global没有顶头!!!修改完成后再次重启docker容器。好吧,我服了我自己
再次进入,成功,喜大普奔
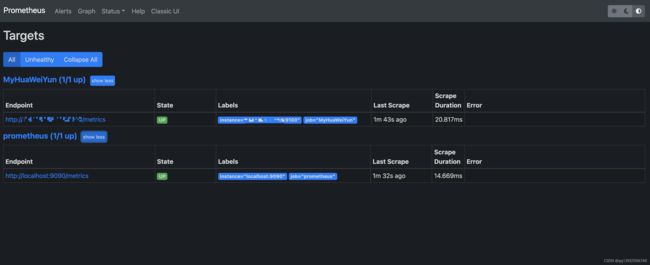
安装grafana
[root@hecs-82454 ~]# docker pull grafana/grafana
Using default tag: latest
latest: Pulling from grafana/grafana
540db60ca938: Pull complete
475d6aa6cde2: Pull complete
86c565d1875f: Pull complete
bacbab00d598: Pull complete
eba2484373d9: Pull complete
4f4fb700ef54: Pull complete
de780c7f2383: Pull complete
40175e15d294: Pull complete
Digest: sha256:811ee7d685fe45e5625928716d189c518f2b96edaa86122a04cc6faf1e988180
Status: Downloaded newer image for grafana/grafana:latest
docker.io/grafana/grafana:latest
[root@hecs-82454 ~]# docker run -d -p 3000:3000 --name=jmeterGraf grafana/grafana
1d65cb2ad57ad7dd6849c848e1398f1455d8bfaf5cf93171208af1f7f6c671d7
配置grafana
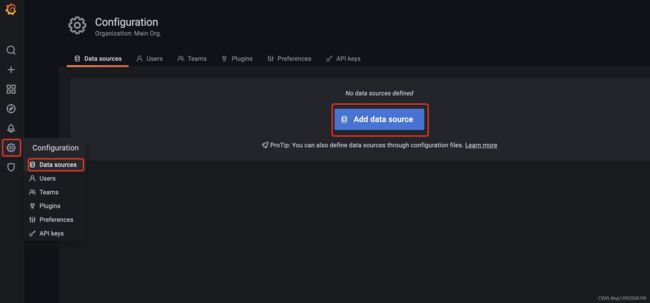
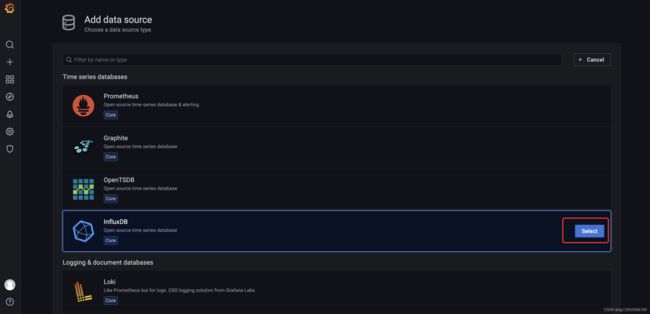
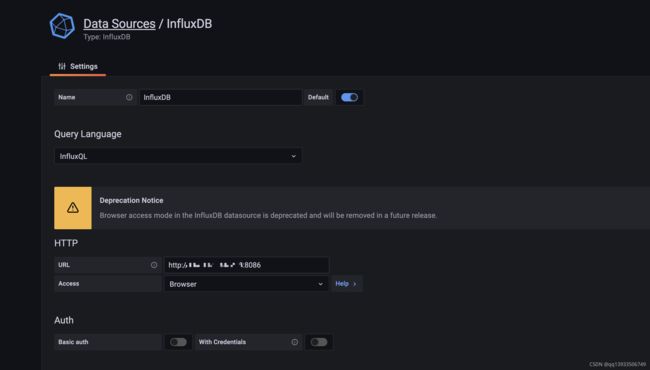
grafana配置influxdb数据源
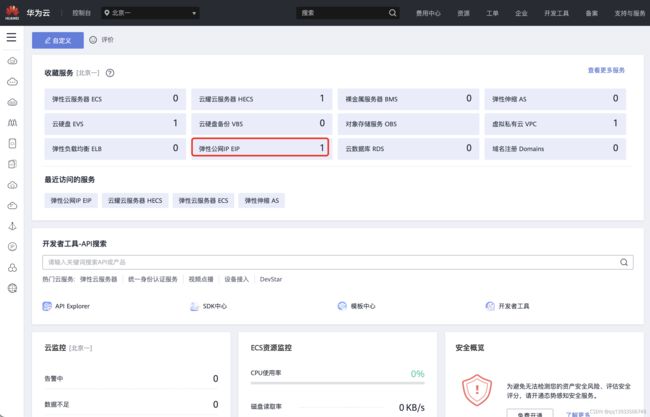
由于我们是在云主机上安装的,所以想要在外网访问云主机还要做一下设置
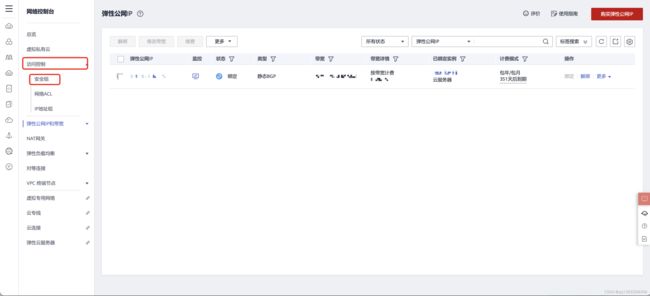
选择default这条记录,这个就是我们现在的安全组的策略,点击配置规则
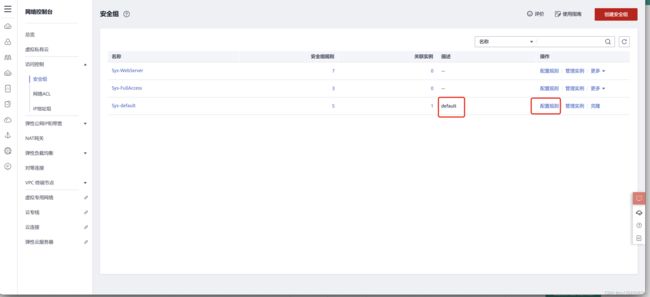
点击添加规则,由于我这里已经添加过了,所以下面有一条

新增一条入口记录,端口选择我们grafana开放的端口,也就是3000
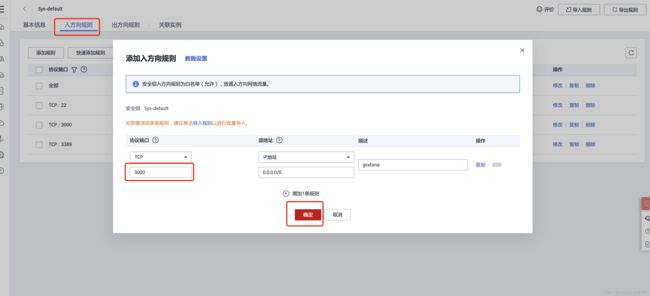
这个时候再回到自己的电脑上访问云主机配置的grafana就可以了,地址
http://1xxxxxx:3000
访问成功
初始的用户名和密码都是admin
但是刚开始是不成功的,所以我在想是不是influxdb不对外网开放的原因,尝试着配置了一下安全组,于是便开放了8083和8086两个端口
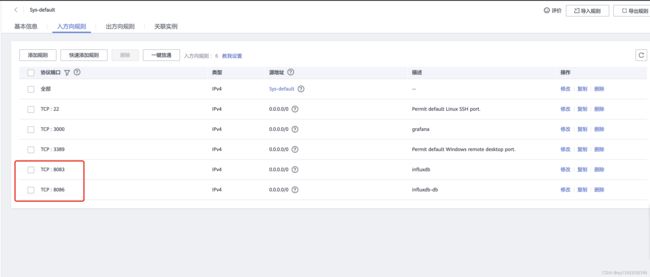
顺便登陆了一下influxdb的后台也可以正常访问正常查询

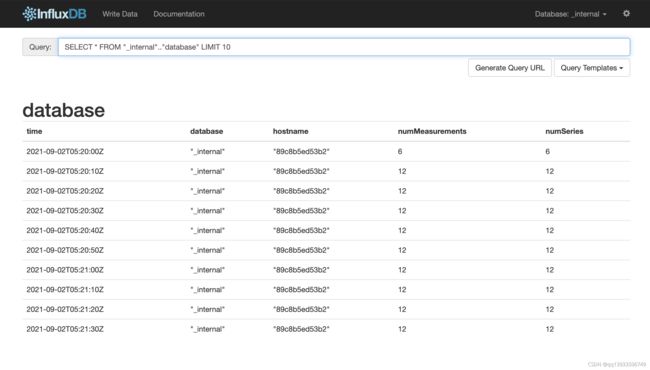
还记得当时我们在grafana配置influxdb的时候有一个提示么
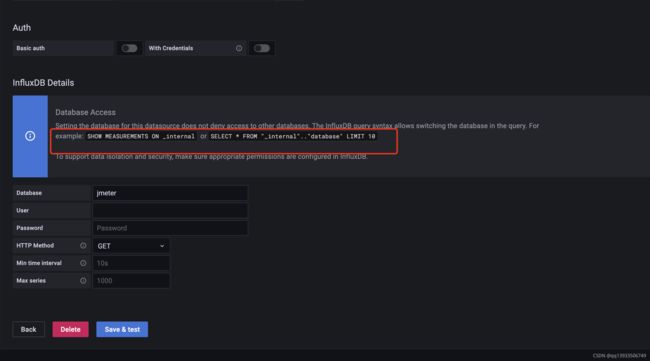
复制出来查询一下,正常出结果,说明我们的配置是正常的
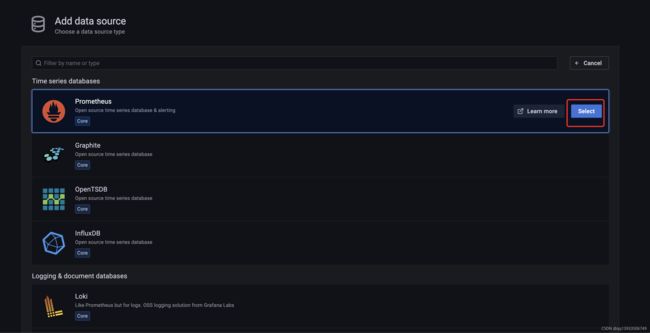
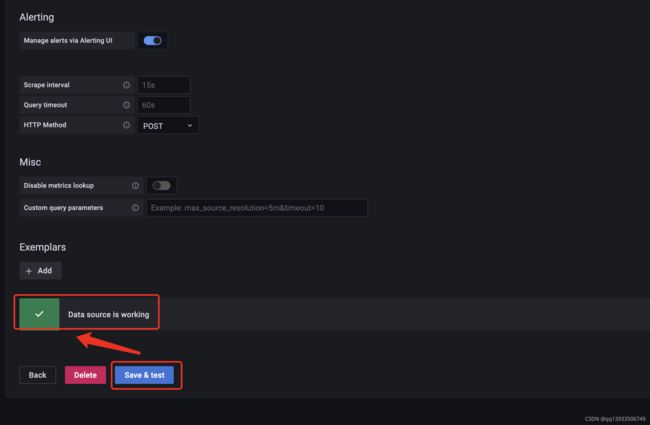
grafana配置prometheus数据源
grafana配置Jmeter监控大盘
其实已经有很多现成的监控大盘供我们使用了
传送门
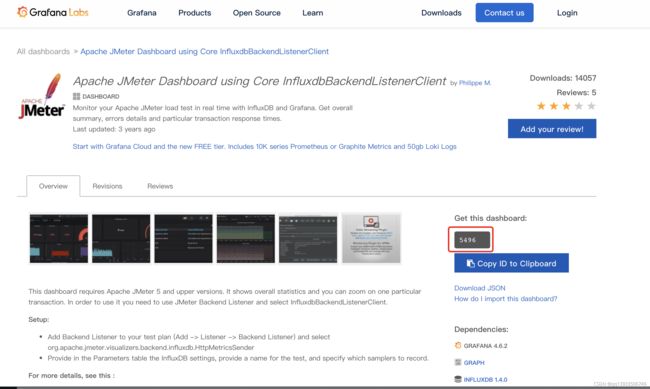
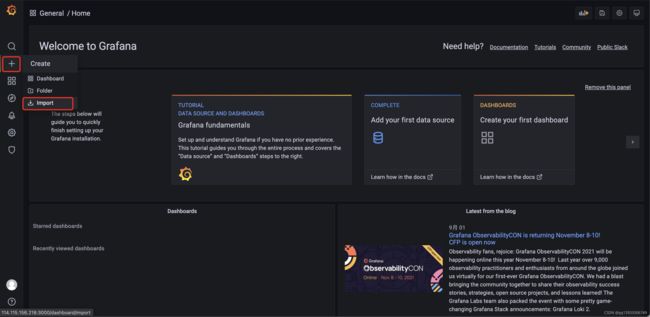
将刚刚的id复制进来,点击load
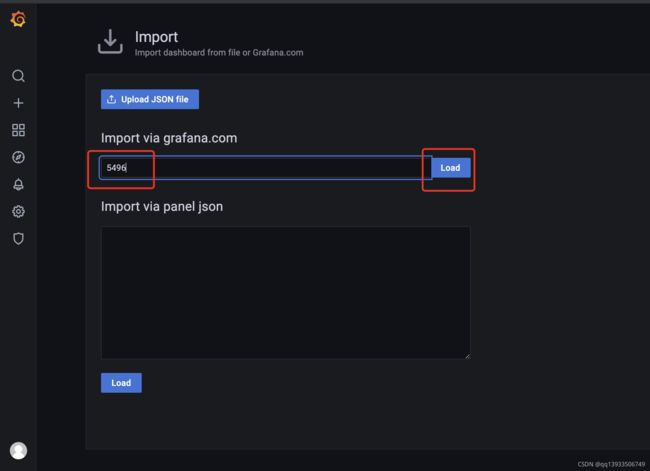
选择influxdb

模版就倒入进来了

grafana配置prometheus监控大盘
同样的,我们导入prometheus监控大盘
传送门

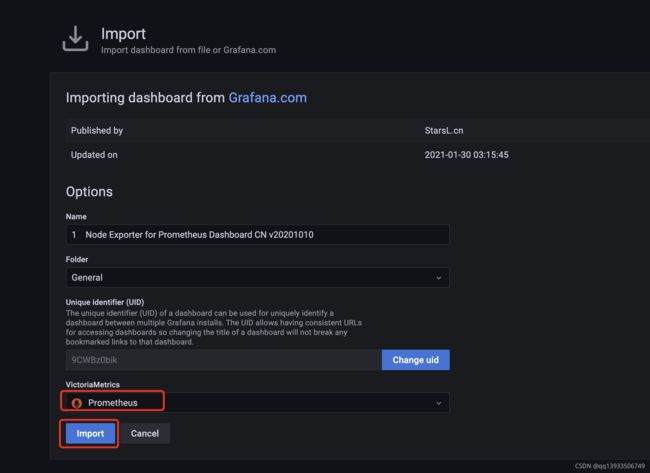
emmm,这个是可以正常使用的,不用再加什么配置了

java环境安装配置
下载
wget https://repo.huaweicloud.com/java/jdk/8u201-b09/jdk-8u201-linux-x64.tar.gz
解压
tar -zxvf jdk-8u201-linux-x64.tar.gz
挪个地儿
mv jdk1.8.0_201 /usr/local/jdk1.8/
修改配置
vim /etc/profile
底部新增内容
export JAVA_HOME=/usr/local/jdk1.8
export PATH=$JAVA_HOME/bin:$PATH
export CLASSPATH=.:$JAVA_HOME/lib/dt.jar:$JAVA_HOME/lib/tools.jar
让配置立即生效
source /etc/profile
检查
[root@hecs-82454 jdk1.8]# java -version
java version "1.8.0_201"
Java(TM) SE Runtime Environment (build 1.8.0_201-b09)
Java HotSpot(TM) 64-Bit Server VM (build 25.201-b09, mixed mode)
Jmeter安装
上传一个和本地电脑一样版本的jmeter
scp /Users/zc/Desktop/linux/apache-jmeter-5.3.zip [email protected]:/usr/local
解压
unzip apache-jmeter-5.3.zip
配置
[root@hecs-82454 local]# vim /etc/profile
文件末尾新增
export JMETER_HOME=/usr/local/apache-jmeter-5.3
export PATH=${JMETER_HOME}/bin:$PATH
让文件立即生效
[root@hecs-82454 local]# source /etc/profile
检查结果
[root@hecs-82454 local]# jmeter --version
Sep 03, 2021 10:39:54 AM java.util.prefs.FileSystemPreferences$1 run
INFO: Created user preferences directory.
    _    ____   _    ____ _   _ _____       _ __  __ _____ _____ _____ ____
   / \  |  _ \ / \  / ___| | | | ____|     | |  \/  | ____|_   _| ____|  _ \
  / _ \ | |_) / _ \| |   | |_| |  _|    _  | | |\/| |  _|   | | |  _| | |_) |
 / ___ \|  __/ ___ \ |___|  _  | |___  | |_| | |  | | |___  | | | |___|  _ <
/_/   \_\_| /_/   \_\____|_| |_|_____|  \___/|_|  |_|_____| |_| |_____|_| \_\ 5.3

Copyright (c) 1999-2020 The Apache Software Foundation

[root@hecs-82454 local]#
让我们来压测一把
刚才我们在grafana上的jmeter监控大盘,啥玩儿意都没有,刚才我们已经把jmeter和java环境安装好了,现在再上传两个jar包,自己用springboot写的,想要的话我传到百度云上了,自己拿就行
链接: https://pan.baidu.com/s/1evo87u18ihGQTm4c6NaMBA 提取码: d3tn
[root@hecs-82454 Idea]# ls
helloworld-0.0.1-SNAPSHOT.jar  niceto-0.0.1-SNAPSHOT.jar
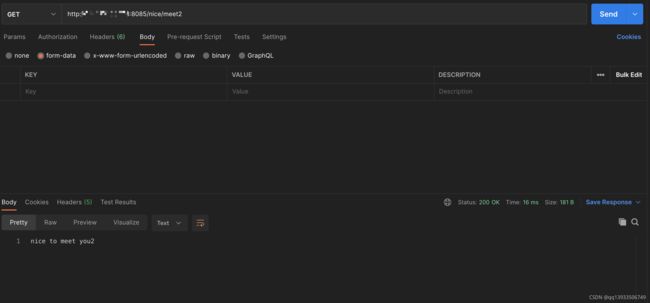
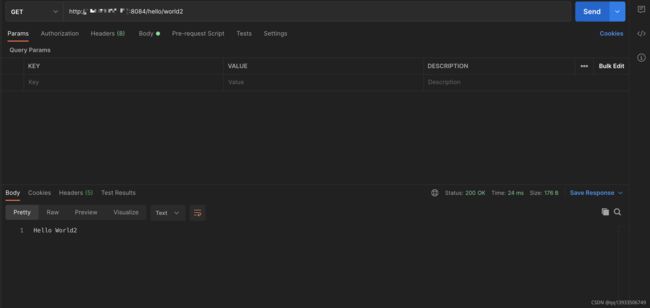
想在自己电脑上测试一下可行不可行,但是我的jar包使用的是8084和8085端口,需要打开8084和8085端口 在安全组里
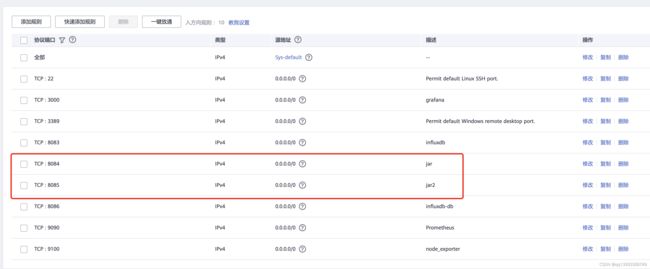
启动两个jar包在服务器上
[root@hecs-82454 Idea]# java -jar helloworld-0.0.1-SNAPSHOT.jar

  .   ____          _            __ _ _
 /\\ / ___'_ __ _ _(_)_ __  __ _ \ \ \ \
( ( )\___ | '_ | '_| | '_ \/ _` | \ \ \ \
 \\/  ___)| |_)| | | | | || (_| |  ) ) ) )
  '  |____| .__|_| |_|_| |_\__, | / / / /
 =========|_|==============|___/=/_/_/_/
 :: Spring Boot ::                (v2.5.4)

2021-09-03 11:36:56.439  INFO 22752 --- [           main] com.helloworld.HelloworldApplication     : Starting HelloworldApplication v0.0.1-SNAPSHOT using Java 1.8.0_201 on hecs-82454 with PID 22752 (/usr/local/Idea/helloworld-0.0.1-SNAPSHOT.jar started by root in /usr/local/Idea)
2021-09-03 11:36:56.442  INFO 22752 --- [           main] com.helloworld.HelloworldApplication     : No active profile set, falling back to default profiles: default
2021-09-03 11:36:58.798  INFO 22752 --- [           main] o.s.b.w.embedded.tomcat.TomcatWebServer  : Tomcat initialized with port(s): 8084 (http)
2021-09-03 11:36:58.840  INFO 22752 --- [           main] o.apache.catalina.core.StandardService   : Starting service [Tomcat]
2021-09-03 11:36:58.841  INFO 22752 --- [           main] org.apache.catalina.core.StandardEngine  : Starting Servlet engine: [Apache Tomcat/9.0.52]
2021-09-03 11:36:58.974  INFO 22752 --- [           main] o.a.c.c.C.[Tomcat].[localhost].[/]       : Initializing Spring embedded WebApplicationContext
2021-09-03 11:36:58.974  INFO 22752 --- [           main] w.s.c.ServletWebServerApplicationContext : Root WebApplicationContext: initialization completed in 2414 ms
2021-09-03 11:37:00.428  INFO 22752 --- [           main] o.s.b.w.embedded.tomcat.TomcatWebServer  : Tomcat started on port(s): 8084 (http) with context path ''
2021-09-03 11:37:00.450  INFO 22752 --- [           main] com.helloworld.HelloworldApplication     : Started HelloworldApplication in 5.142 seconds (JVM running for 5.983)
[root@hecs-82454 Idea]# java -jar niceto-0.0.1-SNAPSHOT.jar

  .   ____          _            __ _ _
 /\\ / ___'_ __ _ _(_)_ __  __ _ \ \ \ \
( ( )\___ | '_ | '_| | '_ \/ _` | \ \ \ \
 \\/  ___)| |_)| | | | | || (_| |  ) ) ) )
  '  |____| .__|_| |_|_| |_\__, | / / / /
 =========|_|==============|___/=/_/_/_/
 :: Spring Boot ::                (v2.5.4)

2021-09-03 11:37:20.637  INFO 22769 --- [           main] com.niceto.NicetoApplication             : Starting NicetoApplication v0.0.1-SNAPSHOT using Java 1.8.0_201 on hecs-82454 with PID 22769 (/usr/local/Idea/niceto-0.0.1-SNAPSHOT.jar started by root in /usr/local/Idea)
2021-09-03 11:37:20.640  INFO 22769 --- [           main] com.niceto.NicetoApplication             : No active profile set, falling back to default profiles: default
2021-09-03 11:37:22.996  INFO 22769 --- [           main] o.s.b.w.embedded.tomcat.TomcatWebServer  : Tomcat initialized with port(s): 8085 (http)
2021-09-03 11:37:23.021  INFO 22769 --- [           main] o.apache.catalina.core.StandardService   : Starting service [Tomcat]
2021-09-03 11:37:23.023  INFO 22769 --- [           main] org.apache.catalina.core.StandardEngine  : Starting Servlet engine: [Apache Tomcat/9.0.52]
2021-09-03 11:37:23.169  INFO 22769 --- [           main] o.a.c.c.C.[Tomcat].[localhost].[/]       : Initializing Spring embedded WebApplicationContext
2021-09-03 11:37:23.169  INFO 22769 --- [           main] w.s.c.ServletWebServerApplicationContext : Root WebApplicationContext: initialization completed in 2416 ms
2021-09-03 11:37:24.640  INFO 22769 --- [           main] o.s.b.w.embedded.tomcat.TomcatWebServer  : Tomcat started on port(s): 8085 (http) with context path ''
2021-09-03 11:37:24.672  INFO 22769 --- [           main] com.niceto.NicetoApplication             : Started NicetoApplication in 5.056 seconds (JVM running for 5.866)
后端监听器
    influxdbMetricsSender:org.apache.jmeter.visualizers.backend.influxdb.HttpMetricsSender
    influxdbUrl:influx数据库的url。只需要将自己的主机地址替换就行了
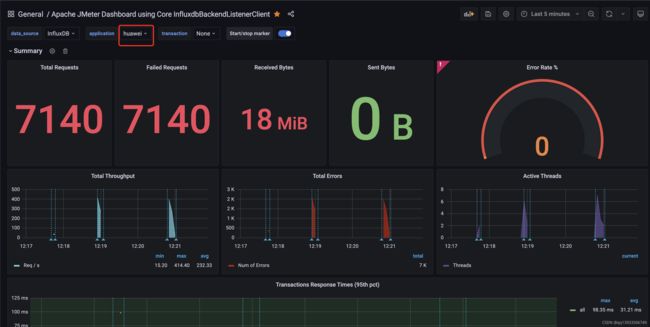
    application:被测试的应用名称。这个值对应的是Grafana上的application,在没有压测之前,这里是空的,但是一旦执行了脚本,这里就会有一个选项
measurement:使用默认的”jmeter“就行
summaryOnly:为true的情况下,只输出所有请求的集合数据报告,为flase的情况下,输出每条数据的详情报告、
samplersRegex:正则表达式将与样本名称匹配并发送到后端。默认匹配所有
testTitle:测试名称。默认的设置为 Test name。该值作为名为“text”的字段存储在“事件”度量中。 但是我没看出来有啥用,JMeter在测试的开始和结束时自动生成一个注释,其值以'started'和'ended'结尾
percentiles:要发送到后端的百分位数,多个值已;分割
非GUI执行jmeter脚本
刚刚我们是在自己电脑上请求的,但是一般真实情况下是不会在本机发起请求的,一般都会放在服务器上。
我们来看一下当我们以GUI模式启动jmeter的时候打印出来的日志
ZHR:bin zc$ ./jmeter
================================================================================
Don't use GUI mode for load testing !, only for Test creation and Test debugging.
For load testing, use CLI Mode (was NON GUI):
   jmeter -n -t [jmx file] -l [results file] -e -o [Path to web report folder]
& increase Java Heap to meet your test requirements:
   Modify current env variable HEAP="-Xms1g -Xmx1g -XX:MaxMetaspaceSize=256m" in the jmeter batch file
Check : https://jmeter.apache.org/usermanual/best-practices.html
================================================================================
里面有这么一段:Don’t use GUI mode for load testing !
而且也为我们标明了非GUI启动的方式
jmeter -n -t [jmx file] -l [results file] -e -o [Path to web report folder]
results file的格式为jtl
然后我们就来亲自试一下,结果,emmm,虽然都是错误的,但是我们至少执行成功了
[root@hecs-82454 jiaoben]# jmeter -n -t /usr/local/apache-jmeter-5.3/jiaoben/huaweiyun.jmx -l /usr/local/apache-jmeter-5.3/jtl/result.jtl -e -o /usr/local/apache-jmeter-5.3/webreport/result.html
Creating summariser <summary>
Created the tree successfully using /usr/local/apache-jmeter-5.3/jiaoben/huaweiyun.jmx
Starting standalone test @ Fri Sep 03 12:42:52 CST 2021 (1630644172965)
Waiting for possible Shutdown/StopTestNow/HeapDump/ThreadDump message on port 4445
summary +   6365 in 00:00:06 = 1102.9/s Avg:     5 Min:     0 Max:  1005 Err:  6365 (100.00%) Active: 11 Started: 11 Finished: 0
summary +  27635 in 00:00:14 = 2008.9/s Avg:     3 Min:     0 Max:    33 Err: 27635 (100.00%) Active: 0 Started: 11 Finished: 11
summary =  34000 in 00:00:20 = 1741.2/s Avg:     4 Min:     0 Max:  1005 Err: 34000 (100.00%)
Tidying up ...    @ Fri Sep 03 12:43:13 CST 2021 (1630644193757)
... end of run
[root@hecs-82454 jiaoben]#
