华为云服务器部署Spring Boot+Vue项目流程
华为云服务器部署Spring Boot+Vue项目流程
- 前言
- 技术选型
-
- 1、服务器环境搭建
-
- 1.1 jdk下载
-
- 1.1.1搜索jdk安装包
- 1.1.2 安装jdk
- 1.1.3 验证是否安装成功
- 1.2 安装[mysql](https://dev.mysql.com/)
-
- 1.2.1 下载wget
- 1.2.2 卸载mariadb
- 1.2.3 删除名为mysql的文件夹
- 1.2.4 调整安装位置
- 1.2.5 下载mysql文件
- 1.2.5.1 下载命令
- 1.2.5.2 查找下载网址
- 注意:后来发现这里的mysql都是8.0版本的!!!
- 1.2.6 安装mysql
- 1.2.7 安装mysql服务
- 1.2.8 启动mysql
- 1.2.9 查看临时密码
- 1.2.10 登录mysql
- 1.2.11 修改密码
- 1.2.12 其他命令
- 1.3 下载nginx
-
- 1.3.1 切换安装路径
- 1.3.2 下载nginx压缩包
- 1.3.3 解压
- 1.3.4 安装nginx的依赖项
- 1.3.5 配置nginx
- 1.3.6 编译、安装
- 1.3.7 开放访问端口
- 1.3.8 设置开机自启动
- 1.3.9 本地测试nginx
- 2、打包部署
-
- 2.1 远程连接mysql
-
- 2.1.1 查询访问权限
- 2.1.2 修改root用户的host字段为%
- 2.1.3 刷新权限
- 2.1.4 打开端口
- 2.1.5 navicat远程连接
- 2.1.6 克隆数据库表
- 2.2 Vue代码打包
-
- 2.2.1 打开Vue工程,终端运行
- 2.2.2 新建代码路径
- 2.2.3 上传dist文件夹
- 2.3 Spring Boot代码打包
-
- 2.3.1 IDEA中执行命令
- 2.3.2 上传jar包
- 2.3.3 使用nohup让后端文件在后台启动
- 2.4 个人nginx配置
- 参考文献
前言
个人使用Vue+Springboot写了个小项目,需要部署到服务器上。部署期间借鉴了很多博客,这里总结一下,写一篇博客记录一下流程,方便后续回顾。
- 2023-5-26
记录搭建流程 - 2023-6-2
补充nginx个人配置
技术选型
- 服务器:华为云 云耀云服务器HECS
- 服务器系统: CentOS 7.6 64bit
- 项目结构:Vue2 + Spring Boot + MybatisPlus
- 环境结构:jdk1.8 + mysql 8.0 + nginx 1.19
1、服务器环境搭建
1.1 jdk下载
这里使用的华为云服务器选择操作系统后,已经有了yum命令,可以使用yum命令快速安装。
1.1.1搜索jdk安装包
yum search java | grep jdk
1.1.2 安装jdk
yum install java-1.8.0-openjdk
1.1.3 验证是否安装成功
java -version
1.2 安装mysql
安装mysql的过程比较长,会出现的错误也比较多,我尽量写得详细一些。
1.2.1 下载wget
yum -y install wget
1.2.2 卸载mariadb
一般CentOS默认安装了mariadb,所以先查看是否安装mariadb。自带的mariadb和mysql有冲突,如果安装了就需要先卸载mariadb。
# 查看mariadb文件
rpm -qa | grep mariadb
# 删除mariadb文件
rpm -e mariadb-libs --nodeps
1.2.3 删除名为mysql的文件夹
# 查找名为mysql的文件夹
find / -name mysql
# 删除文件夹
rm -rf 包名
1.2.4 调整安装位置
这里的安装位置可以根据需要自行选择,我这里选择装在/usr/local/mysql下。
cd /usr/local
mkdir mysql
cd mysql
1.2.5 下载mysql文件
这里先给一个我使用的命令,再给查找下载网址的教程。如果大家也是CentOS 7 + mysql 8.0的话,可以直接使用这个命令。
1.2.5.1 下载命令
wget https://dev.mysql.com/get/mysql80-community-release-el7-7.noarch.rpm
1.2.5.2 查找下载网址
这里每一步都有相应的链接,完全可以直接跳到最后一步链接处。为了防止以后MySQL官网下载路径会有变化,还是把步骤截图都放上了。
注意:后来发现这里的mysql都是8.0版本的!!!
- 进入官网
# 官网地址,点击标题链接更快哦
https://dev.mysql.com/

-
点击Downloads

-
点击MySQL Community (GPL)Downloads

-
点击MSQL Yum Repository

-
点击Download

-
右键No Thanks…

-
此时就拿到了下载链接了
如:https://dev.mysql.com/get/mysql80-community-release-el7-7.noarch.rpm
1.2.6 安装mysql
rpm -ivh mysql80-community-release-el7-7.noarch.rpm
1.2.7 安装mysql服务
yum -y install mysql-server
1.2.8 启动mysql
systemctl start mysqld
1.2.9 查看临时密码
启动mysql后,第一次登录使用的是临时密码,使用下述命令查看临时密码。
grep 'temporary password' /var/log/mysqld.log

1.2.10 登录mysql
输入登陆命令后,输入刚刚的临时密码登录。mysql输入密码不会显示,一个一个输入即可。
# 登录命令
mysql -u root -p
1.2.11 修改密码
ALTER USER 'root'@'localhost' IDENTIFIED BY 'your-password';
1.2.12 其他命令
# 关闭mysql服务
service mysqld stop

# 启动mysql服务
service mysqld start

# 刷新mysql权限(修改user表后一定要刷新权限才会生效)
flush privileges;

# 设置密码策略为LOW(习惯设置的123456会被提示密码策略不符合,可以使用这个命令降低要求)
set global validate_password.policy=LOW;

# 设置密码长度
set global validate_password.length=6;
1.3 下载nginx
1.3.1 切换安装路径
cd /usr/local
1.3.2 下载nginx压缩包
wget http://nginx.org/download/nginx-1.19.0.tar.gz
1.3.3 解压
tar -zxvf nginx-1.19.0.tar.gz
1.3.4 安装nginx的依赖项
yum install -y gcc gcc-c++ make automake autoconf libtool pcre pcre-devel zlib zlib-devel openssl openssl-devel
1.3.5 配置nginx
cd /usr/local/nginx-1.19.0
./configure
1.3.6 编译、安装
make
make install
1.3.7 开放访问端口
#--permanent永久生效,没有此参数重启后失效
firewall-cmd --zone=public --add-port=80/tcp --permanent
#重新载入配置
firewall-cmd --reload
#查看已经开启的端口
firewall-cmd --zone=public --list-ports

# 当然也可以选择把防火墙直接关了,一劳永逸(如果安全性要求比较高的系统,不建议这么搞)
# 查看防火墙状态
systemctl status firewalld
# 永久关闭防火墙(重启也不会开启)
systemctl disable firewalld
1.3.8 设置开机自启动
vi /lib/systemd/system/nginx.service
nginx中添加如下代码
Description=nginx - high performance web server
After=network.target remote-fs.target nss-lookup.target
[Service]
Type=forking
ExecStart=/usr/local/nginx/sbin/nginx -c /usr/local/nginx/conf/nginx.conf
ExecReload=/usr/local/nginx/sbin/nginx -s reload
ExecStop=/usr/local/nginx/sbin/nginx -s stop
[Install]
WantedBy=multi-user.target
- 使配置生效
systemctl daemon-reload
- 设置开机启动
systemctl enable nginx.service
1.3.9 本地测试nginx
curl http://localhost:80/

上面是终端代码测试,也可以在浏览器内输入网址测试功能。如下图

2、打包部署
2.1 远程连接mysql
2.1.1 查询访问权限
select user,host from mysql.user;
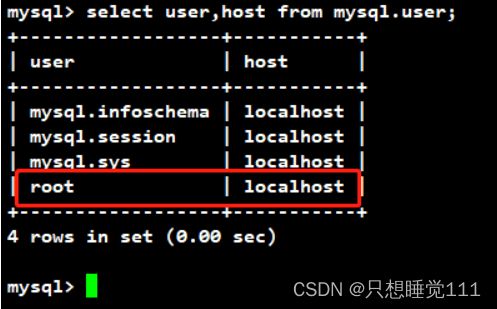
root用户的localhost表示只允许本机访问,要实现远程连接,可以将用户的host改为%,表示允许任意主机访问,如果需要设置只允许特定ip访问,则应改为对应的ip。
2.1.2 修改root用户的host字段为%
update mysql.user set host="%" where user="root";
2.1.3 刷新权限
flush privileges;
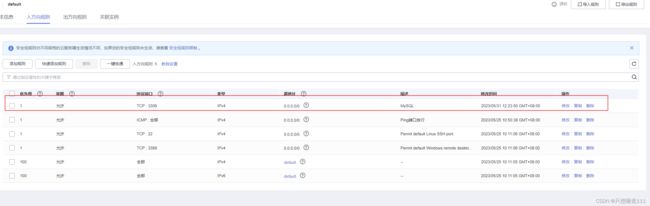
2.1.4 打开端口
添加入方向规则,对所有ip放行3306端口
2.1.5 navicat远程连接


2.1.6 克隆数据库表
首先手动输入命令,在服务器端生成一个数据库。
- 点击 工具->数据传输
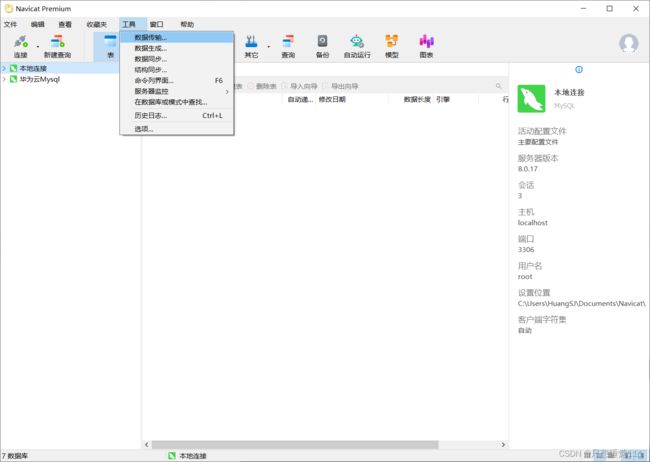
- 选择源和目标的连接和数据库

- 选择要传输的数据表就可以了,navicat会自动把表结构和数据复制过去。我这写的项目还比较简单,只有一张表,大家根据需要选择就可以了。

至此,数据库就搞定了。
2.2 Vue代码打包
2.2.1 打开Vue工程,终端运行
npm run bulid
生成dist文件夹。
2.2.2 新建代码路径
cd /usr
mkdir server
cd server
2.2.3 上传dist文件夹
我这里使用的Xftp进行可视化传输。
放一个阿里云的下载链接吧,点此进入
这里网上搜到了一个Xmanager的资源,还没使用,链接也放下吧,点此进入

2.3 Spring Boot代码打包
2.3.1 IDEA中执行命令
依次点击clean、compile、package,然后会在target目录下生成jar包。


2.3.2 上传jar包
# 创建目录
cd /usr/server
mkdir springboot
cd springboot
2.3.3 使用nohup让后端文件在后台启动
nohup java -jar springboot-0.0.1-SNAPSHOT.jar &
正常启动后,可以打印出启动日志
tail nohup.out
2.4 个人nginx配置
这边花了一周时间才把本地代码部署到服务器上,中间也是错误繁多。遇到的问题记录一下,希望也能帮助到大家。
| 序号 | 问题 | 解决方法 |
|---|---|---|
| 1 | 后端静态资源存放于/src/resources/static下,打为jar包后,前端无法访问 | 将静态资源文件夹更换位置 |
| 2 | nginx.conf配置 | 参见代码 |
| 3 | 本地测试和打包部署后端时需要频繁修改file.static-dir | 新建application.yml文件 |
| 4 | 前端使用localhost地址build会报错 | 将前端的localhost抽离出来,build前更改为服务器ip |
- 问题一
静态资源位置设置在哪里都可以,我这里直接放到前端的public下了,前端build之后也会出现在dist文件夹下,在一个统一的文件夹下方便管理。第二个file开头的是服务器下的绝对路径。同时新增file属性,方便新建文件时使用。
# application.yml
spring:
	web:
		resources:
			static-location:classpath:/static, classpath:/resources, file:D:\Code\GitDownload\rockcls\front\public\static, file:/usr/server/dist/static

file:
    static-dir: D:\Code\GitDownload\rockcls\front\public\static
import org.springframework.beans.factory.annotation.Value;
import org.springframework.context.annotation.Configuration;

import javax.annotation.PostConstruct;
import java.io.File;

/**
 * 文件存储配置类
 * @author HuangSJ
 */
@Configuration
public class FileStorageConfig {

    @Value("${file.static-dir}") // 从配置文件中读取文件夹路径
    private String staticDir;


    @PostConstruct
    public void init() {
        File directory = new File(staticDir);
        if (!directory.exists()) {
            directory.mkdirs(); // 如果文件夹不存在,则创建
        }
    }

    public String getStaticDir() {
        return staticDir;
    }
}
- 问题二
listen:表示监听的前端端口
server_name:服务器ip
charset:字符编码
root:静态文件路径,即dist路径
index:index.html页面,dist文件下会有,前端的页面都会封装为静态页面了
location:
Location是Nginx中的块级指令(block directive),通过配置Location指令块,可以决定客户端发过来的请求URI如何处理(是映射到本地文件还是转发出去)及被哪个location处理。
下面的/image表示80端口发出的/image开头的请求转交给服务器http://server.ip:server.port下的/image处理。比如http://localhost:80/image会被转交给http://localhost:server.post/image处理,如果location /image中的proxy_pass后不加/image,请求会被转交为http://localhost:server.post,可能会出现请求错误(我就是这里被困了两天,哭死~~~)。
第二个location负责把没有被上面的location转交的请求交给前端处理。
详细关于location匹配方式的信息,参考链接nginx的location优先级。
server {
	listen	80;
	server_name	server.ip;

	#charset koi8-r;
	charset utf-8;

	root /usr/server/dist;
	index index.html index.htm;

	location /image {
		proxy_pass http://server.ip:server.port/image;
		proxy_set_header Host $host;
		proxy_set_header X-Real-Ip $remote_addr;
		proxy_set_header X-Forwarded $proxy_add_x_forwarded_for;
	}

	location / {
		try_files $uri $uri/ /index.html;
	}

	# https跨域配置
	add_header Access-Control-Allow-Origin *;
	add_header Access-Control-Allow-Headers X-Requested-With;
	add_header Access-Control-Allow-Methods GET,POST,OPTIONS;
}
- 问题三
根据需要对application.yml中的内容进行重写,使用下述命令启动jar包,相应内容会被替换。
# jar包名字自己替换
nohup java -jar springboot-0.0.1-SNAPSHOT.jar --spring.profiles.active=prod &
spring:
    # 数据源配置
    datasource:
        driver-class-name: com.mysql.cj.jdbc.Driver
        url: jdbc:mysql://server.ip:3306/databaseName?useUnicode=true&characterEncoding=UTF-8&serverTimezone=Asia/Shanghai
        username: root
        password: 123456
    redis:
        host: server.ip

file:
    static-dir: /usr/server/dist/static
- 问题四
在mian.js中引入全局变量hostURL,在vue文件中可以通过this.hostURL调用。
Vue.prototype.hostURL = 'http://localhost:80'
参考文献
[1] 关于服务器部署流程
[2] CentOS7.6安装MYSQL8.0(亲身实践)
[3] Linux安装mysql8.0(官方教程!)
[4] centos安装nginx
[5] nginx的location优先级