Spring-IoC-注解篇
Spring-IoC-注解篇
- pom依赖
- 容器中注册组件常用注解
-
- @Configuration
-
- 示例
- @ComponentScan
-
- 示例
- @Bean
-
- 示例
- @Import
-
- 示例
- @ImportResource
-
- 示例
- @Component和三个衍生注解
-
- 说明
- 总结给容器注册组件方式
- 属性赋值常用注解
-
- @Value
-
- 说明
- @ConfigurationProperties
- @EnableConfigurationProperties
- Environment类
- @PropertySource
-
- 说明
- 示例
- @AliasFor
-
- 说明
- 示例
-
- 通过@AliasFor为其他注解设置值
- 同一个注解中使用@AliasFor
- @AliasFor中不指定value和attribute
- @AliasFor设置别名,反射获取未生效
- 注入时机和设定注入条件常用注解
-
- @Order
- @DependsOn
-
- 示例
- @Lazy
-
- 示例
- @Conditional
-
- 条件判断在什么时候执行?
- Spring对配置类处理过程
- 自定义@Conditional使用的3步骤
- 说明
- 示例
- 自动装配的常用注解
-
- @Autowired
-
- 说明
- @Resource
-
- 说明
- @Inject
- @Qualifier
-
- 说明
- @Primary
- 生命周期以及作用范围相关常用注解
-
- @Scope
- @PostConstruct
- @PreDestroy
- 总结创建bean初始化和销毁方式
- @Profile注解的使用
-
- 使用场景分析
- 自定义不同环境的数据源
- 编写配置类
- 编写测试类
-
- 1、代码的方式激活
- 2、与junit整合测试
pom依赖
<dependency>
    <groupId>org.springframeworkgroupId>
    <artifactId>spring-contextartifactId>
    <version>5.3.8version>
dependency>
容器中注册组件常用注解
@Configuration
它是在spring3.0版本之后加入的。此注解是spring支持注解驱动开发的一个标志。表明当前类是spring的一个配置类,作用是替代spring的applicationContext.xml。但其本质就是@Component注解,被此注解修饰的类,也会被存入spring的ioc容器。
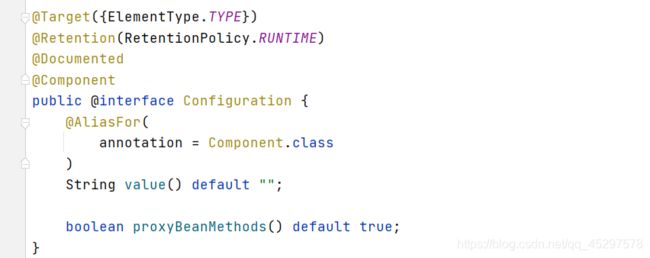
属性:
- value: 用于存入spring的Ioc容器中Bean的id。
- proxyBeanMethods: 指定方法是否应该被代理以强制执行 bean 生命周期行为
使用场景:
在注解驱动开发时,用于编写配置的类,通常可以使用此注解。一般情况下,我们的配置也会分为主从配置,@Configuration一般出现在主配置类上。值得注意的是,如果我们在注解驱动开发时,构建ioc容器使用的是传入字节码的构造函数,此注解可以省略。但是如果传入的是一个包,此注解则不能省略。
示例
/**
在注解驱动的入门案例中,由于没有了applicationContext.xml,
就没法在xml中配置spring创建容器要扫描的包了。
那么,我们自己写的一些类,通过注解配置到ioc容器中也无法实现了。
此时就可以使用此注解来代替spring的配置文件。
**/
@Configuration
public class SpringConfiguration {
}
@ComponentScan
用于指定创建容器时要扫描的包。该注解在指定扫描的位置时,可以指定包名,也可以指定扫描的类。同时支持定义扫描规则,例如包含哪些或者排除哪些。同时,它还支持自定义Bean的命名规则

属性:
-
value:
用于指定要扫描的包。当指定了包的名称之后,spring会扫描指定的包及其子包下的所有类。 -
basePackages:
它和value作用是一样的。 -
basePackageClasses:
指定具体要扫描的类的字节码。 -
nameGenrator:
指定扫描bean对象存入容器时的命名规则。 -
scopeResolver:
用于处理并转换检测到的Bean的作用范围。 -
soperdProxy:
用于指定bean生成时的代理方式。默认是Default,则不使用代理。 -
resourcePattern:
用于指定符合组件检测条件的类文件,默认是包扫描下的 **/*.class -
useDefaultFilters:
是否对带有@Component @Repository @Service @Controller注解的类开启检测,默认是开启的。 -
includeFilters:
自定义组件扫描的过滤规则,用以扫描组件。- FilterType有5种类型:
- ANNOTATION, 注解类型 默认
- ASSIGNABLE_TYPE,指定固定类
- ASPECTJ, ASPECTJ类型
- REGEX,正则表达式
- CUSTOM,自定义类型
- FilterType有5种类型:
-
excludeFilters:
自定义组件扫描的排除规则。 -
lazyInit:
组件扫描时是否采用懒加载 ,默认不开启。
使用场景:
在注解驱动开发时,我们自己编写的类都使用注解的方式进行配置,要想让spring添加到ioc容器中,就需要使用此注解来实现组件的扫描。
细节:
在spring4.3版本之后还加入了一个@ComponentScans的注解,该注解就是支持配置多个@ComponentScan
示例
/**
如果我们加入了dao或者记录日志的工具类,这些使用了@Component或其衍生注解配置的
bean,要想让他们进入ioc容器,就少不了使用@ComponentScan
**/

@Repository("accountDao")
public class AccountDaoImpl implements AccountDao{
	//持久层开发
}

@Configuration
@ComponentScan("cn.zysheep")
public class SpringConfiguration {
}
@Bean
它写在方法上,表示把当前方法的返回值存入spring的ioc容器。同时还可以出现在注解上,作为元注解来使用。
属性:
- name:
用于指定存入spring容器中bean的标识。支持指定多个标识。当不指定该属性时,默认值是当前方法的名称。 - value:
此属性是在4.3.3版本之后加入的。它和name属性的作用是一样的。 - autowireCandidate:
用于指定是否支持自动按类型注入到其他bean中。只影响@Autowired注解的使用。不影响@Resource注解注入。默认值为true,意为允许使用自动按类型注入。 - initMethod:
用于指定初始化方法。 - destroyMethod:
用于指定销毁方法。
示例:
例如,在我们配置JdbcTemplate使用Spring内置数据DriverManagerDataSource时,数据源类是spring-jdbc这个jar包中类,此时我们无法编辑,在上面加注解,此时就可以使用@Bean注解配置,方法的参数的值从容器中获取。
使用场景:
通常情况下,在基于注解的配置中,我们用于把一个类存入spring的ioc容器中,首先考虑的是使用@Component以及他的衍生注解。但是如果遇到要存入容器的Bean对象不是我们写的类,此时无法在类上添加@Component注解,这时就需要此注解了。
示例
@Bean标注的方法创建对象的时候,方法参数的值从容器中获取,相对于在(@Autowired DataSource dataSource)加了@Autowired注解
@Bean("jdbcTemplate")
public JdbcTemplate createJdbcTemplate(DataSource dataSource){
    return new JdbcTemplate(dataSource);
}
@Import
该注解是写在类上的,通常都是和注解驱动的配置类一起使用的。其作用是引入其他的配置类,快速给容器中导入一个组件。使用了此注解之后,可以使我们的注解驱动开发和早期xml配置一样,分别配置不同的内容,使配置更加清晰。同时指定了此注解之后,被引入的类上可以不再使用@Configuration,@Component等注解。

属性:
- value:
用于指定其他配置类的字节码。它支持指定多个配置类。
1、value为普通的类
2、value为@Configuration标注的类
3、value为@CompontentScan标注的类
4、value为ImportBeanDefinitionRegistrar接口类型
5、value为ImportSelector接口类型
6、value为DeferredImportSelector接口类型
关于ImportSelector和ImportBeanDefinitionRegistrar接口
1、ImportSelector接口,返回需要导入的组件的全类名数组。SpringBoot自动配置原理就是使用@Import(AutoConfigurationImportSelector.class)的方式实现ImportSelector接口,向容器中导入了大量的组件。
2、ImportBeanDefinitionRegistrar接口:手动注册bean到容器。
![]()
![]()
![]()
使用场景:
当我们在使用注解驱动开发时,由于配置项过多,如果都写在一个类里面,配置结构和内容将杂乱不堪,此时使用此注解可以把配置项进行分门别类进行配置。
示例
@Configuration
@Import(JdbcConfig.class)
@PropertySource("classpath:jdbc.properties")
@ComponentScan("cn.zysheep")
public class SpringConfiguration {
}

public class JdbcConfig {
    @Value("${jdbc.driver}")
    private String driver;
    @Value("${jdbc.url}")
    private String url;
    @Value("${jdbc.username}")
    private String username;
    @Value("${jdbc.password}")
    private String password;

    @Bean("DevDataSource")
    @Profile("dev")
    public DruidDataSource createDevDataSource(){
        DruidDataSource dataSource = new DruidDataSource();
        dataSource.setDriverClassName(driver);
        dataSource.setUrl(url);
        dataSource.setUsername(username);
        dataSource.setPassword(password);
        dataSource.setMaxActive(10);
        return dataSource;
    }

    @Bean("TestDataSource")
    @Profile("test")
    public DruidDataSource createTestDataSource(){
        DruidDataSource dataSource = new DruidDataSource();
        dataSource.setDriverClassName(driver);
        dataSource.setUrl("jdbc:mysql://localhost:3306/spring_test");
        dataSource.setUsername(username);
        dataSource.setPassword(password);
        dataSource.setMaxActive(50);
        return dataSource;
    }

    @Bean("ProdDataSource")
    @Profile("prod")
    public DruidDataSource createProduceDataSource(){
        DruidDataSource dataSource = new DruidDataSource();
        dataSource.setDriverClassName(driver);
        dataSource.setUrl("jdbc:mysql://localhost:3306/spring_prod");
        dataSource.setUsername(username);
        dataSource.setPassword(password);
        dataSource.setMaxActive(100);
        return dataSource;
    }
}
@ImportResource
@ImportResource注解用于导入Spring的配置文件,让配置文件里面的内容生效;(就是以前写的springmvc.xml、applicationContext.xml)。
与@Import一样,此注解提供类似于Spring XML 中的元素的功能。它通常用于将 @Configuration类设计为由 AnnotationConfigApplicationContext引导,但仍然需要一些 XML功能(如命名空间)时
示例
bean.xml
<beans xmlns="http://www.springframework.org/schema/beans"
       xmlns:xsi="http://www.w3.org/2001/XMLSchema-instance"
       xmlns:task="http://www.springframework.org/schema/task"
       xsi:schemaLocation="
       http://www.springframework.org/schema/beans
       http://www.springframework.org/schema/beans/spring-beans.xsd">

    <bean id="person" class="cn.zysheep.entity.Person">
        <property name="age" value="20"/>
        <property name="username" value="zysheep"/>
    bean>

beans>
DIConfig配置类
@ImportResource("classpath:bean.xml")
@Configuration
@ComponentScan(basePackages = "cn.zysheep.di")
public class DIConfig {
}
DITest测试类
public class DITest {
    public static void main(String[] args) {
        AnnotationConfigApplicationContext applicationContext =
                new AnnotationConfigApplicationContext(DIConfig.class);

        Person person = applicationContext.getBean(Person.class);
        System.out.println(person);
    }
}
@Component和三个衍生注解
@Component

@Controller

@Service
@Repository

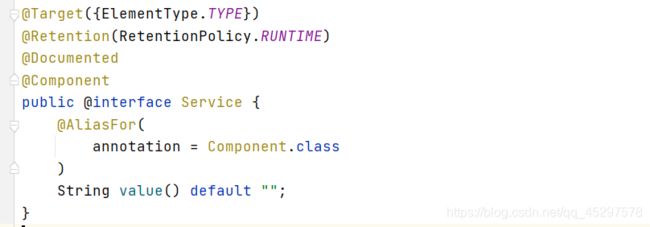
这四个注解都是用于修饰类的。是用于把当前类创建一个对象,存入spring的ioc容器中。在实例化时,首选默认无参构造函数。同时支持带参构造,前提是构造函数的参数依赖必须要有值。否则抛异常
说明
属性:
	value:
		用于指定存入容器时bean的id。当不指定时,默认值为当前类的名称。
使用场景:
当我们需要把自己编写的类注入到Ioc容器中,就可以使用以上四个注解实现。以上四个注解中@Component注解通常用在非三层对象中。而@Controller,@Service,@Repository三个注解一般是针对三层对象使用的,提供更加精确的语义化配置。
需要注意的是,spring在注解驱动开发时,要求必须先接管类对象,然后会处理类中的属性和方法。如果类没有被spring接管,那么里面的属性和方法上的注解都不会被解析。
总结给容器注册组件方式
1、包扫描(@ComponentScan)+组件标记注解(@Component、@Controller、@Service、@Repository)
2、使用 @Configuration与@Bean 注解(导入的第三方包里面的组件)
3、@Import(快速给容器中导入一个组件)
- @Import(要导入到容器中的组件);容器中就会自动注册这个组件,id默认是全类名
- 实现ImportSelector接口: 返回需要导入的组件的全类名数组
- 实现ImportBeanDefinitionRegistrar接口:手动注册bean到容器中
4、实现Spring提供的FactoryBean接口(工厂Bean)
- 默认获取的是工厂bean调用getObject创建的对象
- 要获取工厂Bean本身,需要使用getBean(“&组件id”),给组件id前面加一个&,如
application.getBean("&colorFactoryBean")
测试实现Spring提供的FactoryBean接口给容器注册组件
1、创建GirlFriendFactoryBean类实现FactoryBean接口,重写方法

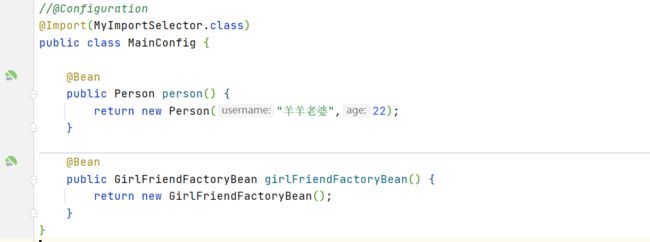
2、向容器中注册GirlFriendFactoryBean组件
3、查看容器中GirlFriendFactoryBean的组件类型
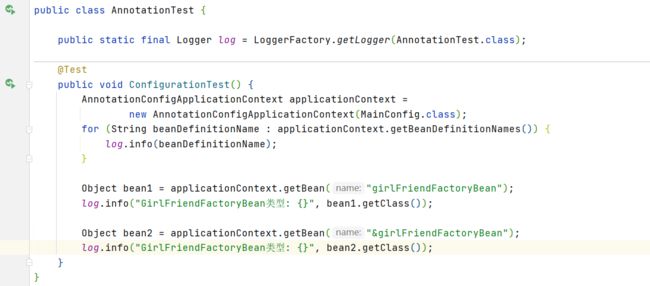
4、GirlFriendFactoryBean的组件类型为GirlFriendFactory

属性赋值常用注解
@Value
1、用于注入基本类型和String类型的数据。
2、它支持使用spring的EL表达式#{}
3、也可以通过${} 的方式获取配置文件中的数据。配置文件支持properties,xml和yml文件。前提必须导入配置文件,一般和@PropertySource结合使用

说明
属性:
- value:
指定注入的数据或者spring的el表达式。
使用场景:
在实际开发中,像连接数据库的配置,发送邮件的配置等等,都可以使用配置文件配置起来。此时读取配置文件就可以借助spring的el表达式读取。
application.yml
person:
  lastName: [email protected]
  url: /user/get,/user/save,/person/get,/person/save
Person实体类中必须要加上 @Component ,使这个类注入到 IOC 容器中,否则 @Value注解不生效
@Component   //必须把类加到Spring容器中被管理
public class Person {
    /**
     * 1、用于注入基本类型和String类型的数据。
     * 2、它支持使用spring的EL表达式`#{}`
     * 3、也可以通过`${} `的方式获取配置文件中的数据。配置文件支持properties,xml和yml文件。前提必须导入配置文件,一般和`@PropertySource`结合使用
     */
    @Value("${person.last-name}")
    private String lastName;
    @Value("#{11*2}")
    private Integer age;
    @Value("true")
    private Boolean boss;

    // ${} 和 #{} 一起使用
    @Value("#{'${person.url}'.split(',')}")
	private List<String> url;
}
@ConfigurationProperties
类上添加@Validated注解,实现JSR303校验
@ConfigurationProperties支持JSR303数据校验,@Value不支持JSR303数据校验。
如果一个类只配置了 @ConfigurationProperties 注解,而没有使用 @Component 注解将该类加入到 IOC 容器中,那么它就不能完成 application.yml配置文件和 Java Bean的数据绑定
application.yml
person:
  lastName: [email protected]
  age: 18
  boss: true
Person实体类中必须要加上 @Component ,使这个类注入到 IOC 容器中
@Data
@Component   //必须把类加到Spring容器中被管理
@ConfigurationProperties(prefix = "person")
@Validated
public class Person {

    //lastName必须是邮箱格式
    @Email
    private String lastName;
    private Integer age;
    private Boolean boss;
}
PersonController
@RestController
@RequiredArgsConstructor
public class PersonController {

    final Person person;

    @GetMapping("/getPerson")
    public String testProperties() {
        return person.toString();
    }
}

注意: 属性不要以isXXX开头,因为实体映射生成的get/set方法会把is去掉,导致set注入的属性值为空
@EnableConfigurationProperties
@EnableConfigurationProperties注解的作用是:让使用了 @ConfigurationProperties 注解的类生效,并且将该类注入到 IOC 容器中,交由 IOC 容器进行管理
实体类有了@EnableConfigurationProperties 注解之后该实体类就不需要加上 @Component 注解了
@Data
// @Component
@ConfigurationProperties(prefix = "person")
@Validated
public class Person {

    //lastName必须是邮箱格式
    @Email
    private String lastName;
    private Integer age;
    private Boolean boss;
}
PersonController有了@EnableConfigurationProperties 注解之后该实体类就不需要加上 @Component 注解了
@RestController
@RequiredArgsConstructor
@EnableConfigurationProperties(Person.class)
public class PersonController {

    final Person person;

    @GetMapping("/getPerson")
    public String testProperties() {
        return person.toString();
    }
}
Environment类
注入Environment 类,getProperty()方法获取配置
import org.springframework.core.env.Environment;

@Configuration
public class RedissonConfig {

    @Autowired
    private Environment env;

    /**
     * Redisson客户端注册
     * 单机模式
     */
    @Bean(destroyMethod = "shutdown")
    public RedissonClient createRedissonClient() {
        Config config = new Config();
        SingleServerConfig singleServerConfig = config.useSingleServer();
        singleServerConfig.setAddress("redis://" + env.getProperty("spring.redis.host") + ":" + env.getProperty("spring.redis.port"));
        singleServerConfig.setTimeout(Integer.valueOf(env.getProperty("redisson.timeout")));
        return Redisson.create(config);
    }
}
@PropertySource
用于指定读取资源文件的位置。注意,它不仅支持properties,也支持xml文件,并且通过YAML解析器,配合自定义PropertySourceFactory实现解析yml配置文件。

说明
属性:
- name:
指定资源的名称。如果没有指定,将根据基础资源描述生成。 - value:
指定资源的位置。可以是类路径,也可以是文件路径。 - ignoreResourceNotFound:
指定是否忽略资源文件有没有,默认是false,也就是说当资源文件不存在时spring启动将会报错。 - encoding:
指定解析资源文件使用的字符集。当有中文的时候,需要指定中文的字符集。 - factory:
指定读取对应资源文件的工厂类,默认的是PropertySourceFactory。
使用场景:
我们实际开发中,使用注解驱动后,xml配置文件就没有了,此时一些配置如果直接写在类中,会造成和java源码的紧密耦合,修改起来不方法。此时一些配置可以使用properties或者yml来配置就变得很灵活方便。
示例
jdbc.properties
# 我们连接数据库的信息如果直接写到JdbcConfig类中,当需要修改时,就面临修改源码
的问题,此时使用@PropertySource和SpringEL表达式,就可以把配置放到properties
文件中了。
jdbc.driver=com.mysql.jdbc.Driver
jdbc.url=jdbc:mysql://localhost:3306/spring_day01
jdbc.username=root
jdbc.password=root
public class JdbcConfig {

    @Value("${jdbc.driver}")
    private String driver;
    @Value("${jdbc.url}")
    private String url;
    @Value("${jdbc.username}")
    private String username;
    @Value("${jdbc.password}")
    private String password;
}
@Configuration
@Import(JdbcConfig.class)
@PropertySource(value = "classpath:jdbc.properties")
@ComponentScan("cn.zysheep")
public class SpringConfiguration {
}
@AliasFor
说明
- AliasFor注解中value和attribute互为别名,随便设置一个,同时会给另外一个设置相同的值。
- annotation:指定具体注解。如果不指定annotation参数的值,那么annotation默认值就是当前注解
示例
通过@AliasFor为其他注解设置值
@B(value = "AliasForTest", aValue = "通过B给A的value参数赋值")
public class AliasForTest {
    public static void main(String[] args) {
        System.out.println(AnnotatedElementUtils.getMergedAnnotation(AliasForTest.class, B.class));
        System.out.println(AnnotatedElementUtils.getMergedAnnotation(AliasForTest.class, A.class));
    }
}

@Retention(RetentionPolicy.RUNTIME)
@Target(ElementType.TYPE)
@interface A {
    String value() default "a";
}

@Retention(RetentionPolicy.RUNTIME)
@Target(ElementType.TYPE)
@A
@interface B{
    String value() default "b";
    @AliasFor(annotation = A.class, value = "value")
    String aValue();
}
重点代码,这个地方使用到了@AliasFor注解
@AliasFor(annotation = A.class, value = "value")
这个相当于给某个注解指定别名,即将B注解中aValue参数作为A中value参数的别名,当给B的aValue设置值的时候,就相当于给A的value设置值,有个前提是@AliasFor注解的annotation参数指定的注解需要加载当前注解上面
同一个注解中使用@AliasFor
@Retention(RetentionPolicy.RUNTIME)
@Target(ElementType.TYPE)
@interface C {
    @AliasFor("v1")
    String v1() default "a";
    @AliasFor("v2")
    String v2() default "a";
}
C注解中的2个参数都设置了@AliasFor,@AliasFor如果不指定annotation参数的值,那么annotation默认值就是当前注解,所以上面2个属性互为别名,当给v1设置值的时候也相当于给v2设置值,当给v2设置值的时候也相当于给v1设置值。
@AliasFor中不指定value和attribute
当@AliasFor中不指定value或者attribute的时候,自动将@AliasFor修饰的参数作为value和attribute的值,如下@AliasFor注解的value参数值为name
@Target(ElementType.TYPE)
@Retention(RetentionPolicy.RUNTIME)
@A
@interface B { //@1
    @AliasFor(annotation = A.class) //@5
    String name() default "b";//@2
}
实践: Controller层每次都需要@RestController、@RequestMapping,能否自定义Controller层组合注解@WebUrl
@Target({ElementType.TYPE})
@Retention(RetentionPolicy.RUNTIME)
@RestController
@RequestMapping
public @interface WebUrl {
    @AliasFor(
            annotation = RequestMapping.class
    )
    String[] value() default {};
}
@AliasFor设置别名,反射获取未生效
@AliasFor 是 一个注解,用来给注解的字段定义别名,这样别名的变量会被赋予一样的值
@Target(ElementType.METHOD)
@Retention(RetentionPolicy.RUNTIME)
@Documented
public @interface JLock{
    @AliasFor("name")
    String value() default "";

    /**
     * 命名
     */
    @AliasFor("value")
    String name() default "";
}
那么,@JLock("#username")和@JLock(name = "#username")和@JLock(value="#username")这三者都是等价的。value 和 name 都是"#username"。
但是注意,如下这样调用是取不到别名的效果的
JLock jLock = method.getAnnotation(JLock.class);
因为@AliasFor是spring的特殊注解!不是Java原生支持的,因此要用Spring的工具类取值!!!
改成如下即可:
JLock jLock = AnnotationUtils.getAnnotation(method, JLock.class);
注入时机和设定注入条件常用注解
@Order
注解@Order或者接口Ordered的作用是定义Spring IOC容器中Bean的执行顺序的优先级,而不是定义Bean的加载顺序,Bean的加载顺序不受@Order或Ordered接口的影响;


- 注解可以作用在类(接口、枚举)、方法、字段声明(包括枚举常量);
- 注解有一个int类型的参数,可以不传,默认是最低优先级;
- 通过常量类的值我们可以推测参数值越小优先级越高;
@DependsOn
用于指定某个类的创建依赖的bean对象先创建。spring中没有特定bean的加载顺序,使用此注解则可指定bean的加载顺序。(在基于注解配置中,是按照类中方法的书写顺序决定的)

属性:
- value:
用于指定bean的唯一标识。被指定的bean会在当前bean创建之前加载。
使用场景:
在观察者模式中,分为事件,事件源和监听器。一般情况下,我们的监听器负责监听事件源,当事件源触发了事件之后,监听器就要捕获,并且做出相应的处理。以此为前提,我们肯定希望监听器的创建时间在事件源之前,此时就可以使用此注解。
示例
@Component
public class CustomerListener {

    public CustomerListener(){
        System.out.println("监听器创建了。。。");
    }
}

@Component
@DependsOn("customerListener")
public class Customer {

    public Customer(){
        System.out.println("事件源创建了。。。");
    }
}

// spring配置类
@Configuration
@ComponentScan("cn.zysheep")
public class SpringConfiguration {
}

//测试类
class SpringConfigurationTest {
    public static void main(String[] args) {
        AnnotationConfigApplicationContext applicationContext =
                new AnnotationConfigApplicationContext("cn.zysheep.config");

    }

}
@Lazy
用于指定单例bean对象的创建时机。在没有使用此注解时,单例bean的生命周期与容器相同。但是当使用了此注解之后,单例对象的创建时机变成了第一次使用时创建。注意:这不是延迟加载思想(因为不是每次使用时都创建,只是第一次创建的时机改变了)。

属性:
- value:
指定是否采用延迟加载。默认值为true,表示开启。
使用场景:
在实际开发中,当我们的Bean是单例对象时,并不是每个都需要一开始都加载到ioc容器之中,有些对象可以在真正使用的时候再加载,当有此需求时,即可使用此注解。值得注意的是,此注解只对单例bean对象起作用,当指定了@Scope注解的prototype取值后,此注解不起作用。
示例
@Component
@Lazy
//@Lazy(value = false)
//@Scope("prototype")
public class LazyBean {

    public LazyBean(){
        System.out.println("LazyBean对象创建了");
    }
}

class SpringConfigurationTest {
    public static void main(String[] args) {
        //1.获取容器
        AnnotationConfigApplicationContext applicationContext =
                new AnnotationConfigApplicationContext("cn.zysheep.config");
        //2.根据字节码获取对象
        LazyBean lazyBean = applicationContext.getBean(LazyBean.class);
        System.out.println(lazyBean);
    }

}
注释掉@Lazy,初始化容器,调用构造函数


分开@Lazy注解,只有在使用的时候才再加载
@Conditional
@Conditional注解是从spring4.0才有的,可以用在任何类型或者方法上面,通过@Conditional注解可以配置一些条件判断,当所有条件都满足的时候,被@Conditional标注的目标才会被spring容器处理。
比如可以通过@Conditional来控制bean是否需要注册,控制被@Configuration标注的配置类是需要需要被解析等。
效果就像这段代码,相当于在spring容器解析目标前面加了一个条件判断:
if(@Conditional中配置的多个条件是否都匹配){
	//spring继续处理被@Conditional注解标注的对象
}
- value: 用于提供一个Condition接口的实现类,实现类中需要编写具体代码实现注入的条件。用来表示条件判断的接口,源码如下:
@FunctionalInterface
public interface Condition {
    /**
     * 判断条件是否匹配
     * context:条件判断上下文
     */
    boolean matches(ConditionContext context, AnnotatedTypeMetadata metadata);
}
是一个函数式接口,内部只有一个matches方法,用来判断条件是否成立的,2个参数:
- context:条件上下文,ConditionContext接口类型的,可以用来获取容器中的个人信息
- metadata:用来获取被@Conditional标注的对象上的所有注解信息
可以自定义Condition处理实现类或者使用Spring中的组合注解
@ConditionalOnBean: 当容器中至少存在一个指定name或class的Bean时,进行实例化
	- 处理实现类: OnBeanCondition	@ConditionalOnBean(CacheManager.class)
@ConditionalOnMissingBean: 当容器中指定name或class的Bean都不存在时,进行实例化
	- 处理实现类: OnBeanCondition	@ConditionalOnMissingBean(CacheManager.class)
@ConditionalOnClass	当类路径下至少存在一个指定的class时,进行实例化
	- 处理实现类: OnClassCondition	@ConditionalOnClass({Aspect.class, Advice.class })
@ConditionalOnMissingClass	当容器中指定class都不存在时,进行实例化
	- 处理实现类: OnClassCondition	@ConditionalOnMissingClass("org.thymeleaf.templatemode.TemplateMode")
@ConditionalOnSingleCandidate	当指定的Bean在容器中只有一个,或者有多个但是指定了首选的Bean时触发实例化
	- 处理实现类: OnBeanCondition	@ConditionalOnSingleCandidate(DataSource.class)
@ConditionalOnProperty	当指定的属性有指定的值时进行实例化
	- 处理实现类: OnPropertyCondition @ConditionalOnProperty(prefix = "spring.aop", name = "auto", havingValue = "true", matchIfMissing = true)
	- 表明: 如果配置了spring.aop.auto并且值为true时匹配,或者spring.aop.auto没配置时匹配
@ConditionalOnResource	当类路径下有指定的资源时触发实例化
	- 处理实现类: OnResourceCondition	@ConditionalOnResource(resources = "classpath:META-INF/build.properties")
@ConditionalOnExpression	基于SpEL表达式的条件判断,当为true的时候进行实例化
	- 处理实现类: OnExpressionCondition	@ConditionalOnExpression("${log.enable:true}")
@ConditionalOnWebApplication	当项目是一个Web项目时进行实例化
	- 处理实现类: OnWebApplicationCondition	@ConditionalOnWebApplication
@ConditionalOnNotWebApplication	当项目不是一个Web项目时进行实例化
	- 处理实现类: OnWebApplicationCondition	@ConditionalOnNotWebApplication
@ConditionalOnJava	当JVM版本为指定的版本范围时触发实例化
	- 处理实现类: OnJavaCondition	@ConditionalOnJava(ConditionalOnJava.JavaVersion.EIGHT)
@ConditionalOnJndi	在JNDI存在的条件下触发实例化
	- 处理实现类: OnJndiCondition	@ConditionalOnJndi({ "java:comp/TransactionManager"})
都是一个注解对应一个condition处理实现类.拿其中@ConditionalOnBean,@ConditionalOnClass 为例,其类图如下:
![]()
条件判断在什么时候执行?
Spring对配置类的处理主要分为2个阶段:
- 配置类解析阶段:会得到一批配置类的信息,和一些需要注册的bean
- bean注册阶段:将配置类解析阶段得到的配置类和需要注册的bean注册到spring容器中
类中有下面任意注解之一的就属于配置类:
- 类上有
@Compontent注解 - 类上有
@Configuration注解 - 类上有
@CompontentScan注解 - 类上有
@Import注解 - 类上有
@ImportResource注解 - 类中方法上有
@Bean标注的方法
spring中处理这2个过程会循环进行,直到完成所有配置类的解析及所有bean的注册。
Spring对配置类处理过程
整个过程大致的过程如下:
- 通常我们会通过new AnnotationConfigApplicationContext()传入多个配置类来启动
- spring容器spring对传入的多个配置类进行解析
- 配置类解析阶段:这个过程就是处理配置类上面6中注解的过程,此过程中又会发现很多新的配置类,比如@Import导入的一批新的类刚好也符合配置类,而被@CompontentScan扫描到的一些类刚好也是配置类;此时会对这些新产生的配置类进行同样的过程解析
- bean注册阶段:配置类解析后,会得到一批配置类和一批需要注册的bean,此时spring容器会将这批配置类作为bean注册到spring容器,同样也会将这批需要注册的bean注册到spring容器
- 经过上面第3个阶段之后,spring容器中会注册很多新的bean,这些新的bean中可能又有很多新的配置类
- Spring从容器中将所有bean拿出来,遍历一下,会过滤得到一批未处理的新的配置类,继续交给第3步进行处理
- step3到step6,这个过程会经历很多次,直到完成所有配置类的解析和bean的注册
从上面过程中可以了解到:
- 可以在配置类上面加上@Conditional注解,来控制是否需要解析这个配置类,配置类如果不被解析,那么这个配置上面6种注解的解析都会被跳过
- 可以在被注册的bean上面加上@Conditional注解,来控制这个bean是否需要注册到spring容器中
- 如果配置类不会被注册到容器,那么这个配置类解析所产生的所有新的配置类及所产生的所有新的bean都不会被注册到容器
一个配置类被spring处理有2个阶段:配置类解析阶段、bean注册阶段(将配置类作为bean被注册到spring容器)。
如果将Condition接口的实现类作为配置类上@Conditional中,那么这个条件会对两个阶段都有效,此时通过Condition是无法精细的控制某个阶段的,如果想控制某个阶段,比如可以让他解析,但是不能让他注册,此时就就需要用到另外一个接口了:ConfigurationCondition
自定义@Conditional使用的3步骤
1、自定义一个类,实现Condition或ConfigurationCondition接口,实现matches方法
2、在目标对象上使用@Conditional注解,并指定value的指为自定义的Condition类型
3、启动spring容器加载资源,此时@Conditional就会起作用了
说明
使用场景:
当我们在开发时,可能会使用多平台来测试,例如我们的测试数据库分别部署到了linux和windows两个操作系统上面,现在根据我们的工程运行环境选择连接的数据库。此时就可以使用此注解。同时基于此注解引出的@Profile注解,就是根据不同的环境,加载不同的配置信息。
示例
public class JdbcConfig {

    @Value("${jdbc.driver}")
    private String driver;
    @Value("${jdbc.url}")
    private String url;
    @Value("${jdbc.username}")
    private String username;
    @Value("${jdbc.password}")
    private String password;

    /**
     * linux系统注入的数据源
     * @param lDriver
     * @param lUrl
     * @param lUsername
     * @param lPassword
     * @return
     */
    @Bean("dataSource")
    @Conditional(LinuxCondition.class)
    public DataSource createLinuxDataSource(@Value("${linux.driver}") String lDriver,
                                            @Value("${linux.url}")String lUrl,
                                            @Value("${linux.username}")String lUsername,
                                            @Value("${linux.password}")String lPassword){
        DriverManagerDataSource dataSource = new DriverManagerDataSource(lUrl,lUsername,lPassword);
        dataSource.setDriverClassName(lDriver);
        System.out.println(lUrl);
        return dataSource;
    }

    /**
     * windows系统注入的数据源
     * @return
     */
    @Bean("dataSource")
    @Conditional(WindowsCondition.class)
    public DataSource createWindowsDataSource(){
        DriverManagerDataSource dataSource = new DriverManagerDataSource();
        dataSource.setDriverClassName(driver);
        dataSource.setUrl(url);
        dataSource.setUsername(username);
        dataSource.setPassword(password);
        System.out.println(url);
        return dataSource;
    }
}


public class LinuxCondition implements Condition {

    @Override
    public boolean matches(ConditionContext context, AnnotatedTypeMetadata metadata) {
        //获取ioc使用的beanFactory
        ConfigurableListableBeanFactory beanFactory = context.getBeanFactory();
        //获取类加载器
        ClassLoader classLoader = context.getClassLoader();
        //获取当前环境信息
        Environment environment = context.getEnvironment();
        //获取bean定义的注册类
        BeanDefinitionRegistry registry = context.getRegistry();

        //获得当前系统名
        String property = environment.getProperty("os.name");
        //包含Windows则说明是windows系统,返回true
        if (property.contains("Linux")){
            return true;
        }
        return false;
    }
}


public class WindowsCondition implements Condition {

    @Override
    public boolean matches(ConditionContext context, AnnotatedTypeMetadata metadata) {
        //获取ioc使用的beanFactory
        ConfigurableListableBeanFactory beanFactory = context.getBeanFactory();
        //获取类加载器
        ClassLoader classLoader = context.getClassLoader();
        //获取当前环境信息
        Environment environment = context.getEnvironment();

        /**
         * 获取所有系统环境变量
         */
        if(environment instanceof StandardEnvironment){
            StandardEnvironment standardEnvironment = (StandardEnvironment)environment;
            Map<String,Object> map = standardEnvironment.getSystemProperties();
            for(Map.Entry<String,Object> me : map.entrySet()){
                System.out.println(me.getKey()+","+me.getValue());
            }
        }

        //获取bean定义的注册类
        BeanDefinitionRegistry registry = context.getRegistry();

        //获得当前系统名
        String property = environment.getProperty("os.name");
        //包含Windows则说明是windows系统,返回true
        if (property.contains("Windows")){
            return true;
        }
        return false;
    }
}
linux.driver=com.mysql.jdbc.Driver
linux.url=jdbc:mysql://localhost:3306/ssm
linux.username=root
linux.password=1234

jdbc.driver=com.mysql.jdbc.Driver
jdbc.url=jdbc:mysql://localhost:3306/spring_day01
jdbc.username=root
jdbc.password=1234
自动装配的常用注解
@Autowired
自动按照类型注入。当ioc容器中有且只有一个类型匹配时可以直接注入成功。当有超过一个匹配时,则使用变量名称(写在方法上就是方法名称)作为bean的id,在符合类型的bean中再次匹配,能匹配上就可以注入成功。当匹配不上时,是否报错要看required属性的取值。

说明
属性:
- required:
是否必须注入成功。默认值是true,表示必须注入成功。当取值为true的时候,注入不成功会报错。
使用场景:
此注解的使用场景非常之多,在实际开发中应用广泛。通常情况下我们自己写的类中注入依赖bean对象时,都可以采用此注解。
@Resource
此注解来源于JSR规范(Java Specification Requests),其作用是找到依赖的组件注入到应用来,它利用了JNDI(Java Naming and Directory Interface Java命名目录接口 J2EE规范之一)技术查找所需的资源。
默认情况下,即所有属性都不指定,它默认按照byType的方式装配bean对象。如果指定了name,没有指定type,则采用byName。如果没有指定name,而是指定了type,则按照byType装配bean对象。当byName和byType都指定了,两个都会校验,有任何一个不符合条件就会报错。
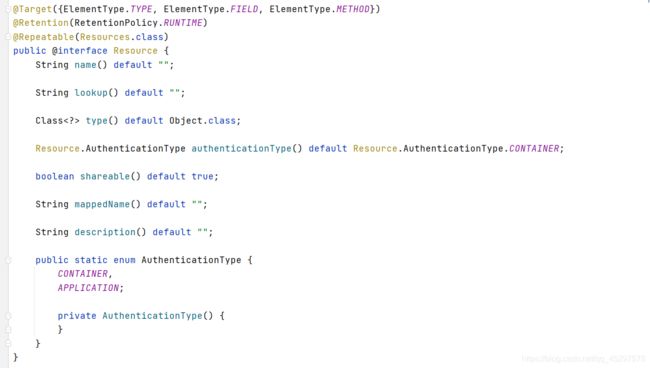
说明
属性:
- name:
资源的JNDI名称。在spring的注入时,指定bean的唯一标识。 - type:
指定bean的类型。 - lookup:
引用指向的资源的名称。它可以使用全局JNDI名称链接到任何兼容的资源。 - authenticationType:
指定资源的身份验证类型。它只能为任何受支持类型的连接工厂的资源指定此选项,而不能为其他类型的资源指定此选项。 - shareable:
指定此资源是否可以在此组件和其他组件之间共享。 - mappedName:
指定资源的映射名称。 - description:
指定资源的描述。
使用场景:
当我们某个类的依赖bean在ioc容器中存在多个的时候,可以使用此注解指定特定的bean对象注入。当然我们也可以使用@Autowired配合@Qualifier注入。
@Inject
它也是用于建立依赖关系的。和@Resource和@Autowired的作用是一样。
在使用之前需要先导入坐标:
<dependency>
      <groupId>javax.injectgroupId>
      <artifactId>javax.injectartifactId>
      <version>1version>
  dependency>
区别:
| 注解 | 来源 | 装配方式 |
|---|---|---|
| @Autowired | 来源于spring框架自身 | 默认是byType自动装配,当配合了@Qualifier注解之后,由@Qualifier实现byName装配。它有一个required属性,用于指定是否必须注入成功 |
| @Resource | 来源于JSR-250规范 | 在没有指定name属性时是byType自动装配,当指定了name属性之后,采用byName方式自动装配。 |
| @Inject | 来源于JSR-330规范。(JSR330是Jcp给出的官方标准反向依赖注入规范。) | 它不支持任何属性,但是可以配合@Qualifier或者@Primary注解使用。 同时,它默认是采用byType装配,当指定了JSR-330规范中的@Named注解之后,变成byName装配。 |
使用场景:
在使用@Autowired注解的地方,都可以替换成@Inject。它也可以出现在方法上,构造函数上和字段上,但是需要注意的是:因为JRE无法决定构造方法注入的优先级,所以规范中规定类中只能有一个构造方法带@Inject注解
@Qualifier
当使用自动按类型注入时,遇到有多个类型匹配的时候,就可以使用此注解来明确注入哪个bean对象。注意它通常情况下都必须配置@Autowired注解一起使用

说明
属性:
- value:
用于指定bean的唯一标识。
使用场景:
在我们的项目开发中,很多时候都会用到消息队列,我们一ActiveMQ为例。当和spring整合之后,Spring框架提供了一个JmsTemplate对象,它既可以用于发送点对点模型消息也可以发送主题模型消息。如果项目中两种消息模型都用上了,那么针对不同的代码,将会注入不同的JmsTemplate,而容器中出现两个之后,就可以使用此注解注入。当然不用也可以,我们只需要把要注入的变量名称改为和要注入的bean的id一致即可。
@Primary
用于指定bean的注入优先级。被@Primary修饰的bean对象优先注入

使用场景:
当我们的依赖对象,有多个存在时,@Autowired注解已经无法完成功能,此时我们首先想到的是@Qualifier注解指定依赖bean的id。但是此时就产生了,无论有多少个bean,每次都会使用指定的bean注入。但是当我们使用@Primary,表示优先使用被@Primary注解的bean,但是当不存在时还会使用其他的。
生命周期以及作用范围相关常用注解
Bean的生命周期: 创建bean对象--->BeanPostProcessor.postProcessBeforeInitialization--->初始化--->BeanPostProcessor.postProcessAfterInitialization--->销毁
创建bean对象:
- 单实例bean:在容器启动的时候创建对象
- 多实例bean:在每次获取的时候创建对象
BeanPostProcessor.postProcessBeforeInitialization
初始化:对象创建完成,并赋值好,调用初始化方法
BeanPostProcessor.postProcessAfterInitialization
销毁
- 单实例bean:容器关闭的时候销毁
- 多实例bean:容器不会管理
@Scope
属性:
- value:
指定作用范围的取值。在注解中默认值是""。但是在spring初始化容器时,会借助ConfigurableBeanFactory接口中的类成员:String SCOPE_SINGLETON = “singleton/prototype”; - scopeName:
它和value的作用是一样的。 - proxyMode:
它是指定bean对象的代理方式的。指定的是ScopedProxyMode枚举的值- DEFAULT:默认值。(就是NO)
- NO:不使用代理。
- INTERFACES:使用JDK官方的基于接口的代理。
- TARGET_CLASS:使用CGLIB基于目标类的子类创建代理对象。
使用场景:
在实际开发中,我们的bean对象默认都是单例的。通常情况下,被spring管理的bean都使用单例模式来创建。但是也有例外,例如Struts2框架中的Action,由于有模型驱动和OGNL表达式的原因,就必须配置成多例的
@PostConstruct
用于指定bean对象的初始化方法。

使用场景:
在bean对象创建完成后,需要对bean中的成员进行一些初始化的操作时,就可以使用此注解配置一个初始化方法,完成一些初始化的操作。
@PreDestroy
用于指定bean对象的销毁方法。

使用场景:
在bean对象销毁之前,可以进行一些清理操作。
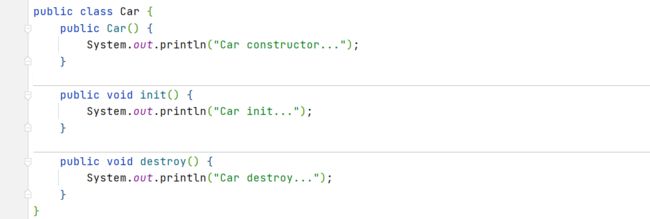
bean初始化方式一:

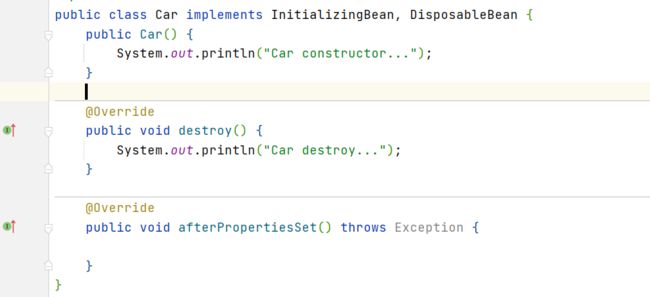
bean初始化方式二:
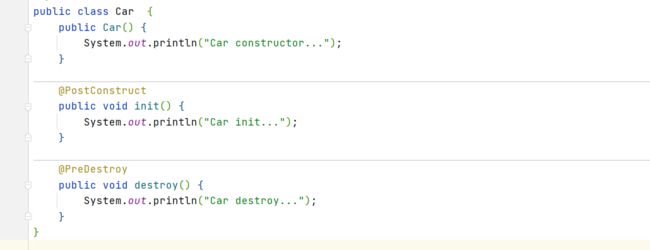
bean初始化方式三:
bean初始化方式四:
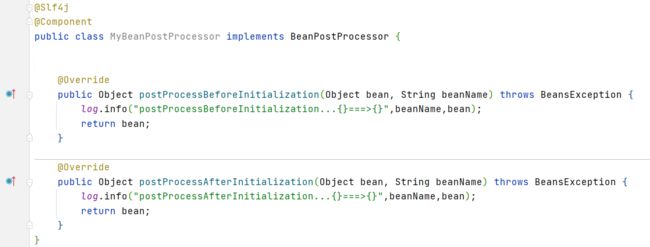
MyBeanPostProcessor必须是容器中的组件

总结创建bean初始化和销毁方式
1、通过@Bean指定init-method和destroy-method方法
2、通过让Bean组件实现InitializingBean(定义初始化逻辑)和DisposableBean(定义销毁逻辑)接口
3、通过使用JSR250注解@PostConstruct(用于指定bean对象的初始化方法)和@PreDestroy(用于指定bean对象的销毁方法)
4、通过实现BeanPostProcessor bean后置处理器接口,在Bean初始化前后进行一些处理工作
postProcessBeforeInitialization: 在bean初始化之前工作postProcessAfterInitialization: 在bean初始化之后工作
@Profile注解的使用
使用场景分析
@Profile注解是spring提供的一个用来标明当前运行环境的注解。我们正常开发的过程中经常遇到的问题是,开发环境是一套环境,测试是一套环境,线上部署又是一套环境。这样从开发到测试再到部署,会对程序中的配置修改多次,尤其是从测试到上线这个环节,让测试的也不敢保证改了哪个配置之后能不能在线上运行。为了解决上面的问题,我们一般会使用一种方法,就是针对不同的环境进行不同的配置,从而在不同的场景中跑我们的程序。
而spring中的@Profile注解的作用就体现在这里。在spring使用DI来注入的时候,能够根据当前制定的运行环境来注入相应的bean。最常见的就是使用不同的DataSource了。
自定义不同环境的数据源
jdbc.properties
# 我们连接数据库的信息如果直接写到JdbcConfig类中,当需要修改时,就面临修改源码的问题,此时使用@PropertySource和SpringEL表达式,就可以把配置放到properties文件中了。
jdbc.driver=com.mysql.jdbc.Driver
jdbc.url=jdbc:mysql://localhost:3306/spring_dev
jdbc.username=root
jdbc.password=root
public class JdbcConfig {
    @Value("${jdbc.driver}")
    private String driver;
    @Value("${jdbc.url}")
    private String url;
    @Value("${jdbc.username}")
    private String username;
    @Value("${jdbc.password}")
    private String password;

    @Bean("DevDataSource")
    @Profile("dev")
    public DruidDataSource createDevDataSource(){
        DruidDataSource dataSource = new DruidDataSource();
        dataSource.setDriverClassName(driver);
        dataSource.setUrl(url);
        dataSource.setUsername(username);
        dataSource.setPassword(password);
        dataSource.setMaxActive(10);
        return dataSource;
    }

    @Bean("TestDataSource")
    @Profile("test")
    public DruidDataSource createTestDataSource(){
        DruidDataSource dataSource = new DruidDataSource();
        dataSource.setDriverClassName(driver);
        dataSource.setUrl("jdbc:mysql://localhost:3306/spring_test");
        dataSource.setUsername(username);
        dataSource.setPassword(password);
        dataSource.setMaxActive(50);
        return dataSource;
    }

    @Bean("ProdDataSource")
    @Profile("prod")
    public DruidDataSource createProduceDataSource(){
        DruidDataSource dataSource = new DruidDataSource();
        dataSource.setDriverClassName(driver);
        dataSource.setUrl("jdbc:mysql://localhost:3306/spring_prod");
        dataSource.setUsername(username);
        dataSource.setPassword(password);
        dataSource.setMaxActive(100);
        return dataSource;
    }
}
编写配置类
@Import(JdbcConfig.class)
@PropertySource("classpath:jdbc.properties")
public class SpringConfiguration {
}
编写测试类
1、代码的方式激活
public class AnnotationTest {

    public static final Logger log = LoggerFactory.getLogger(AnnotationTest.class);

    @Test
    public void ConfigurationTest() {
        // 1. 创建一个无参的applicationContext对象
        AnnotationConfigApplicationContext applicationContext =
                new AnnotationConfigApplicationContext();
        // 2. 设置需要激活的环境
        applicationContext.getEnvironment().setActiveProfiles("dev", "test");
        // 3. 注册主配置类
        applicationContext.register(MainConfig.class);
        // 4. 启动刷新容器
        applicationContext.refresh();

        // 根据类型获取容器中bean的名称
        String[] beanNamesForType = applicationContext.getBeanNamesForType(DataSource.class);
        for (String beanDefinitionName : beanNamesForType) {
            log.info("beanDefinitionName==> {}", beanDefinitionName);
        }
    }
}
2、与junit整合测试
添加测试依赖
<dependency>
     <groupId>org.springframeworkgroupId>
     <artifactId>spring-testartifactId>
 dependency>

 <dependency>
     <groupId>junitgroupId>
     <artifactId>junitartifactId>
     <scope>testscope>
 dependency>
@RunWith(SpringJUnit4ClassRunner.class)
// junit提供的注解
@ContextConfiguration(classes = SpringConfiguration.class)
// spring-test提供的注解
@ActiveProfiles("test")
@Slf4j
public class SpringProfileTest {

    @Autowired
    private DruidDataSource druidDataSource;

    @Test
    public void testProfile() throws SQLException {
        log.info("druidDataSource==> {}", druidDataSource.getConnection());
    }
}


