Linux 进程调度【1】- Linux 里进程阻塞是如何实现的(等待&工作队列)
文章目录
- 前言
- 一、Linux编程中的阻塞、睡眠、挂起是怎么回事
-
- 1.1 内核源码看
- 二、误区一: 进程阻塞消耗CPU资源
- 三、CPU 的时间片轮转机制
- 四、工作队列和等待队列
-
- 4.1 工作队列
-
- 4.1.1 什么是工作队列?
- 4.1.2 同是底半部的实现,与softirq&tasklet微线程的比较
- 4.1.3 什么情况下使用tasklet&软中断,以及工作队列呢?
- 4.1.4 内核线程和工作队列的关系?
- 4.1.5 如何使用工作队列?
- 4.1.6 工作队列的组织架构
- 4.2 等待队列
- 五、误区二:阻塞进程不消耗系统资源
- 六、调度会用到中断吗?pendSV的特性?
- 七、linux中阻塞型读写过程,Linux驱动:阻塞式读写测试
- 总结
前言
以下文章要解决的问题:
- Linux编程中的阻塞是怎么回事?
- Linux编程中的阻塞是怎么实现的?
- 进程的阻塞和线程的阻塞的区别?
- 阻塞之后是如何被唤醒的?
【linux kernel】linux内核如何唤醒线程 - 内核是如何识别被阻塞的线程的,保存了什么?
一、Linux编程中的阻塞、睡眠、挂起是怎么回事
阻塞使用等待队列实现,睡眠使用schedule_timeout主动放弃CPU,
首先这些术语都是对于线程来说的。对线程的控制就好比你控制了一个雇工为你干活。你对雇工的控制是通过编程来实现的。
挂起线程的意思就是你对主动对雇工说:“你睡觉去吧,用着你的时候我主动去叫你,然后接着干活”。
使线程睡眠的意思就是你主动对雇工说:“你睡觉去吧,某时某刻过来报到,然后接着干活”。
线程阻塞的意思就是,你突然发现,你的雇工不知道在什么时候没经过你允许,自己睡觉了,但是你不能怪雇工,因为本来你让雇工扫地,结果扫帚被偷了或被邻居家借去了,你又没让雇工继续干别的活,他就只好睡觉了。至于扫帚回来后,雇工会不会知道,会不会继续干活,你不用担心,雇工一旦发现扫帚回来了,他就会自己去干活的。因为雇工受过良好的培训。这个培训机构就是操作系统。
1.1 内核源码看
- tty_read
static ssize_t n_tty_read(struct tty_struct *tty, struct file *file,
			 unsigned char __user *buf, size_t nr)
{
	struct n_tty_data *ldata = tty->disc_data;
	unsigned char __user *b = buf;
	DEFINE_WAIT_FUNC(wait, woken_wake_function);
	int c, done;
	int minimum, time;
	ssize_t retval = 0;
	long timeout;
	int packet;
	size_t tail;

	c = job_control(tty, file);
	if (c < 0)
		return c;

	/*
	 *	Internal serialization of reads.
	 */
	if (file->f_flags & O_NONBLOCK) { /*判断是否式阻塞方式*/
		if (!mutex_trylock(&ldata->atomic_read_lock))
			return -EAGAIN;
	} else {
		if (mutex_lock_interruptible(&ldata->atomic_read_lock))
			return -ERESTARTSYS;
	}

	down_read(&tty->termios_rwsem);

	minimum = time = 0;
	timeout = MAX_SCHEDULE_TIMEOUT;
	......

	packet = tty->packet;
	tail = ldata->read_tail;

	add_wait_queue(&tty->read_wait, &wait);/*当前任务放入等待队列*/
	while (nr) {
			......
		if (!input_available_p(tty, 0)) {/*判断是否缓冲有数据*/
			if (done) {
				retval = -EIO;
				break;
			}
			......
			if (!timeout)
				break;
			if (file->f_flags & O_NONBLOCK) {/*没有数据且不阻塞退出循环*/
				retval = -EAGAIN;
				break;
			}
			if (signal_pending(current)) {/*阻塞且没有数据等待信号*/
				retval = -ERESTARTSYS;
				break;
			}
			up_read(&tty->termios_rwsem);

			timeout = wait_woken(&wait, TASK_INTERRUPTIBLE,
					     timeout);			/*等待时间结束 则继续检查是否有数据*/

			down_read(&tty->termios_rwsem);
			continue;
		}
		...... /*有数据则读取*/
	}
	......
	remove_wait_queue(&tty->read_wait, &wait);/*读完删除等待*/

	return retval;
}

/*
 * DEFINE_WAIT_FUNC(wait, woken_wake_func);
 *
 * add_wait_queue(&wq, &wait);
 * for (;;) {
 *     if (condition)
 *         break;
 *
 *     p->state = mode;				condition = true;
 *     smp_mb(); // A				smp_wmb(); // C
 *     if (!wait->flags & WQ_FLAG_WOKEN)	wait->flags |= WQ_FLAG_WOKEN;
 *         schedule()				try_to_wake_up();
 *     p->state = TASK_RUNNING;		    ~~~~~~~~~~~~~~~~~~
 *     wait->flags &= ~WQ_FLAG_WOKEN;		condition = true;
 *     smp_mb() // B				smp_wmb(); // C
 *						wait->flags |= WQ_FLAG_WOKEN;
 * }
 * remove_wait_queue(&wq, &wait);
 *
 */
long wait_woken(wait_queue_t *wait, unsigned mode, long timeout)
{
	set_current_state(mode); /* A */
	/*
	 * The above implies an smp_mb(), which matches with the smp_wmb() from
	 * woken_wake_function() such that if we observe WQ_FLAG_WOKEN we must
	 * also observe all state before the wakeup.
	 */
	if (!(wait->flags & WQ_FLAG_WOKEN) && !is_kthread_should_stop())
		timeout = schedule_timeout(timeout);
	__set_current_state(TASK_RUNNING);

	/*
	 * The below implies an smp_mb(), it too pairs with the smp_wmb() from
	 * woken_wake_function() such that we must either observe the wait
	 * condition being true _OR_ WQ_FLAG_WOKEN such that we will not miss
	 * an event.
	 */
	set_mb(wait->flags, wait->flags & ~WQ_FLAG_WOKEN); /* B */

	return timeout;
}
- sleep
/** Sleep for an indicated number of seconds (for use in kernel mode).
 *  x - the number of seconds to sleep.
 */
#define SLEEP(x)					     \
	do { __set_current_state(TASK_INTERRUPTIBLE);        \
		schedule_timeout((x)*HZ);		     \
	} while (0)
二、误区一: 进程阻塞消耗CPU资源
以前认为进程阻塞是不好的,总会将默认阻塞的I/O设置为非阻塞的I/O,这样程序不会一直等待事件的到来。
其实对于CPU来说,阻塞当前进程,就会有时间运行其他进程,不浪费资源。
那么,进程被阻塞之后,CPU会立马执行别的进程吗?CPU还会回来尝试运行被阻塞的进程吗?这些问题都会影响系统的效率
三、CPU 的时间片轮转机制
单CPU为了实现程序的并发执行,采取了最简单,最古老,使用范围最广的时间片轮转机制。也就是在时间片使用完的时候,发现还有进程在执行,则会剥夺当前进程的CPU使用权分配给其他的进程,但是在时间片使用完之前,当前进程被阻塞或者结束,CPU当即进行切换。
但是,由于时间片的间隔时间为5ms或者100ms,人是无法感觉到进程切换的卡顿的。
所以我们就知道了,进程被阻塞之后,会立即运行其他的进程。
四、工作队列和等待队列
- 接下来分析,CPU还会回来尝试运行被阻塞的进程吗?
如图内核中维护一个工作队列,因为时间片轮询的作用,会在进程A,B,C等多个进程之间轮询的跑,这就是进程调度了
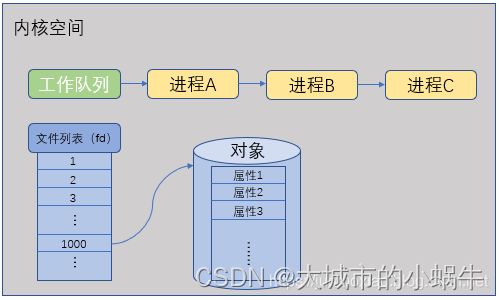
现在假设进程A中某个对象调用了某个方法,引起了进程A的阻塞,内核立刻将进程A从工作队列中移除,同时在该对象中创建等待队列,并加入到等待队列项中。

由上可知,进程A被提出在调度之外,不再受到调度子系统的控制,这就是我们常说的,进程被挂起。这里体现了进程挂起和阻塞的关系。阻塞是人为的动作,主动调用阻塞方法,让程序停下来某一位置。而挂起是阻塞的实现方式。 - 如何唤醒被阻塞的程序?
当这个对象受到某种“刺激”(某事件触发)之后, 操作系统将该对象等待队列上的进程重新放回到工作队列上就绪,等待时间片轮转到该进程
受到的是什么刺激?如何受到刺激?(将来补充)
4.1 工作队列
4.1.1 什么是工作队列?
工作队列是区别于软中断和tasklet微线程的一种将任务推后执行的方式,工作队列将任务推后执行其实是将任务交给了内核线程去执行。正因为是线程执行,所以任务是执行在进程的上下文中,重要的是工作队列可以被重新调度甚至睡眠。
4.1.2 同是底半部的实现,与softirq&tasklet微线程的比较
相同点:都是可以底半部的方式。与tasklet一样,工作队列只能运行在一个cpu上。
不同点:
触发时机不同:软中断和tasktlet归根结底是运行在中断的上下文中。工作队列是可以被调度的运行在进程的上下文中。
运行条件不同:软中断和takslet运行在本地中断打开的情况下运行的,所以仍然不能有运行可能会导致程序休眠或者延时的动作。
4.1.3 什么情况下使用tasklet&软中断,以及工作队列呢?
当考虑在中断中获取大量内存,信号量,以及使用阻塞式IO,睡眠,需要一个调度实体的情况下,考虑使用内核线程来推迟执行动作时用工作队列,否则考虑使用tasklet。
4.1.4 内核线程和工作队列的关系?
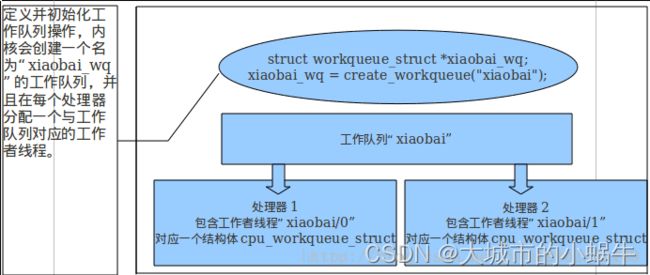
对于每一个工作队列来说,内核总会创建一个守护线程来处理工作队列。也就是说每一个工作队列都有一个与其相对的内核线程。工作时,内核线程轮询的处理这个工作队列上的所有工作节点对应的处理函数(和tasklet的串行执行相似),工作队列由一个workqueue_struct结构体来描述。
4.1.5 如何使用工作队列?
首先明确两个概念:(1)使用内核默认提供的工作队列(2)自己创建工作队列
/*
 * The externally visible workqueue abstraction is an array of
 * per-CPU workqueues:
 */
struct workqueue_struct {
	unsigned int		flags;		/* I: WQ_* flags */

//这个共用体表示该workqueue_struct属于哪个CPU的队列。
	union {
		struct cpu_workqueue_struct __percpu	*pcpu;
		struct cpu_workqueue_struct		*single;
		unsigned long				v;
	} cpu_wq;				/* I: cwq's */
	struct list_head	list;		/* W: list of all workqueues */
//用来连接work_struct的队列头
	struct mutex		flush_mutex;	/* protects wq flushing */
	int			work_color;	/* F: current work color */
	int			flush_color;	/* F: current flush color */
	atomic_t		nr_cwqs_to_flush; /* flush in progress */
	struct wq_flusher	*first_flusher;	/* F: first flusher */
	struct list_head	flusher_queue;	/* F: flush waiters */
	struct list_head	flusher_overflow; /* F: flush overflow list */

	mayday_mask_t		mayday_mask;	/* cpus requesting rescue */
	struct worker		*rescuer;	/* I: rescue worker */

	int			saved_max_active; /* W: saved cwq max_active */
	const char		*name;		/* I: workqueue name */
#ifdef CONFIG_LOCKDEP
	struct lockdep_map	lockdep_map;
#endif
};
workqueue_struct结构体比较复杂,一般没有必要了解所有成员的含义。在workqueue_struct涉及到一个cpu_workqueue_struct结构体,该结构体有什么用呢?
与原来的tasklet一样,一个工作队列也是只能工作在一个CPU上面的,即每一个CPU都有一个工作队列。而cpu_workqueue_sruct就是描述该CPU的工作队列的结构体
/*
 * The per-CPU workqueue.  The lower WORK_STRUCT_FLAG_BITS of
 * work_struct->data are used for flags and thus cwqs need to be
 * aligned at two's power of the number of flag bits.
 */
struct cpu_workqueue_struct {
	struct global_cwq	*gcwq;		/* I: the associated gcwq */
	struct workqueue_struct *wq;		/* I: the owning workqueue ,指向属于该CPU的workqueue_struct结构体*/
	int			work_color;	/* L: current color */
	int			flush_color;	/* L: flushing color */
	int			nr_in_flight[WORK_NR_COLORS];
						/* L: nr of in_flight works */
	int			nr_active;	/* L: nr of active works */
	int			max_active;	/* L: max active works */
	struct list_head	delayed_works;	/* L: delayed works */
};
了解了上面两个结构体之后,我们因该能够大致了解工作队列的工作机制,大体上与tasklet差不多。下面我们就来看一下工作队列最为重要的成员----工作,work_struct。work_struct是工作队列里面的成员,里面会定义该work_struct的处理函数。
struct work_struct {
	atomic_long_t data;
	struct list_head entry;  //指向与其相邻的前后两个work_struct
	work_func_t func;  //该work_struct节点的处理函数。
#ifdef CONFIG_LOCKDEP
	struct lockdep_map lockdep_map;
#endif
};
这些结构被连接成链表。当一个工作者线程被唤醒时,它会执行它的链表上的所有工作。工作被执行完毕,它就将相应的work_struct对象从链表上移去。当链表上不再有对象的时候,它就会继续休眠。
-
使用内核共享工作队列
在linux中,为了方便用户编程,内核提供了一个默认的公共的工作队列(kevent),当内核启动时就创建了一个kevent的工作队列,处于睡眠状态,只有在驱动中调用,schedule_work,此工作队列才被唤醒,执行work_struct中的动作,完毕进入休眠状态。
因此采用共享工作队列,在用户的实现上是非常简单的。
第一步:编写自己的 work_struct 工作函数。
第二步:定义自己的 work_struct 结构体。
第三步:初始化work_struct结构体,使工作函数地址指向work_struct ->func
第四步:可以在适当位置使用schedule_work函数完成向系统工作队列添加自己的work_struct -
采用自定义动作队列
采用共享工作队列会有一个弊端,因为毕竟共享队列采用的是kevent线程,系统里面的其它工作也会使用到该共享队列。如果我们在该工作队列加入太多耗时的程序,无疑会降低系统性能,因此一般在驱动程序中,我们会偏向于使用自定义工作队列,采用自定义工作队列也比较简单,相对于共享工作队列,这里多了一个创建自定义工作的函数,即:create_queue函数(注意这个函数会在每一个CPU上都创建一个一个工作队列和相应的线程,这未免太过于消耗资源,因此我们还可以采用在某一指定的CPU上创建一个工作队列,例如采用create_singlethread_workqueue函数,就会在编号为第一个的CPU上创建内核线程和工作队列。)对于自定义的工作队列,在这里我们不能使用schedule_struct函数将work_struct添加进工作队列了,这是因为schedule_work函数只能往共享工作队列上添加工作节点(work_struct),所以我们必须要采用queue_work 函数。
#include 4.1.6 工作队列的组织架构
组织结构即:workqueue_struct,cpu_workqueue_struct,与work_struct之间的关系。每一个工作队列对应一个workqueue_struct,cpu_workqueue_struct描述了此工作队列对应的cpu,work_struct 对应其上的具体工作任务。


相关API
创建一个队列就会有一个内核线程,一般不要轻易创建队列
位于进程上下文--->可以睡眠
定义:
	struct work_struct work;

初始化:
	INIT_WORK(struct work_struct *work, void (*func)(struct work_struct *work));

定义并初始化:
	DECLARE_WORK(name, void (*func)(struct work_struct *work));

===========================================================
共享队列:
调度:
	int schedule_work(struct work_struct *work);
	返回1成功, 0已经添加在队列上

延迟调度:
	int schedule_delayed_work(struct work_struct *work, unsigned long delay);

===========================================================
自定义队列:
创建新队列和新工作者线程:
	struct workqueue_struct *create_workqueue(const char *name);

调度指定队列:
	int queue_work(struct workqueue_struct *wq, struct work_struct *work);

延迟调度指定队列:
	int queue_delayed_work(struct workqueue_struct *wq,
			struct work_struct *work, unsigned long delay);
销毁队列:
	void destroy_workqueue(struct workqueue_struct *wq);
4.2 等待队列
- 什么是等待队列?
- 如何使用等待队列?
- 如何加入到等待队列
- 等待队列是如何被唤醒的?
五、误区二:阻塞进程不消耗系统资源
系统资源不单指的是CPU,还包括内存,io,磁盘,进程只是被阻塞而不是被消灭。仍然会占用内存资源。
六、调度会用到中断吗?pendSV的特性?
七、linux中阻塞型读写过程,Linux驱动:阻塞式读写测试
#include 总结
提示:这里对文章进行总结:
例如:以上就是今天要讲的内容,本文仅仅简单介绍了pandas的使用,而pandas提供了大量能使我们快速便捷地处理数据的函数和方法。