在 el-table 中嵌入 el-checkbox el-input el-upload 多组件,实现复杂业务场景
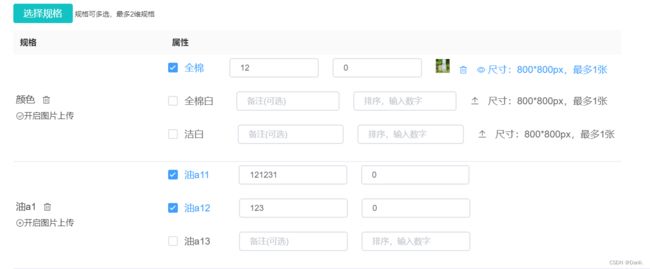
由于业务场景的复杂性,需实现:在 el-table 表格中 嵌入 el-checkbox 多选框 及 el-input 输入框 及 el-upload 上传组件 ,先附上实现效果图。
从图片可以看出其实就是一个规格可以带有多个属性的规格表,实现此效果需涉及到的知识点大概有以下:
- 阻止冒泡
- this.$set() 动态绑定
- 图片上传,预览
- Scoped slot 获取到 table 内部的状态管理数据
- …
首先搭建表格框架(固定两列),这个比较简单
<el-table>
	<el-table-column
         prop=""
         label="规格"
         width="220px">
    </el-table-column>
    <el-table-column
         prop=""
         label="属性"
         width="660px">
    </el-table-column>
</el-table>
由于行数不固定,行内容非普通的静态数据展示,故需用到 slot 来自定义
:data 属性绑定 commodityPropertyList数据,scope 获取 row, column, $index 和 store 等的表格内部数据
实现表格第一列
<el-table
	:data="commodityPropertyList"
	style="width: 100%"
	>
	<el-table-column
         prop=""
         label="规格"
         width="220px">
         	<template slot-scope="scope">
         		<span style="font-size: 14px;">{{scope.row.propertyName}}</span><i style="margin-left: 10px;" class="el-icon-delete" @click="deleteProperty(scope)" ></i>
         		<div style="display: flex;align-items: center;cursor: pointer;" class="property" @click="changeGPicFlag(scope)">
         			<i  v-if="scope.row.gPicFlag == 1" class="el-icon-circle-check"></i>
         			<i class="el-icon-circle-close" v-else></i>
         			<div>开启图片上传</div>
         		</div>
         	</template>
    </el-table-column>
    <el-table-column
         prop=""
         label="属性"
         width="660px">
    </el-table-column>
</el-table>
补充表格第二列
<el-table
	:data="commodityPropertyList"
	style="width: 100%"
	>
	<el-table-column
         prop=""
         label="规格"
         width="220px">
         	<template slot-scope="scope">
         		<span style="font-size: 14px;">{{scope.row.propertyName}}</span><i style="margin-left: 10px;" class="el-icon-delete" @click="deleteProperty(scope)" ></i>
         		<div style="display: flex;align-items: center;cursor: pointer;" class="property" @click="changeGPicFlag(scope)">
         			<i  v-if="scope.row.gPicFlag == 1" class="el-icon-circle-check"></i>
         			<i class="el-icon-circle-close" v-else></i>
         			<div>开启图片上传</div>
         		</div>
         	</template>
    </el-table-column>
    <el-table-column
         prop=""
         label="属性"
         width="660px">
         	<template slot-scope="scope">
         		<el-checkbox-group v-model="checkPropertyList">
         			<el-checkbox v-for="(item1,index) in scope.row.options"   :label="item1" :key="item1.id" :disabled="pageType == 'view'">
         				<div  style="display: flex;justify-content: center;align-items: center;margin-bottom: 20px;">
         					<div style="width: 50%;font-size: 14px;">{{item1.optionValue}}</div>
         					<el-input :disabled="pageType == 'view'" style="margin-right: 20px;" size="mini" v-model="item1.optionAlias" placeholder="备注(可选)"></el-input>
         					<el-input :disabled="pageType == 'view'" size="mini" v-model="item1.optionSort" placeholder="排序,输入数字"></el-input>
         					<span v-if="scope.row.gPicFlag == 1" style="margin-left: 20px;">
         						<div v-if="item1.gPicUrl" style="display: inline;">
         							<el-image ref="preview2"  :preview-src-list="[showgPicUrl]" style="width: 20px;height: 20px;" :src="item1.gPicUrl"></el-image>
         							<i @click.stop.prevent="deleteImage(scope,index)" v-if="pageType != 'view'"  style="margin-left: 10px;font-size: 12px;" class="el-icon-delete" ></i>
         							<i style="margin-left: 10px;font-size: 12px;" @click.stop.prevent="previewImage2(scope,index)" class="el-icon-view"></i>
         						</div>
         						<el-upload v-show="!item1.gPicUrl && pageType != 'view'" ref="upload" class="insert-block"
                                      style="display: inline-block; vertical-align: top; margin-right: 8px;"
                                       action="/api/mdm/upload/image" :limit="1"  accept=".jpg,.jpeg,.png"
                                       :on-success="handleSuccess2" :on-error="handleFormatError"
                                          :file-list="imgFilesListOfOnce" :show-file-list="false">
                                           <i slot="default" @click.stop.prevent="uploadImage(scope,index)" class="el-icon-upload2"></i>
                                 </el-upload>
                                 <span>尺寸:800*800px,最多1张</span>
         					</span>
         				</div>
         			</el-checkbox>
         		</el-checkbox-group>
         	</template>
    </el-table-column>
</el-table>
到此,表格的页面及样式已基本完成,接下来还需处理事件逻辑。
表格第一列事件处理
changeGPicFlag(scope) {
     if(this.pageType == 'view') {
          return
      }
     this.commodityPropertyList.forEach((item,index) => {
          if(index == scope.$index) {
               item.gPicFlag = item.gPicFlag == 1 ? 0 : 1
          }
      })
          this.commodityPropertyList = [...this.commodityPropertyList]

}
表格第二列事件处理
deleteImage(scope,index) {
          this.commodityPropertyList[scope.$index].options[index].gPicUrl = ""
          this.commodityPropertyList = [...this.commodityPropertyList] //实时更新修改的数据
},

previewImage2(scope,index) {
      this.showgPicUrl = this.commodityPropertyList[scope.$index].options[index].gPicUrl
      this.$refs.preview2[0].showViewer = true
},

uploadImage(scope,index) {
      let num = 0
      let list = []
      list = this.commodityPropertyList.filter((item,index) => index < scope.$index)
      list.forEach(item => { num += item.options.length})
       //阻止冒泡到选checkbox
      this.upload2Flag.propertyIndex = scope.$index
      this.upload2Flag.optionsIndex = index
      this.$refs['upload'][num+index].$refs['upload-inner'].handleClick()
},
表格“属性”列由 多选框checkbox、输入框input、 图片上传upload 等组件组成,从代码可看出 checkbox-group 包裹 input等组件,所以当在输入框输入或点击上传图片等操作时,都会触发勾选/取消勾选多选框。这效果不是我们想要的,我们只是想操作上传图片,所以需要在定义事件时加
@click.stop.prevent = 事件名来阻止冒泡(阻止触发勾选操作)
于是又有问题出现了,当在 el-upload 组件加上 @click.stop.prevent = 事件名 时,你会发现,操作点击时不会触发弹出选择文件窗口,这是因为加了阻止冒泡后没有触发到选择文件的操作,这就需要我们自己在事件处理中写逻辑去触发。
1.需要在 el-upload 组件定义 ref
2.用 index 结合 num 找出被点击的那个 el-upload 组件
    uploadImage(scope,index) {
       let num = 0
       let list = []
       list = this.commodityPropertyList.filter((item,index) => index < scope.$index)
       list.forEach(item => { num += item.options.length})
         //阻止冒泡到选checkbox
       this.upload2Flag.propertyIndex = scope.$index
       this.upload2Flag.optionsIndex = index
       this.$refs['upload'][num+index].$refs['upload-inner'].handleClick()//触发选择文件的弹窗
 },
在实现的过程中,我还碰到一个输入框不能输入的问题,我操作输入之后,没有动静,再点击勾选操作时就可以正确显示出来了。于是我猜想了很多种可能并一一去验证
1.el-checkbox 不能包裹其他标签?(从网上搜集到很少有这样复杂地使用多选框)
2.没有加 slot-scope="scope" ?
…
最后在控制台打印后端返回的 commodityPropertyList 数据中发现,其 options 数组下没有 optionAlias 和 optionSort 字段,需要前端这边自己加,最开始我是这样加的
//在commodityPropertyList获取数据的地方
......
this.commodityPropertyList.forEach((group) => {
      if (group.options && group.options.length) {
             group.options.forEach((item) => {
                 item.optionAlias = ""
				 item.optionSort = ""
                  var key = item.propertyCode + ":" + item.optionCode
                  var prop = this.propSpenMap.get(key)
                     if (prop) {
                           group.gPicFlag = prop.gPicFlag == 1 ? 1  : 0
                           propList.push(prop)
                           this.checkPropertyList.push(item)
                     }
             })
        }
})
最后发现还是不可以,于是我尝试 this.$set() 就可以了,是因为 v-model 需要双向绑定,而 this.$set() 则是启用了动态绑定
将上面代码的
item.optionAlias = ""
item.optionSort = ""

改成
this.$set(item,'optionAlias',"")
this.$set(item,'optionSort',"")
