大家来玩WSL(Windows Subsystem for Linux)
文章目录
- (零)前言
- (一)安装
-
- 1.1 安装其他发行版
- (二)主机与网络
-
- 2.1 桥接网络
- 2.2 固定IP地址
- 2.3 改主机名
- 2.4 hosts文件
- (三)启动运行
-
- 3.1 新建用户
- 3.2 默认登录用户
- 3.3 默认启动目录
- 3.4 通过Windows Terminal启动
- 3.5 检查WSL状态
- (四)网络服务
-
- 4.1 安装ssh等
- 4.2 启动服务
- 4.3 在CentOS上我已经不会了
- 4.4 自动运行服务
-
- 4.4.1 Windows下的启动Ubuntu脚本
- 4.4.2 Linux下的启动脚本
- 4.4.3 不要输入密码
- (五)查看WSL资源
-
- 5.1 默认已挂载Windows盘符
- 5.2 限制WSL使用的资源
- (六)闲聊
(零)前言
这不是教程……
随着Windows11发布,WSA(Windows Subsystem for Android)都到来了。还不试试WSL么:)
还有VS2022发布了,Platform Toolset 可以选 WSL2 Toolset。真的不试试么?
什么?你买了VMware Workstation Pro?好吧请自行忽略……
请注意:WSL和其他虚拟机软件冲突,如果你启用了WSL,则VMware虚拟机就不能启动了。
虽然可以临时关闭WSL,但是需要重启生效。重启来重启去,慎重。
(一)安装
现在已经是WSL2啦。
而且微软官方给了一步直接安装的办法:《安装WSL》
默认装好是Ubuntu。
不需要再分步安装组件,升级,安装Linux发行版……等等了。
但是微软可能没有考虑到咱网速那么慢。
所以我取巧,先一键安装:
wsl --install
中途如果发现下载镜像慢,就果断停掉它,再自己去应用商店安装Ubuntu(应用商店快得多)。
也许中途慢和被停掉的是别的东西,那么请参考官方文档:《手动安装WSL》
总之都2022年了,安装完全不是问题。
1.1 安装其他发行版
默认安装Ubuntu以及Windows应用商店里的Linux发行版,都没有任何困难。
由于咱客户装的都是RHEL,那么我们自然该用CentOS的。
但CentOS商店里没有,也不能用官方ISO直接装。
好在有个牛人提供了WSL能装的CentOS项目:在Github上。
注意:他最新的release是CentOS8。
建议用CentOS7,因为8就要不维护了(这个另说了,参见CentOS主页,维护周期,以及CentOS Linux >> Stream区别)。
安装不用说,解压到你指定的目录,执行CentOS7.exe就OK了。
(二)主机与网络
和VMware,VirtualBox等虚拟机不同,WSL是子系统(虽然也是基于HyperV虚拟机)
虽然微软给它独立的IP,但它默认继承了你Windows的主机名,hosts文件。
无法固定的网络环境,以及物理机ping 127.0.0.1都会ping到WSL里面的神奇体验。
2.1 桥接网络
亲,不建议桥接网络哦。
由于WSL现在基于HyperV,确实可以通过修改HyperV的网络配置来实现桥接。
不过重启就不行了,还可能影响正常上网。
所以老老实实的子网吧。
2.2 固定IP地址
但是子网也没有固定的IP地址啊!用起来很不方便!!!
国外某大神说:
既然不能固定它的IP地址,那么换个思路,给它绑定一个固定的新IP吧
我看到讨论的原文,但是忘了记录地址,所以没办法给链接,Sorry。
原理就是给Windows和WSL都增加绑定一个IP地址,可以把这段代码保存到一个批处理文件中,每次计算机重启后,如果你要用WSL,都需要执行一次(管理员权限执行)。
我没改IP,大家抄的也都是这个IP(神奇)。
按照下文,所以你的Windows是192.168.50.88,而WSL是:192.168.50.16。
pause是为了显示可能的错误,而不是一闪而过。
:: Add an IP address in WSL, 192.168.50.16, named eth0:1
wsl -d ubuntu -u root ip addr add 192.168.50.16/24 broadcast 192.168.50.255 dev eth0 label eth0:1

:: Add an IP address in Win10, 192.168.50.88
netsh interface ip add address "vEthernet (WSL)" 192.168.50.88 255.255.255.0

pause
如果是CentOS那么前面那句改一点点(就是名字而已ubuntu vs CentOS7):
:: Add an IP address in WSL, 192.168.50.16, named eth0:1
wsl -d CentOS7 -u root ip addr add 192.168.50.16/24 broadcast 192.168.50.255 dev eth0 label eth0:1
执行完了稍等一下,绑定的IP没那么快,等一下才能访问。
2.3 改主机名
不能正常的用改Linux主机名的方法,改了没用,只能:
- 改Windows的主机名,WSL下也会变(废话,有啥用?)。
- 新建/修改配置文件:/etc/wsl.conf ,加入下面配置。
[network]
hostname=shionlnx
2.4 hosts文件
默认WSL的hosts文件继承自Windows(子系统嘛)。
挺方便的,我们可以在hosts里面把固定的那2个IP,指定主机名:
$shion@shionlnx ~> cat /etc/hosts
# This file was automatically generated by WSL. To stop automatic generation of this file, add the following entry to /etc/wsl.conf:
# [network]
# generateHosts = false
127.0.0.1       localhost
127.0.1.1       shionlnx.localdomain    shionlnx
192.168.168.15  Shion-Haier
192.168.50.16   Shionlnx


# The following lines are desirable for IPv6 capable hosts
::1     ip6-localhost ip6-loopback
fe00::0 ip6-localnet
ff00::0 ip6-mcastprefix
ff02::1 ip6-allnodes
ff02::2 ip6-allrouters
不想它自动生成/etc/hosts,也是修改2.3那个配置文件。
[network]
generateHosts = false
DNS同理,不要自动生成:/etc/resolv.conf,则修改:
[network]
generateResolvConf = false
(三)启动运行
3.1 新建用户
如果你自动安装,或安装的是Ubuntu,那么恭喜你已经新建了一个用户。
但是root用户没有密码,需要自己设置一下。
如果你安装了CentOS,那么你现在就是root……
需要自己建一个普通用户。
普通用户如果需要管理员权限,也需要修改配置,建议加入有管理员权限的组就OK了。
3.2 默认登录用户
如果想改变登录WSL时的默认用户,需要在Windows下执行指令,比如我的:
C:\>ubuntu config --default-user shion
看看完整的帮助:
C:\>ubuntu --help
Launches or configures a Linux distribution.

Usage:
    <no args>
        Launches the user's default shell in the user's home directory.

    install [--root]
        Install the distribuiton and do not launch the shell when complete.
          --root
              Do not create a user account and leave the default user set to root.

    run <command line>
        Run the provided command line in the current working directory. If no
        command line is provided, the default shell is launched.

    config [setting [value]]
        Configure settings for this distribution.
        Settings:
          --default-user <username>
              Sets the default user to <username>. This must be an existing user.

    help
        Print usage information.
3.3 默认启动目录
如果你直接打ubuntu指令,就可以进入wsl并进入用户的home目录。
这个和我们ssh到一台Linux主机是一样的。
C:>ubuntu
顺便,如果你用的指令是:
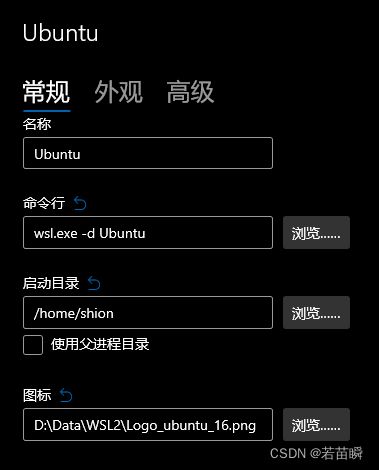
C:>wsl.exe -d Ubuntu
那么进入wsl是OK的,但是你会在Windows下的当前目录(纳尼?)
3.4 通过Windows Terminal启动
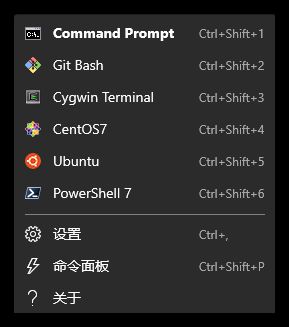
就是Windows终端,一个很方便且挺好看的Win10现代应用。
什么命令行的玩意儿都可以加进去,如果是正常安装Ubuntu,那么里面应该有了此项。

当然,图中我并没有用Linux清一色的企鹅图标,Ubuntu和CentOS的图标是自己设置的。

3.5 检查WSL状态
并不是终端关闭,WSL就会停止运行。
所以需要检查发行版运行情况,比如下面就只有Ubuntu在运行。
C:\>wsl --list --running
Windows Subsystem for Linux Distributions:
Ubuntu (Default)
不管运行没,看装了哪些发行版:
C:\>wsl --list
Windows Subsystem for Linux Distributions:
Ubuntu (Default)
CentOS7
看WSL本身状态(其他不列举了,通过wsl --help看帮助吧):
C:\>wsl --status
Default Distribution: Ubuntu
Default Version: 2

Windows Subsystem for Linux was last updated on 2021-11-27
The Windows Subsystem for Linux kernel can be manually updated with 'wsl --update', but automatic updates cannot occur due to your system settings.
To receive automatic kernel updates, please enable the Windows Update setting: 'Receive updates for other Microsoft products when you update Windows'.
For more information please visit https://aka.ms/wsl2kernel.

Kernel version: 5.10.60.1
(四)网络服务
4.1 安装ssh等
WSL和普通Linux在安装各种软件上并没有区别。
Ubuntu用apt,CentOS用yum,安装JDK环境,安装SSH等服务。此处略过……
4.2 启动服务
但是启动不太常规,不能这样:
$shion@shionlnx ~> systemctl status sshd
System has not been booted with systemd as init system (PID 1). Can't operate.
Failed to connect to bus: Host is down
$shion@shionlnx ~>
Ubuntu只能用:
$shion@shionlnx ~> service ssh status
 * sshd is running
$shion@shionlnx ~>
4.3 在CentOS上我已经不会了
而CentOS嘛,还是指向systemctl了:
PS:下面能运行是做了改动的,并且我在CentOS上还没成功开启telnet……
$shion@Shion-Acer ~> sudo systemctl status sshd
sshd.service - OpenSSH server daemon
    Loaded: loaded (/usr/lib/systemd/system/sshd.service, enabled)
    Active: active (running)
$shion@Shion-Acer ~>
具体改动是参考:《这个项目》
用systemctl.py,代替原有的systemctl执行文件:
下面取得systemctl.py,访问github的curl指令我根本就没成功,文件是另外设法下载的。
mv /usr/bin/systemctl /usr/bin/systemctl.old
curl https://raw.githubusercontent.com/gdraheim/docker-systemctl-replacement/master/files/docker/systemctl.py > /usr/bin/systemctl
chmod +x /usr/bin/systemctl
4.4 自动运行服务
4.4.1 Windows下的启动Ubuntu脚本
在windows下做一个批处理脚本文件来启动Ubuntu。
重启后点击这个脚本,就可以启动Ubuntu了+顺便开启服务。
脚本不建议随Windows系统自动运行,除非你每次开机必开WSL使用。
bat批处理脚本如下:
ubuntu run sudo /etc/init.wsl start
pause
或者一个vbs脚本:
Set ws = CreateObject("Wscript.Shell")
ws.run "ubuntu run sudo /etc/init.wsl start", vbhide
第二个vbs脚本可以无声无息的偷偷执行(报错咋办?)
第一个bat执行后可以看到:
C:\>ubuntu run sudo /etc/init.wsl start
 * Starting OpenBSD Secure Shell server sshd                  [ OK ]
 * Starting internet superserver xinetd                       [ OK ]

C:\>pause
Press any key to continue . . .
4.4.2 Linux下的启动脚本
从上面可以看到实际上调用的是:
/etc/init.wsl
我们编辑它,加入你想启动的服务,比如我这启动了2个:
$shion@shionlnx ~> sudo vim /etc/init.wsl

#! /bin/sh
/etc/init.d/ssh $1
/etc/init.d/xinetd $1
给它执行权限,确认一下有x权限了:
$shion@shionlnx ~> sudo chmod +r /etc/init.wsl
$shion@shionlnx ~> ll /etc/init.wsl
-rwxr-xr-x 1 root root 53 Dec  6 15:54 /etc/init.wsl*
$shion@shionlnx ~>
差不多了吧……
不对!到目前为止,你在Windows下执行bat脚本时,会因为sudo要求你输入密码。
而隐藏窗口的vbs则因为等不到你的密码而失败。
4.4.3 不要输入密码
需要编辑sudoers文件。
$shion@shionlnx ~> sudo vim /etc/sudoers
#靠下的位置加入,避免被覆盖
%sudo   ALL=(ALL) NOPASSWD: /etc/init.wsl
现在应该比较像一台Linux服务器了,用吧:)
(五)查看WSL资源
5.1 默认已挂载Windows盘符
呐,最下面两行,因为我只有2个盘。
$shion@shionlnx ~> df -h
Filesystem      Size  Used Avail Use% Mounted on
/dev/sdb        251G  1.9G  237G   1% /
tmpfs           4.9G     0  4.9G   0% /mnt/wsl
tools           954G  354G  601G  38% /init
none            4.9G     0  4.9G   0% /dev
none            4.9G   12K  4.9G   1% /run
none            4.9G     0  4.9G   0% /run/lock
none            4.9G     0  4.9G   0% /run/shm
none            4.9G     0  4.9G   0% /run/user
tmpfs           4.9G     0  4.9G   0% /sys/fs/cgroup
drivers         954G  354G  601G  38% /usr/lib/wsl/drivers
lib             954G  354G  601G  38% /usr/lib/wsl/lib
C:\             954G  354G  601G  38% /mnt/c
D:\             1.9T  1.3T  592G  69% /mnt/d
5.2 限制WSL使用的资源
默认WSL可以使用主机的全部CPU和内存资源,
可以通过配置文件加以限制:
新建或编辑这个配置文件:
C:\Users\用户名.wslconfig
内容如下一目了然,根据自己的实际情况调整就OK了。
[wsl2]
memory=10GB
processors=8
swap=16GB
localhostForwarding=true
既然Windows的盘符都挂载了,也可以WSL里面来弄:
$shion@shionlnx ~> cat /mnt/c/Users/Shion/.wslconfig
[wsl2]
memory=10GB
processors=8
swap=16GB
localhostForwarding=true
(六)闲聊
目前发现各种应用在WSL下运行正常。
vs2022可以利用wsl进行编译(速度还挺快)。
CentOS(WSL)整体稍慢于CentOS(VMware),某些特定的程序慢很多。
Ubuntu(WSL)整体快于CentOS(VMware)。
同一个程序Ubuntu(WSL)最高比CentOS(WSL)快一倍(蛤???)
文件读写程序的Linux版本在Ubuntu(WSL)下比外部Windows快(?蛤_蛤?)
继续研究,想到就记录,未完待续……