Egress Gateway
目录
文章目录
-
- 目录
- 本节实战
- Egress Gateway
-
- 访问外部服务
-
- 1.Envoy 转发流量到外部服务
- 2.控制对外部服务的访问
- 3.直接访问外部服务
- 总结
- Egress 出口网关
-
- 1.用 Egress gateway 发起 HTTP 请求
- 2.用 Egress gateway 发起 HTTPS 请求
- 关于我
- 最后
本节实战
| 实战名称 |
|---|
| 实战:访问外部服务-2023.11.18(测试成功) |
| 实战:Egress 出口网关-2023.11.18(测试成功) |
Egress Gateway
默认情况下,Istio 网关中 Pod 的所有出站流量都会重定向到其 Sidecar 代理,集群外部 URL 的可访问性取决于代理的配置。默认情况下,Istio 将 Envoy 代理配置为允许传递未知服务的请求,这样当然是非常方便的,但是有的时候可能我们也需要更加严格的控制。
访问外部服务
实战:访问外部服务-2023.11.18(测试成功)
实验环境:
k8s v1.27.6(containerd://1.6.20)(cni:flannel:v0.22.2)
istio v1.19.3(--set profile=demo)
实验软件:
链接:https://pan.baidu.com/s/13xfJyPMCLj0dkmfmH6eJdQ?pwd=uvwh
提取码:uvwh
2023.11.18-实战:访问外部服务-2023.11.18(测试成功)
应用程序在以下链接里:
链接:https://pan.baidu.com/s/1pMnJxgL63oTlGFlhrfnXsA?pwd=7yqb
提取码:7yqb
2023.11.5-实战:BookInfo 示例应用-2023.11.5(测试成功)
接下来我们将来了解下如何在网格中访问外部服务,这里的演示需要我们安装 Istio 的时候使用的是 demo 配置文件或者启用了 Envoy 访问日志。
- 首先同样部署 sleep 示例应用,用来作为发送请求的测试源,如果启用了自动注入 Sidecar,那么可以直接部署 sleep 应用:
kubectl apply -f samples/sleep/sleep.yaml
否则需要使用下面的命令来手动注入 Sidecar:
kubectl apply -f <(istioctl kube-inject -f samples/sleep/sleep.yaml)
- 设置环境变量
SOURCE_POD,值为源 Pod 的名称:
export SOURCE_POD=$(kubectl get pod -l app=sleep -o jsonpath='{.items..metadata.name}')
echo $SOURCE_POD
1.Envoy 转发流量到外部服务
Istio 有一个安装选项 global.outboundTrafficPolicy.mode,它配置 Sidecar 对外部服务(没有在 Istio 的内部服务注册中定义的服务)的处理方式。如果这个选项设置为 ALLOW_ANY, Istio 代理允许调用未知的服务。如果这个选项设置为 REGISTRY_ONLY,那么 Istio 代理会阻止任何没有在网格中定义的 HTTP 服务或 Service Entry 的主机。ALLOW_ANY 是默认值,不控制对外部服务的访问。
- 我们可以运行以下命令来查看该配置的值:
kubectl get istiooperator installed-state -n istio-system -o jsonpath='{.spec.meshConfig.outboundTrafficPolicy.mode}'
正常该命令会输出 ALLOW_ANY 或没有任何输出(默认为 ALLOW_ANY)。
如果之前已经设置为了 REGISTRY_ONLY,则可以使用 istioctl 命令来修改:
istioctl install <flags-you-used-to-install-Istio> --set meshConfig.outboundTrafficPolicy.mode=ALLOW_ANY
![]()
- 我们可以从
SOURCE_POD向外部 HTTPS 服务发出两个请求来进行验证:
$ kubectl exec "$SOURCE_POD" -c sleep -- curl -sSI https://youdianzhishi.com/web | grep  "HTTP/"; kubectl exec "$SOURCE_POD" -c sleep -- curl -sI https://www.baidu.com | grep "HTTP/"
HTTP/1.1 200 OK
HTTP/1.1 200 OK
如果得到 200 状态码,说明我们成功地从网格中发送了 Egress 流量,这是因为我们的网格中的 Sidecar 代理允许访问任何外部服务。当然这种方式虽然很简单,但是丢失了对外部服务流量的 Istio 监控和控制,比如外部服务的调用没有记录到 Mixer 的日志中。
测试结束。
2.控制对外部服务的访问
要控制对外部服务的访问,我们需要用到 Istio 提供的 ServiceEntry 这个 CRD 对象,它用来定义网格中的服务。接下来我们将来了解下如何在不丢失 Istio 的流量监控和控制特性的情况下,配置对外部 HTTP 服务(httpbin.org)和外部 HTTPS 服务(www.baidu.com) 的访问。
为了控制对外部服务的访问,我们需要将 global.outboundTrafficPolicy.mode 选项,从 ALLOW_ANY 模式改为 REGISTRY_ONLY 模式。
如果你使用的是 IstioOperator 来安装 Istio,则只需要在配置中添加以下字段即可:
spec:
  meshConfig:
    outboundTrafficPolicy:
      mode: REGISTRY_ONLY
- 当然也可以使用如下所示的
istio install命令来修改:
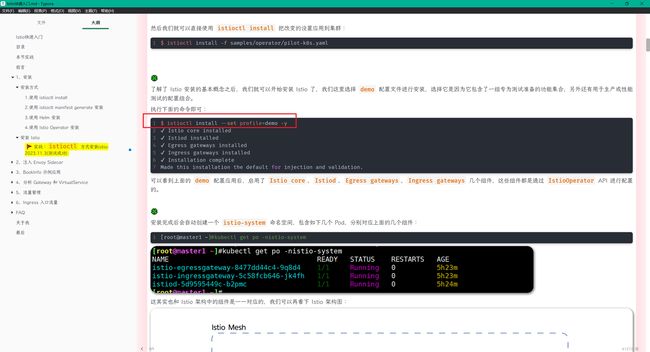
$ istioctl install --set profile=demo --set meshConfig.outboundTrafficPolicy.mode=REGISTRY_ONLY
This will install the Istio 1.19.3 "demo" profile (with components: Istio core, Istiod, Ingress gateways, and Egress gateways) into the cluster. Proceed? (y/N) y
✔ Istio core installed
✔ Istiod installed
✔ Ingress gateways installed
✔ Egress gateways installed
✔ Installation complete                                                                                                                                     Made this installation the default for injection and validation.
安装完成后可以使用下面的命令来查看出口流量策略的配置:
$ kubectl get istiooperator installed-state -n istio-system -o jsonpath='{.spec.meshConfig.outboundTrafficPolicy.mode}'
REGISTRY_ONLY
如果输出结果为 REGISTRY_ONLY 则说明我们已经成功修改了出口流量策略。
- 然后我们再从
SOURCE_POD向外部 HTTPS 服务发出几个请求,来验证它们现在是否被阻止:
$ kubectl exec "$SOURCE_POD" -c sleep -- curl -sSI https://youdianzhishi.com/web | grep  "HTTP/"; kubectl exec "$SOURCE_POD" -c sleep -- curl -sI https://www.baidu.com | grep "HTTP/"
command terminated with exit code 35
command terminated with exit code 35
正常情况下,这里会返回 35 错误码,说明我们已经成功地阻止了对外部服务的访问。
配置更改后可能需要一小段时间才能生效,所以可能仍然可以得到成功的响应,等待一段时间后再重新执行上面的命令即可。
接下来我们就可以自己定义 ServiceEntry 对象来配置对外部服务的访问了。使用 服务条目资源(ServiceEntry)可以将条目添加到 Istio 内部维护的服务注册表中,添加服务条目后,Envoy 代理可以将流量发送到该服务,就好像该服务条目是网格中的服务一样。通过配置服务条目,可以管理在网格外部运行的服务的流量。此外,还可以配置虚拟服务和目标规则,以更精细的方式控制到服务条目的流量,就像为网格中的其他任何服务配置流量一样。
- 这里我们创建一个如下所示的
ServiceEntry对象:
#httpbin-ext.yaml
apiVersion: networking.istio.io/v1alpha3
kind: ServiceEntry
metadata:
  name: httpbin-ext
spec:
  hosts:
    - httpbin.org
  ports:
    - number: 80
      name: http
      protocol: HTTP
  resolution: DNS # 主机的服务发现模式
  location: MESH_EXTERNAL # 指定服务是否应被视为网格外部的一部分还是网格的一部分
该资源对象中我们在 hosts 中指定了 httpbin.org 服务的主机名,然后在 ports 中指定了需要暴露的端口及其属性,表示该 ServiceEntry 对象代表对 http://httpbin.org 的访问。resolution: DNS 定义了如何解析指定的 hosts,这里我们使用 DNS 来解析,location: MESH_EXTERNAL 指明这个服务是在服务网格之外。通过 ServiceEntry 对象可以确保服务网格中的服务能够安全、高效地与外部服务进行交互。
- 在没做任何操作下,我们来测试下
[root@master1 istio-1.19.3]#kubectl exec "$SOURCE_POD" -c sleep -- curl -sS http://httpbin.org/headers
[root@master1 istio-1.19.3]#kubectl exec "$SOURCE_POD" -c sleep -- curl -sS http://httpbin.org/
默认是被拒绝的,没有任何输出。
- 直接应用该资源对象即可,然后我们再从
SOURCE_POD向外部的httpbin.org服务发出一个请求:
[root@master1 istio-1.19.3]#kubectl apply -f httpbin-ext.yaml
serviceentry.networking.istio.io/httpbin-ext created

$ kubectl exec "$SOURCE_POD" -c sleep -- curl -sS http://httpbin.org/headers
{
  "headers": {
    "Accept": "*/*",
    "Host": "httpbin.org",
    "User-Agent": "curl/7.81.0-DEV",
    "X-Amzn-Trace-Id": "Root=1-65546b44-27de380106c519094971d235",
    "X-B3-Sampled": "1",
    "X-B3-Spanid": "906a39d19d204681",
    "X-B3-Traceid": "cb38f6cdbf951fc6906a39d19d204681",
    "X-Envoy-Attempt-Count": "1",
    "X-Envoy-Decorator-Operation": "httpbin.org:80/*",
    "X-Envoy-Peer-Metadata": "ChkKDkFQUF9DT05UQUlORVJTEgcaBXNsZWVwChoKCkNMVVNURVJfSUQSDBoKS3ViZXJuZXRlcwodCgxJTlNUQU5DRV9JUFMSDRoLMTAuMjQ0LjEuNzMKGQoNSVNUSU9fVkVSU0lPThIIGgYxLjE5LjMKoQEKBkxBQkVMUxKWASqTAQoOCgNhcHASBxoFc2xlZXAKJAoZc2VjdXJpdHkuaXN0aW8uaW8vdGxzTW9kZRIHGgVpc3RpbwoqCh9zZXJ2aWNlLmlzdGlvLmlvL2Nhbm9uaWNhbC1uYW1lEgcaBXNsZWVwCi8KI3NlcnZpY2UuaXN0aW8uaW8vY2Fub25pY2FsLXJldmlzaW9uEggaBmxhdGVzdAoaCgdNRVNIX0lEEg8aDWNsdXN0ZXIubG9jYWwKHwoETkFNRRIXGhVzbGVlcC05NDU0Y2M0NzYtZHQ1ZmsKFgoJTkFNRVNQQUNFEgkaB2RlZmF1bHQKSQoFT1dORVISQBo+a3ViZXJuZXRlczovL2FwaXMvYXBwcy92MS9uYW1lc3BhY2VzL2RlZmF1bHQvZGVwbG95bWVudHMvc2xlZXAKGAoNV09SS0xPQURfTkFNRRIHGgVzbGVlcA==",
    "X-Envoy-Peer-Metadata-Id": "sidecar~10.244.1.73~sleep-9454cc476-dt5fk.default~default.svc.cluster.local"
  }
}
可以看到现在我们可以正常访问 httpbin.org 服务了,这是因为我们已经在网格中定义了 httpbin.org 服务,所以现在我们可以正常访问了。在上面输出中也可以看到由 Istio Sidecar 代理添加的头信息:X-Envoy-Decorator-Operation。
- 而且现在通过
SOURCE_POD的 Sidecar 代理的日志也可以看到对httpbin.org的访问日志了:
$ kubectl logs "$SOURCE_POD" -c istio-proxy | tail
2023-11-15T06:07:43.983716Z     info    Readiness succeeded in 1.829954774s
2023-11-15T06:07:43.984077Z     info    Envoy proxy is ready
# ......
[2023-11-15T06:55:00.306Z] "GET /headers HTTP/1.1" 200 - via_upstream - "-" 0 1157 494 493 "-" "curl/7.81.0-DEV" "6c68a884-d28b-9293-8d2d-c742f0c960d6" "httpbin.org" "35.153.249.234:80" outbound|80||httpbin.org 10.244.1.73:34132 54.161.176.214:80 10.244.1.73:58240 - default
这是访问外部 HTTP 服务的方法。
接下来我们来看下如何访问外部 HTTPS 服务。
- 同样需要创建一个
ServiceEntry对象来允许对外部服务的访问,如下所示:
#baidu-ext.yaml
apiVersion: networking.istio.io/v1alpha3
kind: ServiceEntry
metadata:
  name: baidu
spec:
  hosts:
    - www.baidu.com
  ports:
    - number: 443
      name: https
      protocol: HTTPS
  resolution: DNS
  location: MESH_EXTERNAL
可以看到该资源对象和前面的 httpbin.org 的 ServiceEntry 对象基本一致,只是将端口改为了 443,然后将主机名改为了 www.baidu.com,表示对 https://www.baidu.com 服务的访问。
- 在没做任何操作下,我们来测试下
[root@master1 istio-1.19.3]#kubectl exec "$SOURCE_POD" -c sleep -- curl -sSI https://www.baidu.com | grep  "HTTP/"
curl: (35) OpenSSL SSL_connect: SSL_ERROR_SYSCALL in connection to www.baidu.com:443
command terminated with exit code 35
默认是被拒绝的,没有任何输出。
- 同样直接应用该资源对象即可,然后我们再从
SOURCE_POD向外部的https://www.baidu.com服务发出一个请求:
[root@master1 istio-1.19.3]#kubectl apply -f baidu-ext.yaml

$ kubectl exec "$SOURCE_POD" -c sleep -- curl -sSI https://www.baidu.com | grep  "HTTP/"
HTTP/1.1 200 OK
正常也可以得到 200 状态码,说明我们已经成功地访问了 https://www.baidu.com 服务。检查 SOURCE_POD 的 Sidecar 代理的日志:
$ kubectl logs "$SOURCE_POD" -c istio-proxy | tail
# ......
[2023-11-15T07:03:28.034Z] "- - -" 0 - - - "-" 785 5670 262 - "-" "-" "-" "-" "110.242.68.4:443" outbound|443||www.baidu.com 10.244.1.73:34336 110.242.68.4:443 10.244.1.73:34334 www.baidu.com -
除了上面直接通过 ServiceEntry 来声明对外部服务的访问之外,我们也可以使用 VirtualService 和 DestinationRule 来声明对外部服务的路由访问规则,以更精细的方式控制到服务条目的流量,这样可以更加灵活的控制对外部服务的访问。
接下来我们来设置对 httpbin.org 服务访问的超时规则。
- 从用作测试源的 Pod 内部,向外部服务
httpbin.org的/delay端点发出 curl 请求:
$ kubectl exec "$SOURCE_POD" -c sleep -- time curl -o /dev/null -sS -w "%{http_code}\n" http://httpbin.org/delay/5
200
real    0m 5.56s
user    0m 0.00s
sys     0m 0.00s
这个请求大约在 5 秒内返回 200 (OK)。
- 然后我们可以使用
VirtualService来设置对httpbin.org服务访问的超时规则,如下所示:
#httpbin-ext-vs.yaml
apiVersion: networking.istio.io/v1alpha3
kind: VirtualService
metadata:
  name: httpbin-ext-vs
spec:
  hosts:
    - httpbin.org
  http:
    - timeout: 3s
      route:
        - destination:
            host: httpbin.org
          weight: 100
在这个虚拟服务中我们设置了对 httpbin.org 服务的超时时间为 3 秒,然后将流量路由到 httpbin.org 服务中。
- 应用该资源对象后,我们再次向
httpbin.org的/delay端点发出 curl 请求:
[root@master1 istio-1.19.3]#kubectl apply -f httpbin-ext-vs.yaml

$ kubectl exec "$SOURCE_POD" -c sleep -- time curl -o /dev/null -sS -w "%{http_code}\n" http://httpbin.org/delay/5
504
real    0m 3.05s
user    0m 0.00s
sys     0m 0.00s
这一次,在 3 秒后出现了 504 (Gateway Timeout),Istio 在 3 秒后切断了响应时间为 5 秒的 httpbin.org 服务的请求,证明上面我们配置的超时规则已经生效了。
- 同样,我们也来看下日志
[root@master1 istio-1.19.3]#kubectl logs "$SOURCE_POD" -c istio-proxy | tail
……
[2023-11-18T01:40:46.196Z] "GET /delay/5 HTTP/1.1" 504 UT response_timeout - "-" 0 24 3001 - "-" "curl/7.81.0-DEV" "cb9e5f55-daee-95fc-8fef-065a36deac14" "httpbin.org" "50.19.8.183:80" outbound|80||httpbin.org 10.244.1.19:47880 54.161.176.214:80 10.244.1.19:42108 - -
[root@master1 istio-1.19.3]#
测试结束。
3.直接访问外部服务
此外我们还可以让特定范围的 IP 完全绕过 Istio,可以通过配置 Envoy Sidecar 来防止它们拦截外部请求。要设置绕过 Istio,需要更改 global.proxy.includeIPRanges 或 global.proxy.excludeIPRanges 配置参数,然后更新 istio-sidecar-injector 配置,当然也可以通过设置相应的注解在 Pod 上进行配置,例如 traffic.sidecar.istio.io/includeOutboundIPRanges,istio-sidecar-injector 配置的更新,影响的是新部署应用的 Pod。
- 排除所有外部 IP 重定向到 Sidecar 代理的一种简单方法是将
global.proxy.includeIPRanges配置选项设置为内部集群服务使用的 IP 范围,这些 IP 范围值取决于集群所在的平台。比如我们这里是使用 Kubeadm 搭建的集群默认值为10.96.0.0/12,但不是固定的,可以使用以下命令确定实际值:
$ kubectl describe pod kube-apiserver -n kube-system | grep 'service-cluster-ip-range'
      --service-cluster-ip-range=10.96.0.0/12
- 然后使用
--set global.proxy.includeIPRanges="10.96.0.0/12"参数来更新配置即可:
istioctl install <flags-you-used-to-install-Istio> --set values.global.proxy.includeIPRanges="10.96.0.0/12"
- 由于绕行配置仅影响新的部署,所以需要重新部署 sleep 程序。在更新
istio-sidecar-injectorconfigmap 和重新部署 sleep 程序后,Istio Sidecar 将仅拦截和管理集群中的内部请求,任何外部请求都会绕过 Sidecar,并直接到达其预期的目的地。比如:
$ kubectl exec "$SOURCE_POD" -c sleep -- curl -sS http://httpbin.org/headers
{
  "headers": {
    "Accept": "*/*",
    "Host": "httpbin.org",
    ...
  }
}
与通过 HTTP 和 HTTPS 访问外部服务不同,我们不会看到任何与 Istio Sidecar 有关的请求头,并且发送到外部服务的请求既不会出现在 Sidecar 的日志中,也不会出现在 Mixer 日志中。 绕过 Istio Sidecar 意味着不能再监视对外部服务的访问了。
- 最后记得清理上面创建的资源对象。
 kubectl delete -f httpbin-ext.yaml
 kubectl delete -f httpbin-ext-vs.yaml
 kubectl delete -f baidu-ext.yaml
总结
这里我们学习了从 Istio 网格调用外部服务的三种方法:
- 配置 Envoy 以允许访问任何外部服务。
- 使用
ServiceEntry将一个可访问的外部服务注册到网格中,这是推荐的方法。 - 配置 Istio Sidecar 以从其重新映射的 IP 表中排除外部 IP。
第一种方法通过 Istio Sidecar 代理来引导流量,包括对网格内部未知服务的调用。使用这种方法时,无法监控对外部服务的访问或无法利用 Istio 的流量控制功能。要轻松为特定的服务切换到第二种方法,只需为那些外部服务创建 ServiceEntry 即可,此过程使您可以先访问任何外部服务,然后再根据需要决定是否启用控制访问、流量监控、流量控制等功能。
第二种方法可以使用 Istio 服务网格所有的功能去调用集群内或集群外的服务。这里我们学习了如何监控对外部服务的访问并设置对外部服务的调用的超时规则。
第三种方法绕过了 Istio Sidecar 代理,使你的服务可以直接访问任意的外部服务。但是,以这种方式配置代理需要了解集群提供商相关知识和配置。 与第一种方法类似,您也将失去对外部服务访问的监控,并且无法将 Istio 功能应用于外部服务的流量。
Egress 出口网关
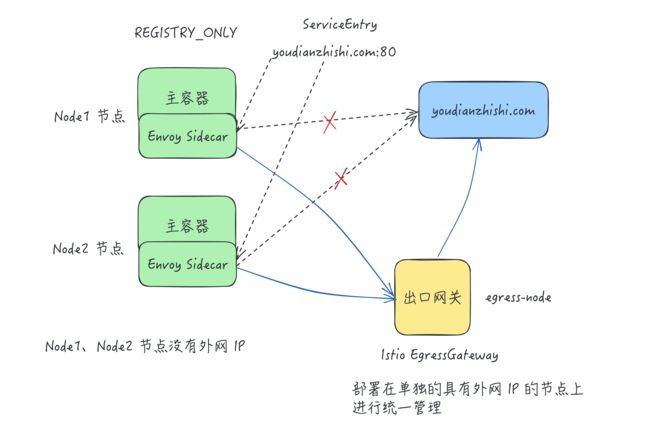
上面我们了解了位于服务网格内部的应用应如何访问网格外部的 HTTP 和 HTTPS 服务,我们学习了如何通过 ServiceEntry 对象配置 Istio 以受控的方式访问外部服务,这种方式实际上是通过 Sidecar 直接调用的外部服务,但是有时候我们可能需要通过专用的 Egress Gateway 服务来调用外部服务,这种方式可以更好的控制对外部服务的访问。
Istio 使用 Ingress 和 Egress Gateway 配置运行在服务网格边缘的负载均衡,Ingress Gateway 允许定义网格所有入站流量的入口。 Egress Gateway 是一个与 Ingress Gateway 对称的概念,它定义了网格的出口。Egress Gateway 允许我们将 Istio 的功能(例如,监视和路由规则)应用于网格的出站流量。
使用场景
比如有一个对安全要求非常严格的团队,要求服务网格所有的出站流量必须经过一组专用节点。专用节点运行在专门的机器上,与集群中运行应用程序的其他节点隔离,这些专用节点用于实施 Egress 流量的策略,并且受到比其余节点更严密地监控。
另一个使用场景是集群中的应用节点没有公有 IP,所以在该节点上运行的网格服务都无法访问互联网,那么我们就可以通过定义 Egress gateway,将公有 IP 分配给 Egress Gateway 节点,用它引导所有的出站流量,可以使应用节点以受控的方式访问外部服务。
实战:Egress 出口网关-2023.11.18(测试成功)
实验环境:
k8s v1.27.6(containerd://1.6.20)(cni:flannel:v0.22.2)
istio v1.19.3(--set profile=demo)
实验软件:
链接:https://pan.baidu.com/s/1Rk7ujMOHtzOYpi-HrElyyA?pwd=m81j
提取码:m81j
2023.11.18-实战:Egress 出口网关-2023.11.18(测试成功)
应用程序在以下链接里:
链接:https://pan.baidu.com/s/1pMnJxgL63oTlGFlhrfnXsA?pwd=7yqb
提取码:7yqb
2023.11.5-实战:BookInfo 示例应用-2023.11.5(测试成功)
接下来我们就来学习下在 Istio 中如何配置使用 Egress Gateway。
准备工作
- 如果你使用的
demo这个配置文件安装 Istio,那么 Egress Gateway 已经默认安装了,可以通过下面的命令来查看:
$ kubectl get pod -l istio=egressgateway -n istio-system
NAME                                   READY   STATUS    RESTARTS        AGE
istio-egressgateway-556f6f58f4-hkzdd   1/1     Running   0               14d
如果没有 Pod 返回,可以通过下面的步骤来部署 Istio Egress Gateway。如果你使用 IstioOperator 安装 Istio,请在配置中添加以下字段:
spec:
  components:
    egressGateways:
      - name: istio-egressgateway
        enabled: true
否则使用如下的 istioctl install 命令来安装:
$ istioctl install <flags-you-used-to-install-Istio> \
                   --set components.egressGateways[0].name=istio-egressgateway \
                   --set components.egressGateways[0].enabled=true
- 同样我们还是使用 sleep 示例做为发送请求的测试源,如果启用了自动 Sidecar 注入,运行以下命令部署示例应用程序:
kubectl apply -f samples/sleep/sleep.yaml
否则,在使用以下命令部署 sleep 应用程序之前,手动注入 Sidecar:
kubectl apply -f <(istioctl kube-inject -f samples/sleep/sleep.yaml)
- 为了发送请求,您需要创建 SOURCE_POD 环境变量来存储源 Pod 的名称:
export SOURCE_POD=$(kubectl get pod -l app=sleep -o jsonpath={.items..metadata.name})
echo $SOURCE_POD
1.用 Egress gateway 发起 HTTP 请求
- 首先创建一个
ServiceEntry对象来允许流量直接访问外部的edition.cnn.com服务。
#cnn-ext.yaml
apiVersion: networking.istio.io/v1alpha3
kind: ServiceEntry
metadata:
  name: cnn
spec:
  hosts:
    - edition.cnn.com
  ports:
    - number: 80
      name: http-port
      protocol: HTTP
    - number: 443
      name: https
      protocol: HTTPS
  resolution: DNS
  #location没指定,默认就是一个外部服务
- 默认没做配置,我们去访问是访问不了的
[root@master1 istio-1.19.3]#kubectl exec "$SOURCE_POD" -c sleep -- curl -sSL -o /dev/null -D - http://edition.cnn.com/politics
HTTP/1.1 502 Bad Gateway
date: Sat, 18 Nov 2023 03:17:10 GMT
server: envoy
content-length: 0
- 部署,然后发送 HTTPS 请求到
https://edition.cnn.com/politics验证ServiceEntry是否已正确应用。
[root@master1 istio-1.19.3]#kubectl apply -f cnn-ext.yaml
serviceentry.networking.istio.io/cnn created

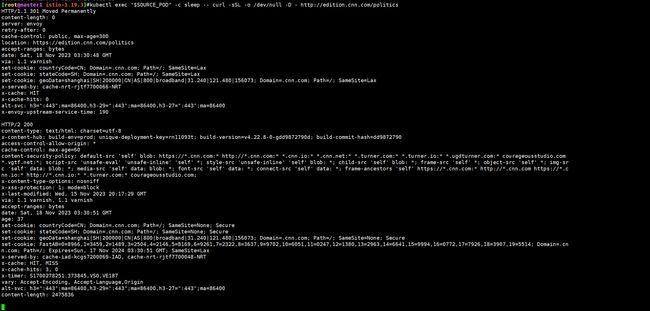
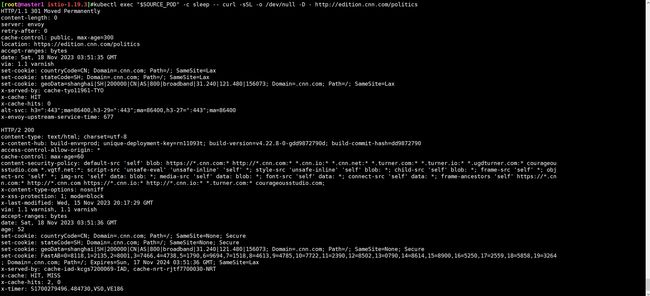
$ kubectl exec "$SOURCE_POD" -c sleep -- curl -sSL -o /dev/null -D - http://edition.cnn.com/politics
# 输出如下内
HTTP/1.1 301 Moved Permanently
# ......
location: https://edition.cnn.com/politics
# ......

HTTP/2 200
Content-Type: text/html; charset=utf-8
# ......
- 然后为
edition.cnn.com的 80 端口创建一个 egress Gateway,并为指向 Egress Gateway 的流量创建一个DestinationRule规则,如下所示:
#cnn-egress-gateway.yaml
apiVersion: networking.istio.io/v1alpha3
kind: Gateway
metadata:
  name: istio-egressgateway
spec:
  selector:
    istio: egressgateway # 匹配 Egress Gateway Pod 的标签
  servers:
    - port:
        number: 80
        name: http
        protocol: HTTP
      hosts:
        - edition.cnn.com # 也支持通配符 * 的形式
---
apiVersion: networking.istio.io/v1alpha3
kind: DestinationRule
metadata:
  name: egressgateway-for-cnn
spec:
  host: istio-egressgateway.istio-system.svc.cluster.local # 目标规则为 Egress Gateway
  subsets:
    - name: cnn # 定义一个子集 cnn,没有指定 labels,则 subset 会包含所有符合 host 字段指定的服务的 Pod (需要注意下。)
在上面的对象中我们首先定义了一个 Gateway 对象,不过这里我们定义的是一个 Egress Gateway,通过 istio: egressgateway 匹配 Egress Gateway Pod 的标签,并在 servers 中定义了 edition.cnn.com 服务的 80 端口。然后定义了一个 DestinationRule 对象,指定了目标规则为 istio-egressgateway.istio-system.svc.cluster.local,并定义了一个子集 cnn。
这里的子集名称是 cnn,但没有指定 labels。这意味着,这个 subset 会涵盖所有属于 istio-egressgateway.istio-system.svc.cluster.local 服务的 Pod。这种情况下,subset 的作用主要是为了在其他 Istio 配置中提供一个方便的引用名称,而不是为了区分不同的 Pod 子集。
- 如何再定义一个
VirtualService对象将流量从 Sidecar 引导至 Egress Gateway,再从 Egress Gateway 引导至外部服务,如下所示:
#cnn-egress-gateway.yaml
apiVersion: networking.istio.io/v1alpha3
kind: VirtualService
metadata:
  name: direct-cnn-through-egress-gateway
spec:
  hosts:
    - edition.cnn.com
  gateways:
    - istio-egressgateway # Egress Gateway
    - mesh # 网格内部的流量
  http:
    - match:
        - gateways:
            - mesh # 这条规则适用于从服务网格内发出的流量
          port: 80
      route:
        - destination:
            host: istio-egressgateway.istio-system.svc.cluster.local # 流量将被路由到 egress gateway
            subset: cnn
            port:
              number: 80
          weight: 100
    - match:
        - gateways:
            - istio-egressgateway # 这条规则适用于通过 istio-egressgateway 的流量
          port: 80
      route:
        - destination:
            host: edition.cnn.com # 流量将被路由到外部服务
            port:
              number: 80
          weight: 100
在上面的 VirtualService 对象中通过 hosts 指定 edition.cnn.com,表示该虚拟服务用于该服务的请求,gateways 字段中定义了 istio-egressgateway 和 mesh 两个值,istio-egressgateway 是上面我们定义的 Egress Gateway,mesh 表示该虚拟服务用于网格内部的流量,也就是说这个虚拟服务指定了如何处理来自服务网格内部以及通过 istio-egressgateway 的流量。
mesh是一个特殊的关键字,在 Istio 中表示服务网格内的所有 Sidecar 代理。当使用mesh作为网关时,这意味着VirtualService中定义的路由规则适用于服务网格内的所有服务,即所有装有 Istio sidecar 代理的服务。
http 字段中定义了两个 match,第一个 match 用于匹配 mesh 网关,第二个 match 用于匹配 istio-egressgateway 网关,然后在 route 中定义了两个 destination,第一个 destination 用于将流量引导至 Egress Gateway 的 cnn 子集,第二个 destination 用于将流量引导至外部服务。
总结来说,这个 VirtualService 的作用是控制服务网格内部到 edition.cnn.com 的流量。当流量起始于服务网格内时,它首先被路由到 istio-egressgateway,然后再路由到 edition.cnn.com,这种配置有助于统一和控制从服务网格内部到外部服务的流量,可以用于流量监控、安全控制或实施特定的流量策略。
- 应用上面的资源对象后,我们再次向
edition.cnn.com的/politics端点发出 curl 请求:
[root@master1 istio-1.19.3]#kubectl apply -f cnn-egress-gateway.yaml
gateway.networking.istio.io/istio-egressgateway created
destinationrule.networking.istio.io/egressgateway-for-cnn created
virtualservice.networking.istio.io/direct-cnn-through-egress-gateway created

$ kubectl exec "$SOURCE_POD" -c sleep -- curl -sSL -o /dev/null -D - http://edition.cnn.com/politics
# ......
HTTP/1.1 301 Moved Permanently

location: https://edition.cnn.com/politics
# ......

HTTP/2 200
Content-Type: text/html; charset=utf-8
# ......
- 正常和前面的一次测试输出结果是一致的,但是这次在请求是经过
istio-egressgatewayPod 发出的,我们可以查看日志来验证:
kubectl logs -l istio=egressgateway -c istio-proxy -n istio-system | tail
正常会看到一行类似于下面这样的内容:
[2023-11-15T08:48:38.683Z] "GET /politics HTTP/2" 301 - via_upstream - "-" 0 0 204 203 "10.244.1.73" "curl/7.81.0-DEV" "6c2c4550-92d4-955c-b6cb-83bf2b0e06f4" "edition.cnn.com" "151.101.3.5:80" outbound|80||edition.cnn.com 10.244.2.184:46620 10.244.2.184:8080 10.244.1.73:49924 - -
==因为我们这里只是将 80 端口的流量重定向到 Egress Gateway 了,所以重定向后 443 端口的 HTTPS 流量将直接进入 edition.cnn.com,所以没有看到 443 端口的日志,==但是我们可以通过 SOURCE_POD 的 Sidecar 代理的日志来查看到:
$ kubectl logs "$SOURCE_POD" -c istio-proxy | tail
# ......
[2023-11-15T08:55:55.513Z] "GET /politics HTTP/1.1" 301 - via_upstream - "-" 0 0 191 191 "-" "curl/7.81.0-DEV" "12ce15aa-1247-9b7e-8185-4224f96f5ea0" "edition.cnn.com" "10.244.2.184:8080" outbound|80|cnn|istio-egressgateway.istio-system.svc.cluster.local 10.244.1.73:49926 151.101.195.5:80 10.244.1.73:41576 - -
[2023-11-15T08:55:55.753Z] "- - -" 0 - - - "-" 839 2487786 1750 - "-" "-" "-" "-" "151.101.195.5:443" outbound|443||edition.cnn.com 10.244.1.73:45246 151.101.67.5:443 10.244.1.73:42998 edition.cnn.com -
- 清除刚才创建的资源
[root@master1 istio-1.19.3]#kubectl delete -f cnn-ext.yaml
[root@master1 istio-1.19.3]#kubectl delete -f cnn-egress-gateway.yaml
测试成功。
2.用 Egress gateway 发起 HTTPS 请求
上面我们已经学习了如何通过 Egress Gateway 发起 HTTP 请求,接下来我们再来学习下如何通过 Egress Gateway 发起 HTTPS 请求。
原理都是一样的,只是我们需要在相应的 ServiceEntry、Egress Gateway 和 VirtualService 中指定 TLS 协议的端口 443。
- 首先为
edition.cnn.com定义ServiceEntry服务:
#cnn-https.yaml
apiVersion: networking.istio.io/v1alpha3
kind: ServiceEntry
metadata:
  name: cnn
spec:
  hosts:
    - edition.cnn.com
  ports:
    - number: 443
      name: tls
      protocol: TLS
  resolution: DNS
- 应用该资源对象后,发送 HTTPS 请求到
https://edition.cnn.com/politics,验证该ServiceEntry是否已正确生效。
[root@master1 istio-1.19.3]#kubectl apply -f cnn-https.yaml
serviceentry.networking.istio.io/cnn created

$ kubectl exec "$SOURCE_POD" -c sleep -- curl -sSL -o /dev/null -D - https://edition.cnn.com/politics
...
HTTP/2 200
Content-Type: text/html; charset=utf-8
...
- 接下来同样的方式为
edition.cnn.com创建一个 Egress Gateway。除此之外还需要创建一个目标规则和一个虚拟服务,用来引导流量通过 Egress Gateway,并通过 Egress Gateway 与外部服务通信。
#cnn-https.yaml
apiVersion: networking.istio.io/v1alpha3
kind: Gateway
metadata:
  name: istio-egressgateway
spec:
  selector:
    istio: egressgateway
  servers:
    - port:
        number: 443
        name: tls
        protocol: TLS
      hosts:
        - edition.cnn.com
      tls:
        mode: PASSTHROUGH # 透传
---
apiVersion: networking.istio.io/v1alpha3
kind: DestinationRule
metadata:
  name: egressgateway-for-cnn
spec:
  host: istio-egressgateway.istio-system.svc.cluster.local
  subsets:
    - name: cnn
---
apiVersion: networking.istio.io/v1alpha3
kind: VirtualService
metadata:
  name: direct-cnn-through-egress-gateway
spec:
  hosts:
    - edition.cnn.com
  gateways:
    - mesh
    - istio-egressgateway
  tls:
    - match:
        - gateways:
            - mesh
          port: 443
          sniHosts:
            - edition.cnn.com
      route:
        - destination:
            host: istio-egressgateway.istio-system.svc.cluster.local
            subset: cnn
            port:
              number: 443
    - match:
        - gateways:
            - istio-egressgateway
          port: 443
          sniHosts:
            - edition.cnn.com
      route:
        - destination:
            host: edition.cnn.com
            port:
              number: 443
          weight: 100
上面对象中定义的 Gateway 对象和前面的一样,只是将端口改为了 443,然后在 tls 中指定了 mode: PASSTHROUGH,表示该 Gateway 对象用于 TLS 协议的请求。然后在后面的 VirtualService 对象中就是配置 spec.tls 属性,用于指定 TLS 协议的请求的路由规则,配置方法和前面 HTTP 方式类似,只是注意要将端口改为 443,并且在 match 中指定 sniHosts 为 edition.cnn.com,表示该虚拟服务用于处理 edition.cnn.com 的 TLS 请求。
- 应用上面的资源对象后,我们现在发送 HTTPS 请求到
https://edition.cnn.com/politics,输出结果应该和之前一样。
[root@master1 istio-1.19.3]#kubectl apply -f cnn-https.yaml
serviceentry.networking.istio.io/cnn unchanged
gateway.networking.istio.io/istio-egressgateway created
destinationrule.networking.istio.io/egressgateway-for-cnn created
virtualservice.networking.istio.io/direct-cnn-through-egress-gateway created


$ kubectl exec "$SOURCE_POD" -c sleep -- curl -sSL -o /dev/null -D - https://edition.cnn.com/politics
...
HTTP/2 200
Content-Type: text/html; charset=utf-8
...
- 检查 Egress Gateway 代理的日志,则打印日志的命令是:
kubectl logs -l istio=egressgateway -n istio-system
应该会看到类似于下面的内容:
[2023-11-15T08:59:55.513Z] "- - -" 0 - 627 1879689 44 - "-" "-" "-" "-" "151.101.129.67:443" outbound|443||edition.cnn.com 172.30.109.80:41122 172.30.109.80:443 172.30.109.112:59970 edition.cnn.com
- 到这里我们就实现了通过 Egress Gateway 发起 HTTPS 请求。最后记得清理上面创建的资源对象:
[root@master1 istio-1.19.3]#kubectl delete -f cnn-https.yaml
测试结束。
需要注意的是,Istio 无法强制让所有出站流量都经过 Egress Gateway, Istio 只是通过 Sidecar 代理实现了这种流向。攻击者只要绕过 Sidecar 代理, 就可以不经 Egress Gateway 直接与网格外的服务进行通信,从而避开了 Istio 的控制和监控。出于安全考虑,集群管理员和云供应商必须确保网格所有的出站流量都要经过 Egress Gateway。这需要通过 Istio 之外的机制来满足这一要求。例如,集群管理员可以配置防火墙,拒绝 Egress Gateway 以外的所有流量。Kubernetes NetworkPolicy 也能禁止所有不是从 Egress Gateway 发起的出站流量,但是这个需要 CNI 插件的支持。 此外,集群管理员和云供应商还可以对网络进行限制,让运行应用的节点只能通过 gateway 来访问外部网络。要实现这一限制,可以只给 Gateway Pod 分配公网 IP,并且可以配置 NAT 设备, 丢弃来自 Egress Gateway Pod 之外的所有流量。
关于我
我的博客主旨:
- 排版美观,语言精炼;
- 文档即手册,步骤明细,拒绝埋坑,提供源码;
- 本人实战文档都是亲测成功的,各位小伙伴在实际操作过程中如有什么疑问,可随时联系本人帮您解决问题,让我们一起进步!
微信二维码
x2675263825 (舍得), qq:2675263825。
微信公众号
《云原生架构师实战》
个人博客站点
http://onedayxyy.cn/
语雀
https://www.yuque.com/xyy-onlyone
csdn
https://blog.csdn.net/weixin_39246554?spm=1010.2135.3001.5421
知乎
https://www.zhihu.com/people/foryouone
最后
好了,关于本次就到这里了,感谢大家阅读,最后祝大家生活快乐,每天都过的有意义哦,我们下期见!
