【mmdetection】用自己的coco数据集训练mask r-cnn并进行验证、测试,推理可视化,更改backbone,只针对某一标签进行训练
大前提:Ubuntu20.04LTS
本人呕心沥血从无到有的摸索,自己边尝试边整理的,其实耐心多看官方文档确实能找到很多东西(下面有官方文档的链接这里就不重复粘贴了),也为了方便我自己copy语句嘻嘻~
为什么不是用Windows,作为一个小白我一开始真的想用windows,因为我懒得配双系统,但是没办法,是真的lj,安装又难,训练有诸多限制,就so sad知道吧。安装就看别的博主吧跟着别的博主so easy嘿嘿~
一、准备好自己的coco数据集
labelme标注的数据集生成json文件,使用labeleme2coco.py分别生成train,test,val的json文件。
二、修改配置文件
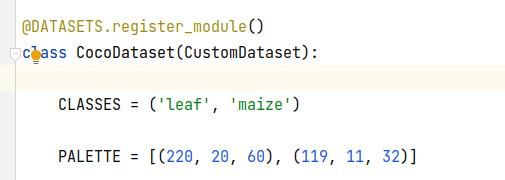
2.1 ./mmdet/dateset/coco.py
修改对应类别(只有一个类别时需要在第一个类别后加上,)PALETTE是调色板,设置对应CLASSES的mask颜色,只有一个颜色或者没有定义则系统自己生成mask颜色并且所有类别颜色一致。
2.2 ./mmdet/core/evaluation/class_names.py
找到对应coco_classes修改
2.3 ./configs/mask_rcnn/mask_rcnn_r50_fpn_1x_coco.py
按照里面的路径找到并修改配置文件
2.4 ./configs/base/models/mask_rcnn_r50_fpn.py
ctrl+f找到num_classes修改成自己的数量,不需要+1,文件里边有多少个num_classes都得改
如果需要保存最佳权重文件,则在这句上加上save_best='auto':
evaluation = dict(metric=['bbox', 'segm'], save_best='auto')
2.5 ./configs/_base_/datasets/coco_instance.py
有多处要修改,这里要修改的是指向自己数据集的路径
这里的img_scale要修改大小,CUDA memory够大可以直接改成自己数据集的图片大小,我的8+16G改成自己的(2000,2000)疯狂爆内存,只能改(800,2000)或者backbone层数少的话可以(1000,2000),这个resize是会选取自适应的,我在这里卡了超级久,气死我了,后面发现是我对resize的理解错了,后面看到文档解释才反应过来是这里的问题。一开始不想resize才改的(2000,2000),一直cuda out of memory,真的捉鸡!!!
对resize参数解读原文:https://zhuanlan.zhihu.com/p/381117525
这里如果自己有测试集的话就改test.json,没有的话就保存默认是val.json,后面test.py测试的时候会读取这里,忘了改也没事,训练完之后会保存生成当此训练的mask_rcnn_r50_fpn_1x_coco.py,直接去里面找到这里改然后再test.py也行哒
2.6./configs/_base_/schedules/schedule_1x.py
lr(学习率)官方是8张GPU ==> 0.02,如果没有特别说明学习率,一般都是线性计算的,即4张GPU就0.01,两张就0.005,以此类推。
另外如果要修改total_epochs,别忘了修改10行的step, step两个值一般为total_epochs的80%和90%,表示在该epochs修改学习率。
【原文链接:https://blog.csdn.net/weixin_42418700/article/details/108627170】
并且在max_epochs修改自己要训练多少个epochs
2.7./configs/_base_/default_runtime.py
这里我修改了batch_size
三、训练
python tools/train.pyconfigs/mask_rcnn/mask_rcnn_r50_fpn_1x_coco.py3.1研究怎么只训练分割特定标签?
我有两个类别的标签但是我只想要它训练里面的leaf类别,所以修改了2.1,2.2删掉了另外一个标签和2.3的num_classes,相当于只有一个标签,倒是跑得起来,但是还没跑完,跑完再来更新8
四、测试
4.1 ./home/mmdetection/tools/test.py
输出保存为pkl文件后面计算结果可视化可以直接读取:
需要读取生成参数配置的py文件/保存的pth权重文件/--eval 选择所需的验证指标,这里是分割,可选择的是bbox和segm/--out定义输出的pkl文件的保存路径
python tools/test.py work_dirs/mask_rcnn_r50_fpn_1x_coco/20230309_014418/mask_rcnn_r50_fpn_1x_coco.py work_dirs/mask_rcnn_r50_fpn_1x_coco/20230309_014418/latest.pth --eval bbox segm --out test_files/20230309_014418.pkl4.2 tools/analysis_tools/eval_metric.py
验证分类分析结果:
需要读取生成参数配置的py文件/test.py保存的pkl文件/--eval 选择所需的验证指标
python tools/analysis_tools/eval_metric.py work_dirs/mask_rcnn_r50_fpn_1x_coco/20230309_014418/mask_rcnn_r50_fpn_1x_coco.py test_files/20230309_014418.pkl --eval bbox segm输出结果:
Evaluating bbox...
Loading and preparing results...
DONE (t=0.00s)
creating index...
index created!
Running per image evaluation...
Evaluate annotation type *bbox*
DONE (t=0.13s).
Accumulating evaluation results...
DONE (t=0.02s).
Average Precision (AP) @[ IoU=0.50:0.95 | area= all | maxDets=100 ] = 0.537
Average Precision (AP) @[ IoU=0.50 | area= all | maxDets=1000 ] = 0.921
Average Precision (AP) @[ IoU=0.75 | area= all | maxDets=1000 ] = 0.569
Average Precision (AP) @[ IoU=0.50:0.95 | area= small |maxDets=1000 ] = 0.275
Average Precision (AP) @[ IoU=0.50:0.95 | area=medium |maxDets=1000 ] = 0.495
Average Precision (AP) @[ IoU=0.50:0.95 | area= large |maxDets=1000 ] = 0.579
Average Recall (AR) @[ IoU=0.50:0.95 | area= all | maxDets=100 ] = 0.599
Average Recall (AR) @[ IoU=0.50:0.95 | area= all | maxDets=300 ] = 0.599
Average Recall (AR) @[ IoU=0.50:0.95 | area= all | maxDets=1000 ] = 0.599
Average Recall (AR) @[ IoU=0.50:0.95 | area= small |maxDets=1000 ] = 0.292
Average Recall (AR) @[ IoU=0.50:0.95 | area=medium |maxDets=1000 ] = 0.533
Average Recall (AR) @[ IoU=0.50:0.95 | area= large |maxDets=1000 ] = 0.650
Evaluating segm...
/home/mmdetection/mmdet/datasets/coco.py:437:UserWarning: The key "bbox" is deleted for more accurate mask AP ofsmall/medium/large instances since v2.12.0. This does not change the overallmAP calculation.
warnings.warn(
Loading and preparing results...
DONE (t=0.01s)
creating index...
index created!
Running per image evaluation...
Evaluate annotation type *segm*
DONE (t=0.18s).
Accumulating evaluation results...
DONE (t=0.02s).
Average Precision (AP) @[ IoU=0.50:0.95 | area= all | maxDets=100 ] = 0.479
Average Precision (AP) @[ IoU=0.50 | area= all | maxDets=1000 ] = 0.890
Average Precision (AP) @[ IoU=0.75 | area= all | maxDets=1000 ] = 0.481
Average Precision (AP) @[ IoU=0.50:0.95 | area= small | maxDets=1000] = 0.206
Average Precision (AP) @[ IoU=0.50:0.95 | area=medium |maxDets=1000 ] = 0.362
Average Precision (AP) @[ IoU=0.50:0.95 | area= large |maxDets=1000 ] = 0.526
Average Recall (AR) @[ IoU=0.50:0.95 | area= all | maxDets=100 ] = 0.544
Average Recall (AR) @[ IoU=0.50:0.95 | area= all | maxDets=300 ] = 0.544
Average Recall (AR) @[ IoU=0.50:0.95 | area= all | maxDets=1000 ] = 0.544
Average Recall (AR) @[ IoU=0.50:0.95 | area= small |maxDets=1000 ] = 0.290
AverageRecall (AR) @[ IoU=0.50:0.95 |area=medium | maxDets=1000 ] = 0.440
Average Recall (AR) @[ IoU=0.50:0.95 | area= large |maxDets=1000 ] = 0.586
OrderedDict([('bbox_mAP', 0.5371),('bbox_mAP_50', 0.9209), ('bbox_mAP_75', 0.5689), ('bbox_mAP_s', 0.2751),('bbox_mAP_m', 0.4952), ('bbox_mAP_l', 0.5794), ('bbox_mAP_copypaste', '0.53710.9209 0.5689 0.2751 0.4952 0.5794'), ('segm_mAP', 0.4787), ('segm_mAP_50',0.8897), ('segm_mAP_75', 0.481), ('segm_mAP_s', 0.2061), ('segm_mAP_m',0.3621), ('segm_mAP_l', 0.5261), ('segm_mAP_copypaste', '0.4787 0.8897 0.48100.2061 0.3621 0.5261')])
4.3 tools/analysis_tools/analyze_results.py
将模型的预测结果框画出来进行可视化,会保存排序good的20张图的结果和排序bad的20张图,gt(上)和pre(下)的对比结果:
需要读取生成参数配置的py文件/保存的结果 pkl 文件/--out是结果保存到的目录/--show-score-thr 指定可视化框的阈值
python tools/analysis_tools/analyze_results.py work_dirs/mask_rcnn_r50_fpn_1x_coco/20230309_014418/mask_rcnn_r50_fpn_1x_coco.py test_files/20230309_014418.pkl work_dirs/mask_rcnn_r50_fpn_1x_coco/20230313_104317/score_50/ --show-score-thr 0.54.4 tools/analysis_tools/analyze_logs.py
这个工具有两个功能:plot_curve画图cal_train_time计算训练时间
一、画图!曲线!保存!:
需要读取训练保存的log.json文件/--keys 需要画图的参数/--out 需要保存的路径和文件类型
画mAP的:
python tools/analysis_tools/analyze_logs.py plot_curve work_dirs/mask_rcnn_r50_fpn_1x_coco/20230309_014418/20230309_014418.log.json --keys segm_mAP segm_mAP_50 segm_mAP_75 --out work_dirs/mask_rcnn_r50_fpn_1x_coco/20230309_014418/20230309_014418_mAP.jpg
画loss的:
python tools/analysis_tools/analyze_logs.py plot_curve work_dirs/mask_rcnn_r50_fpn_1x_coco/20230310_091754/20230310_091754.log.json --keys loss_rpn_cls loss_rpn_bbox loss_cls loss_bbox loss_mask loss --out work_dirs/mask_rcnn_r50_fpn_1x_coco/20230310_091754/20230310_091754_loss.pdf二、计算训练时间
需要读取训练保存的log.json文件
python tools/analysis_tools/analyze_logs.py cal_train_time work_dirs/mask_rcnn_s50_fpn_syncbn-backbone+head_mstrain_1x_coco/20230324_142401_resnest_1500epochs/20230324_142401.log.json -----Analyze train time of work_dirs/mask_rcnn_s50_fpn_syncbn-backbone+head_mstrain_1x_coco/20230324_142401_resnest_1500epochs/20230324_142401.log.json-----
slowest epoch 1497, average time is 0.4182
fastest epoch 1, average time is 0.3667
time std over epochs is 0.0034
average iter time: 0.4131 s/iter
4.5 混淆矩阵tools/analysis_tools/confusion_matrix.py
画出混淆矩阵分析分类情况:
需要读取生成参数配置的py文件/test.py保存的pkl文件/--out 保存路径以及保存图片类型
python tools/analysis_tools/confusion_matrix.py work_dirs/mask_rcnn_r50_fpn_1x_coco/20230309_014418/mask_rcnn_r50_fpn_1x_coco.py work_dirs/mask_rcnn_r50_fpn_1x_coco/20230309_014418/20230309_014418.pkl --out work_dirs/mask_rcnn_r50_fpn_1x_coco/20230309_014418/4.6 tools/analysis_tools/benchmark.py
此工具是用来测试模型在当前环境下的推理速度的,模型会跑一遍配置文件中指定的测试集,计算单图推理时间(FPS):
需要输入生成参数配置的py文件/保存的pth权重文件
python tools/analysis_tools/benchmark.py work_dirs/mask_rcnn_r50_fpn_1x_coco/20230309_014418/mask_rcnn_r50_fpn_1x_coco.py work_dirs/mask_rcnn_r50_fpn_1x_coco/20230309_014418/latest.pth但是这个如果训练的时候是非分布式训练的话,输入这个语句会报错:
File "tools/analysis_tools/benchmark.py",line 185, in main
raise NotImplementedError('Only supports distributed mode')
NotImplementedError: Only supportsdistributed mode
所以需要改一下分布式训练
python -m torch.distributed.launch --nproc_per_node=1 --master_port=29500 tools/analysis_tools/benchmark.py work_dirs/mask_rcnn_r50_fpn_1x_coco/20230309_014418/mask_rcnn_r50_fpn_1x_coco.py work_dirs/mask_rcnn_r50_fpn_1x_coco/20230309_014418/latest.pth --launcher pytorch一张卡所以--nproc_per_node=1,相当于一张卡的分布式训练,这样就不会报错辣~
得到结果
Done image [50 / 2000], fps: 13.2 img / s, times per image: 75.5 ms/ img
4.7 自己加进去的tools/analysis_tools/plot_pr_curve.py
这个是在一个博主那看到的,画PR曲线的,我没试过,先存着等后面再试吧
【博主原文:https://blog.csdn.net/weixin_44966641/article/details/124558532】
python plot_pr_curve.py configs/my_coco_config/my_coco_config.py faster_rcnn_fpn_coco.pkl五、推理
官网文档给的单张推理代码,推理未标注图片,修改了一下推理整个文件夹里的图片并保存
【https://mmdetection.readthedocs.io/zh_CN/latest/1_exist_data_model.html】
import os
from mmdet.apis importinit_detector,inference_detector


#指定模型的配置文件和 checkpoint 文件路径
config_file = '/home/mmdetection/work_dirs/mask_rcnn_r50_fpn_1x_coco/20230313_104317_resnet101_800_2000/mask_rcnn_r50_fpn_1x_coco.py'
checkpoint_file = '/home/mmdetection/work_dirs/mask_rcnn_r50_fpn_1x_coco/20230313_104317_resnet101_800_2000/epoch_300.pth'
img_path = '/home/mmdetection/tests/test_pic/'


save_path = '/home/mmdetection/tests/resnet101_800_2000/'
if not os.path.exists(save_path):
    os.makedirs(save_path)

 # 根据配置文件和 checkpoint 文件构建模型
#model = init_detector(config_file, checkpoint_file, device='cuda:0')
model =init_detector(config_file, checkpoint_file, device='cpu')

img_file =os.listdir(img_path)
for img_name in img_file:
    # print(img_name)
    img = os.path.join(img_path, img_name)

    # 测试单张图片并展示结果
    #img ='/home/mmdetection/tests/test_pic/2022_07_05_13_53_08_874_0_29148_0_80.jpg'  # 或者img = mmcv.imread(img),这样图片仅会被读一次
    result = inference_detector(model, img)
    # 将结果可视化,可以进去改mask和字体参数(颜色,透明度等)
    model.show_result(img, result, score_thr=0.5, bbox_color=(250, 190, 0), mask_color =[(115, 82, 130), (139, 168, 66)])
    # 或者将可视化结果保存为图片
    final_save_path = os.path.join(save_path, f'result_{img_name}')
    model.show_result(img, result, out_file=final_save_path)
print(final_save_path)六、替换backbone(之前的推翻推翻,因为我改backbone,跑出来的结果永远比resnet50的差,而且性能也不怎么样,思考了很久感觉就是我改backbone的方式的问题,一开始我想的是是不是因为我找的预训练权重文件不是基于coco数据集训练的所以才有问题,所以我就在官方文档里面找有没有基于coco数据集训练的权重文件,但是我忽然发现那些backbone模型点开的连接是另外的代码,比如resnest:【https://github.com/open-mmlab/mmdetection/blob/master/configs/resnest/mask_rcnn_s50_fpn_syncbn-backbone%2Bhead_mstrain_1x_coco.py】忽然明白为什么我无论更换什么backbone模型,训练出来的结果都比原来的差了。)
6.1 更换resnet101:configs/_base_/models/mask_rcnn_r50_fpn.py
最好改的,直接用configs/mask_rcnn/mask_rcnn_r101_fpn_1x_coco.py也行,在r50那边直接改101也行
1.把文件里的bacnbone的depth=50改成depth=101 2.把init_cfg的checkpoint=‘torchvision://resnet50’改成checkpoint=‘torchvision://resnet101’
3.训练,完事。
6.2 更换resnext:configs/_base_/models/mask_rcnn_r50_fpn.py
1.自己改的方式,会因为对模型的不熟悉,参数配置啥的设置有误,比如groups应该是32/64的,我一开始设置的是1,所以结果奇奇怪怪的,比resnet50出来的结果差
但是这个官方只给了x101的代码,没有x50的代码,还得再研究研究
configs/mask_rcnn/mask_rcnn_x101_32x4d_fpn_1x_coco.py
configs/mask_rcnn/mask_rcnn_x101_32x8d_fpn_1x_coco.py
configs/mask_rcnn/mask_rcnn_x101_64x4d_fpn_1x_coco.py
2.init_cfg会下载预备训练权重文件,在pytorch官网的torchvision有resnext50的权重文件,看看改改101的代码跑起来结果怎么样。(我还没跑,跑完更新)
checkpoint=‘torchvision://resnext50_32x4d’:【https://pytorch.org/vision/stable/models.html#classification】
【ResNeXt:https://pytorch.org/vision/stable/models/resnext.html】
6.3 更换Res2Net:configs/res2net/mask_rcnn_r2_101_fpn_2x_coco.py
这个一开始没有找到预训练权重pth文件的连接,看了一下mmlab只有res2net101的权重文件没有res2net50的,
init_cfg=dict(type='Pretrained', checkpoint='open-mmlab://res2net101_v1d_26w_4s')
后面在github里边遨游,捞到了一个,book一下,在跑ing
(更新,跑不完md,8+16G跑了好几次都爆显存,我得再研究研究)
【res2net预训练权重github:https://github.com/Res2Net/Res2Net-PretrainedModels/blob/master/res2net.py】
6.4 改用resnest
configs/resnest/mask_rcnn_s50_fpn_syncbn-backbone+head_mstrain_1x_coco.py
configs/resnest/mask_rcnn_s101_fpn_syncbn-backbone+head_mstrain_1x_coco.py
正确方法resnest50跑完自己的数据集果然,结果比resnet50的好,哈哈哈哈哈哈哈哈


