详解ssh远程登录服务
华子目录
- 简介
-
- 概念
- 功能
- 分类
-
- 文字接口
- 图形接口
- 文字接口ssh连接服务器
-
- 浅浅介绍一下加密技术
- 凯撒加密
- 加密分类
-
- 对称加密
- 非对称加密
- 非对称加密方法(也叫公钥加密)
- ssh两大类认证方式:
- 连接加密技术简介
-
- 密钥解析
- ssh工作过程
-
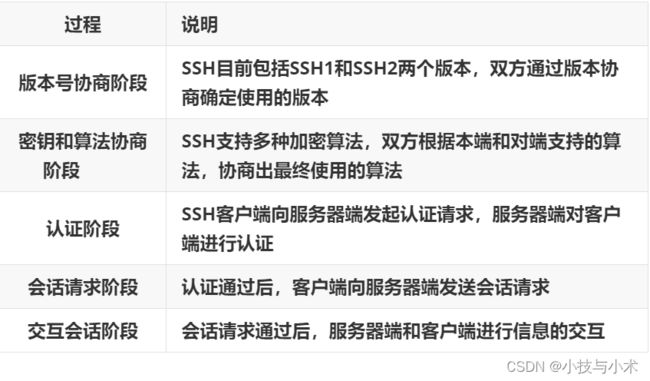
- 版本协商阶段
- 密钥和算法协商阶段
- 认证阶段(两种认证方法)
- ssh服务配置
-
- 安装ssh
- 配置文件分析
- ssh实验
-
- 实验1
- 实验2
- 实验3
- 实验4
简介
概念
- 远程连接服务器通过文字接口或图形接口方式来远程登录系统,让你在远程终端前登录Linux主机以取得可操作主机接口(shell),而登录后的操作感觉就像坐在系统前面一样
功能
- 分享主机的运算能力
- 服务器类型:有限度开放连接
- 工作站类型:只对内网开放
分类
文字接口
- 明文传输:Telnet,RSH等,目前非常少用
这里我们可以使用wireshark抓包工具验证telnet明文传输
- 第一步:首先我们需要在Linux主机中安装telnet服务
[root@server ~]# yum  install telnet-server -y  # 安装telnet

[root@server ~]# systemctl start  telnet.socket  # 启动服务
- 第二步:使用MobaXterm建立telnet连接

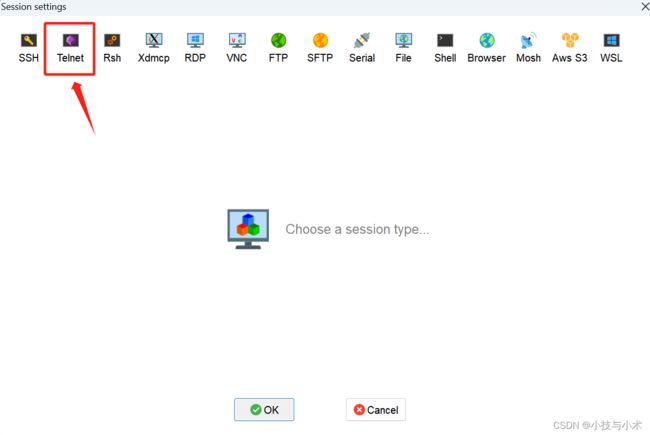
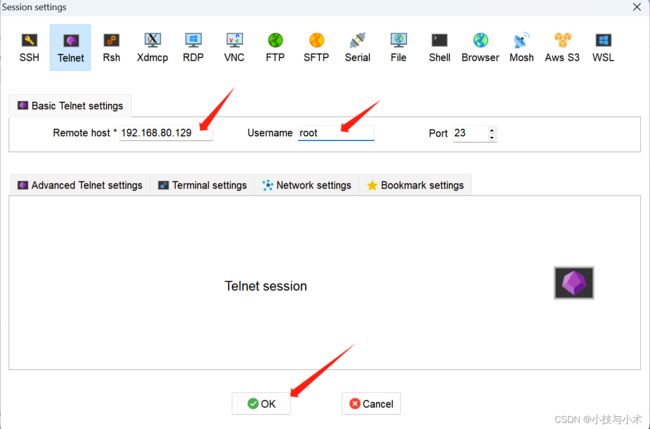

输入Linux主机密码,进入主机

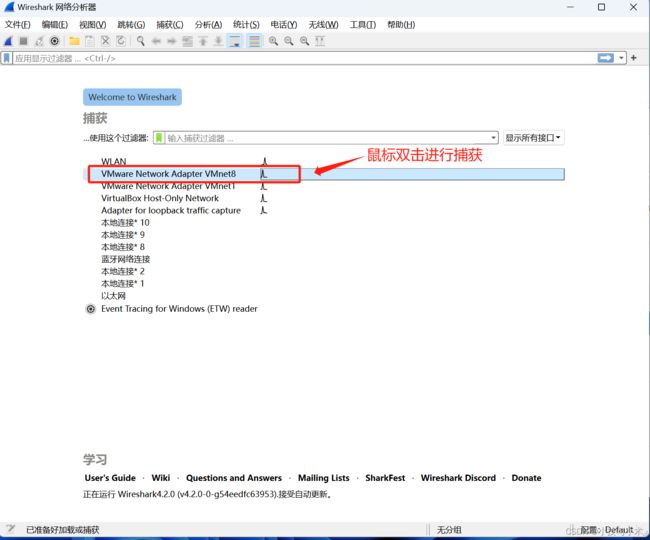
- 第三步:启动wireshark,选择VMnet8网卡
如果没有wireshark,则可以在https://www.wireshark.org/download.html下载安装wireshark,傻瓜式安装即可

在MobaXterm中输入ip a
[root@server ~]# ip a
1: lo: <LOOPBACK,UP,LOWER_UP> mtu 65536 qdisc noqueue state UNKNOWN group default qlen 1000
    link/loopback 00:00:00:00:00:00 brd 00:00:00:00:00:00
    inet 127.0.0.1/8 scope host lo
       valid_lft forever preferred_lft forever
    inet6 ::1/128 scope host
       valid_lft forever preferred_lft forever
2: ens160: <BROADCAST,MULTICAST,UP,LOWER_UP> mtu 1500 qdisc mq state UP group default qlen 1000
    link/ether 00:0c:29:9e:1d:25 brd ff:ff:ff:ff:ff:ff
    altname enp3s0
    inet 192.168.80.129/24 brd 192.168.80.255 scope global noprefixroute ens160
       valid_lft forever preferred_lft forever
    inet6 fe80::20c:29ff:fe9e:1d25/64 scope link noprefixroute
       valid_lft forever preferred_lft forever
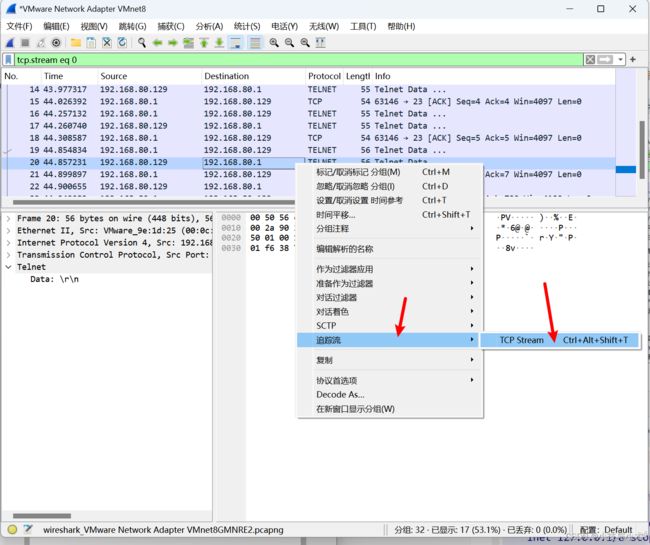
在wireshark选择记录后单右键->追踪流->TCP流
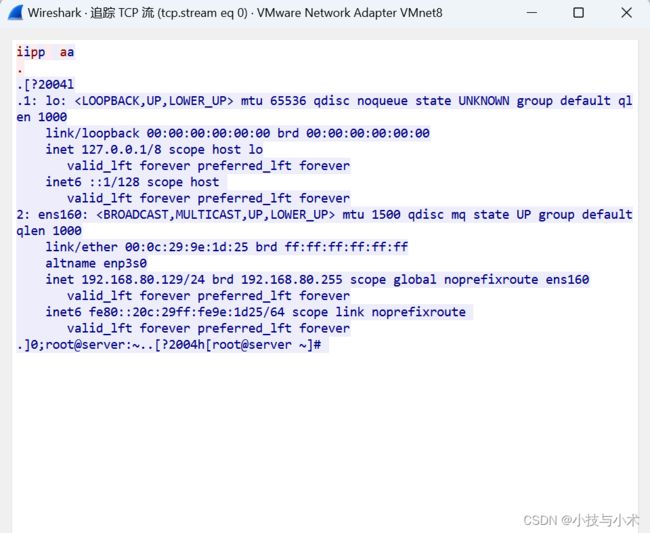
我们可以看到是明文传输
图形接口
- XDMCP,VNC,XRDP等
文字接口ssh连接服务器
- ssh(Secure Shell Protocol,安全壳程序协议)由IETF的网络小组(Network Working Group)所制定,可以通过数据包加密技术将等待传输的数据包加密后再传输到网络上。
- ssh协议本身提供两个服务器功能:
- 一个是类似telnet的远程连接使用shell的服务器;
- 另一个就是类似ftp服务的sftp-server,提供更安全的ftp服务。
浅浅介绍一下加密技术
明文:原始消息
密文:加密后的消息
密钥:加解密的关键参数
加密算法:替换,位置移动等等
凯撒加密
明文:hello
密钥:3
参考:
abcdefghijklmnopq...
defghijklmnopqrstuv...
密文:KHOOR
加密分类
对称加密
加解密使用同一个密钥,DES
非对称加密
加解密双方各用一对密钥,公钥和私钥
- 公钥:公共密钥,存储在公共的设备上,任何用户都可以获取
- 私钥:私有密钥,存储在个人计算机设备上,只有自己可以使用
- 使用公钥加密必须使用私钥加密,使用私钥加密必须使用公钥解密
非对称加密方法(也叫公钥加密)
bob 公钥b   私钥b
alice  公钥a   私钥a
1.bob  公钥b加密 <------>  alice  私钥b解密   (不成立)
2.bob  公钥a加密 <------>  alice  私钥a解密   (能保证数据安全,但不能保证身份验证)
3.bob  私钥b加密 <------> alice   公钥b解密   (能进行身份验证,但不能保证数据安全)
4.bob  私钥a加密 <------> alice  公钥a解密    (不成立)
所以,在生产中,也就只能使用23方法
非对称加密使用rsa算法
数字证书
ssh两大类认证方式:
1.传统的密码认证
2.密钥认证
连接加密技术简介
- 目前常见的网络数据包加密技术通常是通过非对称密钥系统来处理的
- 主要通过两把不一样的公钥与私钥来进行加密与解密的过程
密钥解析
- 公钥(public key):提供给远程主机进行数据加密的行为,所有人都可获得你的公钥来将数据加密
- 私钥(private key):远程主机用你的公钥加密的数据,在本地端就能使用私钥来进行加密,私钥只有自己拥有。
ssh工作过程
版本协商阶段
- 服务器端打开端口22(端口不会单独出现,必须和upd和tcp进行绑定),等待客户端连接;
- 客户端向服务器端发起TCP初始连接请求,TCP连接建立后,服务器向客户端发送第一个报文,包括版本标志字符串,格式为
SSH-<主协议版本号>.<次协议版本号>.<软件版本号>,协议版本号由主版本号和次版本号组成,软件版本号主要是为调试使用。 - 客户端收到报文后,解析该数据包,如果服务器的协议版本号比自己的低,且客户端能支持服务器端的低版本,就使用服务器端的低版本协议号,否则使用自己的协议版本号。
- 客户端回应服务器一个报文,包含了客户端决定使用的协议版本号。服务器比较客户端发来的版本号,决定是否能同客户端一起工作。如果协商成功,则进入密钥和算法协商阶段,否则服务器断开TCP连接
- 注意:上述报文都是采用明文方式传输
密钥和算法协商阶段
- 服务器端和客户端分别发送算法协商报文给对端,报文中包含自己支持的公钥算法列表、加密算法列表、MAC(Message Authentication Code,消息验证码)算法列表、压缩算法列表等等
- 服务器端和客户端根据对端和本端支持的算法列表得出最终使用的算法
- 服务器端和客户端利用DH交换(Diffie-Hellman Exchange)算法、主机密钥对等参数,生成会话密钥和会话ID。
- 由此,服务器端和客户端就取得了相同的会话密钥和会话ID。对于后续传输的数据,两端都会使用会话密钥进行加密和解密,保证了数据传送的安全。在认证阶段,两端会使用会话用于认证过程
- 会话密钥的生成:
- 客户端需要使用适当的客户端程序来请求连接服务器,服务器将服务器的公钥发送给客户端。(服务器的公钥产生过程:服务器每次启动sshd服务时,该服务会主动去找/etc/ssh/ssh_host*文件,若系统刚装完,由于没有这些公钥文件,因此sshd会主动去计算出这些需要的公钥文件,同时也会计算出服务器自己所需要的私钥文件。)
- 服务器生成会话ID,并将会话ID发给客户端。
- 若客户端第一次连接到此服务器,则会将服务器的公钥数据记录到客户端的用户主目录内的~/.ssh/known_hosts。若是已经记录过该服务器的公钥数据,则客户端会去比对此次接收到的与之前的记录是否有差异。客户端生成会话密钥,并用服务器的公钥加密后,发送给服务器。
- 服务器用自己的私钥将收到的数据解密,获得会话密钥。
- 服务器和客户端都知道了会话密钥,以后的传输都将被会话密钥加密
认证阶段(两种认证方法)
- 基于口令的认证(password认证):客户端向服务器发出password认证请求,将用户名和密码加密后发送给服务器,服务器将该信息解密后得到用户名和密码的明文,与设备上保存的用户名和密码进行比较,并返回认证成功或失败消息。
- 基于密钥的认证(publickey认证):
- 客户端产生一对公共密钥,将公钥保存到将要登录的服务器上的那个账号的家目录的.ssh/authorized_keys文件中
- 认证阶段:客户端首先将公钥传给服务器端。服务器端收到公钥后会与本地该账号家目录下的authorized_keys中的公钥进行对比,如果不相同,则认证失败;否则服务端生成一段随机字符串,并先后用客户端公钥和会话密钥对其加密,发送给客户端。客户端收到后将解密后的随机字符串用会话密钥发送给服务器。如果发回的字符串与服务器端之前生成的一样,则认证通过,否则,认证失败。
- 注:服务器端对客户端进行认证,如果认证失败,则向客户端发送认证失败消息,其中包含可以再次认证的方法列表。客户端从认证方法列表中选取一种认证方法再次进行认证,该过程反复进行。直到认证成功或者认证次数达到上限,服务器关闭连接为止
ssh服务配置
安装ssh
[root@server ~]# yum install openssh-server -y

[root@server ~]# systemctl status sshd
配置文件分析
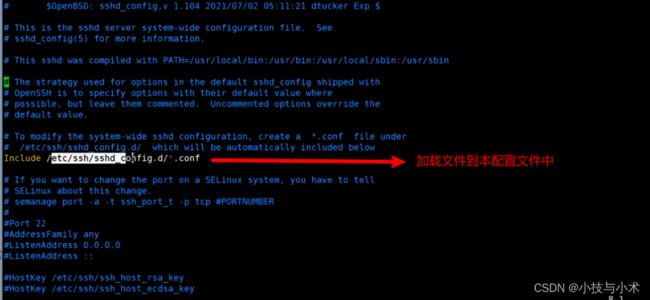
[root@server ~]# vim /etc/ssh/sshd_config
21.#Port 22  # 默认监听22端口,可修改
22.#AddressFamily any  # IPV4和IPV6协议家族用哪个,any表示二者均有
23.#ListenAddress 0.0.0.0 # 指明监控的地址,0.0.0.0表示本机的所有地址(默认可修改)
24.#ListenAddress :: # 指明监听的IPV6的所有地址格式

26.#HostKey /etc/ssh/ssh_host_rsa_key     # rsa私钥认证,默认
27.#HostKey /etc/ssh/ssh_host_ecdsa_key   # ecdsa私钥认证
28.#HostKey /etc/ssh/ssh_host_ed25519_key # ed25519私钥认证


34 #SyslogFacility AUTH  # ssh登录系统的时会记录信息并保存在/var/log/secure
35.#LogLevel INFO   # 日志的等级

39.#LoginGraceTime 2m   # 登录的宽限时间,默认2分钟没有输入密码,则自动断开连接
40 #PermitRootLogin prohibit-password  # 只允许root以密钥形式登录,不能以密码的方式登录 可以设置PermitRootLogin yes,允许管理员登录
41.#StrictModes yes   # 是否让sshd去检查用户主目录或相关文件的权限数据
42.#MaxAuthTries 6  # 最大认证尝试次数,最多可以尝试6次输入密码。之后需要等待某段时间后才能再次输入密码
43.#MaxSessions 10   # 允许的最大会话数

49.AuthorizedKeysFile .ssh/authorized_keys # 选择基于密钥验证时,客户端生成一对公私钥之后,会将公钥放到.ssh/authorizd_keys里面
65 #PasswordAuthentication yes  # 登录ssh时是否进行密码验证
66 #PermitEmptyPasswords no    # 登录ssh时是否允许密码为空

……
123.Subsystem sftp /usr/libexec/openssh/sftp-server #支持 SFTP ,如果注释掉,则不支持sftp连接
AllowUsers user1 user2 #登录白名单(默认没有这个配置,需要自己手动添加),允许远程登录的用户。如果名单中没有的用户,则提示拒绝登录
ssh实验
实验1
- 配置ssh监听端口号
- 第一步:server端操作,编辑配置文件
[root@server ~]# vim /etc/ssh/sshd_config
Port 2222 # 修改第21行参数,去掉#,改为2222
- 第二步:server端操作,重启服务
[root@server ~]# systemctl  restart  sshd

[root@server ~]# netstat -ntlp  # 查看端口号是否改变
- 第三步:node1端操作,ssh登录服务器
[root@node1 ~]# ssh [email protected]  # 默认登录会被拒绝,因为我们已经把端口号改了
ssh: connect to host 192.168.80.129 port 22: Connection refused

[root@node1 ~]# ssh  -p 2222  [email protected]  # 使用-p执行端口登录
[root@server ~]#
- 注意:修改ssh端口号必须关闭selinux,或者说只要涉及修改端口的操作,都需要关闭selinux
# 定位server端,修改会原来的22端口
[root@server ~]# vim  /etc/ssh/sshd_config
Port 22    # 修改第21行参数,去掉#,改为22
[root@server ~]# systemctl restart sshd
[root@server ~]# netstat  -ntlp

# 开启selinux
[root@server ~]# vim  /etc/selinux/config
SELINUX=enforcing  # 改为enforcing即开启
[root@server ~]# reboot   # 重启生效,等待
[root@server ~]# vim  /etc/ssh/sshd_config   # 重新修改端口号为2222
Port 2222

#重启服务后会报错,selinux会拦截端口号修改
[root@server ~]# systemctl restart sshd
Job for sshd.service failed because the control process exited with error code.
See "systemctl status sshd.service" and "journalctl -xeu sshd.service" for details.  # 输入这两条提示命令可以进行排错

[root@server ~]# setenforce  0   # 临时关闭selinux,为1表示开启selinux
[root@server ~]# getenforce      # 查看selinux状态
Permissive                       # 临时关闭,不拦截但会记录行为

[root@server ~]# systemctl restart sshd    # 临时关闭selinux后重启服务成功
- 注意:修改端口这类的系统参数,需要关闭selinux或配置selinux让其放行
实验2
- 拒绝root账户远程登录
- 方法:使用配置文件中的Permitrootlogin参数进行实现
- 参数值:

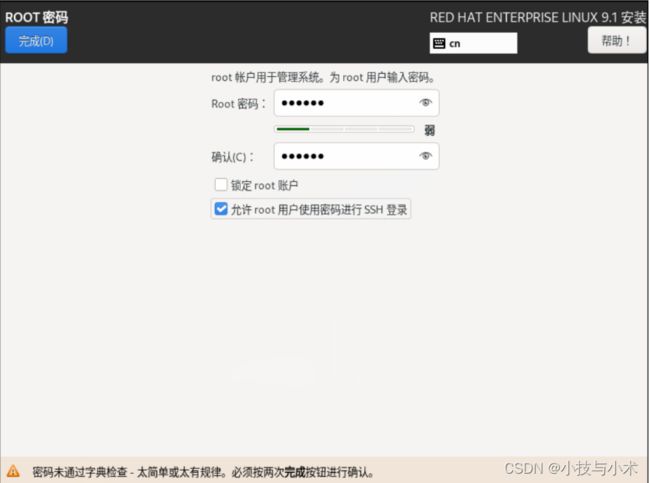
- 注意:RHEL9系统在安装系统时设置了允许使用root使用密码登录ssh时,在 /etc/ssh/sshd_config.d目录下会多一个文件01-permitrootlogin.conf,该文件会单独记录Permitrootlogin yes参数,所以在设置允许root账户登录ssh时应在该文件中设置
[root@server ~]# ll /etc/ssh/sshd_config.d
总用量 8
-rw-r--r--. 1 root root 141 11月 10 23:42 01-permitrootlogin.conf
-rw-------. 1 root root 719 10月 30 18:23 50-redhat.conf
- 第一步:定位server,编辑配置文件
[root@server ~]# vim /etc/ssh/sshd_config.d/01-permitrootlogin.conf
PermitRootLogin no  # yes修改为no,表示拒绝以root身份登录服务器

[root@server ~]# systemctl restart sshd
- 第二步:定位node1,测试远程登录
[root@node1 ~]# ssh  -p 2222 [email protected]   # 以root身份登录被拒绝
[email protected]'s password:
Permission denied, please try again.
实验3
- 虚拟机之间实现免密登录
在做实验3之前,我们西安介绍一些基础知识
- ssh-keygen命令:用于生成,管理密钥
- 格式
[root@server ~]# ssh-keygen -t rsa
-
分析
- -t:指定加密类型
- rsa:rsa公钥加密算法,可以产生公钥和私钥
- 注意:执行后对应账户目录下的隐藏目录.ssh中会有2个文件:
- /root/.ssh/id_rsa:本机私钥文件
- /root/.ssh/id_rsa.pub:本机公钥文件
-
第一步:定位node1,制作公私对
[root@node1 ~]# ssh-keygen -t rsa
- 第二步:定位node1,将公钥上传
[root@node1 ~]# ssh-copy-id   [email protected]  # 将node1公钥上传给129主机
The authenticity of host '192.168.48.130 (192.168.48.130)' can't be established.
ED25519 key fingerprint is SHA256:K7nvJFkfIh+p9YytEGR44wLbTfpB0Y52oVou0UdG6nc.
This key is not known by any other names
Are you sure you want to continue connecting (yes/no/[fingerprint])? yes #输入
/usr/bin/ssh-copy-id: INFO: attempting to log in with the new key(s), to filter out any that are already installed
/usr/bin/ssh-copy-id: INFO: 1 key(s) remain to be installed -- if you are prompted now it is to install the new keys
[email protected]'s password:   # 输入登录密码

Number of key(s) added: 1

Now try logging into the machine, with:   "ssh '[email protected]'"
and check to make sure that only the key(s) you wanted were added.
- 第三步:客户端测试,在node1端进行ssh登录
[root@node1 ~]# ssh [email protected]
Activate the web console with: systemctl enable --now cockpit.socket

Register this system with Red Hat Insights: insights-client --register
Create an account or view all your systems at https://red.ht/insights-dashboard
Last failed login: Sun Nov 19 15:34:55 CST 2023 from 192.168.80.130 on ssh:notty
There were 6 failed login attempts since the last successful login.
Last login: Sun Nov 19 14:38:54 2023 from 192.168.80.1
[root@server ~]#
- 第四步:由于目标时双向免密,只需要在server端制作公私钥对,将其上传给node1端即可
[root@server ~]# ssh-keygen -t rsa  #当这条命令一执行后,就会在当前用户的家目录下会有一个.ssh的目录,.ssh下会有id_rsa 和 id_rsa.pub


[root@server ~]# ssh-copy-id [email protected] # 当这条命令执行后,192.168.80.130这台主机上的当前用户的家目录下的.ssh目录下会出现authorized_keys这个文本

[root@server ~]# ssh [email protected]
Activate the web console with: systemctl enable --now cockpit.socket

Register this system with Red Hat Insights: insights-client --register
Create an account or view all your systems at https://red.ht/insights-dashboard
Last login: Sun Nov 19 15:42:21 2023 from 192.168.80.129
[root@node1 ~]#
最终实验3完成
实验4
- xshell使用密钥登录
- 之前xshell使用的时密码登录,现在通过密钥的配置,实现无密码登录
# 注意:以下步骤检查后若有authorized_keys文件则可忽略

# 先在服务器端检查/root/.ssh/authorized_keys是否存在,它是存储公钥的文件,若不存在需要创建

# 服务器端操作
[root@server ~]# cd /root
[root@server ~]# ls -a   # 先检查
[root@server ~]# mkdir .ssh
[root@server ~]# cd .ssh
[root@server .ssh]# vim authorized_keys
#有时需要注意.ssh目录的权限

