linux 截屏_如何在Linux上创建截屏视频

linux 截屏
 Proxima Studio/Shutterstock.com Proxima Studio / Shutterstock.com
Want to make a screencast on Linux but feeling overwhelmed by the choice of tools and programs? We describe three ways to create a screencast. The quick and easy way, the hard-core and granular way, and the way we think is the best all-rounder.
是否想在Linux上进行截屏,但对工具和程序的选择感到不知所措? 我们描述了创建截屏的三种方法。 快速简便的方法,核心和细粒度的方法以及我们认为的方法是最好的多面手。
如何拍摄优质的截屏视频 (How to Film a Good Screencast)
To create a screencast, you have to record what’s happening on your desktop, together with the commentary you’re adding to it. That requires the ability to record video from your desktop, and audio from your Linux sound subsystem, and possibly from other sources as well.
要创建截屏视频,您必须记录桌面上发生的情况以及要添加的注释。 这就需要能够从您的桌面录制视频,并从Linux声音子系统以及可能还从其他来源录制音频。
When you watch a good screencast, you’ll notice the commentary or narrative is right on point. It’s polished. The delivery has confidence and clarity. There’s no room for “um’s and ah’s” when you are producing a screencast. They’re painful to listen to, and they make your screencast feel amateurish. That’s the very opposite of the effect you’re trying to create. You want your audience to feel that you are an authority on whatever it is you’re talking about. Sounding like you’re bumbling your way through isn’t the way to do that.
当您观看精彩的电视广播时,您会发现评论或叙述正确无误。 它是抛光的。 交付过程充满信心和明确性。 制作截屏视频时,没有空间可以“嗯”和“嗯”。 他们很难听,并且让您的截屏视频感觉很业余。 这与您要创建的效果正好相反。 您希望您的听众感到您在谈论的内容上拥有权威。 听起来像是在摸索自己,这不是实现此目标的方法。
Because of this, many of the slicker screencasts have their audio track recorded and edited separately and then mixed back into the screen video. That’s too big a topic to cover in one small article, so we’re going to look at ways to record the audio and the desktop video at the same time. That doesn’t mean you’re doomed to sounding amateurish. There are simple techniques you can use to raise the quality of your verbal delivery.
因此,许多闪烁的截屏视频都记录并编辑了它们的音轨,然后再混回到屏幕视频中。 这个话题太大了,无法在一篇小文章中介绍,因此我们将研究同时记录音频和桌面视频的方法。 这并不意味着您注定要听起来业余。 您可以使用一些简单的技巧来提高口头传递的质量。
The most elementary—but the most impactful—are a script and practice. Run through your screencast several times before you try to record it. Take notes so that you know what you want to say, and which points you want to draw particular attention to. Don’t be put off by the word “script.” It doesn’t need to be a sophisticated document. A page or two of easy to read bullet points will help enormously. Paradoxically, you don’t want to be distracted trying to read the script when you’re supposed to be speaking.
最基本但最有影响力的是脚本和实践。 在尝试录制之前,请多次播放截屏视频。 做笔记,以便您知道要说什么,以及要特别注意哪些要点。 不要被“脚本”这个词所困扰。 不必是复杂的文档。 一两页易于阅读的要点将极大地帮助您。 矛盾的是,您不想在说话时试图分散注意力。
Put the time in with dry-runs. There’s a reason professionals have rehearsals. It is very difficult to step through the topic you want to describe, control the software you’re using to screencast, and still deliver a good verbal performance.
安排空转时间。 专业人士进行彩排是有原因的。 逐步浏览您要描述的主题,控制用于截屏的软件并仍然提供良好的语言性能是非常困难的。
选择一个好的麦克风(和相机,如果需要的话) (Pick a Good Microphone (and Camera, If You Want))
You’re going to need something to record your voice. That means buying a microphone if you don’t already own one. It’d be a small miracle if the one built into your laptop is going to be good enough. It doesn’t have to cost a fortune, but a reasonable, external microphone that allows you to talk naturally and be recorded at a good volume is an absolute must-have. And a stand for it will pay dividends.
您将需要一些声音来录音。 这意味着如果您还没有麦克风,请购买。 如果您的笔记本电脑内置一个足够好,那将是一个小奇迹。 它不一定要花很多钱,但是绝对必要的是,一个合理的外部麦克风可以让您自然说话并以高音量进行录音。 并且它的立场将支付股息。
If you want to film yourself so that you appear in your screencast, you’re going to need a camera. If all it is going to record is your head and shoulders so that you can be seen in a small window in one corner of your screencast, you don’t need a movie grade camera. But you’ll need something a step up from the basic built-in webcam that came with your laptop. A separate camera means you can place it where you need it to be.
如果您想拍摄自己的影片,以便出现在截屏视频中,则需要一台照相机。 如果只记录您的头和肩膀,以便可以在截屏的一个角落中的小窗口中看到您,则不需要电影级摄像机。 但是,您需要从笔记本电脑随附的基本内置网络摄像头中获取更多帮助。 单独的相机意味着您可以将其放置在需要的地方。
Auto-focus, automatic light adjustment, and a good resolution sensor are all important factors. It’s not out of the question that a good grade camera may have a microphone sufficient to your needs. So if you’re in the market for a camera and a microphone, get the camera first and see if the microphone is up to the task.
自动对焦,自动调光和良好的分辨率传感器都是重要因素。 高质量的摄像头可能具有足以满足您需求的麦克风,这并不是没有问题的。 因此,如果您在市场上需要照相机和麦克风,请先购买照相机,然后看看麦克风是否适合您的工作。
简短的短片:使用GNOME的内置记录器 (Short, SIlent Clips: Use GNOME’s Built-In Recorder)
It’s worth mentioning in passing that if you use the GNOME desktop environment (DE), you have access to a simple screen recorder built right into your DE—but without any audio. If you have a need for a short, silent, video clip, this will suffice. For example, it would be perfect to create a small clip to send to someone to show them the steps required to reproduce a bug.
值得一提的是,如果您使用GNOME桌面环境(DE),则可以访问内置在DE中的简单屏幕录像机,但是没有任何音频。 如果您需要一个简短的,无声的视频剪辑,就足够了。 例如,创建一个小片段发送给某人以向他们展示重现错误所需的步骤是非常理想的。
To start recording the activity on your desktop, simply press:
要开始在桌面上记录活动,只需按:
Ctrl+Shift+Alt+R
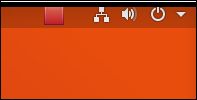
Screen recording will start immediately. A red circular indicator will appear in the tool notification area, close to the networking, sound, and power icons.
屏幕记录将立即开始。 红色的圆形指示器将出现在工具通知区域中,靠近网络,声音和电源图标。

To stop the recording, use the same key combination:
要停止录制,请使用相同的组合键:
Ctrl+Shift+Alt+R

The recording indicator is removed from the notification area. Your recording is stored in your ~/Videos directory with a timestamped filename. The file will have a “.webm” extension, indicating it has been recorded in the WebM video format.
记录指示符已从通知区域中删除。 您的录制内容带有时间戳的文件名存储在~/Videos目录中。 该文件将带有“ .webm”扩展名,表示它已以WebM视频格式记录。

If you want to upload your recording to YouTube, you’ll need to convert it to the MPEG-4 (MP4) format. We’ll see how to do that shortly, using another tool that we’ll look at called ffmpeg.
如果您要将录制内容上传到YouTube ,则需要将其转换为MPEG-4(MP4)格式。 我们将使用另一种名为ffmpeg工具,稍后将介绍如何做到这一点。
Note that by default, the maximum recording length is 30 seconds. You can adjust that using the dconf-editor. The setting is located under org > gnome > settings-daemon > plugins > media-keys. The setting to adjust is called max-screencast-length.
请注意,默认情况下,最大记录长度为30秒。 您可以使用dconf-editor进行调整。 该设置位于org > gnome > settings-daemon > plugins > media-keys 。 要调整的设置称为max-screencast-length 。

快速简便:使用recordMyDesktop进行记录 (Quick and Easy: Record With recordMyDesktop)
recordMydesktop is a simple and straightforward screen and audio recording tool. It allows you to record your desktop, a section of the desktop, or a specific application window.
recordMydesktop是一个简单明了的屏幕和音频录制工具。 它允许您记录您的桌面,桌面的一部分或特定的应用程序窗口。
To install recordMyDesktop on Ubuntu, use this command:
要在Ubuntu上安装recordMyDesktop,请使用以下命令:
sudo apt-get install recordmydesktop gtk-recordmydesktop

To install recordMyDesktop on Fedora, use this command:
要在Fedora上安装recordMyDesktop,请使用以下命令:
sudo dnf install recordmydesktop gtk-recordmydesktop

To install recordMyDesktop on Manjaro, use this command:
要在Manjaro上安装recordMyDesktop,请使用以下命令:
sudo pacman -Syrecordmydesktop gtk-recordmydesktop

The user interface is very simple.
用户界面非常简单。
By default, recordMyDesktop will record the entire desktop. To record a portion of the desktop, left-click and drag in the preview thumbnail. This will define a portion of the screen that will be used for recording. To record a single application window, click the “Select window” button, then click on the application window on your desktop.
默认情况下,recordMyDesktop将记录整个桌面。 要记录桌面的一部分,请在预览缩略图中单击鼠标左键并拖动。 这将定义屏幕上用于记录的部分。 要记录单个应用程序窗口,请单击“选择窗口”按钮,然后在桌面上单击应用程序窗口。

When you are ready to record, click the “Record” button. A red indicator will appear in the notification area close to the networking, sound, and power icons.
准备录制时,单击“录制”按钮。 红色的指示器将出现在通知区域中靠近网络,声音和电源图标的位置。
Left-click on the indicator and select “Stop” from the menu to stop recording. The recording is processed by recordMyDesktop so that it can be saved. If you cancel this process, you’ll lose your recording.
左键单击指示器,然后从菜单中选择“停止”以停止记录。 记录由recordMyDesktop处理,因此可以将其保存。 如果取消此过程,则会丢失录制内容。

When the recording has been processed, click the “Save as” button to save your screencast. A “File Save” dialog allows you to choose where to save the recording.
录制完成后,单击“另存为”按钮以保存您的截屏视频。 “文件保存”对话框使您可以选择保存记录的位置。

The recording is in the “.ogv” Ogg video format. It is the only format provided. To convert the file to a different video format, you could use the next tool we’ll discuss, which is ffmpeg.
录制采用“ .ogv” Ogg视频格式。 这是唯一提供的格式。 要将文件转换为其他视频格式,可以使用我们将讨论的下一个工具ffmpeg 。
从命令行:ffmpeg (From the Command Line: ffmpeg)
The FFmpeg project released its first version of the ffmpeg utility in the year 2000. Their original vision for a useful graphics and video conversion program has been far surpassed. ffmpeg is now a tremendously capable suite of tools and codecs, and is used in numerous other well-known applications such as VLC, Plex, and Blender.
FFmpeg项目于2000年发布了ffmpeg实用程序的第一个版本。他们对于有用的图形和视频转换程序的最初愿景已被大大超越。 ffmpeg现在是功能强大的工具和编解码器套件,并用于许多其他知名应用程序,例如VLC , Plex和Blender 。
If you ever need to do some audio or video recording or format conversion, and you’re wondering whether ffmpeg can do it, you can stop wondering. Basically, the answer is “yes.”
如果您需要进行一些音频或视频记录或格式转换,并且想知道ffmpeg是否可以做到,就可以不再想知道。 基本上,答案是“是”。
ffmpeg has many, many options. Here’s a list of ffmpeg options that runs to over 4000 lines. That wealth of rich functionality does pose quite a learning curve if you want to do anything beyond simple format conversions. There’s no pretty front end for ffmpeg , but what it lacks in terms of interface it makes up for in sheer power, speed, and flexibility. And because it is command-line driven, you can call it from scripts. You can record transient output from unattended commands or record GUI screen activity that can’t be redirected into a file.
ffmpeg有很多很多选择。 这是运行超过4000行的ffmpeg选项的列表。 如果您想进行除简单格式转换以外的任何操作,那么丰富的功能确实会带来很大的学习难度。 ffmpeg没有漂亮的前端,但是它在接口方面所缺乏的是它在强大的功能,速度和灵活性方面所弥补的。 并且由于它是命令行驱动的,因此可以从脚本中调用它。 您可以记录无人值守命令的瞬时输出,也可以记录无法重定向到文件的GUI屏幕活动。
During our testing, ffmpeg had to be installed on Fedora 31 and Ubuntu 18.04. It was already present on Manjaro 18.1.0. To install ffmpeg on Ubuntu, use this command:
在我们的测试过程中,必须在Fedora 31和Ubuntu 18.04上安装ffmpeg 。 它已经存在于Manjaro 18.1.0中。 要在Ubuntu上安装ffmpeg ,请使用以下命令:
sudo apt-get install ffmpeg

To install it on Fedora required the addition of two repositories. This command will register the first:
要在Fedora上安装它,需要添加两个存储库。 此命令将注册第一个:
sudo dnf -y install https://download1.rpmfusion.org/free/fedora/rpmfusion-free-release-$(rpm -E %fedora).noarch.rpm

This command will register the second:
此命令将注册第二个:
sudo dnf -y install https://download1.rpmfusion.org/nonfree/fedora/rpmfusion-nonfree-release-$(rpm -E %fedora).noarch.rpm

The ffmpeg application can now be installed with this command:
现在可以使用以下命令安装ffmpeg应用程序:
sudo dnf -y install ffmpeg

如何使用ffmpeg录制视频和音频 (How to Record Video and Audio with ffmpeg)
To keep things (relatively) simple, we’ll do a straight-forward recording of the entire desktop with audio. There are quite a few parameters we must provide to ffmpeg to get this done. We can use some utilities to help us find the values for some of them.
为了使事情(相对)简单,我们将使用音频对整个桌面进行直接记录。 我们必须为ffmpeg提供很多参数才能完成此操作。 我们可以使用一些实用程序来帮助我们找到其中一些的值。
To identify the available screen resolutions, we can use xrandr. We don’t need to provide any parameters to this command:
要确定可用的屏幕分辨率,我们可以使用xrandr 。 我们不需要为此命令提供任何参数:
xrandr

The output lists all of the available screen resolutions.
输出列出了所有可用的屏幕分辨率。

The current resolution—and highest available on this test machine—is 1920×1080. We’ll use that.
当前的分辨率(也是该测试机上可用的最高分辨率)是1920×1080。 我们将使用它。
Now we’ll find out which PulseAudio sound sources exist on this test machine. We’ll use the pactl utility and ask it to list the sources. The syntax is refreshingly simple:
现在,我们将找出该测试机上存在哪些PulseAudio声源。 我们将使用pactl实用程序,并要求它列出源。 语法非常简单:
pactl list sources

By scrolling through the detailed output, we can see that there is a source #0, which is an output source. That means it produces sound output.
通过滚动查看详细的输出,我们可以看到有一个source #0 ,它是一个输出源。 这意味着它将产生声音输出。

Checking the rest of the output reveals another source called source #1. This is an input source.
检查输出的其余部分会发现另一个称为source #1 。 这是输入源。

That means source #1 accepts sound input. This would come from a microphone, for example. So we’ll use source #1 with ffmpeg and record our voice via the microphone.
这意味着源#1接受声音输入。 例如,这将来自麦克风。 因此,我们将使用ffmpeg信号源#1,并通过麦克风录制语音。
Here’s the entire ffmpeg command.
这是整个ffmpeg命令。
ffmpeg -video_size 1920x1080 -framerate 25 -f x11grab -i :0.0 -f pulse -ac 2 -i 1 output.mkv -async 1 -vsync 1

Let’s break that down:
让我们分解一下:
-video_size 1920×1080: Sets the size of the video capture. This is the value we used
xrandrto find.-video_size 1920×1080 :设置视频捕获的大小。 这是我们使用
xrandr查找的值。-framerate 25: Sets the frames per second value.
-framerate 25 :设置每秒的帧数。
-f x11grab: Force the video format to a specific type. Here we’re setting the input format to the output of your X server.
-f x11grab :将视频格式强制为特定类型。 在这里,我们将输入格式设置为X服务器的输出。
-i :0.0: This specifies the video input will come from the main screen.
-i:0.0 :这指定视频输入将来自主屏幕。
-f pulse: Sets the expected format to be PulseAudio.
-f pulse :将期望的格式设置为PulseAudio。
-ac 2: Set two audio channels
-ac 2 :设置两个音频通道
-i 1: Take audio input from PulseAudio source #1. This is the value we used
pactlto discover.-i 1 :从PulseAudio源1获取音频输入。 这是我们使用
pactl发现的值。output.mkv: The name of the file we wish to create.
output.mkv :我们要创建的文件的名称。
-async 1: Set the audio sync method. This is a deprecated parameter, but we’re using it here to avoid error messages that can be ignored.
-async 1 :设置音频同步方法。 这是一个已弃用的参数,但是我们在这里使用它是为了避免错误消息可以忽略。
-vsync 1: set the video sync method. This is a deprecated parameter, but we’re using it here to avoid error messages that can be ignored.
-vsync 1 :设置视频同步方法。 这是一个已弃用的参数,但是我们在这里使用它是为了避免错误消息可以忽略。
You can see a lot of information scrolling in the terminal window as the recording takes place. Minimize this terminal window or put the main window of the application you’re talking about on top of it so that it doesn’t appear in your screencast.
录制过程中,您会在终端窗口中看到很多信息滚动。 最小化此终端窗口或将您正在谈论的应用程序的主窗口置于其顶部,以使其不会出现在截屏中。

To stop the recording, enter Ctrl+C in the terminal window. If all goes well, you’ll see a confirmation message from ffmpeg reporting that it is exiting normally.
要停止录制,请在终端窗口中输入Ctrl + C。 如果一切顺利,您将看到来自ffmpeg的确认消息,报告它正在正常退出。
We didn’t put a path on the output filename in the ffmpeg command, so it’ll be created in the directory ffmpeg was launched from. In this example, that was our home directory.
我们没有在ffmpeg命令的输出文件名上放置路径,因此将在启动ffmpeg的目录中创建该路径。 在此示例中,这是我们的主目录。

使用ffmpeg转换视频文件 (Converting Video Files with ffmpeg)
We noted earlier that the preferred video format for upload to YouTube is MPEG-4. We can easily convert the “.mkv” to a “.mp4” file using ffmpeg. We say “convert,” but actually, we’re creating a new file altogether. Your original file is untouched.
前面我们提到,上传到YouTube的首选视频格式是MPEG-4。 我们可以使用ffmpeg轻松地将“ .mkv”转换为“ .mp4”文件。 我们说“转换”,但实际上,我们正在完全创建一个新文件。 您的原始文件未更改。
The command is simple. We tell ffmpeg to use the original file as the input, using the -i (input) option. The file extension of the output file tells ffmpeg what type of file to create.
该命令很简单。 我们使用-i (输入)选项告诉ffmpeg使用原始文件作为输入。 输出文件的文件扩展名告诉ffmpeg要创建什么类型的文件。
ffmpeg -i output,mkv output.mp4

A new file is created with an “.mp4” file extension.
创建一个带有“ .mp4”文件扩展名的新文件。

To convert our screencast that was recorded with the Ctrl+Shift+Alt+R method to the MPEG-4 video format, use this command:
要将使用Ctrl+Shift+Alt+R方法记录的截屏视频转换为MPEG-4视频格式,请使用以下命令:
ffmpwg -i "Screencast from 11-02-19 10:47:05.webm" output.mp4
功能强大但用户友好:使用OBS Studio (Capable But User-Friendly: Use OBS Studio)
If you’re looking for something that has more capabilities than recordMyDesktop and is easier to drive than ffmpeg, Open Broadcaster Software Studio (OBS Studio) ticks all the boxes.
如果您正在寻找比recordMyDesktop具有更多功能并且比ffmpeg更易于驱动的产品,那么Open Broadcaster Software Studio (OBS Studio)会在所有方框中打勾。
Install OBS Studio on Ubuntu with this command:
使用以下命令在Ubuntu上安装OBS Studio:
sudo apt-get install obs-studio

Install OBS Studio on Fedora with this command:
使用以下命令在Fedora上安装OBS Studio:
sudo dnf install obs-studio

Install OBS Studio on Manjaro with this command:
使用以下命令在Manjaro上安装OBS Studio:
sudo pacman -Sy obs-studio

如何在OBS Studio中使用源和场景 (How to Use Sources and Scenes in OBS Studio)
OBS Studio has a large work area and a collection of panes along the bottom of the application.
OBS Studio在工作区的底部有一个很大的工作区和一组窗格。

Where do you start?
你从哪里开始?
To put the software through its paces, I needed a target, some end-point that I could try to achieve. It seemed sensible to watch a good screencast and then try to replicate their production. The screencast I used as a template showed a desktop with several open applications on it. There was a small inset window showing a view of the presenter. Occasionally, the display was changed to show a zoomed-in view of a single window. This allowed a particular detail to be discussed. A voiceover provided the narrative.
为了使软件步入正轨,我需要一个目标,以及可以尝试实现的一些目标。 观看一场精彩的电视转播,然后尝试复制其作品似乎很明智。 我用作模板的截屏视频显示了一个桌面,上面有几个打开的应用程序。 有一个小的嵌入式窗口,显示演示者的视图。 有时,显示被更改为显示单个窗口的放大视图。 这允许讨论特定的细节。 旁白提供了叙述。
All of that was surprisingly easy to replicate in OBS Studio, because of its concept of scenes and sources. A source in OBS is something that produces sound or video. Your desktop, a window on the desktop, a webcam, an output audio source, and an input audio source such as a microphone are all valid sources.
由于其场景和资源的概念,所有这些都非常容易在OBS Studio中复制。 OBS中的源是产生声音或视频的东西。 您的桌面,桌面上的窗口,网络摄像头,输出音频源和输入音频源(如麦克风)都是有效的源。
A collection of sources can be combined into a scene. Multiple scenes can be created containing different combinations of sources. Hopping between scenes is accomplished with a single mouse click.
可以将源集合合并到一个场景中。 可以创建包含不同来源组合的多个场景。 只需单击一下鼠标即可在场景之间跳转。
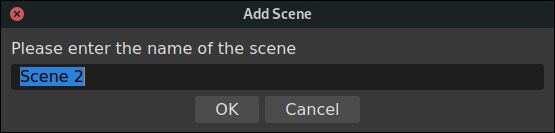
To create a scene, right-click in the “Scenes” pane and click on “Add” in the context menu. Enter a name for the scene in the “Add Scene” dialog and click the “OK” button.
要创建场景,请在“场景”窗格中右键单击,然后在上下文菜单中单击“添加”。 在“添加场景”对话框中输入场景的名称,然后单击“确定”按钮。
The scenes you create are listed in the “Scenes” pane.
您创建的场景将在“场景”窗格中列出。

We have created two scenes, one for the desktop and webcam composite view, and one for the zoomed-in view of the terminal window. We need to add some sources to these scenes. We’ll use the “Zoom on Terminal Window” scene. To add sources to a scene, select it in the “Scenes” pane then right-click in the “Sources” pane. Click on “Add” in the context menu.
我们创建了两个场景,一个场景用于桌面和网络摄像头合成视图,另一个场景用于终端窗口的放大视图。 我们需要向这些场景添加一些资源。 我们将使用“在终端窗口上缩放”场景。 要将源添加到场景,请在“场景”窗格中选择它,然后右键单击“源”窗格。 在上下文菜单中单击“添加”。
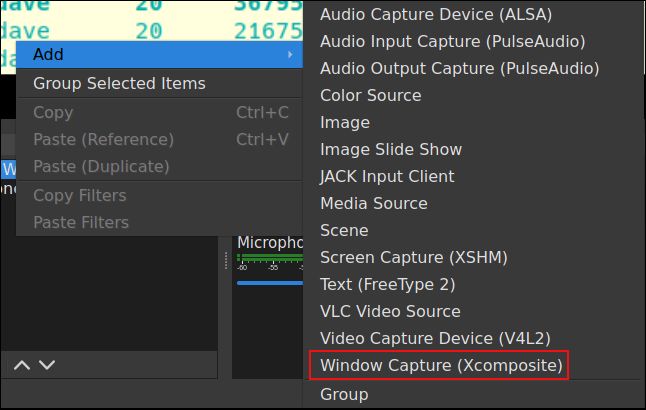
The menu allows you to add images, audio inputs and outputs, application windows, video sources, and other elements you may wish to include in the screencast. We’re going to capture a window. Click on the “Window Capture (Xcomposite)” menu option.
菜单允许您添加图像,音频输入和输出,应用程序窗口,视频源以及您可能希望包括在截屏中的其他元素。 我们将捕获一个窗口。 单击“窗口捕获(Xcomposite)”菜单选项。
In the “Create/Select Source” dialog, create a name for the source and click the “OK” button.
在“创建/选择源”对话框中,为源创建一个名称,然后单击“确定”按钮。

In the “Properties for Window Capture” dialog, use the “Window” drop-down menu to select the window you wish to add to the scene and click the “OK” button.
在“窗口捕获属性”对话框中,使用“窗口”下拉菜单选择要添加到场景中的窗口,然后单击“确定”按钮。

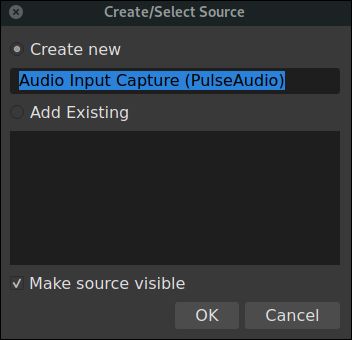
Let’s repeat that and add a source for the microphone. Right-click in the “Sources” pane and click on “Add” in the context menu. The test machine used to research this article used PulseAudio. If you were using a different scheme such as Advanced Linux Sound Architecture (ALSA), you’d select different options. We chose “Audio Input Capture (PulseAudio)” from the menu.
让我们重复一遍,并为麦克风添加一个源。 右键单击“源”窗格,然后在上下文菜单中单击“添加”。 用于研究本文的测试机使用了PulseAudio 。 如果您使用其他方案,例如Advanced Linux Sound Architecture (ALSA),则将选择其他选项。 我们从菜单中选择“音频输入捕获(PulseAudio)”。
In the “Create/Select Source” dialog, give a name to the source and click the “OK” button.
在“创建/选择源”对话框中,为源命名,然后单击“确定”按钮。
In the “Properties for ‘Audio Input Capture (Pulse Audio)'” dialog, use the “Device” drop-down to pick the sound device your microphone is connected to. Click the “OK” button.
在““音频输入捕获(脉冲音频)”的属性”对话框中,使用“设备”下拉菜单选择麦克风连接到的声音设备。 点击“确定”按钮。

Your “Sources” pane should now have two sources in it, for the current scene.
现在,“源”窗格中应包含当前场景的两个源。

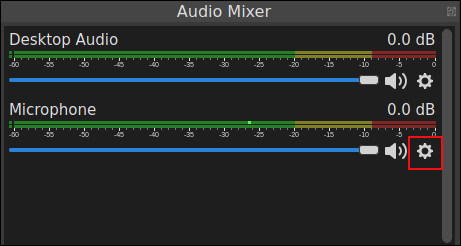
There’s a lot of fine-tuning you can apply to your sources. For example, in the “Audio Mixer” pane, right-clicking on the settings icon for the microphone brings up a context menu.
您可以将许多微调应用到您的资源中。 例如,在“音频混音器”窗格中,右键单击麦克风的设置图标会弹出一个上下文菜单。
Selecting “Filters” displays the “Filters for ‘Microphone'” dialog.
选择“过滤器”将显示“麦克风的过滤器”对话框。
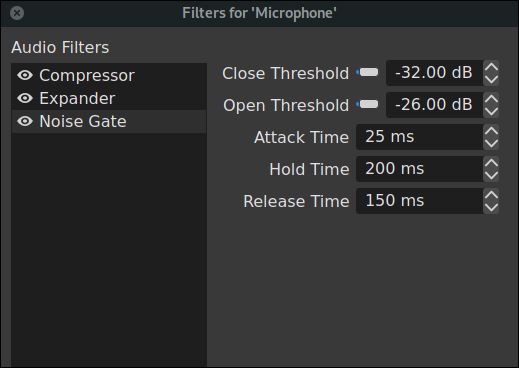
To add a filter, right-click in the left-hand pane and select “Add” from the context menu. Each filter has properties that can be adjusted.
要添加过滤器,请在左侧窗格中右键单击,然后从上下文菜单中选择“添加”。 每个过滤器都有可以调整的属性。

By trial and error, we settled on a selection of filters and settings that worked well with the test microphone. We achieved a good balance between clarity and volume and a reduction in background noise.
通过反复试验,我们选择了一些与测试麦克风配合使用的滤波器和设置。 我们在清晰度和体积以及减少背景噪音之间取得了良好的平衡。
Creating a second scene was just as easy. The desktop we were recording was running in a virtual machine. That was easily added to its scene by adding in the window that the entire virtual machine was running in. The webcam was added as a video source and dragged and sized to sit in the corner of the display. Here’s the view the audience would receive:
创建第二个场景同样容易。 我们正在记录的桌面正在虚拟机中运行。 通过添加整个虚拟机都在其中运行的窗口,可以很容易地将其添加到其场景中。网络摄像头是作为视频源添加的,并且拖动并调整大小以位于显示器的角落。 这是观众会收到的视图:

Moving between the two scenes is as simple as clicking on the scene name in the “Scenes” pane. The zoomed-in terminal scene gave a full-screen view of the Top command in a terminal window.
在两个场景之间移动就像在“场景”窗格中单击场景名称一样简单。 放大的终端场景可在终端窗口中全屏显示Top命令。
Although it can do it, OBS Studio advises against recording in MPEG-4 format. If something goes wrong, you are liable to lose your file. Instead, they advise you to record in FLV or MKV.
尽管可以做到,但是OBS Studio建议不要以MPEG-4格式录制。 如果出现问题,您有可能会丢失文件。 相反,他们建议您以FLV或MKV录制。
If you need to deliver your screencast in a different video format, OBS Studio can do the conversions for you or, of course, you could use ffmpeg.
如果您需要以其他视频格式提供截屏,OBS Studio可以为您进行转换,或者当然可以使用ffmpeg 。
灯光,摄像头,动作 (Lights, Camera, Action)
You might never make it to Hollywood, but if you need to deliver a well-produced screencast, Linux has all the tools you need.
您可能永远也不会进入好莱坞,但是如果您需要提供精心制作的截屏视频,Linux将提供您所需的所有工具。
翻译自: https://www.howtogeek.com/446706/how-to-create-a-screencast-on-linux/
linux 截屏