Redis:Java客户端
前言
"在当今大数据和高并发的应用场景下,对于数据缓存和高效访问的需求日益增长。而Redis作为一款高性能的内存数据库,以其快速的读写能力和丰富的数据结构成为众多应用的首选。与此同时,Java作为广泛应用于企业级开发的编程语言,在与Redis的集成中扮演着重要的角色。因此,掌握如何使用Redis的Java客户端成为了Java开发人员的重要技能之一。
本篇博客将详细介绍Redis的Java客户端,包括其基本概念、使用方法和常见应用场景。我们将通过实际的代码示例和应用案例,带领读者深入了解如何在Java项目中使用Redis进行数据缓存、会话管理等操作,以及如何利用Java客户端与Redis进行交互。
一、前期准备
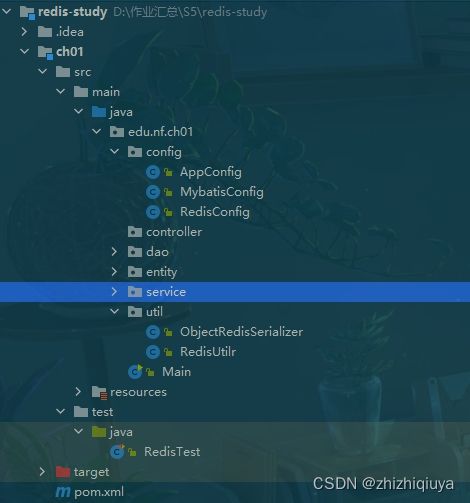
1、新建项目,结构如下
2、导入依赖
            ch.qos.logback
            logback-classic
            1.3.8


            org.springframework.data
            spring-data-redis
            2.5.6


            io.lettuce
            lettuce-core
            6.2.2.RELEASE


            org.projectlombok
            lombok
            1.18.12


            junit
            junit
            4.12
让我逐个解释一下每个依赖项的作用:
logback-classic: Logback是一个用于记录日志的框架,logback-classic是其经典模块,提供了SLF4J(Simple Logging Facade for Java)的实现。通过使用logback-classic,你可以在应用程序中配置和记录日志。
spring-data-redis: 这是Spring Data框架的一部分,它提供了对Redis数据库的集成支持。使用spring-data-redis,你可以轻松地使用Spring框架与Redis进行交互,执行各种操作,如存储和检索数据。
lettuce-core: Lettuce是一个高性能的Java Redis客户端库,用于与Redis服务器进行通信。lettuce-core是Lettuce的核心模块,它提供了与Redis的连接管理、命令执行和数据传输相关的功能。
lombok: Lombok是一个Java库,通过注解来减少代码的冗余。它提供了一些注解,可以自动生成Java类的常见方法(如getter、setter、equals、hashCode等),从而简化了开发流程。
junit: JUnit是一个用于编写和运行单元测试的Java框架。它提供了一组用于验证代码是否按预期运行的断言方法和测试运行器。使用JUnit,你可以编写测试用例来验证你的代码的正确性和健壮性。
二、编写 Redis 配置类
1、RedisConfig 配置类
@Configuration
public class RedisConfig {

    @Bean
    public LettuceConnectionFactory connectionFactory() {
        RedisStandaloneConfiguration configuration = new RedisStandaloneConfiguration("localhost", 6379);
        configuration.setPassword(RedisPassword.of("qiu"));
        configuration.setDatabase(0);
        return new LettuceConnectionFactory(configuration);
    }

    /**
     * 装配RedisTemplate,并自定义序列化器
     * @return
     */
    @Bean
    public RedisTemplate redisTemplate() {
        RedisTemplate redisTemplate = new RedisTemplate<>();
        //设置连接工厂
        redisTemplate.setConnectionFactory(connectionFactory());
        //自定义key的序列化器(使用字符串序列化器)
        redisTemplate.setKeySerializer(RedisSerializer.string());
        redisTemplate.setHashKeySerializer(RedisSerializer.string());
        //自定义value的序列化器(使用json序列化器)
        redisTemplate.setValueSerializer(RedisSerializer.json());
        redisTemplate.setHashValueSerializer(RedisSerializer.json());
        //返回redisTempalte
        return redisTemplate;
    }
}
这段代码是一个Redis的配置类,用于配置与Redis的连接和序列化方式。
@Configuration注解表示这是一个配置类,用于定义一个或多个 bean 对象。@Bean注解表示下面的方法将会返回一个 bean 对象,并注册到应用程序上下文中,以供其他组件使用。首先,我们定义了一个名为
connectionFactory的方法,返回一个LettuceConnectionFactory对象。LettuceConnectionFactory是连接 Redis 服务器的工厂类。在这个方法中,我们创建了一个RedisStandaloneConfiguration对象,用于指定 Redis 服务器的主机名和端口号。然后,我们设置了 Redis 的密码(如果有密码),并指定要连接的数据库索引。最后,我们将这个配置对象传递给LettuceConnectionFactory的构造函数,创建并返回连接工厂。接下来,我们定义了一个名为
redisTemplate的方法,返回一个RedisTemplate对象。RedisTemplate是 Spring 提供的用于操作 Redis 的模板类。在这个方法中,我们创建了一个新的RedisTemplate对象,并设置其连接工厂为前面创建的LettuceConnectionFactory对象。为了正确地序列化键和值,我们使用了一些序列化器:
- 使用
RedisSerializer.string()方法来设置键和哈希键的序列化器,使它们以字符串形式进行序列化和反序列化。- 使用
RedisSerializer.json()方法来设置值和哈希值的序列化器,以支持 JSON 格式的序列化和反序列化。最后,我们返回了配置好的
RedisTemplate对象。通过这样的配置,我们可以在应用程序中注入
RedisTemplate对象,并使用它来执行 Redis 的操作,如存储、获取、删除数据等。此外,键和值的序列化方式也被正确地配置,以便在 Redis 中存储和传输数据时能够正确地进行序列化和反序列化操作。
三、编写 RedisUtil 工具类
public class RedisUtilr {

    /**
     * redis 的连接对象
     * 定义了一个名为connection的私有静态变量,
     * 用于保存 Redis 的连接对象。
     */
    private static StatefulRedisConnection connection;

    /**
     * 使用 Redis 客户端库 lettuce 创建一个RedisURI实例,设置 Redis 服务的相关信息,
     * 然后使用 RedisClient 来创建 Redis 连接对象,并将其保存到connection静态变量中。
     * 在静态代码块中进行初始化,确保在类加载时创建 Redis 连接对象,并且只创建一次,
     * 以提高应用程序的性能和效率。
     */
    static {
        // 初始化连接的 uri,创建一个RedisURI实例,
        // 表示Redis服务的地址和配置信息。这里使用lettuce作为客户端库。
        RedisURI redisURI = RedisURI.Builder
                .redis("lettuce")
                // 设置Redis服务的主机地址为127.0.0.1。
                .withHost("127.0.0.1")
                // 设置Redis服务的端口号为6379。
                .withPort(6379)
                // 设置Redis服务的密码为123456。
//                .withPassword("123456")
                // 设置Redis服务的数据库编号为0。
                .withDatabase(0)
                // 设置Redis服务的超时时间为2秒。
                .withTimeout(Duration.ofSeconds(2))
                .build();

        // 初始化连接对象并设置自定义序列化器
        connection = RedisClient.create(redisURI).connect(new ObjectRedisSerializer());
    }

    /**
     * 从连接中
     * @return
     */
    public static RedisCommands getCommands(){
        // 获取一个同步命令
        return connection.sync();
    }

}
该工具类具有以下功能:
- 创建一个RedisURI实例,用于设置Redis服务的相关信息,如主机地址、端口号、密码、数据库编号和超时时间。
- 使用RedisClient类和RedisURI实例创建一个Redis连接对象,并将连接对象保存在connection静态变量中。
- 提供一个静态方法getCommands(),用于获取一个与Redis数据库进行同步通信的RedisCommands对象。
通过使用这个工具类,你可以更方便地进行与Redis数据库的交互操作,例如执行各种命令、读取和写入数据等。
四、自定义序列化器
public class ObjectRedisSerializer implements RedisCodec {

    /**
     * 这个方法将 key 从 redis 取出来的时候转换为字符串类型
     * 将 key 的字节缓冲(ByteBuffter)转换为字节缓冲
     * @param byteBuffer
     * @return
     */
    @Override
    public String decodeKey(ByteBuffer byteBuffer) {
        ByteBuffer allocate = ByteBuffer.allocate(byteBuffer.capacity());
        allocate.put(byteBuffer);

        // 将字节数组以 UTF-8 的编码转换成 string 并返回
        return new String(allocate.array(), StandardCharsets.UTF_8);
    }

    /**
     * 从 redis 中取出的字节数组转换成任意的 Object 对象
     * @param byteBuffer
     * @return
     */
    @Override
    public Object decodeValue(ByteBuffer byteBuffer) {
        // 先分配系统内存空间
        ByteBuffer allocate = ByteBuffer.allocate(byteBuffer.capacity());
        allocate.put(byteBuffer);
        // 构建字节数组的输入流,这样就可以在 jvm 的内存中将这个字节数组
        // 反序列化为任意的 Object 对象
        try(ByteArrayInputStream bais = new ByteArrayInputStream(allocate.array())){
            // 再通过对象输入流将其转换即可
            ObjectInputStream objectInputStream = new ObjectInputStream(bais);
            return objectInputStream.readObject();
        } catch (IOException | ClassNotFoundException e){
            throw new RuntimeException("无法反序列化value",e);
        }

    }

    /**
     * 将字符串的 key 序列化成字节数组保存到 redis
     * @param key
     * @return
     */
    @Override
    public ByteBuffer encodeKey(String key) {
        return ByteBuffer.wrap(key.getBytes(StandardCharsets.UTF_8));
    }

    /**
     * 将 Object 序列化成字节数组保存到 redis 中
     * @param value
     * @return
     */
    @Override
    public ByteBuffer encodeValue(Object value) {
        try(ByteArrayOutputStream baos = new ByteArrayOutputStream()){
            ObjectOutputStream objectOutputStream = new ObjectOutputStream(baos);
            // 将对象写入流中变成字节数组
            objectOutputStream.writeObject(value);
            // 从流中获取字节数组
            byte[] bytes = baos.toByteArray();
            // 将字节数组包装成 ByteBuffer 对象并返回
            return ByteBuffer.wrap(bytes);
        } catch (IOException e){
            throw new RuntimeException("无法序列化value",e);
        }
    }
}
这段代码实现了一个自定义的 Redis 序列化器(RedisSerializer),用于将键和值在 Redis 和 Java 对象之间进行序列化和反序列化操作。
该类实现了 RedisCodec 接口,并指定了其泛型类型为
,表示键为字符串类型,值为任意对象类型。在该类中,有四个方法需要实现:
decodeKey方法用于将从 Redis 中取出的字节缓冲(ByteBuffer)转换为字符串类型的键。它先创建一个与传入参数相同容量的 ByteBuffer 对象,然后将传入参数中的字节复制到新创建的 ByteBuffer 中,并使用 UTF-8 编码将字节数组转换为字符串并返回。
decodeValue方法用于将从 Redis 中取出的字节缓冲转换为任意对象类型的值。它先创建一个与传入参数相同容量的 ByteBuffer 对象,然后将传入参数中的字节复制到新创建的 ByteBuffer 中。接下来,它使用 ByteArrayInputStream 将字节数组包装成输入流,再通过 ObjectInputStream 对象将输入流反序列化为对象并返回。
encodeKey方法用于将字符串类型的键序列化为字节数组保存到 Redis 中。它将键转换为字节数组,并使用 wrap 方法将字节数组包装成 ByteBuffer 对象并返回。
encodeValue方法用于将任意对象类型的值序列化为字节数组保存到 Redis 中。它使用 ByteArrayOutputStream 创建一个输出流,然后通过 ObjectOutputStream 将对象写入输出流,最后通过 toByteArray 方法获取字节数组,并使用 wrap 方法将字节数组包装成 ByteBuffer 对象并返回。通过使用这个自定义的 Redis 序列化器,我们可以在 Redis 中保存任意类型的 Java 对象,并在需要时进行序列化和反序列化操作。
五、使用java代码操作 Redis
1、set key、get key、mset、gset
 public void testLettuce(){
        // 获取 redisCommands 命令对象
        RedisCommands commands = RedisUtilr.getCommands();
        commands.set("user:1001","qiu");
        String val = (String) commands.get("user:1001");
        log.info(val);

        Map map = new HashMap<>();
        map.put("user:1002","user2");
        map.put("user:1003","user3");
        commands.mset(map);
        List list = commands.mget("user:1001","user:1002","user:1003");
        list.forEach(System.out::println);
        list.forEach(keyValue -> log.info("---》" + keyValue.getKey()));

    }
这段代码使用了Lettuce库来连接和操作Redis数据库。以下是代码的解释:
RedisUtilr.getCommands():这是一个自定义的工具类方法,用于获取Redis命令对象。
commands.set("user:1001", "qiu"):通过set命令将键为"user:1001",值为"qiu"的数据存储到Redis中。
commands.get("user:1001"):通过get命令获取键为"user:1001"的值,并将其赋给变量val。
log.info(val):将变量val的值打印到日志中。
map.put("user:1002", "user2")和map.put("user:1003", "user3"):将键值对"user:1002"-"user2"和"user:1003"-"user3"添加到一个Map集合中。
commands.mset(map):通过mset命令批量设置多个键值对。
commands.mget("user:1001", "user:1002", "user:1003"):通过mget命令批量获取多个键对应的值,并将结果存储在一个列表中。
list.forEach(System.out::println):遍历列表list并将每个元素打印到控制台。
log.info("---》" + keyValue.getKey()):将每个键值对的键打印到日志中。
1)运行结果
我们在控制台通过 get和mget都可以把set和mset进去的值取出来,在可视化工具中也可以查到设置进去的值。
2、hset、hget
 @Test
    public void testHash(){
        RedisCommands commands = RedisUtilr.getCommands();
        commands.hset("user","name","user1");
        commands.hset("user","age","21");
        commands.hset("user","sex","男");
        log.info("--->" + commands.hget("user","name"));
        log.info("--->" + commands.hget("user","age"));
        log.info("--->" + commands.hget("user","sex"));

    }
这段代码用于测试使用Lettuce库操作Redis的Hash数据结构。以下是代码的解释:
RedisUtilr.getCommands():这是一个自定义的工具类方法,用于获取Redis命令对象。
commands.hset("user", "name", "user1")、commands.hset("user", "age", "21")、commands.hset("user", "sex", "男"):分别通过hset命令向名为"user"的Hash结构中添加字段"名字"、"年龄"和"性别",并分别设置它们的值为"user1"、"21"和"男"。
log.info("--->" + commands.hget("user", "name"))、log.info("--->" + commands.hget("user", "age"))、log.info("--->" + commands.hget("user", "sex")):分别通过hget命令获取名为"user"的Hash结构中字段"名字"、"年龄"和"性别"的值,并将它们打印到日志中。
2)运行结果
3、del
@Test
    public void testDel(){
        RedisCommands commands = RedisUtilr.getCommands();

        // 删除键
        commands.del("user:1001","user:1002","user:1003");
    }
在示例中,使用了三个键分别为 "user:1001"、"user:1002"、"user:1003"。
该方法会将传入的键从 Redis 中删除,并返回一个表示删除成功的整数值。如果键不存在,返回的整数值为 0;如果键删除成功,返回的整数值为 1。
这段代码的作用就是删除 Redis 中的三个键 "user:1001"、"user:1002"、"user:1003" 及其关联的值。
3)运行结果
4、setex、expire
  @Test
    public void testExpire() throws InterruptedException {
        RedisCommands commands = RedisUtilr.getCommands();
        // 过期时间单位是秒
        commands.setex("user:1001",5,"user1");
        Thread.sleep(5000);
        log.info("--->" + commands.get("user:1001"));

        commands.set("user:1002","user2");
        // 给已存在的 key 设置过期时间
        commands.expire("user:1002",2);
    }
这段代码是一个针对Redis的过期时间设置的测试方法。首先通过
RedisUtilr.getCommands()方法获取了一个RedisCommands对象,然后进行了以下操作:
- 使用
setex方法设置了一个键为"user:1001"的值为"user1"并且设置了5秒的过期时间。- 接着调用
Thread.sleep(5000)来等待5秒钟,然后尝试获取"user:1001"键的值并打印输出。- 使用
set方法设置了一个键为"user:1002"的值为"user2"。- 最后使用
expire方法为已存在的"user:1002"键设置了2秒的过期时间。在测试方法中,通过这些操作来验证Redis中键的过期时间设置是否符合预期。
4)运行结果
当创建出这个user:1001时,在可视化工具中查看到时,2秒后这个值就自动的销毁了。
5、序列化一个实体
 @Test
    public void testSerialize() throws JsonProcessingException {
        Product product = new Product();
        product.setProductName("iphonr");
        product.setFirm("Apple Inc");
        product.setPlace("China");
        // 将实体序列化成 JSON 字符串
        String productJson = new ObjectMapper().writeValueAsString(product);

        RedisCommands commands = RedisUtilr.getCommands();
        commands.set("product:10001",productJson);
        Object json = commands.get("product:10001");
        // 将 JSON 字符串,反序列化为 product 对象
        product = new ObjectMapper().readValue(json.toString(),Product.class);
        //commands.del("product:10001");
        log.info("---->" + product);

    }
这段代码是一个针对Redis中对象序列化和反序列化的测试方法。具体来说,它完成了以下操作:
- 首先创建了一个Product对象,并设置了一些属性。
- 然后使用ObjectMapper将Product对象序列化成JSON字符串。
- 获取RedisCommands对象,并使用
set方法将序列化后的JSON字符串存储到名为"product:10001"的键中。- 接着使用
get方法从Redis中获取"product:10001"键的值,得到的是一个JSON字符串。- 使用ObjectMapper将JSON字符串反序列化为Product对象。
通过这个测试方法,可以验证在Redis中存储和读取对象的序列化和反序列化过程是否正确。
5)运行结果
6、使用自定义序列化器
新建一个实体类
@Data
public class Product implements Serializable {

    private String productName;
    private String place;
    private String firm;

}
这段代码定义了一个Java类 Product,使用了 Lombok 提供的 @Data 注解,该注解可以自动生成类的 getter、setter、equals、hashCode 和 toString 方法。
在这个 Product 类中,包含了三个成员变量 productName、place 和 firm,它们分别表示产品名称、产地和公司。
由于该类实现了 Serializable 接口,表明这个类的对象可以被序列化,也就是可以在网络上传输或者持久化到磁盘上。
测试类
 /**
     * 自定义序列化器
     */
    @Test
    public void testSerialize2(){
        Product product = new Product();
        product.setProductName("iphonr");
        product.setFirm("Apple Inc");
        product.setPlace("China");

        RedisCommands commands = RedisUtilr.getCommands();
        commands.set("user:1001",product);
        product = (Product) commands.get("user:1001");
        log.info(product.getProductName());
        log.info(product.getFirm());
        log.info(product.getPlace());

    }
这段代码是一个针对Redis中对象序列化和反序列化的测试方法,使用了自定义的序列化器。具体来说,它完成了以下操作:
- 首先创建了一个Product对象,并设置了一些属性。
- 获取RedisCommands对象,并使用
set方法将Product对象存储到名为"user:1001"的键中。由于使用了自定义的序列化器,对象会被序列化成字节数组进行存储。- 使用
get方法从Redis中获取"user:1001"键的值,得到的是序列化后的字节数组。- 将字节数组反序列化为Product对象。
- 最后使用日志输出Product对象的属性。
通过这个测试方法,可以验证在Redis中使用自定义的序列化器进行对象的序列化和反序列化是否正确。
6)运行结果
六、总结
这章就已经讲完了,大家一定要注意,先打开自己的redis的服务先,才能正确的操作redis,不然会报错的。