rsync远程同步
rsync远程同步: 是一个开源的快速备份工具。可以在不同主机之间同步整个目录
在远程,一个是源端,一个是发起端。
源端负责文件原始位置,发起端和源端文件同步。
拷贝文件,连接文件,设备
可以保持源文件或者目录的权限不变 时间、软连接、所有者,所有组等均可以保持不变
可以实现增量同步。只同步发生变化的数据,数据传输效率很高支持匿名认证。
适合同步大文件,可与数据库同步
同步方式
1、完整备份,第一次同步都是完整备份
2、往后的同步,都是增量备份(差异备份),只同步变化的数据。
rsync的命令选项
-r 递归模式,目录包含子目录里免得所有内容。
-l 复制链接文件,软连接
-v 显示同步过程中的详细信息
-z 文件传输,进行压缩
-a 归档模式,可以保留文件按的权限、属性等待
-p 保留文件的权限标记(所有者、所有组)
-t 保留时间标记(时间戳)
-g 保留文件的所在组(管理员)
-o 保留文件的所在者(管理员)
-H 保留硬链接
-D: 保留设备文件和其他特殊文件
--delete: 删除目标位置有,但是原始位置没有的文件
下行同步:
从源端同步到客户端
上行同步
从客户端同步到源端
test1 源端
test2 客户端
下行同步
systemctl stop firewalld
setenforce 0
vim /etc/rsyncd.conf
***************************************
uid = root
gid = root
use chroot = yes
#禁锢在源文件
address = 192.168.10.10
#监听地址
port = 873
#监听端口
log file = /var/log/rsync.log
pid file = /var/run/rsyncd.pid
hosts allow = 192.168.10.0/24
#指定可以访问服务端的地址
![]()
取消注释:以上述后缀名的,同步时不进行压缩
配置共享模块和目录、账户、密码
[test1]
path = /opt/test
comment = test
read only = no
auth users = backuper
secrets file = /etc/rsyncd_users.db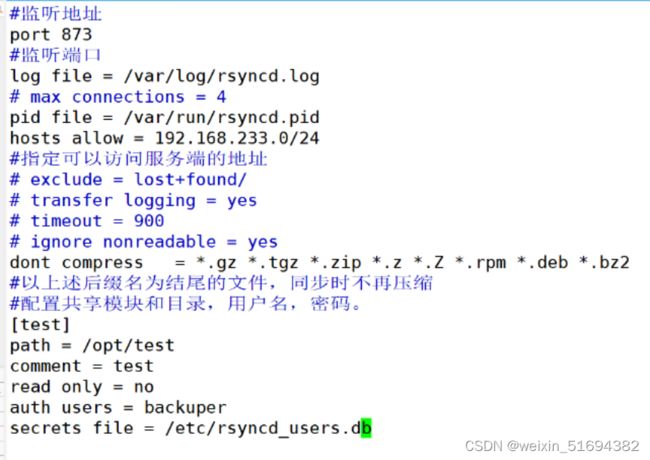
***************************************
vim /etc/rsyncd_users.db
***************************************
backuper:123456
***************************************
chmod 600 /rsyncd_users.db
mkdir -p /opt/test
chmod 777 /opt/test
rsync --daemon 重启
netstat -antp | grep rsync
kill $(cat /var/run/rsyncd.pid) 关闭服务
cd /opt/test
创建文件到/opt/test
test2
rsync -avz [email protected]::test /opt/
rsync 发起同步的命令
-avz a保留文件权限 v显示详细过程 z同步过程中对文件进行压缩
:test 模块名称
免密交换
test2
echo"123456"> /etc/server.pass
chmod 600 /etc/server.pass
rsync -avz --password-file=/etc/server.pass [email protected]::test /opt
inotifv通知接口,可以用来监控文件系统的各种变化情况,文件存取,删除,移动,修改都可以被监控
inotifv机制和rsync配合使用。既可以通知变化,也可以实现同步
tar -xf inotify-tools-3.14,tar.gz
监控事件队列
最多监控的实例
每个实例最多监控的文件
vim /etc/sysctl.conf
********************************
fs.inotify.max_queued_events = 16384
fs.inotify.max_user_instances = 1024
fs.inotify.max_user_watches = 1048576
********************************
sysctl -p
./configure
make && make install
test1
vim /etc/rsyncd.conf
read only = no
test2
inotifywait -mrq -e modify,create,move,delete /opt/test/
-m 持续监控
-r 递归整个目录
-q 简化的输出信息,信息提示
-e 指定监控的事件,多个事件用逗号隔开
rsync -avz --password-file=/etc/server.pass /opt/data [email protected]::test /opt
创建一个监控脚本
CMD="inotifywait -mrq -e modify,create,move,delete /opt/data/"
rsync_cmd="rsync -avz --password-file=/etc/server.pass /opt/data [email protected]::test"
$CMD | while read DIRECTORY EVENT FILE
do
if[ $(pgrep rsync | wc -l) -le 0 ]
then
$rsync_cmd
fi
done
给脚本777权限
chmod +x /etc/rc.d/rc.local
echo '/opt/inotify.sh' >> /etc/rc.d/rc.local
crontab -e -u root
* * * * * /opt/inotify.sh
快速删除大量文件
创建一个空文件
rsync --delete-before -a -H -v --progress --stats /home/blank/ /opt/test1
--delete-before 在传输的过程中进行删除
-a 归档
-H 硬链接
-v 输出过程信息
--progress 显示传输过程
两个文件一样