黑马MySQL基础篇笔记整理——超详细
前言
本文是对B站黑马 《MySQL数据库讲解》中基础篇的知识总结,一不小心码了一万多字~,可根据目录快速定位需要内容!
因为内容较多,可能会出现内容不对的地方,欢迎各位评论区指正,我看到以后会及时修改,后续也会根据情况更新后面内容。如果是格式问题,各位多多海涵!
概述-数据模型
1、关系型数据库(RDBMS)
概念
建立在关系模型基础上,由多张相互连接的二维表组成的数据库
特点
- 使用表存储结构,格式统一,便于维护
- 使用SQL语言操作,标准统一,使用方便
2、MySQL数据库
数据模型
客户端通过SQL语句连接DBMS(数据库管理系统)来创建数据库或者在数据库里面创建表
- 一个数据服务器当中可以创建多个数据库
- 一个数据库当中可以创建多个表
- 一个表当中可以存储多个记录
SQL
1、SQL通用语法及分类
通用语法
1、SQL语句可以单行或者多行书写,以分号结尾
2、SQL语句可以使用空格/缩进来增强语句的可读性
3、MySQL数据库的SQL语句不区分大小写,关键字建议使用大写
4、注释:
单行注释:-- 注释内容 或 # 注释内容
多行注释:/*注释内容*/
分类
2、DDL
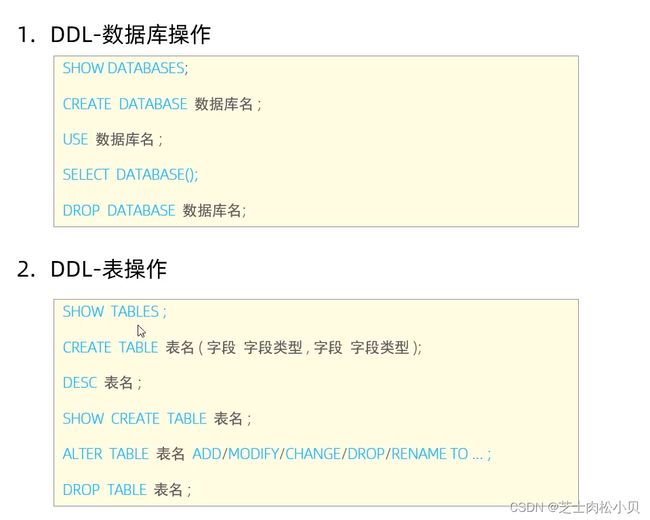
数据库操作
注:
- [ IF NOT EXISTS]:如果库不存在,则进行创建,否则,不进行操作
- [ ]的内容都是可选的
查询所有数据库
创建
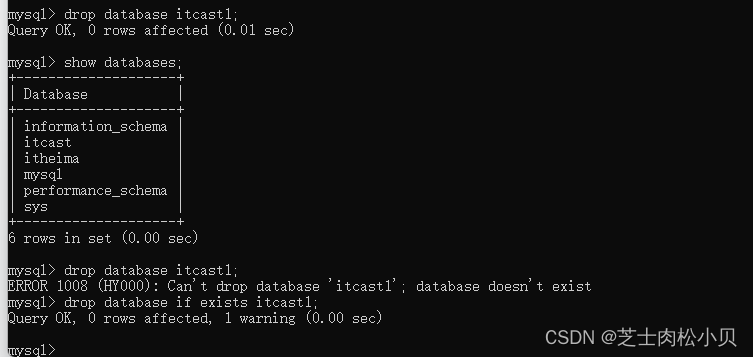
删除
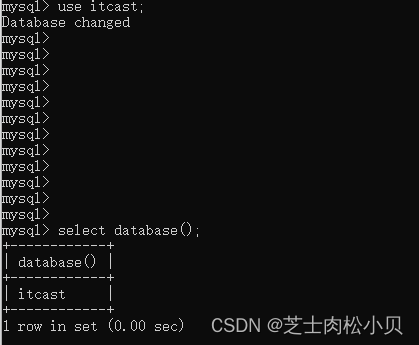
使用
表操作
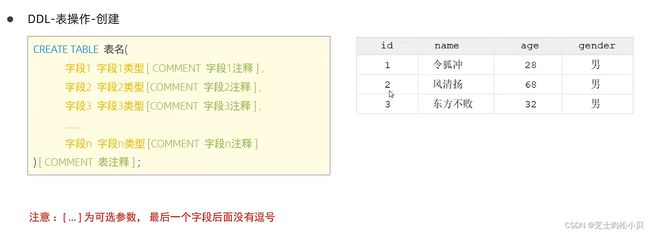
表操作—创建
表操作—查询
查询当前数据所有表
查询表结构及建表语句
表操作—数据类型
数值类型
注:有符号范围:允许出现负数,它的取值范围
无符号范围:不允许出现负数,它的取值范围
TINYINT—Java中的byte;SMALLINT—Java中的short;
INT/INTEGER—Java中的int;BGIINT—Java中的long;
123.45—精度(长度):5,标度(小数点后面的位数):2
eg:age TINYINT UNSIGNED;score double(4,1)(分数最大100.0,标度设为1)
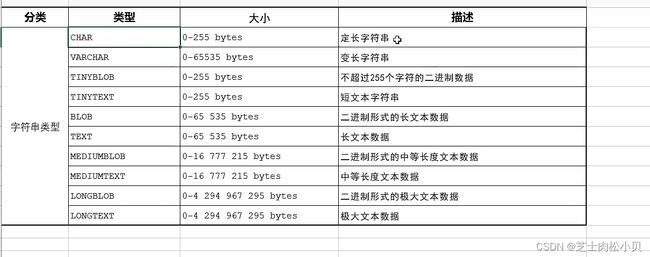
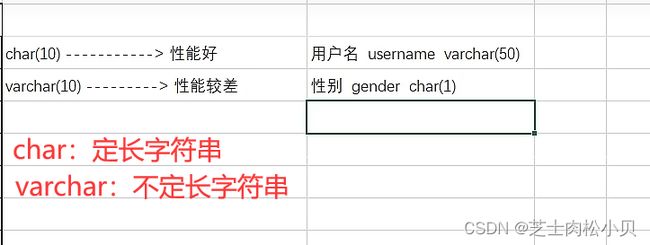
字符串类型
eg:
注·:二进制数据:视频、音频、软件包等,用得不多
日期时间类型
注:DATE、TIME、DATETIME用得更多
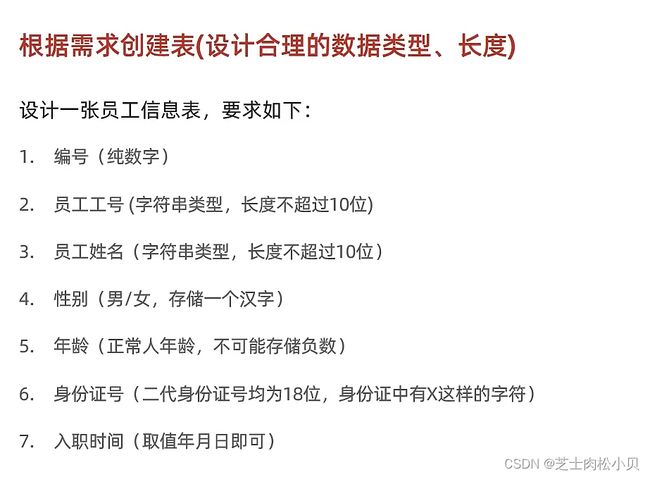
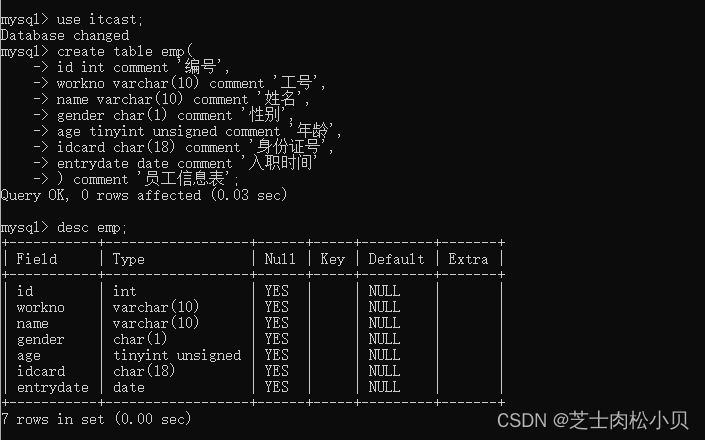
案例
表操作—修改&删除
添加
eg:为emp表添加一个新字段,昵称为nickname,长度不超过20
修改
eg:将emp表的nickname字段修改为username,类型为varchar(30)
eg:将emp表的表名修改为employee
删除
eg:将emp表中字段username删除
![]()
eg:
- drop:
- truncate:
小结
3、DML
数据操作语言,用来对数据库表中的数据记录进行增删改操作
添加数据(INSERT)
注:
- 插入数据时,指定的字段顺序需要与值的顺序是一一对应的
- 字符串和日期类型数据应该包含在引号中
- 插入的数据大小,应该在字段的规定范围内
eg1:
out:
eg2:
out:
修改数据(UPDATE)
注:
- 修改语句的条件可以有,也可以没有,如果没有条件,则会修改整张表的所有数据
eg:
out:
删除数据(DELETE)
注:
- DELETE语句的条件可以有,也可以没有,如果没有条件,则会删除整张表的所有数据
- DELETE语句不能删除某一个字段的值(可以使用UPDATE)
eg:删除gender为女的员工;删除所有员工
out:
小结
4、DQL
数据查询语言,DQL(Data Query Language),日常生活中,查询的行为比增删改操作更多。其中分组查询常配合聚合函数使用,所以在讲解分组查询之前先讲解聚合函数。
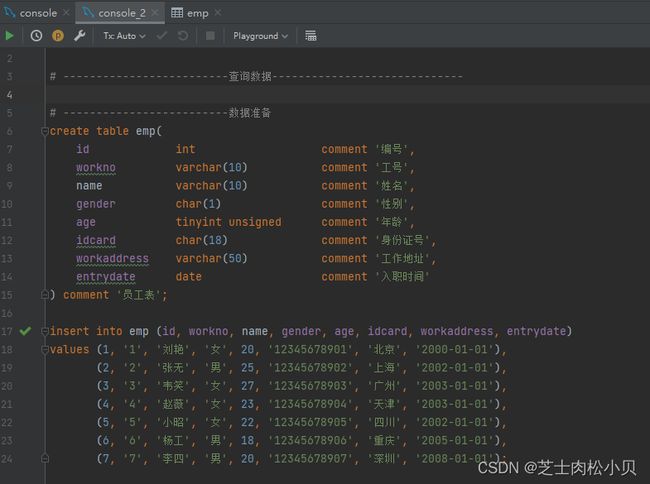
前期数据准备如下:
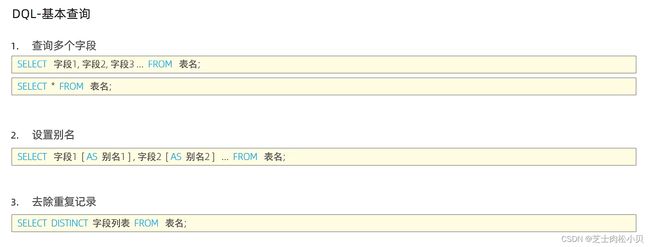
基础查询
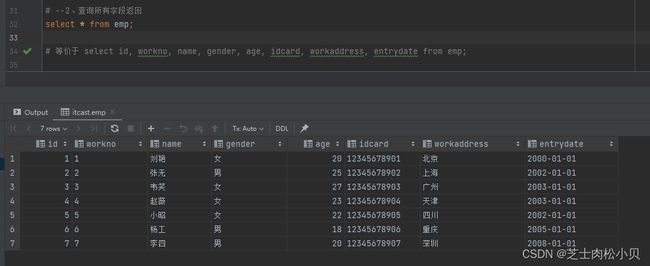
eg :
注:实际开发中还是不要写" select * from emp",写下面那句,更直观的知道返回哪些数据字段
条件查询
注:其余条件自行验证,这里只展示like
聚合函数
注:其余聚合函数自行验证,这里只展示count
注:null 值不参与所有聚合函数运算
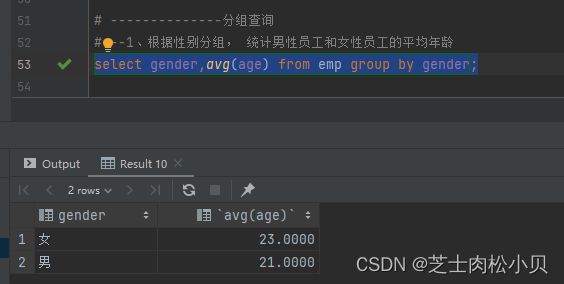
分组查询
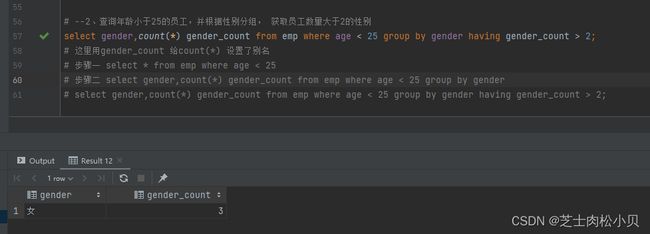
eg :
注:
- 执行顺序:where > 聚合函数 > having #分组的时候执行聚合函数;
- 分组之后,查询的一段一般为聚合函数和分组字段,查询其他字段无意义。
排序查询
分页查询
案例练习
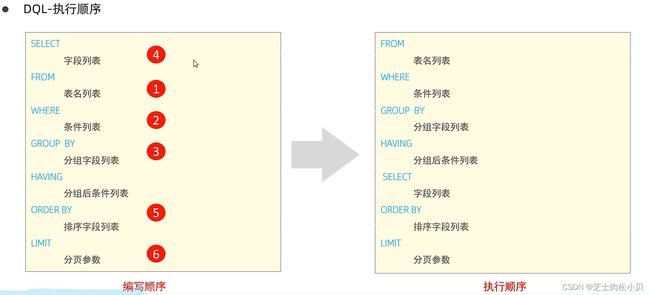
执行顺序
小结
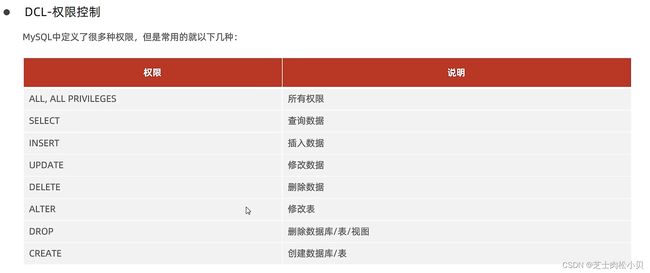
5、DCL
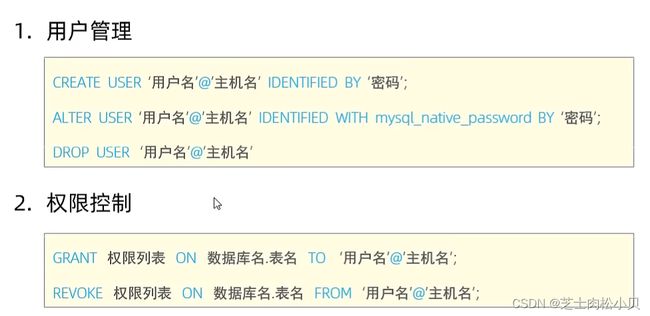
用来管理数据库用户、控制数据库的访问权限。
用户管理
注:在MySQL中,用户的信息及用户所具有的权限的信息都是存放在 mysql 库中的 user 表里,同时知道主机地址和用户名才能完整的定位一个用户。
# 创建用户 itcast, 只能在当前主机 localhost 访问, 密码123456;
create user 'itcast'@'localhost' identified by '123456';    # 这里只是创建了用户,但是并没有给他分配权限!

# 创建用户 heima, 可以在任意主机访问该数据库, 密码123456;
create user 'heima'@'%' identified by '123456';

# 修改用户 heima 密码1234;
alter user 'heima'@'%' identified with mysql_native_password by '1234';

# 删除 itcast@localhost 用户
drop user 'itcast'@'localhost';
注:
- 主机名可以使用 % 通配;
- 这类SQL开发人员操作较少,主要是DBA(Database Administrator 数据库管理员)使用。
权限控制
# --查询权限
show grants for 'heima'@'%';   # GRANT USAGE ON *.* TO `heima`@`%`

# --授予权限
grant all on itcast.* to 'heima'@'%'; # GRANT ALL PRIVILEGES ON `itcast`.* TO `heima`@`%`

# --撤销权限
revoke all on itcast.* from 'heima'@'%'; # GRANT USAGE ON *.* TO `heima`@`%`
注:
- 多个权限之间,使用逗号分隔;
- 授权时,数据库名和表名可以使用* 进行通配 ,代表所有。
小结
6、函数
一段可以直接被另一段程序调用的程序或代码。
字符串函数
 -- concat
 select concat('hello','mysql');  #hellomysql

 -- lower
 select  lower('Hello');    #hello

 -- upper
 select  upper('hello');    #HELLO

 -- lpad
 select lpad('01',5 ,'-');   #---01

 -- rpad
 select rpad('01',5 ,'-');   #01---

 -- trim
 select trim(' hello mysql ');  #hello mysql

 -- substring
 select substring('hello world',1,5);  # hello (从 1 开始数的)
-- 1、企业员工工号统一为五位数,不足五位的前面补0
update emp set workno = lpad(workno, 5, '0');数值函数
 -- 数值函数
 -- ceil 向上取整
select ceil(1.2);              # 2

 -- floor 向下取整
select ceil(1.9);              # 1

 -- mod  (x / y)的模
select mod(6, 4);              # 2

 -- rand
select rand();

 -- round
 select round(2.345, 2);       # 2.35
-- 2、通过数据库函数,生成一个六位数的随机验证码
select lpad(round(rand() * 1000000, 0), 6, '0');日期函数
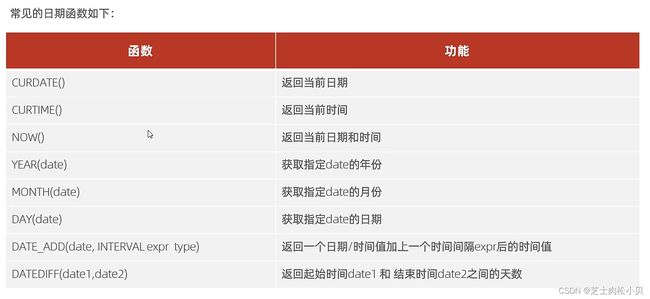
 -- ------------------------------------------------------ 日期函数
 -- curdate()
select curdate();  # 2023-10-25

 -- curtime()
select curtime();  # 13:22:46

-- now()
 select now();  # 2023-10-25 13:23:20

 -- YEAR, MONTH, DAY
select YEAR(now());
select MONTH(now());
select DAY(now());

 -- DATA_ADD(data, INTERVAL expr type)
select date_add(now(), INTERVAL 70 DAY); # 2024-01-03 13:27:39

 -- DATEDIFF(date1, date2)
select datediff('2024.1.13', '2023.10.25');  # 80 (还有80天我就放寒假啦!!!!!!!!!!!!!哈哈哈哈哈哈哈哈哈哈)
select datediff('2001.7.1', '2023.10.25');  # 好家伙,我活了8151天

 -- 查询所有员工入职天数,并根据入职天数倒序排序
select name, datediff(curdate(), entrydate) entrydays from emp order by entrydays desc;
流程函数
 -- -------------------------------------流程函数
 -- IF(value,t,f)
select if(true, 'ok', 'error');  #ok

-- IFNULL(value1,value2)
select ifnull('ok', 'default');  #ok
select ifnull('', 'default');  #''
select ifnull(null, 'default');  #default

-- CASE WHEN [val1] THEN [res1]....ELSE[default] END

-- CASE [expr] WHEN [val1] THEN [res1]....ELSE[default] END

-- 需求:查询emp表员工姓名和城市(北京,上海---->一线城市,其他----->二线城市)
select
    name,
    (case workaddress when '北京' then '一线城市' when '上海' then '一线城市' else'二线城市' end) as '工作地址'
from emp;
小结
7、约束
概述
演示
create table user(
    id int primary key  auto_increment comment '主键',
    name varchar(10) not null unique comment '姓名',
    age int check ( age > 0 && age <= 120 ) comment '年龄',
    status char(1) default  '1' comment '状态',
    gender char(1) comment '性别'
) comment '用户表';

-- 插入数据
-- 主键是递增的,数据库自动维护,我们不用插入
insert into user(name, age, status,gender) values ('Tom1', 19, 1, '男'), ('Tom2', 25, 0, '男');
-- 验证主键约束
insert into user(name, age, status,gender) values ('Tom3', 19, 1, '男');
-- 验证name
insert into user(name, age, status,gender) values (null, 19, 1, '男');
insert into user(name, age, status,gender) values ('Tom3', 19, 1, '男');
-- 验证age
insert into user(name, age, status,gender) values ('Tom3', 130, 1, '男');
-- 验证status
insert into user(name, age, gender) values ('Tom4', 30, '男');
外键约束
用来让两张表的数据之间建立连接,从而保证数据的一致性和完整性
-- 添加外键
alter table 表_name add constraint  fk_表_name_status foreign key (status) references user(id);
-- 删除外键
alter table 表_name drop foreign key fk_表_name_status;
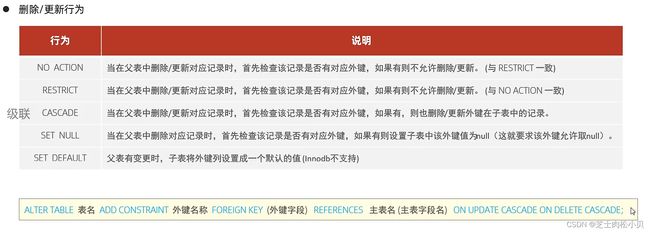
外键删除更新行为
-- 删除更新行为
alter table 表_name add constraint  fk_表_name_status foreign key (status) references user(id) on update cascade on delete cascade ;
alter table 表_name add constraint  fk_表_name_status foreign key (status) references user(id) on update set null on delete set null ;
小结
8、多表查询
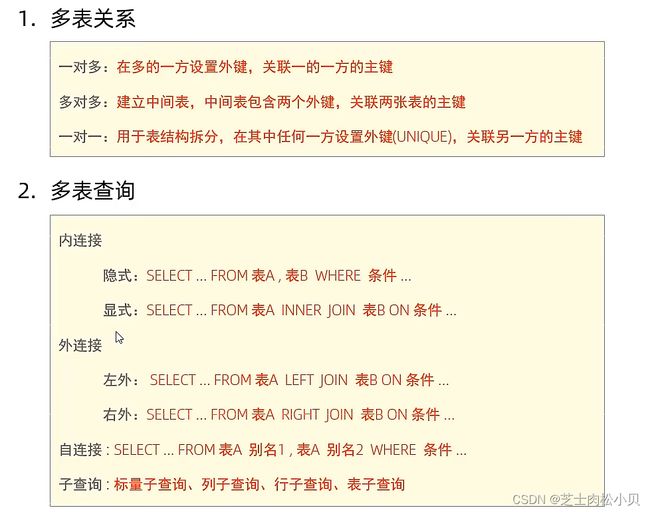
多表关系
一对多(多对一)
多对多
一对一
概述
注:要消除笛卡尔积,只需要在查询语句的后面加一个where条件即可。
内连接
# 注意,一定得是连接的另一个表的主键才可以
alter table emp add constraint  fk foreign key (dep_id) references dep(id) on update cascade on delete cascade ;

-- 内连接
-- 1、查询每一个员工的姓名,及关联的部门的名称(隐式内连接实现)
-- 表结构:emp, dep
-- 连接条件:emp.dep_id = dep.id
select emp.name, dep.dep from emp, dep  where  emp.dep_id = dep.id;

# 一旦对表起了别名,就不能再通过表明来限定字段
select e.name,d.dep from emp e, dep d where e.id = d.id ;

-- 2、查询每一个员工的姓名,及关联的部门的名称(显示内连接实现)  ---INNER JOIN ... ON ...
-- 表结构:emp, dep
-- 连接条件:emp.dep_id = dep.id
select e.name, d.dep from emp e inner join dep d on e.dep_id = d.id;

select e.name, d.dep from emp e  join dep d on e.dep_id = d.id;
外连接
-- 外连接
-- 1、查询emp表所有的数据,和对应的部门信息(左外连接)
-- 表结构:emp, dep
-- 连接条件:emp.dep_id = dep.id
select e.*, d.dep from emp e left join dep d on d.id = e.dep_id;

-- 2、 查询dep表所有的数据,和对应的员工信息(右外连接)
select e.*, d.* from emp e right join dep d on d.id = e.dep_id;
注:实际开发中,左外用得更多,因为右外可以改为左外。
自连接
-- 自连接
-- 1、查询员工及其所属工作地址
-- 表结构: emp
select a.name, b.name from emp a, emp b where a.manageid = b.id;

-- 2、查询所有员工 emp 及其 领导的 名字,如果员工没有领导,也要查询出来
select a.name '员工', b.name '领导' from emp a left join emp b on a.manageid = b.id;
联合查询- union, union all
对于 union 查询,就是把多次查询的结果合并起来,形成一个新的查询结果集。
-- union all ,union
-- 1、将地址在北京的, 和年龄大于 20 岁的员工全部查询
select * from emp where workaddress = '北京'
# union all # 查询结果直接合并
union #查询结果合并并去重
select * from emp where age > 20;

# 对于联合查询的多张表的列数必须保持一致,字段类型也需要保持一致
子查询
标量子查询
-- 标量子查询
-- 1、查询“管理部门”的所有员工信息
-- a. 查询“管理部门”的ID
select id from dep where dep = '管理部门';

-- b. 根据管理部门ID查询员工信息
select * from emp where dep_id = 3;


select * from emp where dep_id = (select id from dep where dep = '管理部门');


-- 2、 查询在“小昭”入职之后的员工信息
-- a. 查询“小昭”入职日期
select entrydate from emp where name = '小昭';

-- b. 查询指定入职日期之后的员工信息
select * from emp where entrydate > '2002-01-01';

select * from emp where entrydate > (select entrydate from emp where name = '小昭');
列子查询
-- 列子查询
-- 1、 查询“销售部” 和“研发部” 的所有员工信息
select * from emp where dep_id in (select id from dep where dep = '销售部' or dep = '研发部');

-- 2、 查询比销售部所有人工资都高的员工信息
select * from emp where salary > all((select salary from emp where dep_id = (select id from dep where dep = '销售部')));
# all 返回回来的结构都需要满足

-- 3、查询比研发部其中任意一人工资高的员工信息
select * from emp where salary > any (select salary from emp where dep_id = (select id from dep where dep = '研发部'));
# any = some
行子查询
-- 行子查询 一行多列
-- 1、查询与“刘艳”的薪资及直属领导相同的员工信息
select * from emp where (salary,manageid) = (select salary,manageid from emp where name = '刘艳');
表子查询
注:表子查询通常在 from 之后。
-- 表子查询
-- 1、 查询与“李四”,“杨工”的工作地点和薪资相同的员工信息
select * from emp where (workaddress,salary) in (select workaddress,salary from emp where name = '李四' or name = '杨工');

-- 2、 查询入职日期是 “2002-01-01” 之后的员工信息,及其部门信息
select e.*, d.dep from (select * from emp where entrydate > '2002-01-01') e left join dep d on e.dep_id = d.id;
练习
-- 案例
-- 1、查询员工姓名、年龄、部门信息(隐式内连接)
-- 表:emp , dept
-- 连接条件 : emp.dep_id = dep.id
select e.name,e.age, d.dep from emp e,dep d where e.dep_id = d.id;

-- 2、查询年龄大于20的员工姓名、年龄、部门信息 (显示内连接)
-- 表:emp , dept
-- 连接条件 : emp.dep_id = dep.id
select e.name,e.age,d.dep from emp e join dep d on d.id = e.dep_id where e.age > 20;

-- 3、查询拥有员工的部门ID、部门名称 (部门表和员工表交集的部分)
-- 表:emp , dept
-- 连接条件 : emp.dep_id = dep.id
-- distinct 去重
select distinct d.id, d.dep from emp e,dep d where e.dep_id = d.id;

-- 4、查询所有年龄大于25的员工及其归属的部门名称,如果没有分配部门,也要展示出来
-- 表:emp , dept
-- 连接条件 : emp.dep_id = dep.id
-- 外连接
select e.name,d.dep from emp e left join dep d on d.id = e.dep_id where e.age > 25;

-- 5、查询所有员工工资等级
-- 表:emp , salgrade
-- 连接条件 : emp.salary >= salgrade.losal &&  emp.salary <= salgrade.hisal
select * from emp e ,salgrade s where e.salary >= s.losal &&  e.salary <= s.hisal;
select * from emp e ,salgrade s where e.salary between s.losal and s.hisal;

-- 6、查询"研发部"所有员工信息及工资等级
-- 表:emp , salgrade, dep
-- 连接条件 :e.salary between s.losal and s.hisal; emp.dep_id = dep.id
-- 查询条件:dep.dep = '研发部'
select e.*, s.grade
from emp e,
     dep d,
     salgrade s
where (e.salary between s.losal and s.hisal)
  and e.dep_id = d.id
  and d.dep = '研发部';

-- 7、查询"研发部"员工的平均工资
-- 表:emp ,  dep
-- 连接条件 : emp.dep_id = dep.id
select avg(e.salary)
from emp e,
     dep d
where e.dep_id = d.id
  and d.dep = '研发部';

-- 8、查询工资比李四高的员工信息
-- 表:emp
select *
from emp e
where salary > (select e.salary from emp e where e.name = '李四');

-- 9、查询比平均工资高的员工信息
-- 表:emp
select *
from emp e
where salary > (select avg(salary) from emp);

-- 10、查询低于本部门平均工资的员工
-- 表:emp , dept
-- 连接条件 : emp.dep_id = dep.id
select *
from emp e2
where e2.salary < (select avg(e1.salary) from emp e1 where e1.dep_id = e2.dep_id);

-- 11、查询所有部门的信息,并统计部门的员工人数
select d.id,d.dep ,(select count(*) from emp e where e.dep_id = d.id) '人数' from dep d;
小结
9、事务
简介
一组操作的集合,它是不可分割的工作单位,事务会把所有的操作作为一个整体一起向系统提交或撤销操作请求,即这些操作要么同时成功,要么同时失败。默认MySQL的事务是自动提交的,也就是说,当执行一条DML语句,MySQL会立即隐式的提交事务。
操作演示
-- 数据准备
create table account(
    id int auto_increment primary key comment '主键ID',
    name varchar(10) comment '姓名',
    monney int comment '余额'
) comment '账户表';

insert into account (id, name, monney)
values (null,'张三',2000),(null,'李四',2000);

-- 恢复数据
update account set monney = 2000 where name = '张三' or name = '李四';

-- 张三给李四转账1000
select * from account where name = '张三';
update account set monney = monney - 1000 where name = '张三';
程序抛出异常...
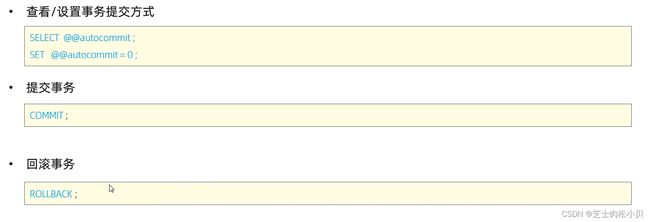
update account set monney = monney + 1000 where name = '李四';select @@autocommit;
set @@autocommit = 0;
-- 张三给李四转账1000
select * from account where name = '张三';
update account set monney = monney - 1000 where name = '张三';
update account set monney = monney + 1000 where name = '李四';
-- 提交事务
commit ;
-- 回滚事务;
rollback ;- 事务操作: 解决二:
-- 张三给李四转账1000
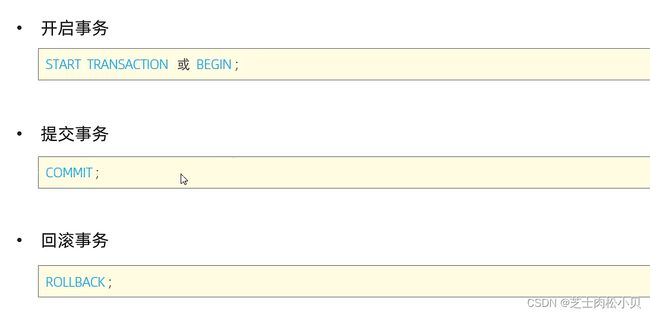
start transaction ;
select * from account where name = '张三';
update account set monney = monney - 1000 where name = '张三';
update account set monney = monney + 1000 where name = '李四';
commit ;
rollback ;
四大特性ACID
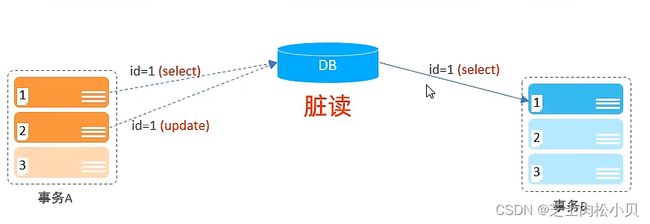
并发事务问题
多个并发事务在执行的过程中出现的问题,有以下三种情况:
事务隔离级别
为解决并发事务问题,设置来了事务隔离级别,下表中从上到下隔离级别越来越高,但是性能越来越差,实际开发中,二者加以权衡使用。
注:事务隔离级别越高,数据越安全,但是性能越低 。


