Python通过人脸识别全面分析好友,一起看透你的“朋友圈”!
微信:一个提供即时通讯服务的应用程序,更是一种生活方式,超过数十亿的使用者,越来越多的人选择使用它来沟通交流。
不知从何时起,我们的生活离不开微信,每天睁开眼的第一件事就是打开微信,关注着朋友圈里好友的动态,而朋友圈中或虚或实的状态更新,似乎都在证明自己的“有趣”,寻找那份或有或无的存在感。
有人选择在朋友圈记录生活的点滴,有人选择在朋友圈展示自己的观点。有时我们想去展示自己,有时又想去窥探着别人的生活,而有时又不想别人过多的了解自己的生活,或是屏蔽对方,或是不给对方看朋友圈,又或是不想看对方的朋友圈。
作者本人也是微信的重度依赖者,每天的工作生活都离不开它,也会关注朋友圈里好友的动态,我个人认为微信朋友圈是一种文化的体现,诸如:发圈、点赞、留言等,都能侧面的反应一个人的生活、工作、心态、爱好、修养、上进心、努力程度等。
今天就跟着我一起来揭秘微信朋友圈,利用 Python+AI人工智能 进行多角度分析,一起看透你的“朋友圈”。
我们将使用Python抓取朋友圈数据,并对获取到的数据进行全面分析,包含好友性别、地理位置分布、个性签名、备注名、好友类型等,逐一进行分析,同时还会使用人脸识别技术对好友头像进行分析,分析到你怀疑人生。。。。。。
整个过程分为四步:
- 获取数据
- 处理数据
- 存储数据
- 数据可视化
一、获取数据
关于微信好友数据的获取,可以通过itchat库,itchat是一个开源的微信个人号的接口,可以实现信息收发、获取好友列表等功能。
具体的用法和说明,在代码中已经做了详细的注释。
#!/usr/bin/env python3 # -*- coding: utf-8 -*- # 导入itchat模块,操作微信个人号的接口 import itchat # 获取数据 def get_data(): # 扫描二维码登陆微信,实际上就是通过网页版微信登陆 itchat.auto_login() # 获取所有好友信息 friends = itchat.get_friends(update=True) # 返回一个包含用户信息字典的列表 return friends if __name__ == '__main__': print(get_data()) 执行代码时电脑屏幕会出现一个二维码,手机微信扫描后即可完成登陆!
二、处理数据
对获取的数据进行处理,筛选出需要的数据。
通过对返回的用户信息进行分析,发现列表中第一个元素是用户自己,可以排除掉。同时我们只取需要的字段数据,各个字段及其取值的含义已在代码中做了说明。
# 处理数据 def parse_data(data): friends = [] for item in data[1:]: # 第一个元素是自己,排除掉 friend = { 'NickName': item['NickName'], # 昵称 'RemarkName': item['RemarkName'], # 备注名 'Sex': item['Sex'], # 性别:1男,2女,0未设置 'Province': item['Province'], # 省份 'City': item['City'], # 城市 'Signature': item['Signature'].replace('\n', ' ').replace(',', ' '), # 个性签名(处理签名内容换行的情况) 'StarFriend': item['StarFriend'], # 星标好友:1是,0否 'ContactFlag': item['ContactFlag'] # 好友类型及权限:1和3好友,259和33027不让他看我的朋友圈,65539不看他的朋友圈,65795两项设置全禁止 } print(friend) friends.append(friend) return friends if __name__ == '__main__': print(parse_data(get_data())) 三、存储数据
为了便于分析数据并进行可视化操作,这里将数据存储到文本文件中。
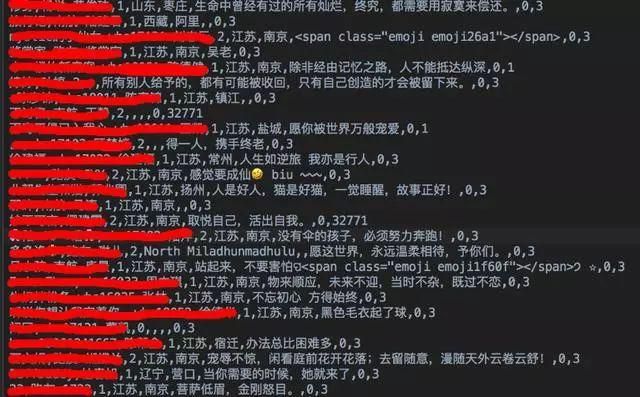
# 存储数据,存储到文本文件 def save_to_txt(): friends = parse_data(get_data()) for item in friends: with open('friends.txt', mode='a', encoding='utf-8') as f: f.write('%s,%s,%d,%s,%s,%s,%d,%d\n' % ( item['NickName'], item['RemarkName'], item['Sex'], item['Province'], item['City'], item['Signature'], item['StarFriend'], item['ContactFlag'])) if __name__ == '__main__': save_to_txt() 重要说明: 这里我获取的是自己的微信好友数据(共计950条,因工作关系,好友数比较多),考虑到个人隐私,部分信息做了处理。
四、数据可视化
这里使用的是pyecharts,pyecharts是一个用于生成Echarts图表的类库,便于在Python中根据数据生成可视化的图表。
Echarts是百度开源的一个数据可视化JS库,主要用于数据可视化。
# 安装pyecharts pip install pyecharts 1. 好友性别分析
代码实现:
#!/usr/bin/env python3 # -*- coding: utf-8 -*- # 导入Pie组件,用于生成饼图 from pyecharts import Pie # 获取所有性别 sex = [] with open('friends.txt', mode='r', encoding='utf-8') as f: rows = f.readlines() for row in rows: sex.append(row.split(',')[2]) # print(sex) # 统计每个性别的数量 attr = ['帅哥', '美女', '未知'] value = [sex.count('1'), sex.count('2'), sex.count('0')] pie = Pie('好友性别比例', '好友总人数:%d' % len(sex), title_pos='center') pie.add('', attr, value, radius=[30, 75], rosetype='area', is_label_show=True, is_legend_show=True, legend_top='bottom') # pie.show_config() pie.render('好友性别比例.html') 可视化结果:
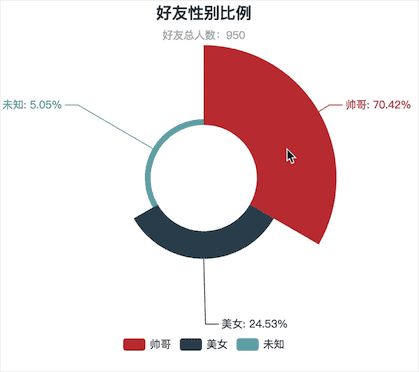
好友主要为男性,占比70%,男女比例严重失衡
看到这个结果,我是有些淡淡忧桑的,微信好友总人数为950,帅哥占比70.42%,美女占比24.53%,男女比例严重失衡,但一点也不意外,本人是一名IT工作者,平时喜欢跑步,所以工作、生活接触到的大部分都是男性朋友,出现男女比例失衡实属正常。
2. 好友位置分析
pyecharts v0.3.2以后,pyecharts 将不再自带地图 js 文件。如用户需要用到地图图表,可自行安装对应的地图文件包。
# 安装地图文件包 pip install echarts-china-provinces-pypkg # 中国省、市、县、区地图 pip install echarts-china-cities-pypkg pip install echarts-china-counties-pypkg pip install echarts-china-misc-pypkg pip install echarts-countries-pypkg # 全球国家地图 pip install echarts-united-kingdom-pypkg 代码实现:
# 导入Counter类,用于统计值出现的次数 from collections import Counter # 导入Geo组件,用于生成地理坐标类图 from pyecharts import Geo import json # 导入Bar组件,用于生成柱状图 from pyecharts import Bar # 数据可视化 def render(): # 获取所有城市 cities = [] with open('friends.txt', mode='r', encoding='utf-8') as f: rows = f.readlines() for row in rows: city = row.split(',')[4] if city != '': # 去掉城市名为空的值 cities.append(city) # 对城市数据和坐标文件中的地名进行处理 handle(cities) # 统计每个城市出现的次数 data = Counter(cities).most_common() # 使用Counter类统计出现的次数,并转换为元组列表 print(data) # 根据城市数据生成地理坐标图 geo = Geo('好友位置分布', '', title_color='#fff', title_pos='center', width=1200, height=600, background_color='#404a59') attr, value = geo.cast(data) geo.add('', attr, value, visual_range=[0, 500], visual_text_color='#fff', symbol_size=15, is_visualmap=True, is_piecewise=True) geo.render('好友位置分布.html') # 根据城市数据生成柱状图 data_top20 = Counter(cities).most_common(20) # 返回出现次数最多的20条 bar = Bar('好友所在城市TOP20', '', title_pos='center', width=1200, height=600) attr, value = bar.cast(data_top20) bar.add('', attr, value, is_visualmap=True, visual_text_color='#fff', is_more_utils=True, is_label_show=True) bar.render('好友所在城市TOP20.html') 出现的问题:
- 报错:ValueError: No coordinate is specified for xxx(地名)
- 原因:pyecharts的坐标文件中没有该地名,实际上是名称不一致导致的,如数据中地名为'达州',而坐标文件中为'达州市'
- 坐标文件所在路径:项目/venv/lib/python3.6/site-packages/pyecharts/datasets/city_coordinates.json
- 解决:修改坐标文件,在原位置下复制个同样的,然后修改下地名
{ "南京市": [ 107.5, 31.22 ], "南京": [ 107.5, 31.22 ], } 不过由于要修改的地名太多,上面的方法实在是麻烦,所以我定义了一个函数,用来处理地名数据找不到的问题
# 处理地名数据,解决坐标文件中找不到地名的问题 def handle(cities): # print(len(cities), len(set(cities))) # 获取坐标文件中所有地名 data = None with open( '/Users/wangbo/PycharmProjects/python-spider/venv/lib/python3.6/site-packages/pyecharts/datasets/city_coordinates.json', mode='r', encoding='utf-8') as f: data = json.loads(f.read()) # 将str转换为json # 循环判断处理 data_new = data.copy() # 拷贝所有地名数据 for city in set(cities): # 使用set去重 # 处理地名为空的数据 if city == '': while city in cities: cities.remove(city) count = 0 for k in data.keys(): count += 1 if k == city: break if k.startswith(city): # 处理简写的地名,如 达州市 简写为 达州 # print(k, city) data_new[city] = data[k] break if k.startswith(city[0:-1]) and len(city) >= 3: # 处理行政变更的地名,如县改区 或 县改市等 data_new[city] = data[k] break # 处理不存在的地名 if count == len(data): while city in cities: cities.remove(city) # print(len(data), len(data_new)) # 写入覆盖坐标文件 with open( '/Users/wangbo/PycharmProjects/python-spider/venv/lib/python3.6/site-packages/pyecharts/datasets/city_coordinates.json', mode='w', encoding='utf-8') as f: f.write(json.dumps(data_new, ensure_ascii=False)) # 将json转换为str 可视化结果:
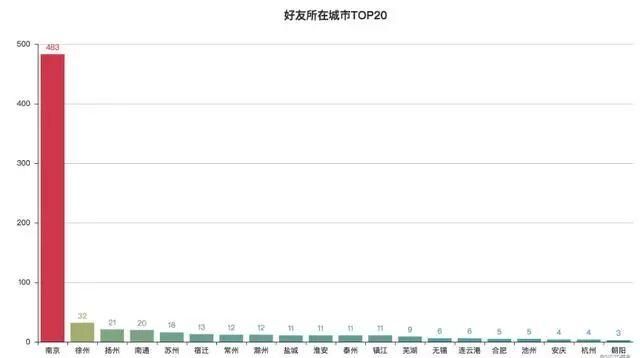
好友主要集中在江苏及周边地区
从图中可以发现:我的微信好友主要集中在江苏及周边地区,本人大学读书时来到南京,现在工作生活也一直在南京,所以南京好友最多,为483个;我自小在徐州长大,所以徐州好友数量也较多;同时因为喜欢跑步,结识了许多跑友,也经常会到周边沿海城市参加各种马拉松活动,所以好友位置主要分布在沿海一带。
3. 个性签名词云图
jieba是一个基于Python的分词库,完美支持中文分词,功能强大
pip install jieba Matplotlib是一个Python的2D绘图库,能够生成高质量的图形,可以快速生成绘图、直方图、功率谱、柱状图、误差图、散点图等
pip install matplotlib wordcloud是一个基于Python的词云生成类库,可以生成词云图
pip install wordcloud 代码实现:
#!/usr/bin/env python3 # -*- coding: utf-8 -*- # 导入jieba模块,用于中文分词 import jieba # 导入matplotlib,用于生成2D图形 import matplotlib.pyplot as plt # 导入wordcount,用于制作词云图 from wordcloud import WordCloud, STOPWORDS # 获取所有个性签名 signatures = [] with open('friends.txt', mode='r', encoding='utf-8') as f: rows = f.readlines() for row in rows: signature = row.split(',')[5] if signature != '': signatures.append(signature) # 设置分词 split = jieba.cut(str(signatures), cut_all=False) # False精准模式分词、True全模式分词 words = ' '.join(split) # 以空格进行拼接 # print(words) # 设置屏蔽词,去除个性签名中的表情、特殊符号等 stopwords = STOPWORDS.copy() stopwords.add('span') stopwords.add('class') stopwords.add('emoji') stopwords.add('emoji1f334') stopwords.add('emoji1f388') stopwords.add('emoji1f33a') stopwords.add('emoji1f33c') stopwords.add('emoji1f633') # 导入背景图 bg_image = plt.imread('bg.jpg') # 设置词云参数,参数分别表示:画布宽高、背景颜色、背景图形状、字体、屏蔽词、最大词的字体大小 wc = WordCloud(width=1024, height=768, background_color='white', mask=bg_image, font_path='STKAITI.TTF', stopwords=stopwords, max_font_size=400, random_state=50) # 将分词后数据传入云图 wc.generate_from_text(words) plt.imshow(wc) # 绘制图像 plt.axis('off') # 不显示坐标轴 # 保存结果到本地 wc.to_file('个性签名词云图.jpg') 可视化结果:
充满正能量、努力生活
个性签名可以反映人的一种心态,对所有好友的个性签名进行分词后制作如下词云图:
从词云图中可以看到,微信好友个性签名中出现频率较高的词汇有:自己、努力、生活、世界、就是、我们、人生、没有、需要、不要、时间、一切、一起、永远、未来、运动、快乐、温柔、个性等,整体来看,我的微信好友还是充满正能量的,都是积极向上、努力生活、有个性的年青人。
我们可以来详细的分析下这些高频词:
- 自己、就是、我们、个性: 彰显个性的自我、自以为是、自大等,也说明了年青人的个性张扬、无所畏惧
- 努力、生活、时间、需要: 说明大家都在努力的工作,追求各自所需,为更好的生活拼博着
- 世界、人生、快乐、未来: 正所谓“世界那么大,我想去看看”,生活虽不易,但对外面的世界、对人生的追求从未停止过,快乐最重要
- 运动、健康、温柔、享受: 说明喜欢运动的朋友比较多,大家都越来越关注健康。温柔、享受也成为共识,活着不易,且活且享受。
4. 备注名词云图
获取好友的备注名,根据备注名生成词名图
代码实现:
#!/usr/bin/env python3 # -*- coding: utf-8 -*- # 导入jieba模块,用于中文分词 import jieba # 导入matplotlib,用于生成2D图形 import matplotlib.pyplot as plt # 导入wordcount,用于制作词云图 from wordcloud import WordCloud, STOPWORDS # 获取备注名 remarkNames = [] with open('friends.txt', mode='r', encoding='utf-8') as f: rows = f.readlines() for row in rows: remarkName = row.split(',')[1] if remarkName != '': remarkNames.append(remarkName) # 设置分词 split = jieba.cut(str(remarkNames), cut_all=False) # False精准模式分词、True全模式分词 words = ' '.join(split) # 以空格进行拼接 print(words) # 导入背景图 bg_image = plt.imread('bg.jpg') # 设置词云参数,参数分别表示:画布宽高、背景颜色、背景图形状、字体、屏蔽词、最大词的字体大小 wc = WordCloud(width=1024, height=768, background_color='white', mask=bg_image, font_path='STKAITI.TTF', max_font_size=400, random_state=50) # 将分词后数据传入云图 wc.generate_from_text(words) plt.imshow(wc) # 绘制图像 plt.axis('off') # 不显示坐标轴 # 保存结果到本地 wc.to_file('备注名词云图.jpg') 可视化结果:
好友备注中“跑友”、“南航”出现的频率最高
从图中可以看出,我的好友备注中出现的高频词有:跑友、南航、wbs17091、wbs18031、wbs17022、wbs17071等
- 本人平时喜欢跑步,也经常参加各种马拉松活动,认识的跑友比较多,所以不足为奇
- 由于工作上与南航有一定的交集,所以南航的好友也比较多
- 以wbs开头的备注都是我工作中带过的学生,数量众多,身为一名IT教育工作者,深感光荣。
- 重要说明:考虑个人隐私,图中部分姓名做了化名处理,请勿当真,如有不便,还望谅解。
5. 好友分类分析
根据备注名,对好友进行分类,统计各类好友的数量
PS:我的习惯是对好友添加备注,标记好友的类型或来源,这属于个人洁癖的一种吧
代码实现:
#!/usr/bin/env python3 # -*- coding: utf-8 -*- # 导入jieba模块,用于中文分词 import jieba # 导入Counter类,用于统计值出现的次数 from collections import Counter from pyecharts import Bar # 获取备注名 remarkNames = [] with open('friends.txt', mode='r', encoding='utf-8') as f: rows = f.readlines() for row in rows: remarkName = row.split(',')[1] if remarkName != '': remarkNames.append(remarkName) # 设置分词 words = [x for x in jieba.cut(str(remarkNames), cut_all=False) if x not in ['-', ',', '(', ')', '(', ')', ' ', "'"]] # 排除短横线、逗号、空格、单引号 data_top10 = Counter(words).most_common(10) # 返回出现次数最多的20条 print(data_top10) bar = Bar('好友分类TOP10', '', title_pos='center', width=1200, height=600) attr, value = bar.cast(data_top10) bar.add('', attr, value, visual_range=[0, 200], is_visualmap=True, is_label_show=True) bar.render('好友分类TOP10.html') 可视化结果:
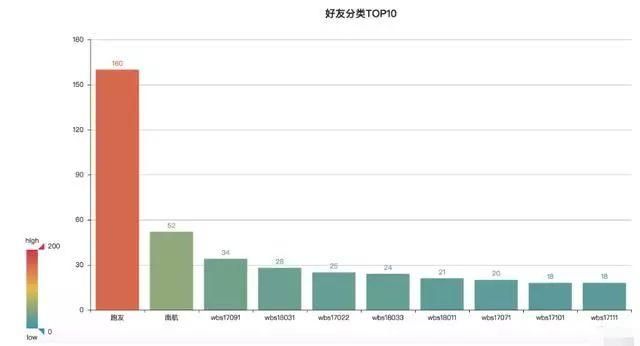
学生最多,其次是跑友
这里只统计好友分类数量最多的前10,其中跑友160人,南航52人,其他的都是wbs开头的学生,实际上wbs开头的学生数是最多的,只是在备注时按班级号进行了划分。
通过分析统计,自己对各类好友的数量也做到了心中有数。
6. 特殊好友分析
获取并统计以下的特殊好友: 星标好友 、 不让他看我的朋友圈 、 不看他的朋友圈
代码实现:
#!/usr/bin/env python3 # -*- coding: utf-8 -*- from pyecharts import Bar # 获取特殊好友 star_list = [] # 星标朋友 deny_see_list = [] # 不让他看我的朋友圈 no_see_list = [] # 不看他的朋友圈 with open('friends.txt', mode='r', encoding='utf-8') as f: rows = f.readlines() for row in rows: # # 获取好友名称 name = row.split(',')[1] if row.split(',')[1] != '' else row.split(',')[0] # 获取星标朋友 star = row.split(',')[6] if star == '1': star_list.append(name) # 获取设置了朋友圈权限的朋友 flag = row.split(',')[7].replace('\n', '') if flag in ['259', '33027', '65795']: deny_see_list.append(name) if flag in ['65539', '65795']: no_see_list.append(name) print('星标好友:', star_list) print('不让他看我的朋友圈:', deny_see_list) print('不看他的朋友圈:', no_see_list) attr = ['星标朋友', '不让他看我的朋友圈', '不看他的朋友圈'] value = [len(star_list), len(deny_see_list), len(no_see_list)] bar = Bar('特殊好友分析', '', title_pos='center') bar.add('', attr, value, is_visualmap=True, is_label_show=True) bar.render('特殊好友分析.html') 可视化结果:
特殊好友。。。你懂的
从上图中可以发现:
- 星标好友有4个,主要是特别关注的好友,个人觉得比较重要的朋友
- 不让他看我的朋友圈有30个,这类好友一般是比较陌生的人,了解较少,当然也有个别是觉得不太方便的
- 不看他的朋友圈有8个,这类基本上都是只在朋友圈发广告的,除了广告没有别的内容,而且每次连续性的发多条,看着确实有些烦
补充说明:在代码中有对特殊好友的姓名也进行了输出显示,大家在运行代码时可以在控制台查看特殊好友具体是谁
7. 好友头像分析
使用腾讯优图提供的人脸识别技术,对头像进行检测和分
首先获取所有好友的头像:
import itchat import os # 获取数据 def get_image(): itchat.auto_login() friends = itchat.get_friends(update=True) # 在当前位置创建一个用于存储头像的目录headImages base_path = 'headImages' if not os.path.exists(base_path): os.mkdir(base_path) # 获取所有好友头像 for friend in friends: img_data = itchat.get_head_img(userName=friend['UserName']) # 获取头像数据 img_name = friend['RemarkName'] if friend['RemarkName'] != '' else friend['NickName'] img_file = os.path.join(base_path, img_name + '.jpg') print(img_file) with open(img_file, 'wb') as file: file.write(img_data) if __name__ == '__main__': get_data() 对头像进行人脸检测,检测头像图片中是否存在人脸,统计使用人脸作用头像的占比。
补充说明:
- 使用腾讯优图相关服务需要在其平台上申请开发者账户,并获取审核后的密钥,具体步骤参考官网
- 在进行人脸检测时速度会比较慢,头像数量不同需要等待的时间也会有所不同,我的好友有900多,大概花了10分钟左右
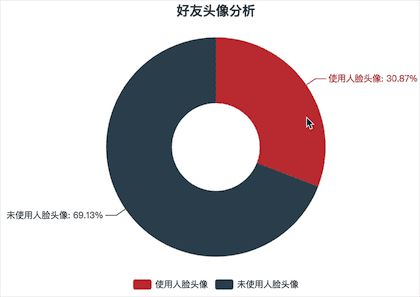
# 导入腾讯优图,用来实现人脸检测等功能 import TencentYoutuyun from pyecharts import Pie def analyse_data(): # 向腾讯优图平台申请的开发密钥,此处需要替换为自己的密钥 appid = '********' secret_id = '************************' secret_key = '************************' userid = '******** end_point = TencentYoutuyun.conf.API_YOUTU_END_POINT # 优图开放平台 youtu = TencentYoutuyun.YouTu(appid, secret_id, secret_key, userid, end_point) use_face = 0 not_use_face = 0 base_path = 'headImages' for file_name in os.listdir(base_path): result = youtu.DetectFace(os.path.join(base_path, file_name)) # 人脸检测与分析 # print(result) # 参考 https://open.youtu.qq.com/legency/#/develop/api-face-analysis-detect # 判断是否使用人像 if result['errorcode'] == 0: # errorcode为0表示图片中存在人像 use_face += 1 gender = '男' if result['face'][0]['gender'] >= 50 else '女' age = result['face'][0]['age'] beauty = result['face'][0]['beauty'] # 魅力值 glasses = '不戴眼镜 ' if result['face'][0]['glasses'] == 0 else '戴眼镜' # print(file_name[:-4], gender, age, beauty, glasses, sep=',') with open('header.txt', mode='a', encoding='utf-8') as f: f.write('%s,%s,%d,%d,%s\n' % (file_name[:-4], gender, age, beauty, glasses)) else: not_use_face += 1 attr = ['使用人脸头像', '未使用人脸头像'] value = [use_face, not_use_face] pie = Pie('好友头像分析', '', title_pos='center') pie.add('', attr, value, radius=[30, 75], is_label_show=True, is_legend_show=True, legend_top='bottom') # pie.show_config() pie.render('好友头像分析.html') if __name__ == '__main__': analyse_data() 可视化结果:
使用人脸头脸的好友并不算多,占比31%
从上图中可以看到,使用人脸头像的好友并不多,占比30.87%,大部分都未使用人脸头像,占比69.13%,从某个角度可以反应出这部分人不愿过多的暴露自己,或是对自我颜值的不自信,具体情况要看个人的心态了。
对于使用人脸头像的,还可以检测图片中人脸的性别、年龄、魅力值、是否戴眼镜等(考虑到个人隐私,部分信息做了处理)。
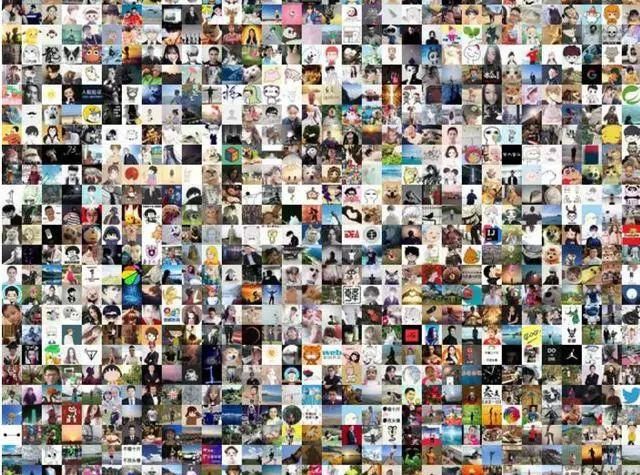
我们还可以将所有头像拼接在一起,生成一个微信好友头像拼接图:
# 拼接头像 def join_image(): base_path = 'headImages' files = os.listdir(base_path) each_size = int(math.sqrt(float(640 * 640) / len(files))) lines = int(640 / each_size) image = Image.new('RGB', (640, 640)) x = 0 y = 0 for file_name in files: img = Image.open(os.path.join(base_path, file_name)) img = img.resize((each_size, each_size), Image.ANTIALIAS) image.paste(img, (x * each_size, y * each_size)) x += 1 if x == lines: x = 0 y += 1 image.save('all.jpg') itchat.send_image('all.jpg', 'filehelper') 生成的头像拼接图,有密集恐惧症的请跳过 ^_^


