Mysql数据库之MHA集群
前言
看别人写csdn博客好久了,刚开始没什么感觉,学的久了发现知识这东西,学的越多,之前的就越容易忘记,没事写写也挺好,一来积累自己的知识和阅历,二来以后忘记了,还能翻回来自己找找.唯一的受限条件就是我这个人有点懒,希望可以坚持下来.这是我的第一篇博客,只是很基础的数据库集群搭建,希望有人能给予多多指导,再下不甚感激.......
-----------------------------------分割线--------
在部署之前首先要知道MHA和它的工作原理
MHA概念?(Master High Availability)
MHA就是一款实现mysql高可用的解决方案,它是日本DeNa公司开发的,它能够在30秒之内完成数据库服务器故障的自动切换,在切换过程中最大限度的保证数据的一致性,以达到真正意义上的高可用.
MHA工作原理
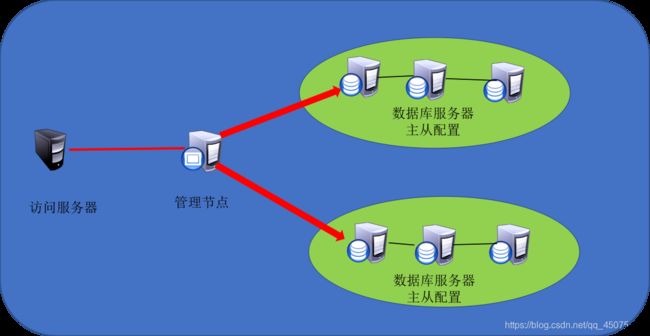
MHA是有管理节点和数据节点组成的:管理节点顾名思义就是用来管理多台数据库集群的,它可以单独布置,也可以布置在某个数据库服务器上,数据节点就是存储数据的mysql服务器,在搭建MHA的时候要将多台数据库服务器配置成一主多从结构,MHA工作过程就是管理节点运行后,监视主从服务器上的主服务器,当主服务器发生故障,管理节点在剩下的从服务器中自动选择一个来当主服务器,并将vip(虚拟ip面向客户端)分配给他,剩下没被选中的服务器,成为当前主服务器的从服务器.

部署MHA
1.1环境说明:
本篇所有实验的真机环境是CentOS Linux release 7.5.1804 (Core) ,五台用来完成实验的虚拟机一台用来做客户端访问,一台配置管理节点,剩下三台充当数据节点,对应IP为:
192.168.4.50 客户端
192.168.4.51 管理节点
192.168.4.52 数据节点主服务器
192.168.4.53 数据节点从服务器
192.168.4.54 数据节点从服务器
192.168.4.100 虚拟IP
2.1实验准备
在以上除客户端虚拟机外所有主机安装perl软件包,因为MHA是perl语言编写的所以需要perl环境.(可以只安装所需要的依赖)
	2.1.1 ssh
			配置所有数据节点的数据库服务器之间免密登录并且配置管理节点可以ssh免密登录所有数据库服务器.使用ssh-keygen //生成秘钥对 ssh-copy-id //传输.
	2.1.2一主多从结构
			配置52为53和54主服务器,53和54是52的从服务器,具体方式是开启主服务器的binlog日志,在从服务器上进入到mysql使用change master命令设置指定主服务器即可.
3.1创建MHA集群
3.1.1配置管理节点51
第一步首先要安装软件(可以去官网下载)
rpm -ivh mha4mysql-node-0.56-0.el6.noarch.rpm
tar -zxvf mha4mysql-manager-0.56.tar.gz   //将下载的软件解压
cd mha4mysql-manager-0.56/    //cd到解压后的目录
perl Makefile.PL
make && make install      //源码编译安装,安装完毕后输入masterha 按TAB键会显示相应的命令则表示安装成功 注意要先安装node在安装manager`
接下来第二步编写主配置文件
首先创建一个配置目录 mkdir /etc/mha
然后在此目录下创建app1.cnf 内容如下:
[server default]     //管理服务默认配置
manager_workdir=/etc/mha   //管理服务工作目录
manager_log=/etc/mha/manager.log  //管理服务日志文件
master_ip_failover_script=/etc/mha/master_ip_failover  //定义故障切换脚本
repl_user=rep
repl_password=123qqq...A    //主从配置的连接用户和密码
ssh_user=root
ssh_port=22						//ssh无密码连接的用户和端口
user=root
password=123qqq...A     //管理主机监控数据服务器的用户名和密码
[server1]         //定义三台数据库服务器
hostname=192.168.4.52     //hostname指定数据库主机ip地址
port=3306           //数据库端口,如果是默认3306可省略
candidate_master=1     //竞选主机,当主库挂掉时,开启竞选为主机

[server2]
hostname=192.168.4.53
port=3306
candidate_master=1

[server3]
hostname=192.168.4.54
port=3306
candidate_master=1
第三步创建故障切换脚本
=#!/usr/bin/env perl

#  Copyright (C) 2011 DeNA Co.,Ltd.
#
#  This program is free software; you can redistribute it and/or modify
#  it under the terms of the GNU General Public License as published by:
#  the Free Software Foundation; either version 2 of the License, or
#  (at your option) any later version.
#
#  This program is distributed in the hope that it will be useful,
#  but WITHOUT ANY WARRANTY; without even the implied warranty of
#  MERCHANTABILITY or FITNESS FOR A PARTICULAR PURPOSE.  See the
#  GNU General Public License for more details.
#
#  You should have received a copy of the GNU General Public License
#   along with this program; if not, write to the Free Software
#  Foundation, Inc.,
#  51 Franklin Street, Fifth Floor, Boston, MA  02110-1301  USA

## Note: This is a sample script and is not complete. Modify the script based on your environment.

use strict;
use warnings FATAL => 'all';

use Getopt::Long;
use MHA::DBHelper;

my (
  $command,        $ssh_user,         $orig_master_host,
  $orig_master_ip, $orig_master_port, $new_master_host,
  $new_master_ip,  $new_master_port,  $new_master_user,
  $new_master_password
);

my $vip = '192.168.4.100/24';  # Virtual IP
my $key = "1";
my $ssh_start_vip = "/sbin/ifconfig eth0:$key $vip";
my $ssh_stop_vip = "/sbin/ifconfig eth0:$key down";

GetOptions(
  'command=s'             => \$command,
  'ssh_user=s'            => \$ssh_user,
  'orig_master_host=s'    => \$orig_master_host,
  'orig_master_ip=s'      => \$orig_master_ip,
  'orig_master_port=i'    => \$orig_master_port,
  'new_master_host=s'     => \$new_master_host,
  'new_master_ip=s'       => \$new_master_ip,
  'new_master_port=i'     => \$new_master_port,
  'new_master_user=s'     => \$new_master_user,
  'new_master_password=s' => \$new_master_password,
);

exit &main();

sub main {
  if ( $command eq "stop" || $command eq "stopssh" ) {

    # $orig_master_host, $orig_master_ip, $orig_master_port are passed.
    # If you manage master ip address at global catalog database,
    # invalidate orig_master_ip here.
    my $exit_code = 1;
    eval {

      # updating global catalog, etc
      &stop_vip();
      $exit_code = 0;
    };
    if ($@) {
      warn "Got Error: $@\n";
      exit $exit_code;
    }
    exit $exit_code;
  }
  elsif ( $command eq "start" ) {

    # all arguments are passed.
    # If you manage master ip address at global catalog database,
    # activate new_master_ip here.
    # You can also grant write access (create user, set read_only=0, etc) here.
    my $exit_code = 10;
    eval {
      my $new_master_handler = new MHA::DBHelper();

      # args: hostname, port, user, password, raise_error_or_not
      $new_master_handler->connect( $new_master_ip, $new_master_port,
        $new_master_user, $new_master_password, 1 );

      ## Set read_only=0 on the new master
      $new_master_handler->disable_log_bin_local();
      print "Set read_only=0 on the new master.\n";
      $new_master_handler->disable_read_only();

      ## Creating an app user on the new master
      print "Creating app user on the new master..\n";
      $new_master_handler->enable_log_bin_local();
      $new_master_handler->disconnect();

      ## Update master ip on the catalog database, etc
      &start_vip();
      $exit_code = 0;
    };
    if ($@) {
      warn $@;

      # If you want to continue failover, exit 10.
      exit $exit_code;
    }
    exit $exit_code;
  }
  elsif ( $command eq "status" ) {

    # do nothing
    exit 0;
  }
  else {
    &usage();
    exit 1;
  }
}
sub start_vip() {
    `ssh $ssh_user\@$new_master_host \" $ssh_start_vip \"`;
}
sub stop_vip() {
    return 0 unless ($ssh_user);
    `ssh $ssh_user\@$orig_master_host \" $ssh_stop_vip \"`;
}

sub usage {
  print
"Usage: master_ip_failover --command=start|stop|stopssh|status --orig_master_host=host --orig_master_ip=ip --orig_master_port=port --new_master_host=host --new_master_ip=ip --new_master_port=port\n";
}
~
~
这个脚本主要明白以下
根据主配置文件定义去创建
			vim /etc/mha/master_ip_failover
			35 my $vip = '192.168.4.100/24';  # Virtual IP      //将35行定义成自己要设置成的vip

			36 my $key = "1";
 			37 my $ssh_start_vip = "/sbin/ifconfig eth0:$key $vip"; //部署vip
 			38 my $ssh_stop_vip = "/sbin/ifconfig eth0:$key down";  //干掉vip//这三行就是谁是主,就在谁上部署vip,谁不是主就宕掉     eht0:$key   <---设置网卡别名
记得给这个脚本添加执行权限
4.1配置数据节点
第一步部署VIP地址
在数据库服务器的主服务器上配置52
ifconfig eth0:1 192.168.4.100        //设置
ifconfig eth0:1                       //查看
4.2授权用户
授权rep用户用来连接主从服务器
授权root用户拥有完全权限监控主机
grant replication slave on *.* to rep@"%" identified
by "123qqq...A";           //授权rep用户
grant all on *.* to root@"%" identified by
"123qqq...A";         //root用户
4.3根据角色做相应的配置
当为主服务器时至少要保证接收到一台从服务器的同步消息所以至少是半同步模式,为从服务器时不需要接收所以是异步模式,所以要给所有的数据库服务器都打开半同步和异步模式.
[mysqld]
		plugin-load="rpl_semi_sync_master=semisync_master.so;rpl_semi_sync_slave=semisync_slave.so" //加载模块
		rpl_semi_sync_master_enabled=1  //启用master模块
		rpl_semi_sync_slave_enabled=1     //启用slave模块
		relay_log_purge=0   //禁止自动删除中继日志文件
5.1测试配置
根据上面的配置,我们的MHA大致已经部署完毕,现在开始测试,在管理节点进行51.
测试ssh配置
masterha_check_ssh --conf=/etc/mha/app1.cnf
测试主从同步配置
masterha_check_repl --conf=/etc/mha/app1.cnf
启动服务
masterha_manager --conf=/etc/mha/app1.cnf --remove_dead_master_conf --ignore_last_failover
–remove_dead_master_conf //删除宕机主库的配置
–ignore_last_failover //忽略xxx.health文件 此文件规定在某个时间段宕机只切换一次
6.1
如果服务没有启动,你就要去看报错信息,修改对应服务,至此MHA所有配置均已完毕,感谢浏览.....