SpringBoot2——数据访问
数据源的自动配置
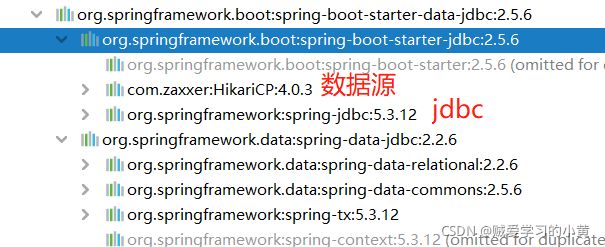
访问数据源我们需要先导入JDBC场景
        <dependency>
            <groupId>org.springframework.boot</groupId>
            <artifactId>spring-boot-starter-data-jdbc</artifactId>
        </dependency>
我们发现他没有自动帮我们引入数据库驱动,因为系统并不知道我们需要使用mysql还是oracle还是其他的数据库,这个需要我们手动导入依赖,这里注意mysql驱动的版本必须与电脑安装的MySQL大版本一致
        <dependency>
            <groupId>mysql</groupId>
            <artifactId>mysql-connector-java</artifactId>
            <!--SpringBoot2.5.6对应的是mysql8.0.27,如果版本不一致,可以通过以下方式修改-->
            <!--<version>xx.xx.xx</version>-->
        </dependency>
放在以前,配置MySQL时,我们都需要对其属性进行设置,在SpringBoot框架中,我们需要看一下自动设置的路径在哪
@Configuration(
    proxyBeanMethods = false
)
@ConditionalOnClass({DataSource.class, EmbeddedDatabaseType.class})
@ConditionalOnMissingBean(
    //这里的注解时分布式开发要用的,现在用不到
    type = {"io.r2dbc.spi.ConnectionFactory"}
)
//DataSourceProperties规定了在哪里修改配置
@EnableConfigurationProperties({DataSourceProperties.class})
@Import({DataSourcePoolMetadataProvidersConfiguration.class, InitializationSpecificCredentialsDataSourceInitializationConfiguration.class, SharedCredentialsDataSourceInitializationConfiguration.class})
public class DataSourceAutoConfiguration {
@ConfigurationProperties(
    prefix = "spring.datasource"
)
public class DataSourceProperties implements BeanClassLoaderAware, InitializingBean {
所以我们就可以在application.yaml文件中进行如下设置
spring:
  datasource:
    url: jdbc:mysql://localhost:3306/mybatis
    username: root
    password: Hkx123
    driver-class-name: com.mysql.cj.jdbc.Driver
测试
@Slf4j
@SpringBootTest
class Boot03WebApplicationTests {
    @Autowired
    JdbcTemplate jdbcTemplate;
    @Test
    void contextLoads() {
        Long aLong = jdbcTemplate.queryForObject("select count(*) from employee", Long.class);
        log.info("数据库中字段数量是{}", aLong);
    }

}
使用Druid数据库连接池
SpringBoot为我们配置的数据库连接池为Hikari,我们可以手动修改为druid数据库连接池
- 自定义
- 找starter
可以去Github上面查看Druid连接池的相关文档 链接
自定义方式引入Druid
导入Druid依赖
        <dependency>
            <groupId>com.alibabagroupId>
            <artifactId>druidartifactId>
            <version>1.2.8version>
        dependency>
在SpringMVC中,我们在xml配置文件中创建一个bean,设置其属性
 <bean id="dataSource" class="com.alibaba.druid.pool.DruidDataSource" init-method="init" destroy-method="close">
     <property name="url" value="${jdbc_url}" />
     <property name="username" value="${jdbc_user}" />
     <property name="password" value="${jdbc_password}" />
 </bean>
在SpringBoot中我们创建Bean的形式就是使用配置类
@Configuration
public class DataSourceConfig {
    @ConfigurationProperties("spring.datasource")
    @Bean
    public DruidDataSource dataSource(){
        DruidDataSource druidDataSource = new DruidDataSource();
        //以下配置我们都可以通过绑定 @ConfigurationProperties("spring.datasource") 配置文件属性自动配置
//        druidDataSource.setUrl();
//        druidDataSource.setUsername();
//        druidDataSource.setPassword();
        return druidDataSource;
    }

}
测试
@Slf4j
@SpringBootTest
class Boot03WebApplicationTests {
    @Autowired
    DataSource dataSource;
    @Test
    void contextLoads()
        log.info("数据源类型为{}", dataSource.getClass()); //数据源类型为class com.alibaba.druid.pool.DruidDataSource
    }

}
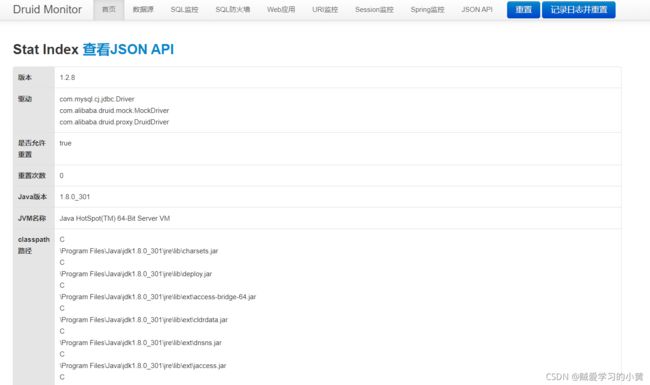
使用Druid的监控功能
我们先来看一下Druid官方文档是怎么说的,它使用的时Spring那套配置方法,配置一个Servlet
在SpringBoot中,我们只需要创建一个Servlet的注册器就可以在里面进行注册了
    //使用Druid内置监控页面
    @Bean
    public ServletRegistrationBean statViewServlet(){
        ServletRegistrationBean<StatViewServlet> registrationBean = new ServletRegistrationBean<>(new StatViewServlet());
        //设置访问路径
        registrationBean.addUrlMappings("/druid/*");
        HashMap<String, String> map = new HashMap<>();
        map.put("loginUsername","admin");
        map.put("loginPassword","admin");
        //设置访问监控页面的账号密码
        registrationBean.setInitParameters(map);
        return registrationBean;
    }
打开SQL监控与防火墙功能
在创建datasource时,可以进行两者的设置
    @ConfigurationProperties("spring.datasource")
    @Bean
    public DruidDataSource dataSource() throws SQLException {
        DruidDataSource druidDataSource = new DruidDataSource();
        //打开sql监控(stat),防火墙(wall)
        druidDataSource.setFilters("stat,wall");
        return druidDataSource;
    }
打开Web监控功能
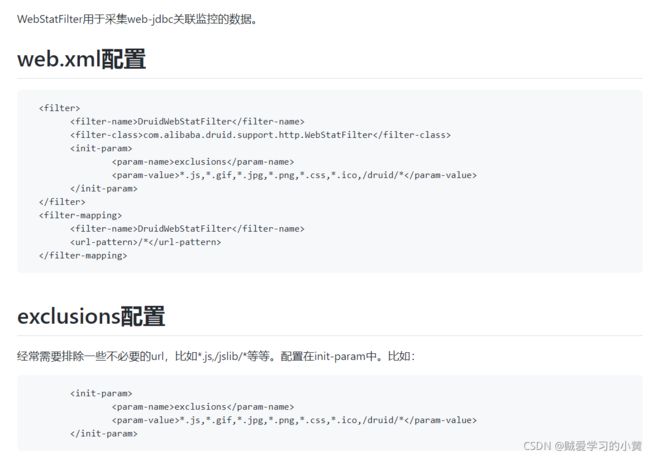
在使用不知道的功能前,小黄建议都是先去看一下官方文档
这里说要配置一个Filter组件,在小黄之前的文章中有介绍过三大组件的配置 SpringBoot中使用原生三大组件
    //打开Druid的web监控统计功能
    @Bean
    public FilterRegistrationBean statFilter(){
        FilterRegistrationBean<WebStatFilter> webStatFilterFilterRegistrationBean = new FilterRegistrationBean<>(new WebStatFilter());
        webStatFilterFilterRegistrationBean.setUrlPatterns(Arrays.asList("/*"));
        HashMap<String, String> map = new HashMap<>();
        map.put("exclusions","*.js,*.gif,*.jpg,*.png,*.css,*.ico,/druid/*");
        webStatFilterFilterRegistrationBean.setInitParameters(map);
        return webStatFilterFilterRegistrationBean;
    }
引入starter
引入druid-spring-boot-starter依赖,这个就非常方便了,帮我们配置好了默认的设置
<!-- https://mvnrepository.com/artifact/com.alibaba/druid-spring-boot-starter -->
<dependency>
    <groupId>com.alibaba</groupId>
    <artifactId>druid-spring-boot-starter</artifactId>
    <version>1.2.8</version>
</dependency>
先来看一下这个依赖的结构,小黄总结了以下,在使用strater时,我们都从结构入手,在自定义的时候我们参照官方文档,学会了开启他的一些相关信息,在引入starter之后,只需要修改配置项即可,那我们找配置项就去相对于的configuration里找
spring:
  datasource:
    url: jdbc:mysql://localhost:3306/mybatis
    username: root
    password: Hkx123
    driver-class-name: com.mysql.cj.jdbc.Driver
    druid:
      stat-view-servlet:
        # 开启druid监控功能(默认为false)
        enabled: true
        # 设置监控页面的权限
        login-username: admin
        login-password: admin
      # 设置开启sql监控、防火墙监控
      filters: 'stat,wall'
      # 设置开启web监控
      web-stat-filter:
        enabled: true
        url-pattern: /*
        exclusions: '*.js,*.gif,*.jpg,*.png,*.css,*.ico,/druid/*'
整合MyBatis操作
要想在SpringBoot中使用MyBatis,就需要导入相关依赖
        <dependency>
            <groupId>org.mybatis.spring.bootgroupId>
            <artifactId>mybatis-spring-boot-starterartifactId>
            <version>2.2.0version>
        dependency>
先回顾一下Spring中整合MyBatis的操作
- 创建mybatis全局配置文件
- sqlSessionFactory(springboot配好了)
- sqlSession(自动配置了)
- Mapper:只要我们写的操作Mybatis接口标注了@Mapper就会被自动识别
MyBatis自动配置类
@Configuration
@ConditionalOnClass({SqlSessionFactory.class, SqlSessionFactoryBean.class})
@ConditionalOnSingleCandidate(DataSource.class)
@EnableConfigurationProperties({MybatisProperties.class})
@AutoConfigureAfter({DataSourceAutoConfiguration.class, MybatisLanguageDriverAutoConfiguration.class})
public class MybatisAutoConfiguration implements InitializingBean {

//mybatis配置项,以mybatis开始
@ConfigurationProperties(
    prefix = "mybatis"
)
public class MybatisProperties {
application.yaml文件
在application.yaml文件中,配置mybatis全局配置文件和mapper文件路径
mybatis:
  # 全局配置文件地址
  config-location: classpath:mybatis/mybatis-config.xml
  mapper-locations: classpath:mybatis/mapper/*.xml
也可以使用以下配置来代替全局配置文件
mybatis:
  # 全局配置文件地址
#  config-location: classpath:mybatis/mybatis-config.xml
  # 用以下方式替代
  configuration:
    # 开启驼峰命名
    map-underscore-to-camel-case: true
具体的使用过程和Spring整合时无大区别
配置模式
配置模式,是使用mapper文件对应接口
<mapper namespace="com.yellowstar.boot02web.mapper.UserMapper">

    <select id="getUserById" resultType="com.yellowstar.boot02web.bean.User">
        select * from t_user where id = #{id}
    select>
mapper>
@Mapper
public interface UserMapper {
    User getUserById(Integer id);
}
注解模式
注解模式可以完全脱离xml配置文件进行开发,不过小黄推荐简洁的sql语句可以用此模式开发,复杂的还是卸载mapper文件中比较清晰易懂
@Mapper
public interface UserMapper {
    @Select("select * from t_user where id = #{id}")
    //@Options() 可以对select的属性进行设置
    User getUserById(Integer id);
}
我们也可以在主程序上使用@MapperScan注解来扫描mapper文件,这样每个mapper文件上不需要添加@Mapper注解,不过小黄还是推荐在每一个mapper文件中加上@Mapper注解哦
@MapperScan("com.yellostar.boot02web.mapper")
@SpringBootApplication
public class Boot02WebApplication {
整合MyBatisPlus并实现简单的CRUD
MyBatisPlus极大的帮你简化了开发过程,大部分sql语句可以直接进行使用
使用MyBatisPlus前,必须要导入相关依赖,这个依赖中包含了mybatis以及jdbc依赖,所以不需要重复导入依赖
        <dependency>
            <groupId>com.baomidougroupId>
            <artifactId>mybatis-plus-boot-starterartifactId>
            <version>3.4.1version>
        dependency>
自动配置
-
MybatisPlusAutoConfiguration 配置类,MybatisPlusProperties 配置项绑定。mybatis-plus:xxx 就是对mybatis-plus的定制
-
SqlSessionFactory 自动配置好。底层是容器中默认的数据源
-
mapperLocations 自动配置好的。有默认值。classpath*:/mapper/**/*.xml;任意包的类路径下的所有mapper文件夹下任意路径下的所有xml都是sql映射文件。 建议以后sql映射文件,放在 mapper下
-
容器中也自动配置好了 SqlSessionTemplate
-
@Mapper 标注的接口也会被自动扫描;建议直接 @MapperScan(“com.atguigu.admin.mapper”) 批量扫描就行
来使用mybatisplus进行简单的CRUD操作
查询
介绍查询表中所有数据,写一个mapper接口,继承BaseMapper即可,如果不需要添加sql语句,里面可以不添加方法,所有的方法在BaseMapper中已帮我们实现
public interface EmpMapper extends BaseMapper<Employee> {
}
service接口,只需继承IService即可
public interface EmpService extends IService<Employee> {
}
service实现类,需要继承ServiceImpl并实现EmpService
@Service
public class EmpServiceImpl extends ServiceImpl<EmpMapper, Employee> implements EmpService {
}
接下来我们就可以直接在controller中调用,mybatisplus自带了分页插件,在小黄使用之后发现对分页条的显示个数并不是很支持,建议还是使用pagehelper分页插件
    @Autowired
    EmpServiceImpl empService;

    @GetMapping("/dynamic_table")
    public String dynamic_table(@RequestParam(value = "pn",defaultValue = "1") Integer pn, Model model){
        PageHelper.startPage(pn,10);
        List<Employee> list = empService.list();
        PageInfo<Employee> info = new PageInfo<>(list,5);

        model.addAttribute("pageInfo",info);
        return "table/dynamic_table";
    }
整合pageHelper
导入依赖
        <dependency>
            <groupId>com.github.pagehelpergroupId>
            <artifactId>pagehelper-spring-boot-starterartifactId>
            <version>1.4.0version>
        dependency>
在配置文件中设置数据库语言,所有关于pagehelper的配置,都可以用前缀为pagehelper来进行设置
pagehelper:
  helper-dialect: mysql


