React+wangEditor生成在线编辑工具
wangEditor富文本编辑器
关键字:React,wangEditor,在线编辑
如果需求中对在线编辑的要求不高,项目的侧重不在这,可以使用wangEditor富文本编辑器,便捷,用法与echarts相通。
wangEditor官网地址
基本使用
推荐wangEditor作者相关文章—— 50 行代码 React Hooks 中使用 wangEditor 富文本编辑器
- 首先需要安装@wangeditor/editor和@wangeditor/editor-for-react,npm,yarn,cnpm皆可。
npm i @wangeditor/editor --save npm i @wangeditor/editor-for-react --save - 安装引入后就可以简单使用
import React, { useState, useEffect } from 'react' import '@wangeditor/editor/dist/css/style.css' import { Editor, Toolbar } from '@wangeditor/editor-for-react' const MyEditor = () => { const [editor, setEditor] = useState(null) // 存储 editor 实例 // `defaultContent` (JSON 格式) 和 `defaultHtml` (HTML 格式) 二选一 const defaultContent = [ { type: "paragraph", children: [{ text: "一行文字" }], } ] // const defaultHtml = '一行文字
' const defaultHtml = '测试
hello World!!!
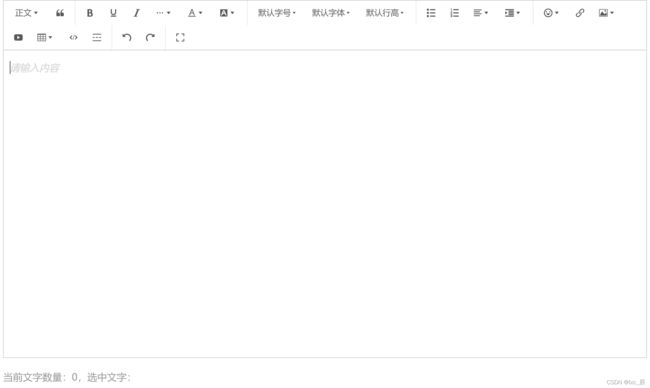
' const toolbarConfig = { } const editorConfig = { placeholder: '请输入内容...', onCreated(editor) { setEditor(editor) } // 记录下 editor 实例,重要! } // 及时销毁 editor ,重要! useEffect(() => { return () => { if (editor == null) return editor.destroy() setEditor(null) } }, [editor]) return ( <> <div style={{ border: '1px solid #ccc', zIndex: 100}}> <Toolbar editor={editor} defaultConfig={toolbarConfig} mode="default" style={{ borderBottom: '1px solid #ccc' }} /> <Editor defaultConfig={editorConfig} // defaultContent={defaultContent} defaultHtml={defaultHtml} mode="default" style={{ height: '91vh'' }} /> </div> </> ) } export default MyEditor - 页面效果

进阶使用
1.工具栏设置
在设置工具栏之前可以利用editor.getAllMenuKeys()打印以下所有工具项的keys,设置的时候直接使用keys值即可
1.1 toolbarKeys
重新配置工具栏,显示哪些菜单,以及菜单的排序、分组。
【注意】可以通过 editor.getAllMenuKeys() 查询编辑器注册的所有菜单 key 。这些都可以用于 toolbarKeys 中。
const toolbarConfig = {
toolbarKeys: [
// 菜单 key
'headerSelect',
// 分割线
'|',
// 菜单 key
'bold', 'italic',
// 菜单组,包含多个菜单
{
key: 'group-more-style', // 必填,要以 group 开头
title: '更多样式', // 必填
iconSvg: '', // 可选
menuKeys: ["through", "code", "clearStyle"] // 下级菜单 key ,必填
},
// 继续配置其他菜单...
]
}
1.2 insertKeys
可以在原本的基础上插入工具项
const toolbarConfig = {
    insertKeys: {
       index: 17, // 插入的位置,基于当前的 toolbarKeys
       keys: ['sub']
    },
  }
1.3 excludeKeys
排除不显示工具项
const toolbarConfig = {
	// 排除全屏展示工具项
    excludeKeys: [
      'fullScreen' // 排除菜单组,写菜单组 key 的值即可
    ],
  }
1.4 modalAppendToBody
将菜单弹出的 modal 添加到 body 下,可以添加css样式控制弹出层样式。
const toolbarConfig = {
	// modalAppentToBody 默认false
    modalAppendToBody: true
  }
2. 上传图片设置
上传图片需要与服务器端相互配合,可能涉及到代理,网络访问权限等问题,具体逻辑是:
wangEditor上传图片 > 服务器端将照片保存 > 并放回给前端一个路径url > 使用返回的url wangEditor会自动匹配出图片。
相关配置:
  const editorConfig = {
      MENU_CONF: {
        'uploadImage': {
          server: '/overview/server/uploadImage',
          // 自定义上传参数,例如传递验证的 token 等。参数会被添加到 formData 中,一起上传到服务端。
          // meta: {
          //   token: 'xxx',
          //   otherKey: 'yyy'
          // },
          // 将 meta 拼接到 url 参数中,默认 false
          metaWithUrl: false,
        }
      },
  }
服务器端返回格式要求:
'POST /overview/server/uploadImage': {
    "errno": 0, // 注意:值是数字,不能是字符串
    "data": {
      "url": "https://gimg2.baidu.com/image_search/src=http%3A%2F%2Fbj-yuantu.fotomore.com%2Fcreative%2Fvcg%2Fnew%2FVCG211360573823.jpg%3FExpires%3D1643621485%26OSSAccessKeyId%3DLTAI2pb9T0vkLPEC%26Signature%3D6S5Z69RbKn%252BdGWNRKyhF7WEP%252F4o%253D%26x-oss-process%3Dimage%252Fauto-orient%252C0%252Fsaveexif%252C1%252Fresize%252Cm_lfit%252Ch_1200%252Cw_1200%252Climit_1%252Fsharpen%252C100%252Fquality%252CQ_80%252Fwatermark%252Cg_se%252Cx_0%252Cy_0%252Cimage_d2F0ZXIvdmNnLXdhdGVyLTIwMDAucG5nP3gtb3NzLXByb2Nlc3M9aW1hZ2UvcmVzaXplLG1fbGZpdCxoXzE3MSx3XzE3MSxsaW1pdF8x%252F&refer=http%3A%2F%2Fbj-yuantu.fotomore.com&app=2002&size=f10000,10000&q=a80&n=0&g=0n&fmt=jpeg?sec=1647066804&t=68a87d4c99a9b48e6098b9b14f3a3780", // 图片 src ,必须
      "alt": "yyy", // 图片描述文字,非必须
      "href": "zzz" // 图片的链接,非必须
    }
  }
如果你的服务端 response body 无法按照上文规定的格式,则无法插入图片,提示失败。
但你可以使用 customInsert 来自定义插入图片。官网地址
3.给modal设置遮罩层
3.1 在Toobar和Editor上添加一层div做遮罩
<div className='write_container'>
<div className='mask' style={{ display: modalShow ? 'block' : 'none'}}/>
<div style={{ backgroundColor: 'white'}}>
3.2 给遮罩div设置css样式
/* 设置modal弹框位置及样式 */
.w-e-modal{
  position: absolute;
  top: 180px;
  margin-left: 50%;
  transform: translateX(-50%);
  z-index: 9999;
}

.mask{
  width: 100%;
  height: 100%;
  position: absolute;
  background-color: rgba(0, 0, 0, .3);
  /* 设置遮罩层的权重,小于modal */
  z-index: 999;
}
3.3 利用react的state控制mask的显示和隐藏
 const editorConfig = {
 	  // 提示文字
      placeholder: '',
      // 控制编辑区自动获取焦点
      autoFocus: true,
      onCreated(editor) {
        setEditor(editor)
        // 获取所有菜单
        console.log('aaaaa', editor.getAllMenuKeys());

        // 监听所有监控弹出框
        editor.on('modalOrPanelShow', modalOrPanel => {
          // 因为下拉框也算弹出,所以要只对modal做遮罩,需要处理
          if(modalOrPanel.type !== 'modal') return
          setModalShow(true)
        })
        editor.on('modalOrPanelHide', () => {
          // 隐藏蒙层
          setModalShow(false)
        })
        hanldeSave = () => {
          console.log('innerHtml', editor.getHtml());
        }
      } // 记录下 editor 实例,重要!
  }
4.设置默认展示内容
wangEditor可以识别两种形式的内容,一种纯文本字符串,另一种是html形式的字符串
所以如果需要在编辑区默认展示某些内容时,需要有准备好的字符串放在defaultHtml中,正常来说需要从服务器端获取。
const defaultHtml = '测试
hello World!!!
'
<div style={{ border: '1px solid #ccc', zIndex: 100}}>
    <Toolbar
        editor={editor}
        defaultConfig={toolbarConfig}
        mode="default"
        style={{ borderBottom: '1px solid #ccc' }}
    />
    <br />
    <Editor
        defaultConfig={editorConfig}
        defaultHtml={defaultHtml}
        mode="default"
        style={{ height: '91vh'}}
    />
div>
5.添加css样式,尽量贴近word文档形式
/* 自定义外部容器 */
.write_container{
  height: 100%;
}

.w-e-modal{
  position: absolute;
  top: 180px;
  margin-left: 50%;
  transform: translateX(-50%);
  z-index: 9999;
}

.mask{
  width: 100%;
  height: 100%;
  position: absolute;
  background-color: rgba(0, 0, 0, .3);
  z-index: 999;
}

.w-e-text-container{
  background-color: #F2F2F2;
  padding-bottom: 20px;
}

.w-e-scroll{
  padding: 0 15%;
  /* padding-bottom: 20px; */
}

.w-e-scroll #w-e-textarea-1{
  background-color: white;
}
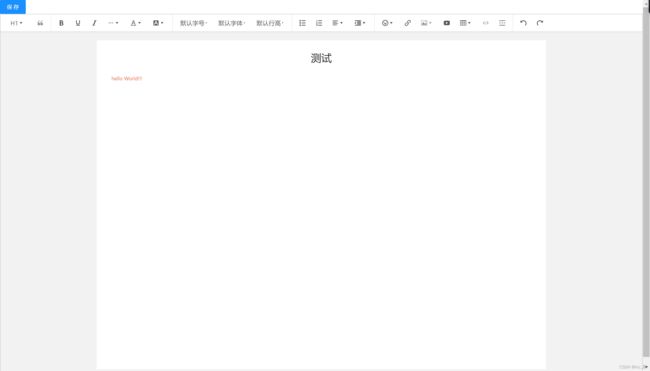
6.效果图
总结
简单的做了一个小 demo,还有很多设置项,详情移步wangEditor官网
(๑•̀ㅂ•́)و✧
