Redis分布式缓存最佳实践
目录
01-Redis缓存入门
简介
背景
Redis 概述
版本及参考说明
Redis初始操作
启动redis服务
进入redis容器
登陆redis服务
查看redis信息
清空redis屏幕
退出redis服务
关闭redis服务
系统帮助
Redis数据存储操作
简易数据存取
Key有效时间设计
总结(Summary)
02-Redis常用数据类型
简介
概述
常用数据类型
String类型操作实践
incr/incrby
decr/decrby
append
strlen
mset/mget
小节面试分析
Hash类型应用实践
hset/hget
hincrby
hmset/hmget
hexists
hdel
hkeys/hvals
小节面试分析
List类型应用实践
lpush
rpush
del
linsert
lset
lrem
ltrim
lpop
rpop
llen
lindex
rpoplpush
小节面试分析
Set类型应用实践
sadd
smembers
spop
scard
smove
sunion
小节面试分析
总结(Summary)
03-Java中操作redis实践
准备工作
创建工程
添加项目依赖
Jedis的应用
简介
准备工作
快速入门实现
基础类型操作
连接池JedisPool应用
RedisTemplate应用
简介
准备工作
快速入门实现
StringRedisTemplate 应用
RedisTemplate 应用
定制RedisTemplate对象(拓展)
项目工程实践
分布式id
业务描述
关键代码实现
单点登陆
业务描述
关键代码实现
秒杀队列
业务描述
关键代码实现
投票系统
业务描述
关键代码实现
购物车简易实现
业务描述
关键代码实现
总结(Summary)
04-Redis 数据持久化实践
简介
背景
持久化方式
Rdb方式持久化
概述
RDB方式配置
Rdb方式持久化实践
小节面试分析
Aof方式数据持久化
概述
AOF方式配置
AOF方式持久化实践
小节面试分析
总结(Summary)
05-Redis 事务处理实践
Redis事务简介
概述
基本指令
Redis事务控制实践
exec提交事务
discard取消事务
秒杀抢票事务处理
Jedis 客户端事务操作
Jedis 客户端秒杀操作实践
总结(Summary)
06-Redis架构设计应用实践
Redis主从复制
简介
基本架构
快速入门实践
主从同步原理分析
小节面试分析
Redis哨兵模式
简介
基本架构
哨兵快速入门
Sentinel 配置进阶
哨兵工作原理分析
Redis集群高可用
简述
基本架构
创建集群
Jedis读写数据测试
RedisTemplate读写数据测试
小节面试分析
总结(Summary)
07-Redis在SpringBoot工程中的综合应用
业务描述
准备工作
初始化数据
添加项目依赖
添加数据库访问配置
业务逻辑代码设计及实现
Domain对象设计
Dao 逻辑对象设计
Service 逻辑对象设计
Controller逻辑对象设计
业务逻辑代码优化
定制RedisTemplate对象
Service中AOP方式缓存应用
Service中缓存一致性分析
Controller中添加本地缓存
Controller中本地缓存一致性分析
Redis集群链接配置实践
总结(Summary)
08-Java中本地缓存实现
简介
为什么要Cache
你都了解哪些Cache?
对本地缓存你会如何设计
本地缓存的设计
Cache接口设计
Cache默认存储设计
SynchronizedCache 设计及实现
LoggingCache 设计及实现
FifoCache设计及实现
LruCache 设计及实现
总结(Summary)
09-Redis课上问题总结
Day01
Redis 应用架构
Redis 启动失败
Redis 全局散列结构
Day02
Redis 连接问题
Redis密码问题
单元测试导包问题
01-Redis缓存入门
简介
背景
我们现在的项目架构中,基本上是Web服务器(Tomcat)和数据库独立部署,独占服务器资源,随着用户数的增长,并发读写数据库,会加大数据库访问压力,导致性能的下降,严重时直接导致系统宕机,例如:
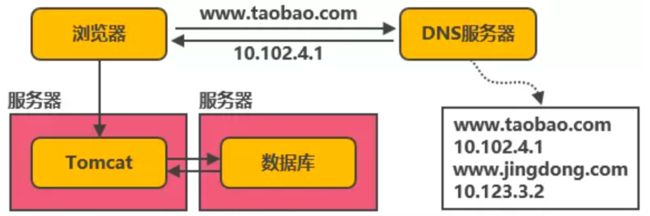
此时,我们可以在Tomcat同服务器上中增加本地缓存,并在外部增加分布式缓存,缓存热门数据。也就是通过缓存能把绝大多数请求在读写数据库前拦截掉,大大降低数据库压力。例如:
基于这样的一种架构设计,于是类似redis的一些分布式数据库就诞生了。
Redis 概述
Redis是一个key-value存储系统(官网:http://redis.io),是一个分布式缓存数据库。在DB-Engines.com的数据库排行中, Redis上升排行第七,如图所示:

版本及参考说明
Redis的次版本号(第一个小数点后的数字)为偶数的版本是稳定版本(2.4、2.6等),奇数为非稳定版本(2.5、2.7),一般推荐在生产环境使用稳定版本。最新版本6.2.2,新增了stream的处理方式,性能更高。Redis官方是不支持windows平台的,windows版本是由微软自己建立的分支,基于官方的Redis源码上进行编译、发布、维护的,所以windows平台的Redis版本要略低于官方版本。
Redis 相关参考网址如下所示:
Bootnb 相关:https://www.runoob.com/redis/redis-tutorial.html
Redis 官网:https://redis.io/
源码地址:https://github.com/redis/redis
Redis 在线测试:http://try.redis.io/
Redis 命令参考:http://doc.redisfans.com/
- 1
- 2
- 3
- 4
- 5
Redis初始操作
启动redis服务
Docker 环境下的启动(docker环境启动多个需要运行多个容器):
docker start redis01 #底层也是通过redis-server启动,start单词后的redis01为容器名
- 1
docker 中查看redis 服务
docker ps
- 1
查看启动的redis进程信息
ps -ef|grep redis
root      3511     1  0 16:29 ?   00:00:01 redis-server *:6379
root      3515     1  0 16:29 ?   00:00:01 redis-server 127.0.0.1:6380
- 1
- 2
- 3
进入redis容器
docker exec -it redis01 bash #redis01 为容器名
登陆redis服务
登陆本地redis
redis-cli
或者
redis-cli -p 6379
或者
redis-cli -p 6379 -a  password #-a后面为password,此操作需要开启redis.conf文件中的 requirepass选项
- 1
- 2
- 3
- 4
- 5
- 6
登陆远程redis
redis-cli -h ip -p 6379 -a password
- 1
查看redis信息
首先登陆redis,然后输入info指令,例如
127.0.0.1:6379> info #查看当前redis节点的详细配置信息
- 1
清空redis屏幕
清除redis屏幕内容
127.0.0.1:6379> clear
- 1
退出redis服务
退出redis服务,例如
127.0.0.1:6379> exit
- 1
关闭redis服务
关闭redis服务,例如:
127.0.0.1:6379> shutdown
- 1
系统帮助
可以基于help指令查看相关指令帮助,例如
127.0.0.1:6379> help
redis-cli 2.8.19
Type: "help @" to get a list of commands in
      "help " for help on
      "help " to get a list of possible help topics
      "quit" to exit
- 1
- 2
- 3
- 4
- 5
- 6
127.0.0.1:6379> help type

  TYPE key
  summary: Determine the type stored at key
  since: 1.0.0
  group: generic
- 1
- 2
- 3
- 4
- 5
- 6
Redis数据存储操作
简易数据存取
基于查看redis中的key
127.0.0.1:6379> keys *
(empty list or set)
- 1
- 2
基于key/value形式存储数据
127.0.0.1:6379> set test1 123
OK
127.0.0.1:6379> set test2 ab
OK
127.0.0.1:6379> keys *
1) "test1"
2) "test2"
- 1
- 2
- 3
- 4
- 5
- 6
- 7
基于key获取redis中存储的数据
127.0.0.1:6379> get test1
"123"
127.0.0.1:6379> get test2
"ab"
127.0.0.1:6379> get test3
(nil)
127.0.0.1:6379>
- 1
- 2
- 3
- 4
- 5
- 6
- 7
清除redis中的数据
清除当前数据库数据
127.0.0.1:6379> flushdb
OK
- 1
- 2
清除所有数据库数据
127.0.0.1:6379> flushall
OK
- 1
- 2
Key有效时间设计
实际工作中我们经常要控制redis中key的有效时长,例如秒杀操作的计时,缓存数据的有效时长等。
Expire (设置生效时长-单位秒)
语法:EXPIRE key seconds
127.0.0.1:6379> set bomb tnt
OK
127.0.0.1:6379> expire bomb 10
(integer) 1
127.0.0.1:6379> ttl bomb
(integer) 5
127.0.0.1:6379> ttl bomb
(integer) 3
127.0.0.1:6379> ttl bomb
(integer) 3
127.0.0.1:6379> ttl bomb
(integer) 2
127.0.0.1:6379> ttl bomb
(integer) 1
127.0.0.1:6379> ttl bomb
(integer) -2
127.0.0.1:6379> ttl bomb
(integer) -2
127.0.0.1:6379>
- 1
- 2
- 3
- 4
- 5
- 6
- 7
- 8
- 9
- 10
- 11
- 12
- 13
- 14
- 15
- 16
- 17
- 18
- 19
- 20
其中,TTL查看key的剩余时间,当返回值为-2时,表示键被删除。
当 key 不存在时,返回 -2 。 当 key 存在但没有设置剩余生存时间时,返回 -1 。
Persist (取消时长设置)
通过persist让对特定key设置的生效时长失效。
语法:PERSIST key
127.0.0.1:6379> set bomb tnt
OK
127.0.0.1:6379> expire bomb 60
(integer) 1
127.0.0.1:6379> ttl bomb
(integer) 49
127.0.0.1:6379> persist bomb
(integer) 1
127.0.0.1:6379> ttl bomb
(integer) -1
127.0.0.1:6379>
- 1
- 2
- 3
- 4
- 5
- 6
- 7
- 8
- 9
- 10
- 11
其中,设置新的数据时需要重新设置该key的生存时间,重新设置值也会清除生存时间。
pexpire (单位毫秒)
pexpire 让key的生效时长以毫秒作为计量单位,这样可以做到更精确的时间控制。例如,可应用于秒杀场景。
语法:PEXPIRE key milliseconds
127.0.0.1:6379> set bomb tnt
OK
127.0.0.1:6379> pexpire bomb 10000
(integer) 1
127.0.0.1:6379> ttl bomb
(integer) 6
127.0.0.1:6379> ttl bomb
(integer) 3
127.0.0.1:6379> ttl bomb
(integer) -2
127.0.0.1:6379>
- 1
- 2
- 3
- 4
- 5
- 6
- 7
- 8
- 9
- 10
- 11
总结(Summary)
本章节主要是讲解了一下redis的一些入门操作,主要是一些需要记住的一些指令,强化练习即可。
02-Redis常用数据类型
简介
概述
Redis作为一种key/value结构的数据存储系统,为了便于对数据进行进行管理,提供了多种数据类型。然后,基于指定类型存储我们项目中产生的数据,例如用户的登陆信息,购物车信息,商品详情信息等等。
常用数据类型
Reids中基础数据结构包含字符串、散列,列表,集合,有序集合。工作中具体使用哪种类型要结合具体场景。
String类型操作实践
字符串类型是redis中最简单的数据类型,它存储的值可以是字符串,其最大字符串长度支持到512M。基于此类型,可以实现博客的字数统计,将日志不断追加到指定key,实现一个分布式自增iid,实现一个博客的的点赞操作等
incr/incrby
当存储的字符串是整数时,redis提供了一个实用的命令INCR,其作用是让当前键值递增,并返回递增后的值。
语法:INCR key
127.0.0.1:6379> set num 1
(integer) 1
127.0.0.1:6379> incr num
(integer) 2
127.0.0.1:6379> keys *
1) "num"
127.0.0.1:6379> incr num
127.0.0.1:6379>
- 1
- 2
- 3
- 4
- 5
- 6
- 7
- 8
说明,如果num不存在,则自动会创建,如果存在自动+1。
指定增长系数
- 1
语法:INCRBY key increment
127.0.0.1:6379> incrby num 2
(integer) 5
127.0.0.1:6379> incrby num 2
(integer) 7
127.0.0.1:6379> incrby num 2
(integer) 9
127.0.0.1:6379>
- 1
- 2
- 3
- 4
- 5
- 6
- 7
decr/decrby
减少指定的整数
DECR key 按照默认步长(默认为1)进行递减
DECRBY key decrement 按照指定步长进行递减
127.0.0.1:6379> incr num
(integer) 10
127.0.0.1:6379> decr num
(integer) 9
127.0.0.1:6379> decrby num 3
- 1
- 2
- 3
- 4
- 5
append
向尾部追加值。如果键不存在则创建该键,其值为写的value,即相当于SET key value。返回值是追加后字符串的总长度。
语法:APPEND key value
127.0.0.1:6379> keys *
1) "num"
2) "test1"
3) "test"
127.0.0.1:6379> get test
"123"
127.0.0.1:6379> append test "abc"
(integer) 6
127.0.0.1:6379> get test
"123abc"
127.0.0.1:6379>
- 1
- 2
- 3
- 4
- 5
- 6
- 7
- 8
- 9
- 10
- 11
strlen
字符串长度,返回数据的长度,如果键不存在则返回0。注意,如果键值为空串,返回也是0。
语法:STRLEN key
127.0.0.1:6379> get test
"123abc"
127.0.0.1:6379> strlen test
(integer) 6
127.0.0.1:6379> strlen tnt
(integer) 0
127.0.0.1:6379> set tnt ""
OK
127.0.0.1:6379> strlen tnt
(integer) 0
127.0.0.1:6379> exists tnt
(integer) 1
127.0.0.1:6379>
- 1
- 2
- 3
- 4
- 5
- 6
- 7
- 8
- 9
- 10
- 11
- 12
- 13
mset/mget
同时设置/获取多个键值
语法:MSET key value [key value …]
MGET key [key …]
127.0.0.1:6379> flushall
OK
127.0.0.1:6379> keys *
(empty list or set)
127.0.0.1:6379> mset a 1 b 2 c 3
OK
127.0.0.1:6379> mget a b c
1) "1"
2) "2"
3) "3"
127.0.0.1:6379>
- 1
- 2
- 3
- 4
- 5
- 6
- 7
- 8
- 9
- 10
- 11
小节面试分析
- 博客的字数统计如何实现?(strlen)
- 如何将审计日志不断追加到指定key?(append)
- 你如何实现一个分布式自增id?(incr-雪花算法)
- 如何实现一个博客的的点赞操作?(incr,decr)
Hash类型应用实践
Redis散列类型相当于Java中的HashMap,实现原理跟HashMap一致,一般用于存储对象信息,存储了字段(field)和字段值的映射,一个散列类型可以包含最多232-1个字段。
hset/hget
语法结构
HSET key field value
HGET key field
HMSET key field value [field value…]
HMGET key field [field]
HGETALL key
- 1
- 2
- 3
- 4
- 5
HSET和HGET赋值和取值
127.0.0.1:6379> hset user username chenchen
(integer) 1
127.0.0.1:6379> hget user username
"chenchen"
127.0.0.1:6379> hset user username chen
(integer) 0
127.0.0.1:6379> keys user
1) "user"
127.0.0.1:6379> hgetall user
1) "username"
2) "chen"
127.0.0.1:6379>
127.0.0.1:6379> hset user age 18
(integer) 1
127.0.0.1:6379> hset user address "xi'an"
(integer) 1
127.0.0.1:6379> hgetall user
1) "username"
2) "chen"
3) "age"
4) "18"
3) "address"
4) "xi'an"
127.0.0.1:6379>
- 1
- 2
- 3
- 4
- 5
- 6
- 7
- 8
- 9
- 10
- 11
- 12
- 13
- 14
- 15
- 16
- 17
- 18
- 19
- 20
- 21
- 22
- 23
- 24
HSET命令不区分插入和更新操作,当执行插入操作时HSET命令返回1,当执行更新操作时返回0。
hincrby
127.0.0.1:6379> hdecrby article total 1		#执行会出错
127.0.0.1:6379> hincrby article total -1		#没有hdecrby自减命令
(integer) 1
127.0.0.1:6379> hget article total			#获取值
- 1
- 2
- 3
- 4
hmset/hmget
HMSET和HMGET设置和获取对象属性
127.0.0.1:6379> hmset person username tony age 18
OK
127.0.0.1:6379> hmget person age username
1) "18"
2) "tony"
127.0.0.1:6379> hgetall person
1) "username"
2) "tony"
3) "age"
4) "18"
127.0.0.1:6379>
- 1
- 2
- 3
- 4
- 5
- 6
- 7
- 8
- 9
- 10
- 11
注意:上面HMGET字段顺序可以自行定义
hexists
属性是否存在
127.0.0.1:6379> hexists killer
(error) ERR wrong number of arguments for 'hexists' command
127.0.0.1:6379> hexists killer a
(integer) 0
127.0.0.1:6379> hexists user username
(integer) 1
127.0.0.1:6379> hexists person age
(integer) 1
127.0.0.1:6379>
- 1
- 2
- 3
- 4
- 5
- 6
- 7
- 8
- 9
- 10
hdel
删除属性
127.0.0.1:6379> hdel user age
(integer) 1
127.0.0.1:6379> hgetall user
1) "username"
2) "chen"
127.0.0.1:6379> hgetall person
1) "username"
2) "tony"
3) "age"
4) "18"
127.0.0.1:6379>
- 1
- 2
- 3
- 4
- 5
- 6
- 7
- 8
- 9
- 10
- 11
hkeys/hvals
只获取字段名HKEYS或字段值HVALS
127.0.0.1:6379> hkeys person
1) "username"
2) "age"
127.0.0.1:6379> hvals person
1) "tony"
2) "18"
2.3.8	hlen
元素个数
127.0.0.1:6379> hlen user
(integer) 1
127.0.0.1:6379> hlen person
(integer) 2
127.0.0.1:6379>
- 1
- 2
- 3
- 4
- 5
- 6
- 7
- 8
- 9
- 10
- 11
- 12
- 13
小节面试分析
- 发布一篇博客需要写内存吗?(需要,hmset)
- 浏览博客内容会怎么做?(hmget)
- 如何判定一篇博客是否存在?(hexists)
- 删除一篇博客如何实现?(hdel)
- 分布式系统中你登录成功以后是如何存储用户信息的?(hmset)
List类型应用实践
Redis的list类型相当于java中的LinkedList,其原理就就是一个双向链表。支持正向、反向查找和遍历等操作,插入删除速度比较快。经常用于实现热销榜,最新评论等的设计。
lpush
在key对应list的头部添加字符串元素
redis 127.0.0.1:6379> lpush mylist "world"
(integer) 1
redis 127.0.0.1:6379> lpush mylist "hello"
(integer) 2
redis 127.0.0.1:6379> lrange mylist 0 -1
1) "hello"
2) "world"
redis 127.0.0.1:6379>
- 1
- 2
- 3
- 4
- 5
- 6
- 7
- 8
其中,Redis Lrange 返回列表中指定区间内的元素,区间以偏移量 START 和 END 指定。 其中 0 表示列表的第一个元素, 1 表示列表的第二个元素,以此类推。 你也可以使用负数下标,以 -1 表示列表的最后一个元素, -2 表示列表的倒数第二个元素,以此类推
rpush
在key对应list的尾部添加字符串元素
redis 127.0.0.1:6379> rpush mylist2 "hello"
(integer) 1
redis 127.0.0.1:6379> rpush mylist2 "world"
(integer) 2
redis 127.0.0.1:6379> lrange mylist2 0 -1
1) "hello"
2) "world"
redis 127.0.0.1:6379>
- 1
- 2
- 3
- 4
- 5
- 6
- 7
- 8
del
redis 127.0.0.1:6379> del mylist
- 1
linsert
在key对应list的特定位置之前或之后添加字符串元素
redis 127.0.0.1:6379> rpush mylist3 "hello"
(integer) 1
redis 127.0.0.1:6379> rpush mylist3 "world"
(integer) 2
redis 127.0.0.1:6379> linsert mylist3 before "world" "there"
(integer) 3
redis 127.0.0.1:6379> lrange mylist3 0 -1
1) "hello"
2) "there"
3) "world"
redis 127.0.0.1:6379>
- 1
- 2
- 3
- 4
- 5
- 6
- 7
- 8
- 9
- 10
- 11
lset
设置list中指定下标的元素值(一般用于修改操作)
redis 127.0.0.1:6379> rpush mylist4 "one"
(integer) 1
redis 127.0.0.1:6379> rpush mylist4 "two"
(integer) 2
redis 127.0.0.1:6379> rpush mylist4 "three"
(integer) 3
redis 127.0.0.1:6379> lset mylist4 0 "four"
OK
redis 127.0.0.1:6379> lset mylist4 -2 "five"
OK
redis 127.0.0.1:6379> lrange mylist4 0 -1
1) "four"
2) "five"
3) "three"
redis 127.0.0.1:6379>
- 1
- 2
- 3
- 4
- 5
- 6
- 7
- 8
- 9
- 10
- 11
- 12
- 13
- 14
- 15
lrem
从key对应list中删除count个和value相同的元素,count>0时,按从头到尾的顺序删除
redis 127.0.0.1:6379> rpush mylist5 "hello"
(integer) 1
redis 127.0.0.1:6379> rpush mylist5 "hello"
(integer) 2
redis 127.0.0.1:6379> rpush mylist5 "foo"
(integer) 3
redis 127.0.0.1:6379> rpush mylist5 "hello"
(integer) 4
redis 127.0.0.1:6379> lrem mylist5 2 "hello"
(integer) 2
redis 127.0.0.1:6379> lrange mylist5 0 -1
1) "foo"
2) "hello"
redis 127.0.0.1:6379>
count<0时,按从尾到头的顺序删除
redis 127.0.0.1:6379> rpush mylist6 "hello"
(integer) 1
redis 127.0.0.1:6379> rpush mylist6 "hello"
(integer) 2
redis 127.0.0.1:6379> rpush mylist6 "foo"
(integer) 3
redis 127.0.0.1:6379> rpush mylist6 "hello"
(integer) 4
redis 127.0.0.1:6379> lrem mylist6 -2 "hello"
(integer) 2
redis 127.0.0.1:6379> lrange mylist6 0 -1
1) "hello"
2) "foo"
redis 127.0.0.1:6379>
count=0时,删除全部
redis 127.0.0.1:6379> rpush mylist7 "hello"
(integer) 1
redis 127.0.0.1:6379> rpush mylist7 "hello"
(integer) 2
redis 127.0.0.1:6379> rpush mylist7 "foo"
(integer) 3
redis 127.0.0.1:6379> rpush mylist7 "hello"
(integer) 4
redis 127.0.0.1:6379> lrem mylist7 0 "hello"
(integer) 3
redis 127.0.0.1:6379> lrange mylist7 0 -1
1) "foo"
redis 127.0.0.1:6379>
- 1
- 2
- 3
- 4
- 5
- 6
- 7
- 8
- 9
- 10
- 11
- 12
- 13
- 14
- 15
- 16
- 17
- 18
- 19
- 20
- 21
- 22
- 23
- 24
- 25
- 26
- 27
- 28
- 29
- 30
- 31
- 32
- 33
- 34
- 35
- 36
- 37
- 38
- 39
- 40
- 41
- 42
- 43
ltrim
保留指定key 的值范围内的数据
redis 127.0.0.1:6379> rpush mylist8 "one"
(integer) 1
redis 127.0.0.1:6379> rpush mylist8 "two"
(integer) 2
redis 127.0.0.1:6379> rpush mylist8 "three"
(integer) 3
redis 127.0.0.1:6379> rpush mylist8 "four"
(integer) 4
redis 127.0.0.1:6379> ltrim mylist8 1 -1
OK
redis 127.0.0.1:6379> lrange mylist8 0 -1
1) "two"
2) "three"
3) "four"
redis 127.0.0.1:6379>
- 1
- 2
- 3
- 4
- 5
- 6
- 7
- 8
- 9
- 10
- 11
- 12
- 13
- 14
- 15
lpop
从list的头部删除元素,并返回删除元素
redis 127.0.0.1:6379> lrange mylist 0 -1
1) "hello"
2) "world"
redis 127.0.0.1:6379> lpop mylist
"hello"
redis 127.0.0.1:6379> lrange mylist 0 -1
1) "world"
redis 127.0.0.1:6379>
- 1
- 2
- 3
- 4
- 5
- 6
- 7
- 8
rpop
从list的尾部删除元素,并返回删除元素:
redis 127.0.0.1:6379> lrange mylist2 0 -1
1) "hello"
2) "world"
redis 127.0.0.1:6379> rpop mylist2
"world"
redis 127.0.0.1:6379> lrange mylist2 0 -1
1) "hello"
redis 127.0.0.1:6379>
- 1
- 2
- 3
- 4
- 5
- 6
- 7
- 8
llen
返回key对应list的长度:
redis 127.0.0.1:6379> llen mylist5
(integer) 2
redis 127.0.0.1:6379>
- 1
- 2
- 3
lindex
返回名称为key的list中index位置的元素:
redis 127.0.0.1:6379> lrange mylist5 0 -1
1) "three"
2) "foo"
redis 127.0.0.1:6379> lindex mylist5 0
"three"
redis 127.0.0.1:6379> lindex mylist5 1
"foo"
redis 127.0.0.1:6379>
- 1
- 2
- 3
- 4
- 5
- 6
- 7
- 8
rpoplpush
从第一个list的尾部移除元素并添加到第二个list的头部,最后返回被移除的元素值,整个操作是原子的.如果第一个list是空或者不存在返回nil:
rpoplpush lst1 lst1
rpoplpush lst1 lst2
小节面试分析
- 如何基于redis实现一个队列结构?(lpush/rpop)
- 如何基于redis实现一个栈结构?(lpush/lpop)
- 如何基于redis实现一个阻塞式队列?(lpush/brpop)
- 如何实现秒杀活动的公平性?(先进先出-FIFO)
- 通过list结构实现一个消息队列(顺序)吗?(可以,FIFO->lpush,rpop)
- 用户注册时的邮件发送功能如何提高其效率?(邮件发送是要调用三方服务,底层通过队列优化其效率,队列一般是list结构)
- 如何动态更新商品的销量列表?(卖的好的排名靠前一些,linsert)
- 商家的粉丝列表使用什么结构实现呢?(list结构)
Set类型应用实践
Redis的Set类似Java中的HashSet,是string类型的无序集合。集合成员是唯一的,这就意味着集合中不能出现重复的数据。Redis中Set集合是通过哈希表实现的,所以添加,删除,查找的复杂度都是O(1)。
sadd
添加元素,重复元素添加失败,返回0
127.0.0.1:6379> sadd name tony
(integer) 1
127.0.0.1:6379> sadd name hellen
(integer) 1
127.0.0.1:6379> sadd name rose
(integer) 1
127.0.0.1:6379> sadd name rose
(integer) 0
- 1
- 2
- 3
- 4
- 5
- 6
- 7
- 8
smembers
获取内容
127.0.0.1:6379> smembers name
- “hellen”
- “rose”
- “tony”
spop
移除并返回集合中的一个随机元素
127.0.0.1:6379> smembers internet
1) "amoeba"
2) "redis"
3) "rabbitmq"
4) "nginx"
127.0.0.1:6379> spop internet
"rabbitmq"
127.0.0.1:6379> spop internet
"nginx"
127.0.0.1:6379> smembers internet
1) "amoeba"
2) "redis"
- 1
- 2
- 3
- 4
- 5
- 6
- 7
- 8
- 9
- 10
- 11
- 12
scard
获取成员个数
127.0.0.1:6379> scard name
(integer) 3
- 1
- 2
smove
移动一个元素到另外一个集合
127.0.0.1:6379> sadd internet amoeba nginx redis
(integer) 3
127.0.0.1:6379> sadd bigdata hadopp spark rabbitmq
(integer) 3
127.0.0.1:6379> smembers internet
1) "amoeba"
2) "redis"
3) "nginx"
127.0.0.1:6379> smembers bigdata
1) "hadopp"
2) "spark"
3) "rabbitmq"
127.0.0.1:6379> smove bigdata internet rabbitmq
(integer) 1
127.0.0.1:6379> smembers internet
1) "amoeba"
2) "redis"
3) "rabbitmq"
4) "nginx"
127.0.0.1:6379> smembers bigdata
1) "hadopp"
2) "spark"
127.0.0.1:6379>
- 1
- 2
- 3
- 4
- 5
- 6
- 7
- 8
- 9
- 10
- 11
- 12
- 13
- 14
- 15
- 16
- 17
- 18
- 19
- 20
- 21
- 22
- 23
sunion
并集
127.0.0.1:6379> sunion internet bigdata
1) "redis"
2) "nginx"
3) "rabbitmq"
4) "amoeba"
5) "hadopp"
6) "spark"
- 1
- 2
- 3
- 4
- 5
- 6
- 7
小节面试分析
- 朋友圈的点赞功能你如何实现?(sadd,srem,smembers,scard)
- 如何实现一个网站投票统计程序?
- 你知道微博中的关注如何实现吗?
总结(Summary)
本章节主要是对redis中的常用数据类型存储结构,基本操作进行了分析和实践,结合指令特性理解其应用场景,
03-Java中操作redis实践
准备工作
创建工程
创建maven父工程,例如03-sca-redis,并在此工程下创建两个子工程,一个为sca-jedis,一个为sca-tempate,例如:
添加项目依赖
sca-jedis 工程依赖
    redis.clients
    jedis
    3.5.2


    junit
    junit
    4.12
    test


    com.google.code.gson
    gson
    2.8.6
- 1
- 2
- 3
- 4
- 5
- 6
- 7
- 8
- 9
- 10
- 11
- 12
- 13
- 14
- 15
- 16
- 17
- 18
- 19
- 20
添加sca-template工程依赖
                org.springframework.boot
                spring-boot-dependencies
                2.3.2.RELEASE
                import
                pom


            org.springframework.boot
            spring-boot-starter-web


            org.springframework.boot
            spring-boot-starter-data-redis


            org.springframework.boot
            spring-boot-starter-test
            test
- 1
- 2
- 3
- 4
- 5
- 6
- 7
- 8
- 9
- 10
- 11
- 12
- 13
- 14
- 15
- 16
- 17
- 18
- 19
- 20
- 21
- 22
- 23
- 24
- 25
- 26
Jedis的应用
简介
Jedis是Java中操作redis的一个客户端,类似通过jdbc访问mysql数据库。
准备工作
第一步:从redis.io官方下载对应版本的redis.conf文件,地址如下(假如下载不下来从code上去取或者从同学那拿):
https://redis.io/topics/config/
- 1
第二步:停止redis并删除挂载目录下(/usr/local/docker/redis01/conf)的redis.conf配置文件.
第三步:将下载的redis.conf文件拷贝到redis挂载目录(/usr/local/docker/redis01/conf)
第四步:基于vim打开redis.conf文件,然后注释 bind 127.0.0.1这一行,并修改protected-mode的值修改为no.
第五步:重启redis服务,并检查启动日志(docker logs 容器id)
快速入门实现
在Jedis工程中定义单元测试类,在类中定义单元测试方法:
基础类型操作
在项目的src/test/java目录创建单元测类,例如:
package com.jt;

import org.junit.Test;
import redis.clients.jedis.Jedis;

import java.util.concurrent.TimeUnit;

public class JedisTests {

    @Test
    public void testGetConnection(){
        //假如不能连通,要注释掉redis.conf中 bind 127.0.0.1,
        //并将protected-mode的值修改为no,然后重启redis再试
        Jedis jedis=new Jedis("192.168.126.130",6379);
        //jedis.auth("123456");//假如在redis.conf中设置了密码
        String ping = jedis.ping();
        System.out.println(ping);
    }

    //字符串类型练习
    @Test
    public void testStringOper() throws InterruptedException {
        //建立链接(与redis建立链接)
        Jedis jedis=new Jedis("192.168.126.130",6379);
        //存储数据(key/value)
        jedis.set("count","1");
        jedis.set("id","10001");
        jedis.set("content","aaaaaaaadfas");
        //更新数据
        jedis.expire("id",1);//设置key的有效时长
        jedis.incr("count");//对key的值进行自增操作
        //获取数据
        String count = jedis.get("count");
        //TimeUnit是Java中枚举类型,SECONDS为枚举类型的实例,sleep底层会调用Thread.sleep()方法
        //TimeUnit.SECONDS.sleep(1);//休眠一秒
        Thread.sleep(1000);
        String id=jedis.get("id");
        Long num=jedis.strlen("content");
        System.out.println("cart.count="+count);
        System.out.println("id="+id);
        System.out.println("num="+num);
        //释放资源
        jedis.close();
    }
//json数据练习
@Test
 public void testJsonOper(){
     //构建对象
      Map map=new HashMap<>();
      map.put("id",100);
      map.put("title","spring 认证");
      map.put("content","very good");
     //将对象转换为json格式字符串
      Gson gson=new Gson();
      String jsonStr=gson.toJson(map);
      //将json字符串写入到redis
      Jedis jedis=new Jedis("192.168.126.128",6379);
      jedis.set("user",jsonStr);
      //读取redis中数据
      jsonStr=jedis.get("user");
      System.out.println(jsonStr);
      Map obj=gson.fromJson(jsonStr,Map.class);
      System.out.println(obj);
      jedis.close();
 }
//hash类型练习
  @Test
  public void testHashOper01(){
        //1.建立连接
        Jedis jedis=new Jedis("192.168.126.130",6379);
        //2.基于hash类型存储对象信息
        jedis.hset("member","id","101");
        jedis.hset("member","username","jack");
        jedis.hset("member","mobile","3333333");
        //3.更新hash类型存储的数据
        jedis.hset("member","username","tony");
        //4.获取hash类型数据信息
        String username=jedis.hget("member","username");
        String mobile = jedis.hget("member", "mobile");
        System.out.println(username);
        System.out.println(mobile);
        //5.释放资源
        jedis.close();
    }
//hash类型练习(直接存储map对象)
@Test
public void testHashOper02(){
    //1.建立连接
    Jedis jedis=new Jedis("192.168.126.130",6379);
    //2.存储一篇博客信息
    Map map=new HashMap<>();
    map.put("x","100");
    map.put("y","200");
    jedis.hset("point",map);
    //3.获取博客内容并输出
    map=jedis.hgetAll("point");
    System.out.println(map);
    //4.释放资源
    jedis.close();
}
   /**
     * 测试:redis中list结构的应用
     * 基于FIFO(First In First Out)算法,借助redis实现一个队列
     */
    @Test
    public void testListOper01(){
        //1.建立连接
        Jedis jedis=new Jedis("192.168.126.130",6379);
        //2.存储数据
        jedis.lpush("lst1","A","B","C","C");
        //3.更新数据
        Long pos=jedis.lpos("lst1","A");//获取A元素的位置
        jedis.lset("lst1",pos,"D");//将A元素位置的内容修改为D
        //4.获取数据
        int len=jedis.llen("lst1").intValue();//获取lst1列表中元素个数
        List rpop = jedis.rpop("lst1",len);//获取lst1列表中所有元素
        System.out.println(rpop);
        //5.释放资源
        jedis.close();
    }


//list类型练习:实现一个阻塞式队列

@Test
public void testListOper02(){
    //1.连接redis
    Jedis jedis=new Jedis("192.168.126.128",6379);
    //2.向队列存数据
    //jedis.lpush("list1","A","B","C");
    //3.按先进先出的顺序从队列取数据
    List list= jedis.brpop(40,"list1");
    System.out.println(list);
    jedis.brpop(40,"list1");
    jedis.brpop(40,"list1");
    jedis.brpop(40,"list1");
    //4.释放资源
    jedis.close();
}
//set类型练习
@Test
public void testSetOper01() {
    //1.连接redis
    Jedis jedis = new Jedis("192.168.126.128", 6379);
    //2.朋友圈点赞
    jedis.sadd("count", "1", "1", "2");
    //3.取出点赞数
    Set set = jedis.smembers("count");
    System.out.println(set);
    //4.释放资源
    jedis.close();
}
}
- 1
- 2
- 3
- 4
- 5
- 6
- 7
- 8
- 9
- 10
- 11
- 12
- 13
- 14
- 15
- 16
- 17
- 18
- 19
- 20
- 21
- 22
- 23
- 24
- 25
- 26
- 27
- 28
- 29
- 30
- 31
- 32
- 33
- 34
- 35
- 36
- 37
- 38
- 39
- 40
- 41
- 42
- 43
- 44
- 45
- 46
- 47
- 48
- 49
- 50
- 51
- 52
- 53
- 54
- 55
- 56
- 57
- 58
- 59
- 60
- 61
- 62
- 63
- 64
- 65
- 66
- 67
- 68
- 69
- 70
- 71
- 72
- 73
- 74
- 75
- 76
- 77
- 78
- 79
- 80
- 81
- 82
- 83
- 84
- 85
- 86
- 87
- 88
- 89
- 90
- 91
- 92
- 93
- 94
- 95
- 96
- 97
- 98
- 99
- 100
- 101
- 102
- 103
- 104
- 105
- 106
- 107
- 108
- 109
- 110
- 111
- 112
- 113
- 114
- 115
- 116
- 117
- 118
- 119
- 120
- 121
- 122
- 123
- 124
- 125
- 126
- 127
- 128
- 129
- 130
- 131
- 132
- 133
- 134
- 135
- 136
- 137
- 138
- 139
- 140
- 141
- 142
- 143
- 144
- 145
- 146
- 147
- 148
- 149
- 150
- 151
- 152
- 153
- 154
连接池JedisPool应用
我们直接基于Jedis访问redis时,每次获取连接,释放连接会带来很大的性能开销,可以借助Jedis连接池,重用创建好的连接,来提高其性能,简易应用方式如下:
package com.jt;

import org.junit.Test;
import redis.clients.jedis.Jedis;
import redis.clients.jedis.JedisPool;
import redis.clients.jedis.JedisPoolConfig;


public class JedisPoolTests {
    @Test
   public void testJedisPool(){
        //定义连接池的配置
        JedisPoolConfig config=new JedisPoolConfig();
        config.setMaxTotal(1000);//最大连接数
        config.setMaxIdle(60);//最大空闲时间(连接不用了要释放)
        //创建连接池
        JedisPool jedisPool=
        new JedisPool(config,"192.168.126.130",6379);
        //从池中获取一个连接
        Jedis resource = jedisPool.getResource();
        resource.auth("123456");
        //通过jedis连接存取数据
        resource.set("class","cgb2004");
        String clazz=resource.get("class");
        System.out.println(clazz);
        //将链接返回池中
        resource.close();
        //关闭连接池
        jedisPool.close();
    }
}
- 1
- 2
- 3
- 4
- 5
- 6
- 7
- 8
- 9
- 10
- 11
- 12
- 13
- 14
- 15
- 16
- 17
- 18
- 19
- 20
- 21
- 22
- 23
- 24
- 25
- 26
- 27
- 28
- 29
- 30
- 31
我们可以基于池对象,设计一个数据源,将来在业务中通过一个数据源对象,从池中获取连接,不用每次获取连接都要创建池对象,例如:
package com.jt.redis;

import redis.clients.jedis.Jedis;
import redis.clients.jedis.JedisPool;
import redis.clients.jedis.JedisPoolConfig;

/**
 * 构建一个Jedis数据源,基于此数据源可以从一个Jedis池中
 * 获取连接(Jedis),进而操作redis数据库。
 */
public class JedisDataSource {
    private static final JedisPool jedisPool;
    private static final String HOST="192.168.126.129";
    private static final int PORT=6379;
    static{
        JedisPoolConfig config=new JedisPoolConfig();
        config.setMaxTotal(16);//最大连接数,默认为8
        config.setMaxIdle(60);
        jedisPool=new JedisPool(config,HOST,PORT);
    }
    /**
     * 获取一个连接对象,后续需要jedis连接时,可以通过此方法直接从池中获取。
     * @return
     */
    public static Jedis getConnection(){
        return jedisPool.getResource();
    }

    /**
     * 提供一个外界可以获取池的方法,
     * 假如外界要关闭池,首先要获取此池对象。
     * @return
     */
    public static JedisPool getJedisPool() {
        return jedisPool;
    }
}
- 1
- 2
- 3
- 4
- 5
- 6
- 7
- 8
- 9
- 10
- 11
- 12
- 13
- 14
- 15
- 16
- 17
- 18
- 19
- 20
- 21
- 22
- 23
- 24
- 25
- 26
- 27
- 28
- 29
- 30
- 31
- 32
- 33
- 34
- 35
- 36
- 37
RedisTemplate应用
简介
RedisTemplate为SpringBoot工程中操作redis数据库的一个Java对象,此对象封装了对redis的一些基本操作。
准备工作
第一步:创建工程配置文件application.yml,其内容如下:
spring:
  redis:
    host: 192.168.64.129  #写自己的ip
    port: 6379
- 1
- 2
- 3
- 4
第二步:创建工程启动类,例如:
package com.jt;

import org.springframework.boot.SpringApplication;
import org.springframework.boot.autoconfigure.SpringBootApplication;

@SpringBootApplication
public class RedisApplication {
    public static void main(String[] args) {
        SpringApplication.run(RedisApplication.class,args);
    }
}
- 1
- 2
- 3
- 4
- 5
- 6
- 7
- 8
- 9
- 10
- 11
快速入门实现
StringRedisTemplate 应用
StringRedisTemplate 是一个专门用于操作redis字符串类型数据的一个对象,其应用方式如下:
package com.jt.redis;
import com.fasterxml.jackson.core.JsonProcessingException;
import com.fasterxml.jackson.databind.ObjectMapper;
import org.junit.jupiter.api.Test;
import org.springframework.beans.factory.annotation.Autowired;
import org.springframework.boot.test.context.SpringBootTest;
import org.springframework.data.redis.connection.RedisConnection;
import org.springframework.data.redis.core.HashOperations;
import org.springframework.data.redis.core.StringRedisTemplate;
import org.springframework.data.redis.core.ValueOperations;
import java.util.HashMap;
import java.util.List;
import java.util.Map;
import java.util.concurrent.TimeUnit;
@SpringBootTest
public class StringRedisTemplateTests {
/**
* 此对象为操作redis的一个客户端对象,这个对象
* 对key/value采用了字符串的序列化(StringRedisSerializer)
* 方式进行,redis数据的读写操作.
*/
@Autowired
private StringRedisTemplate stringRedisTemplate;
@Test
void testHashOper01(){
//1.获取hash操作的对象
HashOperations vo =stringRedisTemplate.opsForHash();
//2.读写redis数据
//2.1存储一个对象
vo.put("user", "id", "100");
vo.put("user", "username", "tony");
vo.put("user", "status", "1");
//2.2获取一个对象
//2.2.1获取对象某个属性值
Object status =vo.get("user","status");
System.out.println(status);
//2.2.2获取对象某个key对应的所有值
List - 1
- 2
- 3
- 4
- 5
- 6
- 7
- 8
- 9
- 10
- 11
- 12
- 13
- 14
- 15
- 16
- 17
- 18
- 19
- 20
- 21
- 22
- 23
- 24
- 25
- 26
- 27
- 28
- 29
- 30
- 31
- 32
- 33
- 34
- 35
- 36
- 37
- 38
- 39
- 40
- 41
- 42
- 43
- 44
- 45
- 46
- 47
- 48
- 49
- 50
- 51
- 52
- 53
- 54
- 55
- 56
- 57
- 58
- 59
- 60
- 61
- 62
- 63
- 64
- 65
- 66
- 67
- 68
- 69
- 70
- 71
- 72
- 73
- 74
- 75
- 76
- 77
- 78
- 79
- 80
- 81
- 82
- 83
- 84
- 85
- 86
- 87
- 88
RedisTemplate 应用
RedisTemplate是一个专门用于实现对远端redis中复杂数据的操作的对应,应用案例如下:
package com.jt.redis;
@SpringBootTest
public class RedisTemplateTests {
    //这个对象在springboot工程的RedisAutoConfiguration类中已经做了配置
    //此对象在基于redis存取数据时默认采用的JDK的序列化方式
    @Autowired
    private RedisTemplate redisTemplate;

    /**
     * 测试字符串数据的存取
     */
    @Test
    void testStringOper01(){
        //自己指定key/value序列化方式
        //redisTemplate.setKeySerializer(new StringRedisSerializer());
        //redisTemplate.setValueSerializer(new StringRedisSerializer());
        ValueOperations vo = redisTemplate.opsForValue();
        //key和value默认会采用JDK的序列化方式进行存储
        vo.set("token", UUID.randomUUID().toString());
        Object token = vo.get("token");
        System.out.println(token);
    }

    @Test
    void testSetData(){
        SetOperations setOperations=redisTemplate.opsForSet();
        setOperations.add("setKey1", "A","B","C","C");
        Object members=setOperations.members("setKey1");
        System.out.println("setKeys="+members);
        //........
    }

    @Test
    void testListData(){
      //向list集合放数据
        ListOperations listOperations = redisTemplate.opsForList();
        listOperations.leftPush("lstKey1", "100"); //lpush
        listOperations.leftPushAll("lstKey1", "200","300");
        listOperations.leftPush("lstKey1", "100", "105");
        listOperations.rightPush("lstKey1", "700");
        Object value= listOperations.range("lstKey1", 0, -1);
        System.out.println(value);
      //从list集合取数据
        Object v1=listOperations.leftPop("lstKey1");//lpop
        System.out.println("left.pop.0="+v1);
        value= listOperations.range("lstKey1", 0, -1);
        System.out.println(value);
    }

    /**通过此方法操作redis中的hash数据*/
    @Test
    void testHashData(){
        HashOperations hashOperations = redisTemplate.opsForHash();//hash
        Map blog=new HashMap<>();
        blog.put("id", "1");
        blog.put("title", "hello redis");
        hashOperations.putAll("blog", blog);
        hashOperations.put("blog", "content", "redis is very good");
        Object hv=hashOperations.get("blog","id");
        System.out.println(hv);
        Object entries=hashOperations.entries("blog");
        System.out.println("entries="+entries);
    }

   @Test
    void testFlushdb(){
        redisTemplate.execute(new RedisCallback() {
            @Override
            public Object doInRedis(RedisConnection redisConnection) throws DataAccessException {
               //redisConnection.flushDb();
                redisConnection.flushAll();
                return "flush ok";
            }
        });
    }

}
- 1
- 2
- 3
- 4
- 5
- 6
- 7
- 8
- 9
- 10
- 11
- 12
- 13
- 14
- 15
- 16
- 17
- 18
- 19
- 20
- 21
- 22
- 23
- 24
- 25
- 26
- 27
- 28
- 29
- 30
- 31
- 32
- 33
- 34
- 35
- 36
- 37
- 38
- 39
- 40
- 41
- 42
- 43
- 44
- 45
- 46
- 47
- 48
- 49
- 50
- 51
- 52
- 53
- 54
- 55
- 56
- 57
- 58
- 59
- 60
- 61
- 62
- 63
- 64
- 65
- 66
- 67
- 68
- 69
- 70
- 71
- 72
- 73
- 74
- 75
- 76
- 77
定制RedisTemplate对象(拓展)
对于系统默认的RedisTemplate默认采用的是JDK的序列化机制,假如我们不希望实用JDK的序列化,可以采用的定制RedisTemplate,并采用自己指定的的序列化方式,例如:
package com.jt.redis.config;
@Configuration
public class RedisConfig {
    @Bean
    public RedisTemplate redisTemplate(RedisConnectionFactory redisConnectionFactory){
        //1.构建RedisTemplate对象
        RedisTemplate redisTemplate=new RedisTemplate<>();
        //2.设置连接工厂
        redisTemplate.setConnectionFactory(redisConnectionFactory);
        //3.定义序列化方式(在这里选择jackson)
        Jackson2JsonRedisSerializer redisSerializer= new Jackson2JsonRedisSerializer(Object.class);
        ObjectMapper objectMapper=new ObjectMapper();
        //设置要序列化的域(属性)
        //any表示任意级别访问修饰符修饰的属性 private,public,protected
        objectMapper.setVisibility(PropertyAccessor.ALL,JsonAutoDetect.Visibility.ANY);
        //启动输入域检查
        objectMapper.activateDefaultTyping(objectMapper.getPolymorphicTypeValidator(),
                ObjectMapper.DefaultTyping.NON_FINAL,
                JsonTypeInfo.As.PROPERTY);
        redisSerializer.setObjectMapper(objectMapper);
        //4.设置RedisTemplate的序列化
        redisTemplate.setKeySerializer(new StringRedisSerializer());
        redisTemplate.setValueSerializer(redisSerializer);
        redisTemplate.setHashKeySerializer(new StringRedisSerializer());
        redisTemplate.setHashValueSerializer(redisSerializer);
        //spring规范中假如修改bean对象的默认特性,建议调用一下afterPropertiesSet()
        redisTemplate.afterPropertiesSet();
       return redisTemplate;
    }
}
- 1
- 2
- 3
- 4
- 5
- 6
- 7
- 8
- 9
- 10
- 11
- 12
- 13
- 14
- 15
- 16
- 17
- 18
- 19
- 20
- 21
- 22
- 23
- 24
- 25
- 26
- 27
- 28
- 29
- 30
创建Blog对象,然后基于RedisTemplate进行序列化实践,Blog代码如下
package com.jt.redis.pojo;

import java.io.Serializable;

public class Blog implements Serializable {//{"id":10,"title":"redis"}
    private static final long serialVersionUID = -6721670401642138021L;
    private Integer id;
    private String title;
    public Blog(){
        System.out.println("Blog()");
    }
    public Blog(Integer id,String title){
        this.id=id;
        this.title=title;
    }

    public Integer getId() {
        return id;
    }

    public void setId(Integer id) {
        this.id = id;
    }

    public String getTitle() {
        return title;
    }

    public void setTitle(String title) {
        this.title = title;
    }
    @Override
    public String toString() {
        return "Blog{" +
                "id=" + id +
                ", title='" + title + '\'' +
                '}';
    }
}
- 1
- 2
- 3
- 4
- 5
- 6
- 7
- 8
- 9
- 10
- 11
- 12
- 13
- 14
- 15
- 16
- 17
- 18
- 19
- 20
- 21
- 22
- 23
- 24
- 25
- 26
- 27
- 28
- 29
- 30
- 31
- 32
- 33
- 34
- 35
- 36
- 37
- 38
- 39
在RedisTemplateTests类中添加如下单元测试方法,进行测试,例如:
@Test
void testJsonOper() throws JsonProcessingException {
    ValueOperations valueOperations = redisTemplate.opsForValue();
    Blog blog=new Blog(10,"study redis");
    valueOperations.set("blog",blog);//序列化
    blog=(Blog)valueOperations.get("blog");//反序列化
    System.out.println("blog="+blog);
}
- 1
- 2
- 3
- 4
- 5
- 6
- 7
- 8
项目工程实践
分布式id
业务描述
在分布式系统中,数据量将越来越大时,就需要对数据进行分表操作,但是,分表后,每个表中的数据都会按自己的节奏进行自增,很有可能出现ID冲突。这时就需要一个单独的机制来负责生成唯一ID,生成出来的ID也可以叫做 分布式ID,这里我们借助redis实现一个简易的分布式id进行实现,当然还有一些第三方的系统,可以帮你生成这样的id,可以自己进行拓展学习.
关键代码实现
package com.jt.demos;

import redis.clients.jedis.Jedis;

/**
 * 需求:生成一个分布递增的id
 * 多张表基于这个方法中生成的id作为主键id值(分布式环境不会采用数据库
 * 表中自带的自增策略-auto_increment)
 */
public class IdGeneratorDemo01 {
    public static Long getId(){
          Jedis jedis=new Jedis("192.168.126.130",6379);
          jedis.auth("123456");
          Long id = jedis.incr("id");
          jedis.close();
          return id;
    }
    public static void main(String[] args) {
         for(int i=0;i<10;i++) {
              new Thread(){
                  @Override
                  public void run() {
                      String tName=Thread.currentThread().getName();
                      System.out.println(tName+"->"+
                              IdGeneratorDemo01.getId());
                  }
              }.start();
          }

    }
}
- 1
- 2
- 3
- 4
- 5
- 6
- 7
- 8
- 9
- 10
- 11
- 12
- 13
- 14
- 15
- 16
- 17
- 18
- 19
- 20
- 21
- 22
- 23
- 24
- 25
- 26
- 27
- 28
- 29
- 30
- 31
单点登陆
业务描述
在分布式系统中,通过会有多个服务,我们登录了一个服务以后,再访问其它服务时,不想再登录,就需要有一套单独的认证系统,我们通常会称之为单点登录系统,在这套系统中提供一个认证服务器,服务完成用户身份认证,在一些中小型分布式系统中中,我们通常会借助redis存储用户的认证信息,例如:
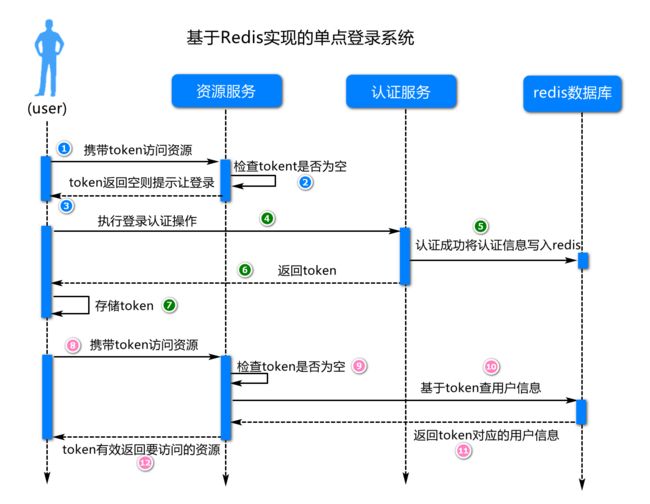
关键代码实现
package com.jt.demos;

import redis.clients.jedis.Jedis;

import java.util.UUID;

/**
 * 单点登录应用实践
 */
public class SSODemo01 {
    static String token;
    //模仿访问服务端的资源
    static void doGetResource(){
        //1.检查token是否存在,(token是存储在客户端-Cookie,localStorage)
        if(token==null){
            System.out.println("please login");
            return;
        }
        //2.检查token是否已经失效
        Jedis jedis=new Jedis("192.168.126.130",6379);
        String user = jedis.get(token);
        jedis.close();
        if(user==null){
            System.out.println("login timeout or token invalid");
            return;
        }
        //3.返回你要访问的资源
        System.out.println("return user resource");
    }
    static void doLogin(String username,String password){
        if("jack".equals(username)&&"123456".equals(password)){
            System.out.println("login ok");
            String token= UUID.randomUUID().toString();
            Jedis jedis=new Jedis("192.168.126.130",6379);
            jedis.set(token,username);//存储用户信息
            jedis.expire(token,1);
            jedis.close();
            //将token存储到客户端
            SSODemo01.token=token;
            return;
        }
        System.out.println("username or password error");
    }
    public static void main(String[] args) throws InterruptedException {//这里的main方法代表客户端
        //1.访问资源
        doGetResource();
        //2.执行登录操作
        doLogin("jack","123456");
        //3.再次访问资源
        Thread.sleep(1000);
        doGetResource();
    }
}
- 1
- 2
- 3
- 4
- 5
- 6
- 7
- 8
- 9
- 10
- 11
- 12
- 13
- 14
- 15
- 16
- 17
- 18
- 19
- 20
- 21
- 22
- 23
- 24
- 25
- 26
- 27
- 28
- 29
- 30
- 31
- 32
- 33
- 34
- 35
- 36
- 37
- 38
- 39
- 40
- 41
- 42
- 43
- 44
- 45
- 46
- 47
- 48
- 49
- 50
- 51
- 52
- 53
- 54
秒杀队列
业务描述
在设计一个秒杀或抢购系统时,为了提高系统的响应速度,通常会将用户的秒杀或抢购请求先存储到一个redis队列,这里我们就基于redis实现一个先进先出队列,例如:

关键代码实现
package com.jt.demos;

import redis.clients.jedis.Jedis;

//秒杀队列演示
//描述逻辑中会将商品抢购信息先写到redis(以队列形式进行存储),
//因为写redis内存数据库要比写你的mysql数据库快很多倍
//算法:先进先出(FIFO)-体现公平性
public class SecondKillDemo01 {

    //商品抢购首先是入队
    static void enque(String msg){//入队
         Jedis jedis=new Jedis("192.168.126.130",6379);
         jedis.auth("123456");//没有认证不需要写这个语句
         jedis.lpush("queue",msg);
         jedis.close();
    }

    //底层异步出队(基于这个消息,生成订单,扣减库存,...)
    static String deque(){//出队
        Jedis jedis=new Jedis("192.168.126.130",6379);
        jedis.auth("123456");//没有认证不需要写这个语句
        String result=jedis.rpop("queue");
        jedis.close();
        return result;
    }
    public static void main(String[] args){
        //1.多次抢购(模拟在界面上多次点击操作)
        new Thread(){
            @Override
            public void run() {
                for(int i=1;i<=10;i++){//模拟页面上按钮点击
                    enque(String.valueOf(i));
                    try{Thread.sleep(100);}catch(Exception e){}
                }
            }
        }.start();

        //2.从队列取内容(模拟后台从队列取数据)
        new Thread(){
            @Override
            public void run() {
                for(;;){
                    String msg=deque();
                    if(msg==null)continue;
                    System.out.print(msg);
                }
            }
        }.start();

    }
}
- 1
- 2
- 3
- 4
- 5
- 6
- 7
- 8
- 9
- 10
- 11
- 12
- 13
- 14
- 15
- 16
- 17
- 18
- 19
- 20
- 21
- 22
- 23
- 24
- 25
- 26
- 27
- 28
- 29
- 30
- 31
- 32
- 33
- 34
- 35
- 36
- 37
- 38
- 39
- 40
- 41
- 42
- 43
- 44
- 45
- 46
- 47
- 48
- 49
- 50
- 51
- 52
投票系统
业务描述
在很多系统中设计中,都会有一个活动设计,开启一个活动之前,可以对这个活动的支持力度先进行一个调查,例如基于这个活动设计一个投票系统,例如:
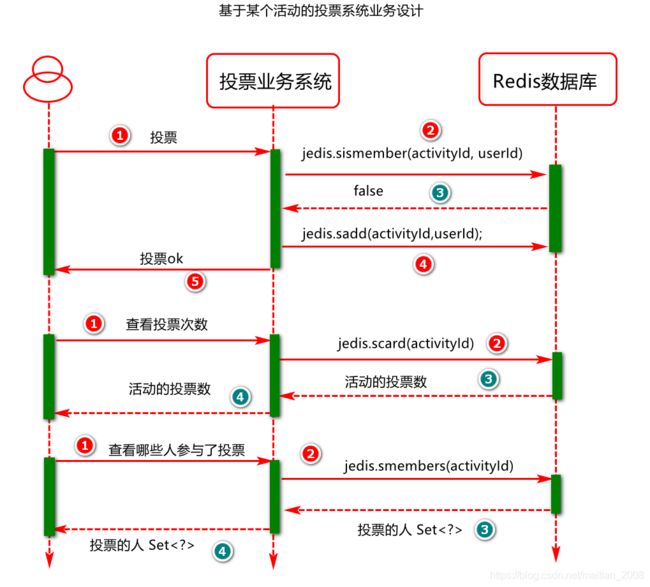
关键代码实现
package com.jt.demos;

import redis.clients.jedis.Jedis;

import java.util.Set;

/**
 * 投票系统演示:模拟基于某个活动的投票程序
 * 业务说明:一个用户只能投票一次(不允许重复)
 * 数据结构设计:基于redis的set类型进行数据存储
 */
public class VoteDemo01 {
    private static Jedis jedis=
            new Jedis("192.168.126.130",6379);
    static{
        jedis.auth("123456");
    }
    //进行投票(key为活动id,value为userId)
    static void vote(String activityId,String userId){
         jedis.sadd(activityId,userId);
    }
    //查看投票次数
    static Long getVoteCount(String activityId){
        Long count = jedis.scard(activityId);
        return count;
    }
    //查看这个活动被哪写用户投过票
    static Set getVoteUsers(String activityId){
        Set smembers = jedis.smembers(activityId);
        return smembers;
    }
    //检查这个用户是否已对这个活动投过票
    static Boolean checkVote(String activityId,String userId){
        Boolean flag = jedis.sismember(activityId, userId);
        return flag;
    }

    public static void main(String[] args) {
        //0.初始化
        String activityId="10001";
        String user1="201";
        String user2="202";
        String user3="203";
        //1.投票
        vote(activityId,user1);
        vote(activityId,user2);
        vote(activityId,user3);
        //2.获取投票次数
        Long voteCount = getVoteCount(activityId);
        System.out.println("投票次数:"+voteCount);
        //3.输出哪些人投过票
        Set users=getVoteUsers(activityId);
        System.out.println(users);
        //4.检查用户是否投过票
        boolean flag=checkVote(activityId,user1);
        System.out.println(user1+":"+(flag?"已投过票":"还没投票"));
    }

}
- 1
- 2
- 3
- 4
- 5
- 6
- 7
- 8
- 9
- 10
- 11
- 12
- 13
- 14
- 15
- 16
- 17
- 18
- 19
- 20
- 21
- 22
- 23
- 24
- 25
- 26
- 27
- 28
- 29
- 30
- 31
- 32
- 33
- 34
- 35
- 36
- 37
- 38
- 39
- 40
- 41
- 42
- 43
- 44
- 45
- 46
- 47
- 48
- 49
- 50
- 51
- 52
- 53
- 54
- 55
- 56
- 57
- 58
- 59
购物车简易实现
业务描述
简易购物车业务设计如图所示:
基础指令操作,例如:
1)向购物车添加商品
hset  cart:101  2001  1
hset  cart:101  2002  1
hset  cart:101  2003  2
2)查看购物车商品
hgetall cart:101
3)删除购物车商品
hdel cart:101 2003
4)改变购物车某个商品的购买数量
hincrby cart:101 2002 2
- 1
- 2
- 3
- 4
- 5
- 6
- 7
- 8
- 9
- 10
关键代码实现
package com.jt.demos;

import redis.clients.jedis.Jedis;

import java.util.Map;

/**
 * 作业:基于redis存储商品购物车信息
 */
public class CartDemo01 {

    public static void addCart(Long userId,Long productId,int num){
        //1.建立redis链接
        Jedis jedis=new Jedis("192.168.126.130",6379);
        jedis.auth("123456");
        //2.向购物车添加商品
        //hincrBy这个函数在key不存在时会自动创建key
        jedis.hincrBy("cart:" + userId, String.valueOf(productId),num);
        //3.释放redis链接
        jedis.close();
    }
    //查看我的购物车
    public static Map listCart(Long userId){
        //1.建立redis链接
        Jedis jedis=new Jedis("192.168.126.130",6379);
        jedis.auth("123456");
        //2.查看购物车商品
        Map map = jedis.hgetAll("cart:" + userId);
        //3.释放redis链接
        jedis.close();
        return map;
    }
    public static void main(String[] args) {
        //1.向购物车添加商品
        addCart(101L,201L,1);
        addCart(101L,202L,1);
        addCart(101L,203L,2);
        //2.查看购物车商品
        Map map = listCart(101L);
        System.out.println(map);
    }

}
- 1
- 2
- 3
- 4
- 5
- 6
- 7
- 8
- 9
- 10
- 11
- 12
- 13
- 14
- 15
- 16
- 17
- 18
- 19
- 20
- 21
- 22
- 23
- 24
- 25
- 26
- 27
- 28
- 29
- 30
- 31
- 32
- 33
- 34
- 35
- 36
- 37
- 38
- 39
- 40
- 41
- 42
- 43
总结(Summary)
本章节主要对Java中操作redis数据库的方式及API应用进行了分析和实践,具体方法的理解可以在实践中基于结果进行分析,逐步进行强化记忆。
04-Redis 数据持久化实践
简介
背景
Redis是一种内存数据库,在断电时数据可能会丢失。比如你redis整个挂了,然后redis不可用了,如果没有持久化的话,redis就会丢失所有的数据,如果通过持久化将数据搞一份儿到磁盘上去,然后再定期同步到一些云存储服务上去,那么就可以保证一些数据不丢失,保证数据的可靠性。
持久化方式
Redis中为了保证在系统宕机(类似进程被杀死)情况下,能更快的进行故障恢复,设计了两种数据持久化方案,分别为rdb和aof方式。
Rdb方式持久化
概述
Rdb方式是通过手动(save-阻塞式,bgsave-异步)或周期性方式保存redis中key/value的一种机制,Rdb方式一般为redis的默认数据持久化方式.系统启动时会自动开启这种方式的持久化机制。
RDB方式配置
RDB方式的持久化是默认开启的,也可按规则自己配置,例如,打开redis.conf文件,例如
# 这里表示每隔60s,如果有超过1000个key发生了变更,那么就生成一个新的dump.rdb文件,就是当前redis内存中完整的数据快照,这个操作也被称之为snapshotting(快照)。

save 60 1000

# 持久化 rdb文件遇到问题时,主进程是否接受写入,yes 表示停止写入,如果是no 表示redis继续提供服务。
stop-writes-on-bgsave-error yes

# 在进行快照镜像时,是否进行压缩。yes:压缩,但是需要一些cpu的消耗。no:不压缩,需要更多的磁盘空间。
rdbcompression yes
# 一个CRC64的校验就被放在了文件末尾,当存储或者加载rbd文件的时候会有一个10%左右的性能下降,为了达到性能的最大化,你可以关掉这个配置项。
rdbchecksum yes

# 快照的文件名
dbfilename dump.rdb

# 存放快照的目录
dir /var/lib/redis
- 1
- 2
- 3
- 4
- 5
- 6
- 7
- 8
- 9
- 10
- 11
- 12
- 13
- 14
- 15
- 16
- 17
Rdb方式持久化实践
试验一
在redis中保存几条数据,然后执行shutdown关闭redis,然后再重启redis,看看刚才插入的数据是否还在?假如数据还在,为什么?
因为,通过redis-cli shutdown这种方式去停掉redis,其实是一种安全退出的模式,redis在退出的时候会将内存中的数据立即生成一份完整的rdb快照,例如
127.0.0.1:6379> set phone 11111111
OK
127.0.0.1:6379> shutdown   #默认也会进行持久化
[root@centos7964 ~]#  docker start redis01
[root@centos7964 ~]# docker exec -it redis01 redis-cli
127.0.0.1:6379> keys *
1) "pone"
- 1
- 2
- 3
- 4
- 5
- 6
- 7
试验二
在redis中再保存几条新的数据,用kill -9粗暴杀死redis进程,模拟redis故障异常退出,导致内存数据丢失的场景?
这次就发现,redis进程异常被杀掉,几条最新的数据就丢失了。例如:
首先,打开第一个客户端,先清除redis内存和磁盘对应的数据
[root@centos7964 data]# docker exec -it redis01 redis-cli
127.0.0.1:6379> flushall
OK
127.0.0.1:6379> exit
[root@centos7964 data]# ls
dump.rdb
[root@centos7964 data]# rm –f dump.rdb
[root@centos7964 data]# ls
- 1
- 2
- 3
- 4
- 5
- 6
- 7
- 8
然后,打开并登录第二个客户端,并向redis存储一些数据,例如
[root@centos7964 ~]# docker exec -it redis01 redis-cli
127.0.0.1:6379> set one mybatis
OK
127.0.0.1:6379> set two spring
OK
127.0.0.1:6379> keys *
1) "one"
2) "two"
- 1
- 2
- 3
- 4
- 5
- 6
- 7
- 8
接下来,再次回到第一个客户端,杀掉redis进程,例如
[root@centos7964 data]# ps -ef | grep redis
polkitd    6995   6974  0 14:44 ?        00:00:00 redis-server *:6379
root       7064   6974  0 14:44 pts/0    00:00:00 redis-cli
root       7111   6467  0 14:47 pts/1    00:00:00 docker exec -it redis01 redis-cli
root       7130   6974  0 14:47 pts/1    00:00:00 redis-cli
root       7278   7180  0 14:51 pts/0    00:00:00 grep --color=auto redis
[root@centos7964 data]# kill -9 6995
[root@centos7964 data]# docker start redis01
- 1
- 2
- 3
- 4
- 5
- 6
- 7
- 8
最后,打开第一个客户端,登录redis,检查key是否还存在.
[root@centos7964 ~]# docker exec -it redis01 redis-cli
127.0.0.1:6379> keys *
(empty array)
127.0.0.1:6379>
[root@centos7964 ~]#
- 1
- 2
- 3
- 4
- 5
试验三
手动调用save(同步保存)或者bgsave(异步保存)执行rdb快照生成.然后杀掉redis进程,再重启检测是否还有刚刚保存的数据.
127.0.0.1:6379> set id 100
OK
127.0.0.1:6379> set name jack
OK
127.0.0.1:6379> save  #阻塞式持久化
OK
127.0.0.1:6379> set address beijing
OK
127.0.0.1:6379> bgsave  #异步方式持久化
Background saving started
- 1
- 2
- 3
- 4
- 5
- 6
- 7
- 8
- 9
- 10
小节面试分析
Redis中的save和bgsave有什么不同?
- Redis Save 命令执行一个同步保存操作,将当前 Redis 实例的所有数据快照(snapshot)以 RDB 文件的形式保存到硬盘。
- BGSAVE 命令执行之后立即返回 OK ,然后 Redis fork 出一个新子进程,原来的 Redis 进程(父进程)继续处理客户端请求,而子进程则负责将数据保存到磁盘,然后退出。
RDB持久化机制有哪些优点?
第一:RDB会生成多个数据文件,每个数据文件都代表了某一个时刻中redis的数据,这种多个数据文件的方式,非常适合做冷备,可以将这种完整的数据文件发送到一些远程云服务上去,在国内可以是阿里云的ODPS分布式存储上,以预定好的备份策略来定期备份redis中的数据.
第二:RDB对redis对外提供的读写服务,影响非常小,可以让redis保持高性能,因为redis主进程只需要fork一个子进程,让子进程执行磁盘IO操作来进行RDB持久化即可。
第三:相对于AOF持久化机制来说,直接基于RDB数据文件来重启和恢复redis进程,更加快速。
RDB持久化机制有哪些缺点?
假如redis故障时,要尽可能少的丢失数据,那么RDB方式不太好,它都是每隔5分钟或更长时间做一次快照,这个时候一旦redis进程宕机,那么会丢失最近几分钟的数据。
Aof方式数据持久化
概述
Aof方式是通过记录写操作日志的方式,记录redis数据的一种持久化机制,这个机制默认是关闭的。
AOF方式配置
# 是否开启AOF,默认关闭
appendonly yes
# 指定 AOF 文件名
appendfilename appendonly.aof
# Redis支持三种刷写模式:
# appendfsync always #每次收到写命令就立即强制写入磁盘,类似MySQL的sync_binlog=1,是最安全的。但该模式下速度也是最慢的,一般不推荐使用。
appendfsync everysec #每秒钟强制写入磁盘一次,在性能和持久化方面做平衡,推荐该方式。
# appendfsync no     #完全依赖OS的写入,一般为30秒左右一次,性能最好但是持久化最没有保证,不推荐。

#在日志重写时,不进行命令追加操作,而只是将其放在缓冲区里,避免与命令的追加造成DISK IO上的冲突。
#设置为yes表示rewrite期间对新写操作不fsync,暂时存在内存中,等rewrite完成后再写入,默认为no,建议yes
no-appendfsync-on-rewrite yes
#当前AOF文件大小是上次日志重写得到AOF文件大小的二倍时,自动启动新的日志重写过程。
auto-aof-rewrite-percentage 100
#当前AOF文件启动新的日志重写过程的最小值,避免刚刚启动Reids时由于文件尺寸较小导致频繁的重写。
auto-aof-rewrite-min-size 64mb
- 1
- 2
- 3
- 4
- 5
- 6
- 7
- 8
- 9
- 10
- 11
- 12
- 13
- 14
- 15
- 16
AOF方式持久化实践
第一:打开AOF的开关,启用AOF持久化
第二:写入一些数据,观察AOF文件(appendonly.aof)中的日志内容
第三:kill -9杀掉redis进程,重新启动redis进程,发现数据被恢复回来了,就是从AOF文件中恢复回来的,redis进程启动的时候,直接就会从appendonly.aof中加载所有的日志,把内存中的数据恢复回来。
小节面试分析
如何理解AOF方式中的rewrite操作?
redis中的可以存储的数据是有限的,很多数据可能会自动过期,也可能会被用户删除或被redis用缓存清除的算法清理掉。也就是说redis中的数据会不断淘汰掉旧的,只有一部分常用的数据会被自动保留在redis内存中,所以可能很多之前的已经被清理掉的数据,对应的写日志还停留在AOF中,AOF日志文件就一个,会不断的膨胀,最好导致文件很大。
所以,AOF会自动在后台每隔一定时间做rewrite操作,比如日志里已经存放了针对100w数据的写日志了,但redis内存现在10万数据; 于是,基于内存中当前的10万数据构建一套最新的日志,然后到AOF文件中; 覆盖之前的老日志,从而,确保AOF日志文件不会过大,保持跟redis内存数据量一致.
AOF持久化机制有哪些优点?
第一:AOF可以更好的保护数据不丢失,一般AOF会每隔1秒,通过一个后台线程执行一次fsync操作,最多丢失1秒钟的数据.
第二:AOF日志文件通常以append-only模式写入,所以没有任何磁盘寻址的开销,写入性能非常高,并且文件不容易破损,即使文件尾部破损,也很容易修复。
第三:AOF日志文件过大的时候,出现后台重写操作,也不会影响客户端的读写。因为在rewrite log的时候,会对其中的日志进行压缩,创建出一份需要恢复数据的最小日志出来。再创建新日志文件的时候,老的日志文件还是照常写入。当新的merge后的日志文件ready的时候,再交换新老日志文件即可。
第四:AOF日志文件的命令通过易读的方式进行记录,这个特性非常适合做灾难性的误删除的紧急恢复。比如某人不小心用flushall命令清空了所有数据,只要这个时候后台rewrite还没有发生,那么就可以立即拷贝AOF文件,将最后一条flushall命令给删了,然后再将该AOF文件放回去,就可以通过恢复机制,自动恢复所有数据.
AOF持久化机制有哪些缺点?
第一:对于同一份数据来说,AOF日志文件通常比RDB数据快照文件更大。
第二:AOF开启后,支持的写QPS会比RDB支持的写QPS低,因为AOF一般会配置成每秒fsync一次日志文件,当然,每秒一次fsync,性能也还是很高的。
第三:AOF这种基于命令日志方式,比基于RDB每次持久化一份完整的数据快照文件的方式,更加脆弱一些,容易有bug。不过AOF为了避免rewrite过程导致的bug,因此每次rewrite并不是基于旧的指令日志进行merge的,而是基于当时内存中的数据进行指令的重新构建,这样健壮性会好很多。
如何选择redis的持久化方式?
第一:不要仅仅使用RDB,因为那样会导致你丢失很多数据。
第二:也不要仅仅使用AOF,因为AOF做冷备没有RDB做冷备进行数据恢复的速度快,并且RDB简单粗暴的数据快照方式更加健壮。
第三:综合使用AOF和RDB两种持久化机制,用AOF来保证数据不丢失,作为数据恢复的第一选择; 用RDB来做不同程度的冷备。
总结(Summary)
本章主要是对redis中的持久化方式,持久化机制,应用实践进行基本分析与讲解。重点是如何在生产环境下应用。
05-Redis 事务处理实践
Redis事务简介
概述
Redis采用了乐观锁方式进行事务控制,它使用watch命令监视给定的key,当exec(提交事务)的时候,如果监视的key从调用watch后发生过变化,则整个事务会失败。也可以调用watch多次监视多个key。注意watch的key是对整个连接有效的,如果连接断开,监视和事务都会被自动清除。当然exec,discard,unwatch命令都会清除连接中的所有监视。
基本指令
redis进行事务控制时,通常是基于如下指令进行实现,例如:
- multi 开启事务
- exec 提交事务
- discard 取消事务
- watch 监控,如果监控的值发生变化,则提交事务时会失败
- unwatch 去掉监控
Redis保证一个事务中的所有命令要么都执行,要么都不执行(原子性)。如果在发送EXEC命令前客户端断线了,则Redis会清空事务队列,事务中的所有命令都不会执行。而一旦客户端发送了EXEC命令,所有的命令就都会被执行,即使此后客户端断线也没关系,因为Redis中已经记录了所有要执行的命令。
Redis事务控制实践
exec提交事务
例如:模拟转账,tony 500,jack 200,tony转给jack100。过程如下:
127.0.0.1:6379> set tony 500
OK
127.0.0.1:6379> set jack 200
OK
127.0.0.1:6379> mget tony jack
1) "500"
2) "200"
127.0.0.1:6379> multi #开启事务
OK
127.0.0.1:6379(TX)> decrby tony 100 #所有指令操作会进入到队列
QUEUED
127.0.0.1:6379(TX)> incrby jack 100
QUEUED
127.0.0.1:6379(TX)> mget tony jack
QUEUED
127.0.0.1:6379(TX)> exec  #提交事务
1) (integer) 400
2) (integer) 300
3) 1) "400"
   2) "300"
127.0.0.1:6379> mget tony jack
1) "400"
2) "300"
127.0.0.1:6379>
- 1
- 2
- 3
- 4
- 5
- 6
- 7
- 8
- 9
- 10
- 11
- 12
- 13
- 14
- 15
- 16
- 17
- 18
- 19
- 20
- 21
- 22
- 23
- 24
discard取消事务
注意redis事务太简单,没有回滚,而只有取消。
127.0.0.1:6379> mget tony jack
1) "400"
2) "300"
127.0.0.1:6379> multi
OK
127.0.0.1:6379> incrby jack 100
QUEUED
127.0.0.1:6379> discard
OK
127.0.0.1:6379> get jack
"300"
127.0.0.1:6379> exec
(error) ERR EXEC without MULTI
- 1
- 2
- 3
- 4
- 5
- 6
- 7
- 8
- 9
- 10
- 11
- 12
- 13
当出现错误指令时,事务也会自动取消。
127.0.0.1:6379> mget tony jack
1) "400"
2) "300"
127.0.0.1:6379> multi
OK
127.0.0.1:6379(TX)> incrby jack 100
QUEUED
127.0.0.1:6379(TX)> abcd
(error) ERR unknown command `abcd`, with args beginning with:
127.0.0.1:6379(TX)> get jack
QUEUED
127.0.0.1:6379(TX)> exec
(error) EXECABORT Transaction discarded because of previous errors.
127.0.0.1:6379> get jack
"300"
127.0.0.1:6379>
- 1
- 2
- 3
- 4
- 5
- 6
- 7
- 8
- 9
- 10
- 11
- 12
- 13
- 14
- 15
- 16
秒杀抢票事务处理
基于一个秒杀,抢购案例,演示redis乐观锁方式,例如
第一步:打开客户端1,执行如下操作
127.0.0.1:6379> set ticket 1
OK
127.0.0.1:6379> set money 0
OK
127.0.0.1:6379> watch ticket		#乐观锁,对值进行观察,改变则事务失败
OK
127.0.0.1:6379> multi				#开启事务
OK
127.0.0.1:6379> decr ticket
QUEUED
127.0.0.1:6379> incrby money 100
QUEUED
- 1
- 2
- 3
- 4
- 5
- 6
- 7
- 8
- 9
- 10
- 11
- 12
第二步:打开客户端2,执行如下操作,演示还没等客户端1提交事务,此时客户端2把票买到了。
127.0.0.1:6379> get ticket
"1"
127.0.0.1:6379> decr ticket
(integer) 0
- 1
- 2
- 3
- 4
第三步,回到客户端1:提交事务,检查ticket的值
127.0.0.1:6379> exec
(nil) #执行事务,失败
127.0.0.1:6379> get ticket
“0”
127.0.0.1:6379> unwatch #取消监控
Jedis 客户端事务操作
基于Jedis进行事务测试,代码如下:
package com.jt;
import org.junit.Test;
import redis.clients.jedis.Jedis;
import redis.clients.jedis.Transaction;

public class JedisTransactionTests {

    @Test
    public void testTransaction(){
        Jedis jedis=new Jedis("192.168.126.130",6379);
        jedis.auth("123456");
        jedis.set("tony","300");
        jedis.set("jack","500");
        //实现操作,tony转账100给jack
        //开启事务
        Transaction multi = jedis.multi();
        //执行业务操作
        try {
            multi.decrBy("tony", 100);
            multi.incrBy("jack", 100);
            int n=100/0;//模拟异常
            //提交事务
            multi.exec();
        }catch(Exception e) {
            //出现异常取消事务
            multi.discard();
        }
        String tonyMoney=jedis.get("tony");
        String jackMoney=jedis.get("jack");
        System.out.println("tonyMoney="+tonyMoney);
        System.out.println("jackMoney="+jackMoney);
        jedis.close();
    }
}
- 1
- 2
- 3
- 4
- 5
- 6
- 7
- 8
- 9
- 10
- 11
- 12
- 13
- 14
- 15
- 16
- 17
- 18
- 19
- 20
- 21
- 22
- 23
- 24
- 25
- 26
- 27
- 28
- 29
- 30
- 31
- 32
- 33
- 34
Jedis 客户端秒杀操作实践
package com.jt.demos;
import redis.clients.jedis.Jedis;
import redis.clients.jedis.Response;
import redis.clients.jedis.Transaction;
import java.util.List;
/**
* redis秒杀练习:
* 模拟两个线程都去抢购同一张票(考虑乐关锁)
*/
public class SecondKillDemo02 {
public static void secKill(){
Jedis jedis=new Jedis("192.168.126.130",6379);
jedis.auth("123456");
jedis.watch("ticket","money");
String ticket = jedis.get("ticket");
if(ticket==null||Integer.valueOf(ticket)==0)
throw new RuntimeException("已无库存");
Transaction multi = jedis.multi();
try {
multi.decr("ticket");
multi.incrBy("money", 100);
List- 1
- 2
- 3
- 4
- 5
- 6
- 7
- 8
- 9
- 10
- 11
- 12
- 13
- 14
- 15
- 16
- 17
- 18
- 19
- 20
- 21
- 22
- 23
- 24
- 25
- 26
- 27
- 28
- 29
- 30
- 31
- 32
- 33
- 34
- 35
- 36
- 37
- 38
- 39
- 40
- 41
- 42
- 43
- 44
- 45
- 46
- 47
- 48
- 49
- 50
- 51
总结(Summary)
本小节重点讲解了redis中的事务,以及事务控制指令,控制机制,乐观锁实现。
06-Redis架构设计应用实践
Redis主从复制
简介
单个Redis支持的读写能力还是有限的,此时我们可以使用多个redis来提高redis的并发处理能力,这些redis如何协同,就需要有一定的架构设计,这里我们首先从主从(Master/Slave)架构进行分析和实现.
基本架构
redis主从架构如图所示:
其中,master负责读写,并将数据同步到salve,从节点负责读操作.
快速入门实践
基于redis,设计一主从架构,一个Master,两个Slave,其中Master负责Redis读写操作,并将数据同步到Slave,Slave只负责读.,其步骤如下:
第一:将redis01拷贝两份,例如:
cp -r redis01/ redis02
- 1
cp -r redis01/ redis03
- 1
第二步:假如已有redis服务,先将原先所有redis服务停止(docker rm -f redis容器名),并启动新的redis容器,例如:
docker run -p 6379:6379 --name redis6379 \
-v /usr/local/docker/redis01/data:/data \
-v /usr/local/docker/redis01/conf/redis.conf:/etc/redis/redis.conf \
-d redis redis-server /etc/redis/redis.conf \
--appendonly yes
- 1
- 2
- 3
- 4
- 5
docker run -p 6380:6379 --name redis6380 \
-v /usr/local/docker/redis02/data:/data \
-v /usr/local/docker/redis02/conf/redis.conf:/etc/redis/redis.conf \
-d redis redis-server /etc/redis/redis.conf \
--appendonly yes
- 1
- 2
- 3
- 4
- 5
docker run -p 6381:6379 --name redis6381 \
-v /usr/local/docker/redis03/data:/data \
-v /usr/local/docker/redis03/conf/redis.conf:/etc/redis/redis.conf \
-d redis redis-server /etc/redis/redis.conf \
--appendonly yes
- 1
- 2
- 3
- 4
- 5
第三步 检测redis服务角色
启动三个客户端,分别登陆三台redis容器服务,通过info指令进行角色查看,默认新启动的三个redis服务角色都为master.
127.0.0.1:6379> info replication
- 1
\# Replication
role:master
connected_slaves:0
master_repl_offset:3860
repl_backlog_active:1
repl_backlog_size:1048576
repl_backlog_first_byte_offset:2
repl_backlog_histlen:3859
- 1
- 2
- 3
- 4
- 5
- 6
- 7
- 8
第四步:检测redis6379的ip设置
docker inspect redis6379
- 1
……
"Networks": {
                "bridge": {
                    "IPAMConfig": null,
                    "Links": null,
                    "Aliases": null,
                    "NetworkID": "c33071765cb48acb1efed6611615c767b04b98e6e298caa0dc845420e6112b73",
                    "EndpointID": "4c77e3f458ea64b7fc45062c5b2b3481fa32005153b7afc211117d0f7603e154",
                    "Gateway": "172.17.0.1",
                    "IPAddress": "172.17.0.2",
                    "IPPrefixLen": 16,
                    "IPv6Gateway": "",
                    "GlobalIPv6Address": "",
                    "GlobalIPv6PrefixLen": 0,
                    "MacAddress": "02:42:ac:11:00:02",
                    "DriverOpts": null
                }
            }
- 1
- 2
- 3
- 4
- 5
- 6
- 7
- 8
- 9
- 10
- 11
- 12
- 13
- 14
- 15
- 16
- 17
- 18
第五步:设置Master/Slave架构
分别登陆redis6380/redis6381,然后执行如下语句
slaveof 172.17.0.2 6379
- 1
说明,假如master有密码,需要在slave的redis.conf配置文件中添加"masterauth 你的密码"这条语句,然后重启redis再执行slaveof 指令操作.
第六步:再次登陆redis6379,然后检测info
[root@centos7964 ~]# docker exec -it redis6379 redis-cli
127.0.0.1:6379> info replication
- 1
- 2
\# Replication
role:master
connected_slaves:2
slave0:ip=172.17.0.3,port=6379,state=online,offset=2004,lag=1
slave1:ip=172.17.0.4,port=6379,state=online,offset=2004,lag=1
master_failover_state:no-failover
master_replid:5baf174fd40e97663998abf5d8e89a51f7458488
master_replid2:0000000000000000000000000000000000000000
master_repl_offset:2004
second_repl_offset:-1
repl_backlog_active:1
repl_backlog_size:1048576
repl_backlog_first_byte_offset:1
repl_backlog_histlen:2004
- 1
- 2
- 3
- 4
- 5
- 6
- 7
- 8
- 9
- 10
- 11
- 12
- 13
- 14
第七步: 登陆redis6379测试,master读写都可以
[root@centos7964 ~]# docker exec -it redis6379 redis-cli
127.0.0.1:6379> set role master6379
OK
127.0.0.1:6379> get role
"master6379"
127.0.0.1:6379>
- 1
- 2
- 3
- 4
- 5
- 6
第八步: 登陆redis6380测试,slave只能读。
[root@centos7964 ~]# docker exec -it redis6380 redis-cli
127.0.0.1:6379> get role
"master6379"
127.0.0.1:6379> set role slave6380
(error) READONLY You can't write against a read only replica.
127.0.0.1:6379>
- 1
- 2
- 3
- 4
- 5
- 6
Java中的读写测试分析,代码如下:
@SpringBootTest
public class MasterSlaveTests {
    @Autowired
    private RedisTemplate redisTemplate;

    @Test
    void testMasterReadWrite(){//配置文件端口为6379
        ValueOperations valueOperations = redisTemplate.opsForValue();
        valueOperations.set("role", "master6379");
        Object role = valueOperations.get("role");
        System.out.println(role);
    }

    @Test
    void testSlaveRead(){//配置文件端口为6380
        ValueOperations valueOperations = redisTemplate.opsForValue();
        Object role = valueOperations.get("role");
        System.out.println(role);
    }

}
- 1
- 2
- 3
- 4
- 5
- 6
- 7
- 8
- 9
- 10
- 11
- 12
- 13
- 14
- 15
- 16
- 17
- 18
- 19
- 20
- 21
主从同步原理分析
Redis的主从结构可以采用一主多从结构,Redis主从复制可以根据是否是全量分为全量同步和增量同步。
- Redis全量同步:
Redis全量复制一般发生在Slave初始化阶段,这时Slave需要将Master上的所有数据都复制一份。具体步骤如下:
1)从服务器连接主服务器,发送SYNC命令;
2)主服务器接收到SYNC命名后,开始执行BGSAVE命令生成RDB文件并使用缓冲区记录此后执行的所有写命令;
3)主服务器BGSAVE执行完后,向所有从服务器发送快照文件,并在发送期间继续记录被执行的写命令;
4)从服务器收到快照文件后丢弃所有旧数据,载入收到的快照;
5)主服务器快照发送完毕后开始向从服务器发送缓冲区中的写命令;
6)从服务器完成对快照的载入,开始接收命令请求,并执行来自主服务器缓冲区的写命令;
- Redis增量同步
Redis增量复制是指Slave初始化后,开始正常工作时主服务器发生的写操作同步到从服务器的过程。 增量复制的过程主要是主服务器每执行一个写命令就会向从服务器发送相同的写命令,从服务器接收并执行收到的写命令。
小节面试分析
- 如果redis要支持10万+的的并发你会怎么做?
单机的redis几乎不太可能说QPS超过10万+,除非一些特殊情况,比如你的机器性能特别好,配置特别高,物理机,维护做的特别好,而且你的整体的操作不是太复杂,一般的单机也就在几万。真正实现redis的高并发,需要读写分离。对缓存而言,一般都是用来支撑读高并发的,写的请求是比较少的,可能写请求也就一秒钟几千。读的请求相对就会比较多,例如,一秒钟二十万次读。所以redis的高并发可以基于主从架构与读写分离机制进行实现。
- Redis的replication机制是怎样的?
(1)redis采用异步方式复制数据到slave节点。
(2)一个master node是可以配置多个slave node的。
(3)slave node也可以连接其他的slave node。
(4)slave node做复制的时候,是不会block master node的正常工作的。
(5)slave node在做复制的时候,也不会block对自己的查询操作,它会用旧的数据集来提供服务; 但是复制完成的时候,需要删除旧数据集,加载新数据集,这个时候就会暂停对外服务了。
(6)slave node主要用来进行横向扩容,做读写分离,扩容的slave node可以提高读的吞吐量。
Redis哨兵模式
简介
哨兵(Sentinel)是Redis的主从架构模式下,实现高可用性(high availability)的一种机制。
由一个或多个Sentinel实例(instance)组成的Sentinel系统(system)可以监视任意多个主服务器,以及这些主服务器属下的所有从服务器,并在被监视的主服务器进入下线状态时,自动将下线主服务器属下的某个从服务器升级为新的主服务器,然后由新的主服务器代替已下线的主服务器继续处理命令请求。
基本架构

哨兵快速入门
第一步:分别进入3台redis容器内部进行配置,在容器指定目录/etc/redis创建sentinel.conf文件,文件内容为:
sentinel monitor redis6379 172.17.0.2 6379 1
- 1
其中, 如上指令表示要的监控的master, redis6379为服务名, 172.17.0.2和6379为master的ip和端口,1表示多少个sentinel认为一个master失效时,master才算真正失效.
假如,这里如果出现 bash: vi: command not found,可依次执行如下两个指令来安装vim
apt-get update
apt-get install vim
- 1
- 2
说明:假如网络不好,也可以在宿主机对应的挂载目录去创建文件,或者在容器中执行:
cat < /etc/redis/sentinel.conf
sentinel monitor redis6379 172.17.0.2 6379 1
EOF
- 1
- 2
- 3
第二步:在每个redis容器内部的/etc/redis目录下执行如下指令(最好是在多个客户端窗口执行),启动哨兵服务
redis-sentinel sentinel.conf
- 1
第三步:打开一个新的客户端连接窗口,关闭redis6379服务(这个服务是master服务)
docker stop redis6379
- 1
其它客户端窗口,检测日志输出,例如
410:X 11 Jul 2021 09:54:27.383 # +switch-master redis6379 172.17.0.2 6379 172.17.0.4 6379
410:X 11 Jul 2021 09:54:27.383 * +slave slave 172.17.0.3:6379 172.17.0.3 6379 @ redis6379 172.17.0.4 6379
410:X 11 Jul 2021 09:54:27.383 * +slave slave 172.17.0.2:6379 172.17.0.2 6379 @ redis6379 172.17.0.4 6379
- 1
- 2
- 3
第四步:登陆ip为172.17.0.4对应的服务进行info检测,例如:
127.0.0.1:6379> info replication
- 1
\# Replication
role:master
connected_slaves:1
slave0:ip=172.17.0.3,port=6379,state=online,offset=222807,lag=0
master_failover_state:no-failover
master_replid:3d63e8474dd7bcb282ff38027d4a78c413cede53
master_replid2:5baf174fd40e97663998abf5d8e89a51f7458488
master_repl_offset:222807
second_repl_offset:110197
repl_backlog_active:1
repl_backlog_size:1048576
repl_backlog_first_byte_offset:29
repl_backlog_histlen:222779
127.0.0.1:6379>
- 1
- 2
- 3
- 4
- 5
- 6
- 7
- 8
- 9
- 10
- 11
- 12
- 13
- 14
从上面的信息输出发现,redis6381服务现在已经变为master。
Sentinel 配置进阶
对于sentinel.conf文件中的内容,我们还可以基于实际需求,进行增强配置,例如:
sentinel monitor redis6379 172.17.0.2 6379 1
daemonize yes #后台运行
logfile "/var/log/sentinel_log.log" #运行日志
sentinel down-after-milliseconds redis6379 30000 #默认30秒
- 1
- 2
- 3
- 4
其中:
1)daemonize yes表示后台运行(默认为no)
2)logfile 用于指定日志文件位置以及名字
3)sentinel down-after-milliseconds 表示master失效了多长时间才认为失效
例如: 基于cat指令创建sentinel.conf文件,并添加相关内容.
cat < /etc/redis/sentinel.conf
sentinel monitor redis6379 172.17.0.2 6379 1
daemonize yes
logfile "/var/log/sentinel_log.log"
sentinel down-after-milliseconds redis6379 30000
EOF
- 1
- 2
- 3
- 4
- 5
- 6
哨兵工作原理分析
1):每个Sentinel以每秒钟一次的频率向它所知的Master,Slave以及其他 Sentinel 实例发送一个 PING 命令。
2):如果一个实例(instance)距离最后一次有效回复 PING 命令的时间超过 down-after-milliseconds 选项所指定的值(这个配置项指定了需要多少失效时间,一个master才会被这个sentinel主观地认为是不可用的。 单位是毫秒,默认为30秒), 则这个实例会被 Sentinel 标记为主观下线。
3):如果一个Master被标记为主观下线,则正在监视这个Master的所有 Sentinel 要以每秒一次的频率确认Master的确进入了主观下线状态。
4):当有足够数量的 Sentinel(大于等于配置文件指定的值)在指定的时间范围内确认Master的确进入了主观下线状态, 则Master会被标记为客观下线 。
5):在一般情况下, 每个 Sentinel 会以每 10 秒一次的频率向它已知的所有Master,Slave发送 INFO 命令 。
6):当Master被 Sentinel 标记为客观下线时,Sentinel 向下线的 Master 的所有 Slave 发送 INFO 命令的频率会从 10 秒一次改为每秒一次 。
7):若没有足够数量的 Sentinel 同意 Master 已经下线, Master 的客观下线状态就会被移除。
8): 若 Master 重新向 Sentinel 的 PING 命令返回有效回复, Master 的主观下线状态就会被移除。
Redis集群高可用
简述
Redis单机模式可靠性保证不是很好,容易出现单点故障,同时其性能也受限于CPU的处理能力,实际开发中Redis必然是高可用的,所以单机模式并不是我们的终点,我们需要对目前redis的架构模式进行升级。
Sentinel模式做到了高可用,但是实质还是只有一个master在提供服务(读写分离的情况本质也是master在提供服务),当master节点所在的机器内存不足以支撑系统的数据时,就需要考虑集群了。
Redis集群架构实现了对redis的水平扩容,即启动N个redis节点,将整个数据分布存储在这N个redis节点中,每个节点存储总数据的1/N。redis集群通过分区提供一定程度的可用性,即使集群中有一部分节点失效或无法进行通讯,集群也可以继续处理命令请求。
基本架构
对于redis集群(Cluster),一般最少设置为6个节点,3个master,3个slave,其简易架构如下:
创建集群
第一步:准备网络环境
创建虚拟网卡,主要是用于redis-cluster能于外界进行网络通信,一般常用桥接模式。
docker network create redis-net
- 1
查看docker的网卡信息,可使用如下指令
docker network ls
- 1
查看docker网络详细信息,可使用命令
docker network inspect redis-net
- 1
第二步:准备redis配置模板
mkdir -p /usr/local/docker/redis-cluster
- 1
cd /usr/local/docker/redis-cluster
- 1
vim redis-cluster.tmpl
- 1
在redis-cluster.tmpl中输入以下内容
port ${PORT}
cluster-enabled yes
cluster-config-file nodes.conf
cluster-node-timeout 5000
cluster-announce-ip 192.168.126.129
cluster-announce-port ${PORT}
cluster-announce-bus-port 1${PORT}
appendonly yes
- 1
- 2
- 3
- 4
- 5
- 6
- 7
- 8
其中:
各节点解释如下所示:
- port:节点端口,即对外提供通信的端口
- cluster-enabled:是否启用集群
- cluster-config-file:集群配置文件
- cluster-node-timeout:连接超时时间
- cluster-announce-ip:宿主机ip
- cluster-announce-port:集群节点映射端口
- cluster-announce-bus-port:集群总线端口
- appendonly:持久化模式
第三步:创建节点配置文件
在redis-cluser中执行以下命令
for port in $(seq 8010 8015); \
do \
  mkdir -p ./${port}/conf  \
  && PORT=${port} envsubst < ./redis-cluster.tmpl > ./${port}/conf/redis.conf \
  && mkdir -p ./${port}/data; \
done
- 1
- 2
- 3
- 4
- 5
- 6
其中:
- for 变量 in $(seq var1 var2);do …; done为linux中的一种shell 循环脚本, 例如:
[root@centos7964 ~]# for i in $(seq 1 5);
> do echo $i;
> done;
1
2
3
4
5
[root@centos7964 ~]#
- 1
- 2
- 3
- 4
- 5
- 6
- 7
- 8
- 9
- 指令envsubst <源文件>目标文件,用于将源文件内容更新到目标文件中.
通过cat指令查看配置文件内容
cat /usr/local/docker/redis-cluster/801{0..5}/conf/redis.conf
- 1
第四步:创建集群中的redis节点容器
for port in $(seq 8010 8015); \
do \
   docker run -it -d -p ${port}:${port} -p 1${port}:1${port} \
  --privileged=true -v /usr/local/docker/redis-cluster/${port}/conf/redis.conf:/usr/local/etc/redis/redis.conf \
  --privileged=true -v /usr/local/docker/redis-cluster/${port}/data:/data \
  --restart always --name redis-${port} --net redis-net \
  --sysctl net.core.somaxconn=1024 redis redis-server /usr/local/etc/redis/redis.conf; \
done
- 1
- 2
- 3
- 4
- 5
- 6
- 7
- 8
其中, --privileged=true表示让启动的容器用户具备真正root权限, --sysctl net.core.somaxconn=1024 这是一个linux的内核参数,用于设置请求队列大小,默认为128,后续启动redis的启动指令需要先放到这个请求队列中,然后依次启动.
创建成功以后,通过docker ps指令查看节点内容。
第五步:创建redis-cluster集群配置
docker exec -it redis-8010 bash
- 1
redis-cli --cluster create 192.168.126.129:8010 192.168.126.129:8011 192.168.126.129:8012 192.168.126.129:8013 192.168.126.129:8014 192.168.126.129:8015 --cluster-replicas 1
- 1
如上指令要尽量放在一行执行,其中最后的1表示主从比例,当出现选择提示信息时,输入yes即可。当集群创建好以后,可以通过一些相关指令查看集群信息,例如
cluster nodes   #查看集群节点数
cluster info #查看集群基本信息
- 1
- 2
第六步:连接redis-cluster,并添加数据到redis
redis-cli -c -h 192.168.126.129 -p 8010
- 1
其中,这里-c表示集群(cluster),-h表示host(一般写ip地址),-p为端口(port)
其它:
在搭建过程,可能在出现问题后,需要停止或直接删除docker容器,可以使用以下参考命令:
批量停止docker 容器,例如:
docker ps -a | grep -i "redis-801*" | awk '{print $1}' | xargs docker stop
- 1
批量删除docker 容器,例如
docker ps -a | grep -i "redis-801*" | awk '{print $1}' | xargs docker rm -f
- 1
批量删除文件,目录等,例如:
rm -rf 801{0..5}/conf/redis.conf
rm -rf 801{0..5}
- 1
- 2
以上就是基于docker搭建redis-cluster的简单步骤,实际应用中可能还要更复杂一些,该文仅用于参考。
Jedis读写数据测试
@Test
void testJedisCluster()throws Exception{
      Set nodes = new HashSet<>();
      nodes.add(new HostAndPort("192.168.126.129",8010));
      nodes.add(new HostAndPort("192.168.126.129",8011));
      nodes.add(new HostAndPort("192.168.126.129",8012));
      nodes.add(new HostAndPort("192.168.126.129",8013));
      nodes.add(new HostAndPort("192.168.126.129",8014));
      nodes.add(new HostAndPort("192.168.126.129",8015));
      JedisCluster jedisCluster = new JedisCluster(nodes);
      //使用jedisCluster操作redis
      jedisCluster.set("test", "cluster");
      String str = jedisCluster.get("test");
      System.out.println(str);
      //关闭连接池
      jedisCluster.close();
 }
- 1
- 2
- 3
- 4
- 5
- 6
- 7
- 8
- 9
- 10
- 11
- 12
- 13
- 14
- 15
- 16
- 17
RedisTemplate读写数据测试
第一步:配置application.yml,例如:
spring:
  redis:
    cluster: #redis 集群配置
      nodes: 192.168.126.129:8010,192.168.126.129:8011,192.168.126.129:8012,192.168.126.129:8013,192.168.126.129:8014,192.168.126.129:8015
      max-redirects: 3 #最大跳转次数
    timeout: 5000 #超时时间
    database: 0
    jedis: #连接池
      pool:
        max-idle: 8
        max-wait: 0
- 1
- 2
- 3
- 4
- 5
- 6
- 7
- 8
- 9
- 10
- 11
第二步:编写单元测试类,代码如下:
package com.cy.redis;
@SpringBootTest
public class RedisClusterTests {
    @Autowired
    private RedisTemplate redisTemplate;
    @Test
    void testMasterReadWrite(){
        //1.获取数据操作对象
        ValueOperations valueOperations = redisTemplate.opsForValue();
        //2.读写数据
        valueOperations.set("city","beijing");
        Object city=valueOperations.get("city");
        System.out.println(city);
    }
}
- 1
- 2
- 3
- 4
- 5
- 6
- 7
- 8
- 9
- 10
- 11
- 12
- 13
- 14
- 15
小节面试分析
- Redis的高并发跟整个系统的高并发是什么关系?
第一:Redis你要搞高并发的话,不可避免,要把底层的缓存搞得很好。例如,mysql的高并发,是通过一系列复杂的分库分表,订单系统,事务要求的,QPS到几万,比较高了。
第二:要做一些电商的商品详情页,真正的超高并发,QPS上十万,甚至是百万,一秒钟百万的请求量,只有redis是不够的,但是redis是整个大型的缓存架构中,支撑高并发的架构里面,非常重要的一个环节。
第三:你的底层的缓存中间件,缓存系统,必须能够支撑的起我们说的那种高并发,其次,再经过良好的整体的缓存架构的设计(多级缓存架构、热点缓存),支撑真正的上十万,甚至上百万的高并发。
总结(Summary)
本章节从redis高性能,高可靠性的角度对redis的主从架构,读写分离、哨兵机制、集群方式做了分析实践。这部分内容也是中大型项目中redis常用的一些架构设计方式。
07-Redis在SpringBoot工程中的综合应用
业务描述
从一个博客数据库中查询所有的文章标签,然后存储到缓存(Cache),后续查询时可从缓存获取。提高其查询性能。
准备工作
初始化数据
初始化数据库中数据,SQL脚本如下:
DROP DATABASE IF EXISTS `blog`;
CREATE DATABASE `blog` DEFAULT character set utf8mb4;
SET names utf8mb4;
SET FOREIGN_KEY_CHECKS = 0;
USE `blog`;

CREATE TABLE `tb_tag` (
  `id` bigint(20) NOT NULL AUTO_INCREMENT COMMENT 'id',
  `name` varchar(255) NOT NULL COMMENT 'data_id',
  PRIMARY KEY (`id`)
) ENGINE=InnoDB DEFAULT CHARSET=utf8 COLLATE=utf8_bin COMMENT='tb_tag';

insert into `tb_tag` values (null,"mysql"),(null,"redis");
- 1
- 2
- 3
- 4
- 5
- 6
- 7
- 8
- 9
- 10
- 11
- 12
- 13
添加项目依赖
在jt-template工程的原有依赖基础上添加mysql数据库访问依赖,例如:
    mysql
    mysql-connector-java


    com.baomidou
    mybatis-plus-boot-starter
    3.4.2
- 1
- 2
- 3
- 4
- 5
- 6
- 7
- 8
- 9
- 10
- 11
添加数据库访问配置
在项目的配置文件(例如application.yml)中添加数据库访问配置,例如:
spring:
  datasource:
    url: jdbc:mysql:///blog?serverTimezone=Asia/Shanghai&characterEncoding=utf8
    username: root
    password: root
- 1
- 2
- 3
- 4
- 5
业务逻辑代码设计及实现
Domain对象设计
创建一个Tag类,基于此类型的对象存储Tag(标签信息),代码如下:
package com.jt.blog.domain;

import com.baomidou.mybatisplus.annotation.IdType;
import com.baomidou.mybatisplus.annotation.TableId;
import com.baomidou.mybatisplus.annotation.TableName;

import java.io.Serializable;

/**
 * 标签类的设计
 */
@TableName("tb_tag")
public class Tag implements Serializable {
    private static final long serialVersionUID = 4504013456197711455L;
    /**标签id*/
    @TableId(type = IdType.AUTO)
    private Long id;
    /**标签名*/
    private String name;

    public Long getId() {
        return id;
    }

    public void setId(Long id) {
        this.id = id;
    }
    public String getName() {
        return name;
    }
    public void setName(String name) {
        this.name = name;
    }
    @Override
    public String toString() {
        return "Tag{" +
                "id=" + id +
                ", name='" + name + '\'' +
                '}';
    }
}
- 1
- 2
- 3
- 4
- 5
- 6
- 7
- 8
- 9
- 10
- 11
- 12
- 13
- 14
- 15
- 16
- 17
- 18
- 19
- 20
- 21
- 22
- 23
- 24
- 25
- 26
- 27
- 28
- 29
- 30
- 31
- 32
- 33
- 34
- 35
- 36
- 37
- 38
- 39
- 40
- 41
Dao 逻辑对象设计
创建Tag信息的数据访问接口,代码如下:
package com.jt.blog.dao;

import com.baomidou.mybatisplus.core.mapper.BaseMapper;
import com.jt.blog.domain.Tag;
import org.apache.ibatis.annotations.Mapper;

@Mapper
public interface TagMapper
        extends BaseMapper {
}
- 1
- 2
- 3
- 4
- 5
- 6
- 7
- 8
- 9
- 10
创建单元测试类,TagMapper中的相关方法进行单元测试,例如:
package com.jt.blog.dao;

import com.jt.blog.domain.Tag;
import org.junit.jupiter.api.Test;
import org.springframework.beans.factory.annotation.Autowired;
import org.springframework.boot.test.context.SpringBootTest;

import java.util.List;

@SpringBootTest
public class TagMapperTests {
    @Autowired
    private TagMapper tagMapper;
    @Test
    void testSelectList(){
        List tags =
        tagMapper.selectList(null);
        for(Tag t:tags){
            System.out.println(t);
            //System.out.println(t.getId()+"/"+t.getName());
        }
    }
}
- 1
- 2
- 3
- 4
- 5
- 6
- 7
- 8
- 9
- 10
- 11
- 12
- 13
- 14
- 15
- 16
- 17
- 18
- 19
- 20
- 21
- 22
- 23
Service 逻辑对象设计
设计TagService接口及实现类,定义Tag(标签)业务逻辑。
第一步:定义TagService接口,代码如下:
package com.jt.blog.service;
import com.jt.blog.domain.Tag;
import java.util.List;
public interface TagService {
    /**
     * 查询所有的标签
     * @return
     */
    List selectTags();
}
- 1
- 2
- 3
- 4
- 5
- 6
- 7
- 8
- 9
- 10
第二步:定义TagServiceImpl类,代码如下:
package com.jt.blog.service.impl;

import com.jt.blog.dao.TagMapper;
import com.jt.blog.domain.Tag;
import com.jt.blog.service.TagService;
import org.springframework.beans.factory.annotation.Autowired;
import org.springframework.data.redis.core.RedisTemplate;
import org.springframework.data.redis.core.ValueOperations;
import org.springframework.stereotype.Service;

import java.util.List;

@Service
public class TagServiceImpl implements TagService {
    //RedisAutoConfiguration 类中做的RedisTemplate的配置
    @Autowired
    private RedisTemplate redisTemplate;
    @Autowired
    private TagMapper tagMapper;
    @Override
    public List selectTags() {
        //1.从redis查询Tag信息,redis有则直接返回
        ValueOperations> valueOperations =
        redisTemplate.opsForValue();
        List tags=valueOperations.get("tags");
        if(tags!=null&&!tags.isEmpty())return tags;
        //2.从redis没有获取tag信息,查询mysql
        tags = tagMapper.selectList(null);
        //3.将从mysql查询到tag信息存储到redis
        valueOperations.set("tags", tags);
        //4.返回查询结果
        return tags;
    }
}
- 1
- 2
- 3
- 4
- 5
- 6
- 7
- 8
- 9
- 10
- 11
- 12
- 13
- 14
- 15
- 16
- 17
- 18
- 19
- 20
- 21
- 22
- 23
- 24
- 25
- 26
- 27
- 28
- 29
- 30
- 31
- 32
- 33
- 34
说明,假如将List存储到redis,此时Tag必须实现Serializable接口。
第三步:定义TagServiceTests单元测试类并进行单元测试,代码如下:
package com.jt.blog.service;

import com.jt.blog.domain.Tag;
import org.junit.jupiter.api.Test;
import org.springframework.beans.factory.annotation.Autowired;
import org.springframework.boot.test.context.SpringBootTest;

import java.util.List;

@SpringBootTest
public class TagServiceTests {
    @Autowired
    private TagService tagService;

    @Test
    void testSelectTags(){
        List tags=
        tagService.selectTags();
        System.out.println(tags);
    }
}
- 1
- 2
- 3
- 4
- 5
- 6
- 7
- 8
- 9
- 10
- 11
- 12
- 13
- 14
- 15
- 16
- 17
- 18
- 19
- 20
- 21
Controller逻辑对象设计
创建Tag控制逻辑对象,用于处理请求和响应逻辑,代码如下:
package com.jt.blog.controller;

import com.jt.blog.domain.Tag;
import com.jt.blog.service.TagService;
import org.springframework.beans.factory.annotation.Autowired;
import org.springframework.web.bind.annotation.GetMapping;
import org.springframework.web.bind.annotation.RequestMapping;
import org.springframework.web.bind.annotation.RestController;

import java.util.ArrayList;
import java.util.List;

@RestController
@RequestMapping("/tag")
public class TagController {
    @Autowired
    private TagService tagService;

    @GetMapping
    public  List doSelectTags(){
      return  tagService.selectTags());//1.redis,2.mysql
    }
}
- 1
- 2
- 3
- 4
- 5
- 6
- 7
- 8
- 9
- 10
- 11
- 12
- 13
- 14
- 15
- 16
- 17
- 18
- 19
- 20
- 21
- 22
- 23
启动服务,打开浏览器进行访问测试。同时思考,我们是否可以在这个层加一个本地cache。
业务逻辑代码优化
定制RedisTemplate对象
RedisTemplate默认采用的是JDK的序列化方式,假如对系统对序列化做一些调整,可以自己定义RedisTemplate对象,例如:
package com.jt;

import com.fasterxml.jackson.annotation.JsonAutoDetect;
import com.fasterxml.jackson.annotation.JsonTypeInfo;
import com.fasterxml.jackson.annotation.PropertyAccessor;
import com.fasterxml.jackson.databind.ObjectMapper;
import org.springframework.boot.autoconfigure.condition.ConditionalOnMissingBean;
import org.springframework.context.annotation.Bean;
import org.springframework.context.annotation.Configuration;
import org.springframework.data.redis.connection.RedisConnectionFactory;
import org.springframework.data.redis.core.RedisTemplate;
import org.springframework.data.redis.serializer.Jackson2JsonRedisSerializer;
import org.springframework.data.redis.serializer.StringRedisSerializer;

import java.net.UnknownHostException;

@Configuration
public class RedisCacheConfig {
    //代码定制参考RedisAutoConfiguration类
    @Bean
    public RedisTemplate redisTemplate(
         RedisConnectionFactory redisConnectionFactory) throws UnknownHostException {
        System.out.println("===redisTemplate===");
        RedisTemplate template = new RedisTemplate();
        template.setConnectionFactory(redisConnectionFactory);
        //定义redisTemplate对象的序列化方式
        //1.定义key的序列化方式
        StringRedisSerializer stringRedisSerializer=new StringRedisSerializer();
        template.setKeySerializer(stringRedisSerializer);
        template.setHashKeySerializer(stringRedisSerializer);
        //2.定义Value的序列化方式
        Jackson2JsonRedisSerializer jsonRedisSerializer=
                new Jackson2JsonRedisSerializer(Object.class);
        ObjectMapper objectMapper=new ObjectMapper();
        objectMapper.setVisibility(
                PropertyAccessor.GETTER,
                JsonAutoDetect.Visibility.ANY);
        objectMapper.activateDefaultTyping(
                objectMapper.getPolymorphicTypeValidator(),
                ObjectMapper.DefaultTyping.NON_FINAL,
                JsonTypeInfo.As.PROPERTY);
        jsonRedisSerializer.setObjectMapper(objectMapper);
        template.setValueSerializer(jsonRedisSerializer);
        template.setHashValueSerializer(jsonRedisSerializer);
        //3.redisTemplate默认特性设置(除了序列化,其它原有特性不丢)
        template.afterPropertiesSet();
        return template;
    }
}
- 1
- 2
- 3
- 4
- 5
- 6
- 7
- 8
- 9
- 10
- 11
- 12
- 13
- 14
- 15
- 16
- 17
- 18
- 19
- 20
- 21
- 22
- 23
- 24
- 25
- 26
- 27
- 28
- 29
- 30
- 31
- 32
- 33
- 34
- 35
- 36
- 37
- 38
- 39
- 40
- 41
- 42
- 43
- 44
- 45
- 46
- 47
- 48
- 49
Service中AOP方式缓存应用
目标:简化缓存代码的编写
解决方案:基于AOP(面向切面编程)方式实现缓存应用
实践步骤:
第一步:在启动上类添加@EnableCaching注解(开启AOP方式的缓存配置),例如:
@EnableCaching //启动AOP方式的缓存配置
@SpringBootApplication
public class RedisApplication {
 ....
}
- 1
- 2
- 3
- 4
- 5
第二步:重构TagServiceImpl中的selectTags()方法,方法上使用@Cacheable注解,例如:
@Cacheable(value = "tagCache")
@Override
public List selectTags() {
    return tagMapper.selectList(null);
}
- 1
- 2
- 3
- 4
- 5
其中,@Cacheable描述的方法为AOP中的一个切入点方法,访问这个方法时,系统底层会通过一个拦截器,检查缓存中是否有你要的数据,假如有则直接返回,没有则执行方法从数据库查询数据.
我们还可以定义Redis中key和value的序列化方式,修改key的生成策略,例如:
package com.jt.blog;
import org.springframework.cache.annotation.CachingConfigurerSupport;
import org.springframework.cache.interceptor.KeyGenerator;
import org.springframework.context.annotation.Bean;
import org.springframework.context.annotation.Configuration;
import org.springframework.data.redis.cache.RedisCacheConfiguration;
import org.springframework.data.redis.cache.RedisCacheManager;
import org.springframework.data.redis.connection.RedisConnectionFactory;
import org.springframework.data.redis.serializer.*;
import java.time.Duration;
@Configuration
public class RedisCacheConfig extends CachingConfigurerSupport {
/**
* 定义缓存key生成器,不定义也可以使用默认的。
* @return
*/
@Bean
public KeyGenerator keyGenerator() {
return (o, method, params) -> {
StringBuilder sb = new StringBuilder();
sb.append(o.getClass().getName()); // 类目
sb.append("::");
sb.append(method.getName()); // 方法名
for (Object param : params) {
sb.append(param.toString());
}
return sb.toString();
};
}
/**
* 自定义Cache管理器对象,不定义也可以,有默认的,但假如希望基于AOP
* 方式实现Redis的操作时,按照指定的序列化方式进行序列化,
* 可以对CacheManager进行自定义。
* @param connectionFactory
* @return
*/
@Bean
public RedisCacheManager cacheManager(RedisConnectionFactory connectionFactory) {
RedisCacheConfiguration config = RedisCacheConfiguration.defaultCacheConfig()
.entryTtl(Duration.ofSeconds(60)) // 60s缓存失效
// 设置key的序列化方式
.serializeKeysWith(RedisSerializationContext.SerializationPair
.fromSerializer(new StringRedisSerializer()))
// 设置value的序列化方式
.serializeValuesWith(RedisSerializationContext.SerializationPair
.fromSerializer(
new Jackson2JsonRedisSerializer- 1
- 2
- 3
- 4
- 5
- 6
- 7
- 8
- 9
- 10
- 11
- 12
- 13
- 14
- 15
- 16
- 17
- 18
- 19
- 20
- 21
- 22
- 23
- 24
- 25
- 26
- 27
- 28
- 29
- 30
- 31
- 32
- 33
- 34
- 35
- 36
- 37
- 38
- 39
- 40
- 41
- 42
- 43
- 44
- 45
- 46
- 47
- 48
- 49
- 50
- 51
- 52
- 53
- 54
- 55
- 56
- 57
- 58
- 59
- 60
第三步:进行单元测试,检测redis中数据的存储.
package com.jt.blog.service;

import com.jt.blog.domain.Tag;
import org.junit.jupiter.api.Test;
import org.springframework.beans.factory.annotation.Autowired;
import org.springframework.boot.test.context.SpringBootTest;
import java.util.List;
@SpringBootTest
public class TagServiceTests {
    @Autowired
    private TagService tagService;
    @Test
    void testSelectTags(){
        List tags=
        tagService.selectTags();
        System.out.println(tags);
    }
}
- 1
- 2
- 3
- 4
- 5
- 6
- 7
- 8
- 9
- 10
- 11
- 12
- 13
- 14
- 15
- 16
- 17
- 18
Service中缓存一致性分析
当我们从数据库查询数据以后,假如将数据存入到了缓存,后续更新了数据库的数据,但假如没有更新缓存就会出现缓存数据与数据库数据不一致的这样的现象,对于这样问题,有时允许在一定时间范围之内存在。假如我们希望在更新了数据库数据以后要更新缓存,如何实现呢?接下来通过一个案例,来演示和解决一下这个问题.
第一步:修改TagService接口,添加相关方法,例如:
package com.jt.blog.service;
import com.jt.blog.domain.Tag;
import java.util.List;
public interface TagService {
    /**
     * 查询所有的标签
     * @return
     */
    List selectTags();
    /**
     * 创建一个新的tag对象
     * @param tag
     */
    void insertTag(Tag tag);

    /**
     * 更新tag对象
     * @param tag
     * @return
     */
    Tag updateTag(Tag tag);

    /**
     * 基于id查询tag信息
     * @param id
     * @return
     */
    Tag selectById(Long id);
}
- 1
- 2
- 3
- 4
- 5
- 6
- 7
- 8
- 9
- 10
- 11
- 12
- 13
- 14
- 15
- 16
- 17
- 18
- 19
- 20
- 21
- 22
- 23
- 24
- 25
- 26
- 27
- 28
- 29
第二步:修改TagServiceImpl类,在类中重写TagService接口方法,例如:
package com.jt.blog.service.impl;

import com.jt.blog.dao.TagMapper;
import com.jt.blog.domain.Tag;
import com.jt.blog.service.TagService;
import org.springframework.beans.factory.annotation.Autowired;
import org.springframework.cache.annotation.CacheEvict;
import org.springframework.cache.annotation.CachePut;
import org.springframework.cache.annotation.Cacheable;
import org.springframework.data.redis.core.RedisTemplate;
import org.springframework.data.redis.core.ValueOperations;
import org.springframework.stereotype.Service;

import java.util.LinkedHashMap;
import java.util.List;

@Service
public class TagServiceImpl implements TagService {

    @Autowired
    private TagMapper tagMapper;

    /*@Cacheable注解描述的方法为缓存切入点方法
     *访问此方法时系统底层会先从缓存查找数据,假如缓存缓存没有,
     *会查询mysql数据库,这个注解假如想生效需要在启动类或者配置
     *类上添加@EnableCaching注解.
     *其中,这里的value用于指定一个key前缀,
     *没有指定key属性,则默认会使用 KeyGenerator对象创建key
     */
    @Cacheable(value = "tagCache")
    @Override
    public List selectTags() {
        return tagMapper.selectList(null);
    }

    /**
     * @CacheEvict注解的作用是定义缓存切入点方法,执行此注解描述的方法
     * 时,底层通过AOP方式执行缓存数据的清除操作.
     * 其中,allEntries表示清除指定key所有数据,beforeInvocation用于定义
     * 在何时清除缓存数据,是更新数据库之后还是之前,false表示之后
     */
    @CacheEvict(value = "tagCache",allEntries = true,beforeInvocation = false)
    @Override
    public void insertTag(Tag tag) {
          tagMapper.insert(tag);
    }
    /**
     * 缓存数据时,可以自己指定key,key的值为spring中的el表达式,语法可以打开@Cacheable注解源码进行查看,
     * 这里的#id表示基于id的值作为key
     */
     @Cacheable(value="tagCache",key="#id")
     @Override
     public Tag selectById(Long id){
          return tagMapper.selectById(id);
     }

   /** @CachePut注解描述的方法为缓存切入点方法,系统底层会在执行此方法后,更新缓存数据,
     * 这里更新完数据以后,key为tag对象的id值,值为方法的返回值.
     */
     @CachePut(value = "tagCache",key="#tag.id")
     @Override
      public Tag updateTag(Tag tag){
          tagMapper.updateById(tag);
          return tag;
      }
}
- 1
- 2
- 3
- 4
- 5
- 6
- 7
- 8
- 9
- 10
- 11
- 12
- 13
- 14
- 15
- 16
- 17
- 18
- 19
- 20
- 21
- 22
- 23
- 24
- 25
- 26
- 27
- 28
- 29
- 30
- 31
- 32
- 33
- 34
- 35
- 36
- 37
- 38
- 39
- 40
- 41
- 42
- 43
- 44
- 45
- 46
- 47
- 48
- 49
- 50
- 51
- 52
- 53
- 54
- 55
- 56
- 57
- 58
- 59
- 60
- 61
- 62
- 63
- 64
- 65
- 66
第三步:修改单元测试类,测试缓存数据一致性.
package com.jt.blog.service;

import com.jt.blog.domain.Tag;
import org.junit.jupiter.api.Test;
import org.springframework.beans.factory.annotation.Autowired;
import org.springframework.boot.test.context.SpringBootTest;
import java.util.List;
@SpringBootTest
public class TagServiceTests {
    @Autowired
    private TagService tagService;
    @Test
    void testSelectTags(){
        List tags=
        tagService.selectTags();
        System.out.println(tags);
    }
    @Test
     void testInsertTag(){
        Tag tag=new Tag();
        tag.setName("Oracle1");
        tagService.insertTag(tag);
    }
        @Test
    void testSelectById(){
        Tag tag = tagService.selectById(1L);
        System.out.println(tag);
    }
      @Test
    void testUpdateTag(){
        Tag tag=new Tag();
        tag.setId(1L);
        tag.setName("mysql8.0");
        tagService.updateTag(tag);
    }
}
- 1
- 2
- 3
- 4
- 5
- 6
- 7
- 8
- 9
- 10
- 11
- 12
- 13
- 14
- 15
- 16
- 17
- 18
- 19
- 20
- 21
- 22
- 23
- 24
- 25
- 26
- 27
- 28
- 29
- 30
- 31
- 32
- 33
- 34
- 35
- 36
Controller中添加本地缓存
在Controller中添加一个本地缓存,减少对远程redis缓存的访问,例如:
package com.jt.blog.controller;

import com.jt.blog.domain.Tag;
import com.jt.blog.service.TagService;
import org.springframework.beans.factory.annotation.Autowired;
import org.springframework.web.bind.annotation.GetMapping;
import org.springframework.web.bind.annotation.RequestMapping;
import org.springframework.web.bind.annotation.RestController;

import java.util.ArrayList;
import java.util.List;
import java.util.concurrent.CopyOnWriteArrayList;

@RestController
@RequestMapping("/tag")
public class TagController {
    @Autowired
    private TagService tagService;
    //此对象存哪了?(JVM)
    private List tags=new CopyOnWriteArrayList<>();//本地 cache
    @GetMapping
    public  List doSelectTags(){
       if(tags.isEmpty()) {
           synchronized (tags) {
               if(tags.isEmpty()) {
                   tags.addAll(tagService.selectTags());//1.redis,2.mysql
               }
           }
       }
       return tags;
    }
}
- 1
- 2
- 3
- 4
- 5
- 6
- 7
- 8
- 9
- 10
- 11
- 12
- 13
- 14
- 15
- 16
- 17
- 18
- 19
- 20
- 21
- 22
- 23
- 24
- 25
- 26
- 27
- 28
- 29
- 30
- 31
- 32
Controller中本地缓存一致性分析
此次项目案例中,我们在Controller层添加了本地缓存,这个缓存我们也需要考虑其缓存一致性,其相关代码实现如下:
package com.jt.blog.controller;

import com.jt.blog.domain.Tag;
import com.jt.blog.service.TagService;
import org.springframework.beans.factory.annotation.Autowired;
import org.springframework.web.bind.annotation.*;

import javax.annotation.PostConstruct;
import javax.annotation.PreDestroy;
import java.util.ArrayList;
import java.util.List;
import java.util.Timer;
import java.util.TimerTask;
import java.util.concurrent.CopyOnWriteArrayList;
import java.util.concurrent.ScheduledExecutorService;

@RestController
@RequestMapping("/tag")
public class TagController {
    @Autowired
    private TagService tagService;
    //private List tags=new ArrayList<>();
    private List tags=new CopyOnWriteArrayList<>();//本地 cache


    @GetMapping("/{id}")
    public Tag doSelectById(@PathVariable("id") Long id){
        //查询本地缓存
        for(Tag t:tags){
            if(t.getId().equals(id)) return t;
        }
        //查询redis,mysql
        return tagService.selectById(id);
    }

    @PostMapping
    public String doInsertTag(Tag tag){
        //向数据库写入数据
        tagService.insertTag(tag);//A
        //更新本地缓存
        tags.add(tag);
        return "insert ok";
    }

    @PutMapping
    public String doUpdateTag(Tag tag){//id=1,name=mysql 8.9
        //向数据库写入数据
        tagService.updateTag(tag);
        //更新本地缓存
        for(Tag t:tags){
            if(t.getId().equals(tag.getId())){
                t.setName(tag.getName());
            }
        }
        return "update ok";
    }


    @GetMapping
    public  List doSelectTags(){//B
       if(tags.isEmpty()) {
           synchronized (tags) {
               if(tags.isEmpty()) {
                   tags.addAll(tagService.selectTags());//1.redis,2.mysql
               }
           }
       }
       return tags;
    }
    /**Spring中Bean对象的生命周期方法,对象初始化时执行此方法*/
    @PostConstruct
    public void doInit(){
        doTimerRefreshTask();
    }
    /**Spring中Bean对象的生命周期方法,Bean对象初始化时执行此方法*/
    @PreDestroy
    public void doDestory(){
        //退出定时任务
        timer.cancel();
    }
    private Timer timer;
    //定义刷新任务
    private void doTimerRefreshTask(){
        //构建一个定时任务调度对象
        timer=new Timer();
        //构建一个任务对象
        TimerTask task=new TimerTask() {
            @Override
            public void run() {
                System.out.println("refresh cache");
                tags.clear();
            }
        };
        //执行任务对象(每隔5秒执行一次)
        timer.schedule(task, 5000, 5000);
    }

}
- 1
- 2
- 3
- 4
- 5
- 6
- 7
- 8
- 9
- 10
- 11
- 12
- 13
- 14
- 15
- 16
- 17
- 18
- 19
- 20
- 21
- 22
- 23
- 24
- 25
- 26
- 27
- 28
- 29
- 30
- 31
- 32
- 33
- 34
- 35
- 36
- 37
- 38
- 39
- 40
- 41
- 42
- 43
- 44
- 45
- 46
- 47
- 48
- 49
- 50
- 51
- 52
- 53
- 54
- 55
- 56
- 57
- 58
- 59
- 60
- 61
- 62
- 63
- 64
- 65
- 66
- 67
- 68
- 69
- 70
- 71
- 72
- 73
- 74
- 75
- 76
- 77
- 78
- 79
- 80
- 81
- 82
- 83
- 84
- 85
- 86
- 87
- 88
- 89
- 90
- 91
- 92
- 93
- 94
- 95
- 96
- 97
- 98
Redis集群链接配置实践
修改项目中的application.yml配置文件,修改redis配置,采用集群方式进行实现,例如:
spring:
  datasource: #默认配置的是HikariDataSource,应用的是HikariCP链接池(HikariPool)
    url: jdbc:mysql:///blog?serverTimezone=Asia/Shanghai&characterEncoding=utf8
    username: root
    password: root
#redis 集群配置
  redis:
    cluster: #redis 集群配置
      nodes: 192.168.126.129:8010,192.168.126.129:8011,192.168.126.129:8012,192.168.126.129:8013,192.168.126.129:8014,192.168.126.129:8015
      max-redirects: 3 #最大跳转次数
    timeout: 5000 #超时时间
    database: 0
    jedis: #连接池
      pool:
        max-idle: 8
        max-wait: 0
#日志配置
logging:
  level:
    com.jt: debug
- 1
- 2
- 3
- 4
- 5
- 6
- 7
- 8
- 9
- 10
- 11
- 12
- 13
- 14
- 15
- 16
- 17
- 18
- 19
- 20
总结(Summary)
本章节重点是学习项目中缓存(Cache)的一种应用思想,例如缓存的整合,分布式缓存,本地缓存的应用场景,可能出现的问题以及对应的解决方案.
08-Java中本地缓存实现
简介
为什么要Cache
- 降低数据库的访问压力.
- 提高查询的性能,改善用户体验.
你都了解哪些Cache?
- 浏览器缓存
- 数据持久层的Cache(MyBatis中的Cache设计)
- 逻辑处理层的Cache(Spring中的Cache)
- CPU的高速缓存
对本地缓存你会如何设计
- 数据的存储结构(散列存储)
- 数据的淘汰算法(FIFO,LRU)
- 任务调度策略(定时刷新缓存)
- 缓存日志的记录(命中率)
- GC时会缓存数据的影响
本地缓存的设计
Cache接口设计
我们在设计Cache时,一般会先设计一个接口,定义一套规范,例如:
package com.jt.cache;

/**
 * Cache 接口规范设计
 */
public interface Cache {
    /**
     * 存储数据
     * @param key
     * @param value
     */
    void putObject(Object key,Object value);

    /**
     * 基于key获取数据
     * @param key
     * @return
     */
    Object getObject(Object key);

    /**
     * 移除指定key的数据
     * @param key
     * @return
     */
    Object removeObject(Object key);

    /**
     * 清空缓存
     */
    void clear();

    /**
     * 获取缓存中数据的个数
     * @return
     */
    int size();
    //...
}
- 1
- 2
- 3
- 4
- 5
- 6
- 7
- 8
- 9
- 10
- 11
- 12
- 13
- 14
- 15
- 16
- 17
- 18
- 19
- 20
- 21
- 22
- 23
- 24
- 25
- 26
- 27
- 28
- 29
- 30
- 31
- 32
- 33
- 34
- 35
- 36
- 37
- 38
- 39
Cache默认存储设计
设计一个Cache的默认存储对象,主要用于存储数据,例如:
package com.jt.cache;

import java.util.HashMap;
import java.util.Map;

public class DefaultCache implements  Cache{
    private Map cache=new HashMap<>();
    @Override
    public void putObject(Object key, Object value) {
         cache.put(key,value);
    }

    @Override
    public Object getObject(Object key) {
        return cache.get(key);
    }

    @Override
    public Object removeObject(Object key) {
        return cache.remove(key);
    }

    @Override
    public void clear() {
         cache.clear();
    }

    @Override
    public int size() {
        return cache.size();
    }

    @Override
    public String toString() {
        return "DefaultCache{" +
                "cache=" + cache.toString() +
                '}';
    }

    public static void main(String[] args) {
        Cache cache=new DefaultCache();
        cache.putObject("A",100);
        cache.putObject("B",200);
        cache.putObject("C",300);
        System.out.println(cache);
    }
}
- 1
- 2
- 3
- 4
- 5
- 6
- 7
- 8
- 9
- 10
- 11
- 12
- 13
- 14
- 15
- 16
- 17
- 18
- 19
- 20
- 21
- 22
- 23
- 24
- 25
- 26
- 27
- 28
- 29
- 30
- 31
- 32
- 33
- 34
- 35
- 36
- 37
- 38
- 39
- 40
- 41
- 42
- 43
- 44
- 45
- 46
- 47
SynchronizedCache 设计及实现
线程安全的Cache设计及实现,例如:
package com.jt.cache;

public class SynchronizedCache implements Cache {
    private Cache cache;

    public SynchronizedCache(Cache cache) {
        this.cache = cache;
    }

    @Override
    public synchronized void putObject(Object key, Object value) {
        cache.putObject(key, value);
    }

    @Override
    public synchronized Object getObject(Object key) {
        return cache.getObject(key);
    }

    @Override
    public synchronized Object removeObject(Object key) {
        return cache.removeObject(key);
    }

    @Override
    public void clear() {
        cache.clear();
    }

    @Override
    public int size() {
        return cache.size();
    }

    @Override
    public String toString() {
        return "SynchronizedCache{" +
                "cache=" + cache +
                '}';
    }

    public static void main(String[] args) {
        Cache cache = new SynchronizedCache(new DefaultCache());
        cache.putObject("A", 100);
        cache.putObject("B", 200);
        System.out.println(cache);
    }
}
- 1
- 2
- 3
- 4
- 5
- 6
- 7
- 8
- 9
- 10
- 11
- 12
- 13
- 14
- 15
- 16
- 17
- 18
- 19
- 20
- 21
- 22
- 23
- 24
- 25
- 26
- 27
- 28
- 29
- 30
- 31
- 32
- 33
- 34
- 35
- 36
- 37
- 38
- 39
- 40
- 41
- 42
- 43
- 44
- 45
- 46
- 47
- 48
LoggingCache 设计及实现
实际工作中我们经常要分析和监控缓存的命中率,例如我们设计了缓存,但为什么还是查询了数据库,有多少请求数据来自缓存,多少请求查询了数据库等,此时需要一个基于日志进行分析的一个过程,因此LoggingCache对象诞生,例如:
package com.jt.cache;

/**
 * 通过此对象记录Cache命中率
 */
public class LoggingCache implements Cache{
    /**对这个cache进行命中率的记录*/
    private Cache cache;
    /**请求次数*/
    private int requests;
    /**命中的次数*/
    private int hints;
    public LoggingCache(Cache cache){
        this.cache=cache;
    }

    @Override
    public void putObject(Object key, Object value) {
         cache.putObject(key,value);
    }
    @Override
    public Object getObject(Object key) {
        //1.记录请求次数
        requests++;
        //2.从cache获取数据
        Object object = cache.getObject(key);
        if(object!=null){
            //计算命中率
            hints++;
            System.out.println("hits/requests is "+hints*1.0/requests);
        }
        return object;
    }
    @Override
    public Object removeObject(Object key) {
        return cache.removeObject(key);
    }

    @Override
    public void clear() {
       cache.clear();
    }
    @Override
    public int size() {
        return cache.size();
    }

    public static void main(String[] args) {
        LoggingCache loggingCache =
                new LoggingCache(new DefaultCache());
        loggingCache.putObject("A",100);
        loggingCache.putObject("B",200);
        loggingCache.putObject("C",300);
        loggingCache.getObject("D");
        loggingCache.getObject("A");
        loggingCache.getObject("A");
    }
}
- 1
- 2
- 3
- 4
- 5
- 6
- 7
- 8
- 9
- 10
- 11
- 12
- 13
- 14
- 15
- 16
- 17
- 18
- 19
- 20
- 21
- 22
- 23
- 24
- 25
- 26
- 27
- 28
- 29
- 30
- 31
- 32
- 33
- 34
- 35
- 36
- 37
- 38
- 39
- 40
- 41
- 42
- 43
- 44
- 45
- 46
- 47
- 48
- 49
- 50
- 51
- 52
- 53
- 54
- 55
- 56
- 57
- 58
FifoCache设计及实现
缓存可以提供的内存空间是有限的,在缓存满的时候,我们要提供一些数据淘汰策略,接下来我们基于FIFO算法,对缓存进行设计,例如:
package com.jt.cache;
import java.util.Deque;
import java.util.LinkedList;
/**
* 有界缓存淘汰策略:FIFO(先进先出)算法
*/
public class FifoCache implements Cache{
/**存储数据的Cache*/
private Cache cache;
/**Cache的最大容量*/
private int maxCap;
/**双端队列(两头都可以操作),基于此队列记录key的顺序*/
private Deque- 1
- 2
- 3
- 4
- 5
- 6
- 7
- 8
- 9
- 10
- 11
- 12
- 13
- 14
- 15
- 16
- 17
- 18
- 19
- 20
- 21
- 22
- 23
- 24
- 25
- 26
- 27
- 28
- 29
- 30
- 31
- 32
- 33
- 34
- 35
- 36
- 37
- 38
- 39
- 40
- 41
- 42
- 43
- 44
- 45
- 46
- 47
- 48
- 49
- 50
- 51
- 52
- 53
- 54
- 55
- 56
- 57
- 58
- 59
- 60
- 61
- 62
- 63
- 64
- 65
- 66
- 67
- 68
- 69
- 70
- 71
- 72
- 73
- 74
- 75
LruCache 设计及实现
基于LRU算法(最近最少使用算法)对缓存进行数据淘汰设计,例如:
package com.cy.java.cache;
import java.util.LinkedHashMap;
import java.util.Map;

/** 缓存淘汰策略:LRU(最近最少使用算法)*/
public class LruCache implements Cache {
 private Cache cache;
 /**通过此属性记录要移除的数据对象*/
 private Object eldestKey;
 /**通过此map记录key的访问顺序*/
 private Map keyMap;
 @SuppressWarnings("serial")
 public LruCache(Cache cache,int maxCap) {
 this.cache=cache;
//LinkedHashMap可以记录key的添加顺序或者访问顺序
 this.keyMap=new LinkedHashMap(maxCap, 0.75f, true)
 {//accessOrder
//此方法每次执行keyMap的put操作时调用
@Override
protected boolean removeEldestEntry (java.util.Map.Entry eldest) {
boolean isFull=size()>maxCap;
if(isFull)eldestKey=eldest.getKey();
return isFull;
}
 };
}
@Override
public void putObject(Object key, Object value) {
//存储数据对象
cache.putObject(key, value);
//记录key的访问顺序,假如已经满了,就要从cache中移除数据
keyMap.put(key, key);//此时会执行keyMap对象的removeEldestEntry
if(eldestKey!=null) {
cache.removeObject(eldestKey);
eldestKey=null;
}
}
@Override
public Object getObject(Object key) {
keyMap.get(key);//记录key的访问顺序
return cache.getObject(key);
}

@Override
public Object removeObject(Object key) {
return cache.removeObject(key);
}

@Override
public void clear() {
cache.clear();
keyMap.clear();
}
@Override
public int size() {
return cache.size();
}
@Override
public String toString() {
return cache.toString();
}

public static void main(String[] args) {
SynchronizedCache cache=
 new SynchronizedCache(
new LoggingCache(
new LruCache(new PerpetualCache(),3)));
cache.putObject("A", 100);
cache.putObject("B", 200);
cache.putObject("C", 300);
cache.getObject("A");
cache.getObject("C");
cache.putObject("D", 400);
cache.putObject("E", 500);
System.out.println(cache);

}
}
- 1
- 2
- 3
- 4
- 5
- 6
- 7
- 8
- 9
- 10
- 11
- 12
- 13
- 14
- 15
- 16
- 17
- 18
- 19
- 20
- 21
- 22
- 23
- 24
- 25
- 26
- 27
- 28
- 29
- 30
- 31
- 32
- 33
- 34
- 35
- 36
- 37
- 38
- 39
- 40
- 41
- 42
- 43
- 44
- 45
- 46
- 47
- 48
- 49
- 50
- 51
- 52
- 53
- 54
- 55
- 56
- 57
- 58
- 59
- 60
- 61
- 62
- 63
- 64
- 65
- 66
- 67
- 68
- 69
- 70
- 71
- 72
- 73
- 74
- 75
- 76
- 77
- 78
总结(Summary)
本章节为基础拓展章节,重点是通过本地缓存的设计,加强Java中一些基础点的理解,同时在Java缓存设计上做一个拔高.
09-Redis课上问题总结
Day01
Redis 应用架构

Redis 启动失败

Redis 全局散列结构

Day02
Redis 连接问题

Redis密码问题

单元测试导包问题

