利用Python中的GDAL和OGR模块实现shapefile对栅格DEM数据的裁剪
之前已经把31景DEM数据拼接完成,这篇文章,利用shapefile文件实现对山东DEM数据的裁剪。
参考:https://blog.csdn.net/GISShiXiSheng/article/details/72843070?ops_request_misc=%257B%2522request%255Fid%2522%253A%2522161423692216780271562057%2522%252C%2522scm%2522%253A%252220140713.130102334.pc%255Fblog.%2522%257D&request_id=161423692216780271562057&biz_id=0&utm_medium=distribute.pc_search_result.none-task-blog-2~blog~first_rank_v1~rank_blog_v1-1-72843070.pc_v1_rank_blog_v1&utm_term=%E6%A0%85%E6%A0%BC%E6%95%B0%E6%8D%AE%E8%A3%81%E5%89%AA&spm=1018.2226.3001.4450
Python、GIS基础教程:https://www.osgeo.cn/pygis/ogr-ogrintro.html
1.代码
from osgeo import gdal, gdalnumeric, ogr,gdal_array
from PIL import Image, ImageDraw
import os
import operator

gdal.UseExceptions()

# This function will convert the rasterized clipper shapefile
# to a mask for use within GDAL.
def imageToArray(i):
    """
    Converts a Python Imaging Library array to a
    gdalnumeric image.
    """
    a = gdalnumeric.fromstring(i.tobytes(), 'b')
    a.shape = i.im.size[1], i.im.size[0]
    return a


def arrayToImage(a):
    """
    Converts a gdalnumeric array to a
    Python Imaging Library Image.
    """
    i = Image.frombytes('L', (a.shape[1], a.shape[0]),
                        (a.astype('b')).tobytes())
    return i


def world2Pixel(geoMatrix, x, y):
    """
    Uses a gdal geomatrix (gdal.GetGeoTransform()) to calculate
    the pixel location of a geospatial coordinate
    """
    # GetGeoTransform返回值:左上角x坐标, 水平分辨率,旋转参数, 左上角y坐标,旋转参数,竖直分辨率。

    ulX = geoMatrix[0]
    ulY = geoMatrix[3]
    xDist = geoMatrix[1]  # 水平分辨率
    pixel = int((x - ulX) / xDist)
    line = int((ulY - y) / xDist)
    return (pixel, line)


#
# EDIT: this is basically an overloaded
# version of the gdal_array.OpenArray passing in xoff, yoff explicitly
# so we can pass these params off to CopyDatasetInfo
#
def OpenArray(array, prototype_ds=None, xoff=0, yoff=0):

    # 出错:RuntimeError: Opening a NumPy array through gdal.Open(gdal_array.GetArrayFilename()) is no longer supported by default unless the GDAL_ARRAY_OPEN_BY_FILENAME configuration option is set to TRUE. The recommended way is to use gdal_array.OpenArray() instead.
    # ds = gdal.Open(gdalnumeric.GetArrayFilename(array))
    ds = gdal_array.OpenArray(array)

    if ds is not None and prototype_ds is not None:
        if type(prototype_ds).__name__ == 'str':
            prototype_ds = gdal.Open(prototype_ds)
        if prototype_ds is not None:
            gdalnumeric.CopyDatasetInfo(prototype_ds, ds, xoff=xoff, yoff=yoff)
    return ds


def histogram(a, bins=range(0, 256)):
    """
    Histogram function for multi-dimensional array.
    a = array
    bins = range of numbers to match
    """
    fa = a.flat
    n = gdalnumeric.searchsorted(gdalnumeric.sort(fa), bins)
    n = gdalnumeric.concatenate([n, [len(fa)]])
    hist = n[1:] - n[:-1]
    return hist


def stretch(a):
    """
    Performs a histogram stretch on a gdalnumeric array image.
    """
    hist = histogram(a)
    im = arrayToImage(a)
    lut = []
    for b in range(0, len(hist), 256):
        # step size
        step = reduce(operator.add, hist[b:b + 256]) / 255
        # create equalization lookup table
        n = 0
        for i in range(256):
            lut.append(n / step)
            n = n + hist[i + b]
        im = im.point(lut)
    return imageToArray(im)


def main(shapefile_path, raster_path):
    # Load the source data as a gdalnumeric array
    srcArray = gdalnumeric.LoadFile(raster_path)

    # Also load as a gdal image to get geotransform
    # (world file) info
    srcImage = gdal.Open(raster_path)
    geoTrans = srcImage.GetGeoTransform()

    # Create an OGR layer from a boundary shapefile
    shapef = ogr.Open(shapefile_path)
    # os.path.split() 常用于将文件路径与文件名分割开,结果以元组的形式显示(python自带的split()也可以实现相同的效果)。
    # os.path.splitext() 将文件名与文件后缀名分割开,结果以元组的形式显示(python自带的split()也可以实现相同的效果)。
    # os.path.splitext(shapefile_path)得到一个元组,两部分:文件名+扩展名。[0]是文件名,[1]为扩展名。
    # GetLayer()的参数是从0开始的。对于Shapefile而言,它只有一个图层,一般情况下这个参数都是0,如果空着,缺省情况下也是0。
    # 该函数是DataSource类的一个成员函数,用来获取第一个图层,返回的是一个Layer类的对象。若返回None,表示获取第一个图层失败。另外,矢量图层的计数是从0开始的,而栅格数据则从1开始,其实shp文件只有一个图层。
    lyr = shapef.GetLayer(os.path.split(os.path.splitext(shapefile_path)[0])[1])
    # # dir(lyr)返回当前范围内的变量、方法和定义的类型列表
    # dir(lyr)
    # GetNextFeature可获取层内所有的要素
    poly = lyr.GetNextFeature()

    # Convert the layer extent to image pixel coordinates
    minX, maxX, minY, maxY = lyr.GetExtent()
    ulX, ulY = world2Pixel(geoTrans, minX, maxY)   # (x方向像素,y方向像素)
    lrX, lrY = world2Pixel(geoTrans, maxX, minY)   # (x方向像素,y方向像素)

    # Calculate the pixel size of the new image
    pxWidth = int(lrX - ulX)
    pxHeight = int(lrY - ulY)

    # clip = srcArray[:, ulY:lrY, ulX:lrX]
    clip = srcArray[ulY:lrY, ulX:lrX]


    # EDIT: create pixel offset to pass to new image Projection info
    #
    xoffset = ulX
    yoffset = ulY
    print
    "Xoffset, Yoffset = ( %f, %f )" % (xoffset, yoffset)

    # Create a new geomatrix for the image
    geoTrans = list(geoTrans)
    # 左上角的坐标值
    geoTrans[0] = minX
    geoTrans[3] = maxY

    # Map points to pixels for drawing the boundary on a blank 8-bit, black and white, mask image.
    points = []
    pixels = []
    # 该函数是Feature类的成员函数,作用是获取要素的空间坐标信息,返回值为Geometry类对象。
    geom = poly.GetGeometryRef()  # 获取要素的几何形状
    # geom.GetGeometryCount()  # 13
    # Geometry类型是多边形,那么就有两层Geometry,获取多边形后,还需要获取构成多边形边缘的折线,才可以读取构成多边形的点。
    pts2 = geom.GetGeometryRef(0)
    # TypeError: coordinate list must contain at least 2 coordinates
    pts = pts2.GetGeometryRef(0)
    # 得到矢量点的坐标
    for p in range(pts.GetPointCount()):
        points.append((pts.GetX(p), pts.GetY(p)))
    # 将点的坐标转化为栅格点坐标
    for p in points:
        pixels.append(world2Pixel(geoTrans, p[0], p[1]))
    # Image.new(mode, size, color)见:https://www.cnblogs.com/way_testlife/archive/2011/04/20/2022997.html
    # 见:https://blog.csdn.net/qq_21239003/article/details/81092468
    # 模式L为灰度图,它的每个像素用8个bit表示,0表示黑,255表示白,其他数字表示不同的灰度。
    rasterPoly = Image.new("L", (pxWidth, pxHeight), 1)
    # Draw()函数创建一个可以在给定图像上绘图的对象。见:https://blog.csdn.net/wuguangbin1230/article/details/80348504
    rasterize = ImageDraw.Draw(rasterPoly)

    # TypeError: coordinate list must contain at least 2 coordinates。将shapefile从multiPolygon换成Polygon时,此句话不会出错。
    rasterize.polygon(pixels,0)
    mask = imageToArray(rasterPoly)

    # Clip the image using the mask
    # clip = gdalnumeric.choose(mask, \
    #                           (clip, 0)).astype(gdalnumeric.uint8)

    clip = gdalnumeric.choose(mask, \
                              (clip, 0)).astype(gdalnumeric.int16)


    # # This image has 1 bands so we stretch each one to make them visually brighter
    # # 无需拉伸,注释掉
    # for i in range(3):
    #     clip[i, :, :] = stretch(clip[i, :, :])

    # Save new tiff
    #
    # EDIT: instead of SaveArray, let's break all the
    # SaveArray steps out more explicity so
    # we can overwrite the offset of the destination
    # raster
    #
    ### the old way using SaveArray
    # gdalnumeric.SaveArray(clip, "OUTPUT.tif", format="GTiff", prototype=raster_path)


    gtiffDriver = gdal.GetDriverByName('GTiff')

    if gtiffDriver is None:
        raise ValueError("Can't find GeoTiff Driver")
    gtiffDriver.CreateCopy("D:\ProfessionalProfile\DEMdata\OutputDataPython\shandong_int16.tif", OpenArray(clip, prototype_ds=raster_path, xoff=xoffset, yoff=yoffset))

    # # Save as an 8-bit jpeg for an easy, quick preview
    # clip = clip.astype(gdalnumeric.uint8)
    # gdalnumeric.SaveArray(clip, "D:\ProfessionalProfile\DEMdata\OutputDataPython\shandong.jpg", format="JPEG")

    gdal.ErrorReset()


if __name__ == '__main__':
    # shapefile_path, raster_path
    shapefile_path = 'D:\ProfessionalProfile\VectorRelevant\VectorDataofRivers-lakes-etc\ShandongProvince\shandong.shp'
    raster_path = 'D:\ProfessionalProfile\DEMdata\OutputDataPython\demMosaic1224.tif'

    main(shapefile_path, raster_path)
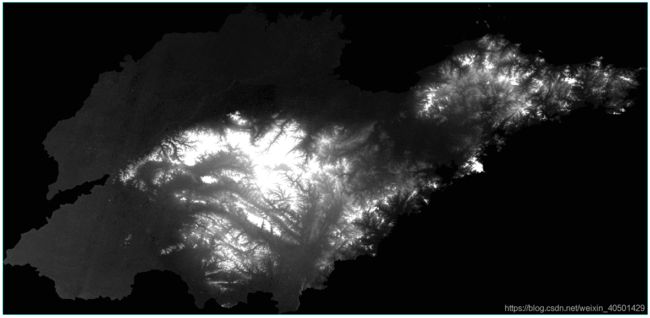
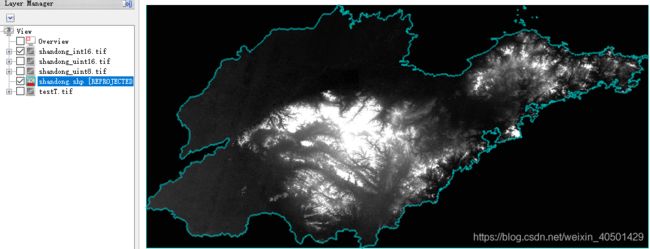
最后的运行结果在ENVI中打开:(上侧是用Python处理后的,下侧是用ENVI软件裁剪的)
两幅图明显不一样,看了一下Metadata和统计信息:(1)Python输出的是8bit图像,ENVI裁剪的是16bit图像。(后续再改一下)(2)列数差了一列。因为是30米的精度,个人感觉差一列并不是什么大问题。
修改一下,将数据类型 uint8 修改为 int16 即可。
最后,Python运行完的结果如下:
3.代码运行过程中的错误
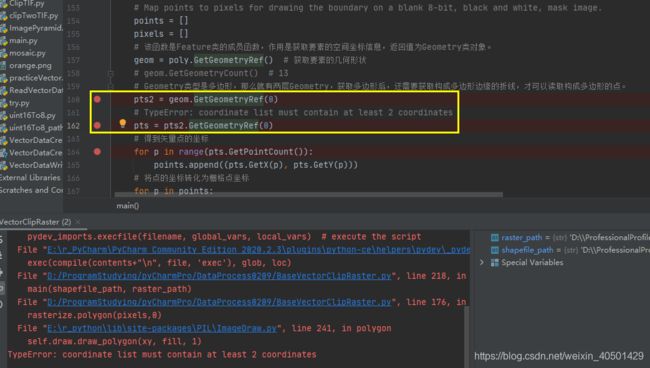
(1)TypeError: coordinate list must contain at least 2 coordinates
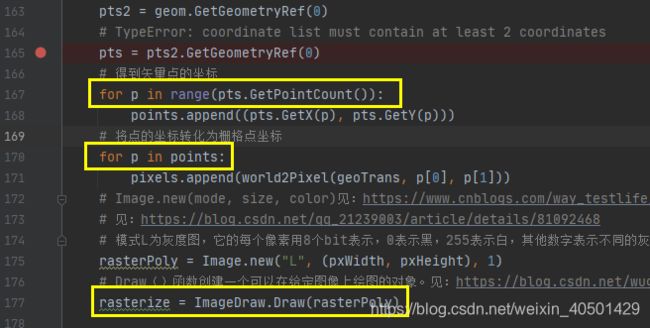
看了一下是因为,points 和 pixels变量都是空的,pts.GetPointCount()函数得不到任何值。查询了一下,Geometry类型是多边形,那么就有两层Geometry,获取多边形后,还需要获取构成多边形边缘的折线,才可以读取构成多边形的点。所以加了一句话:
pts = pts2.GetGeometryRef(0),此时的pts是'LINEARRING',GetPointCount()才能得到点的个数,后续就不报错了。
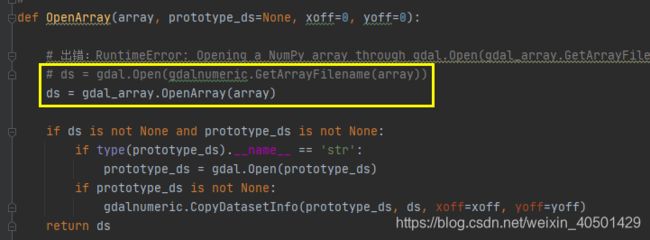
(2) 出错:RuntimeError: Opening a NumPy array through gdal.Open(gdal_array.GetArrayFilename()) is no longer supported by default unless the GDAL_ARRAY_OPEN_BY_FILENAME configuration option is set to TRUE. The recommended way is to use gdal_array.OpenArray() instead.
将ds = gdal.Open(gdalnumeric.GetArrayFilename(array)) 改成 ds = gdal_array.OpenArray(array),就可以了。
最后没报错,出现一个警告:D:/ProgramStudying/pyCharmPro/DataProcess0209/BaseVectorClipRaster.py:27: DeprecationWarning: The binary mode of fromstring is deprecated, as it behaves surprisingly on unicode inputs. Use frombuffer instead
a = gdalnumeric.fromstring(i.tobytes(), 'b')
