SpringDoc基础配置和集成OAuth2登录认证教程
本期内容
- 学会通过注解和Java代码的方式添加SpringDoc配置。
- 在swagger-ui提供的页面上提供OAuth2登录认证,在集成Security的情况下便捷获取access_token并在请求时按照OAuth2规范携带。
为什么集成OAuth2登录认证?
现在大部分教程是在swagger-ui页面添加一个请求头,使用时先去获取一个token,然后再将获取的token填充至页面的token输入框内,如果是通过某个接口自己生成token的方式使用这种配置没什么太大问题,但是如果是通过OAuth2登录获取token时就比较麻烦,要填充token type和access token,所以在swagger-ui提供的页面中提供OAuth2登录的入口,OAuth2登录自动配置,一步到位。
配置方式说明
SpringDoc提供了两种方式来添加配置:
- 注解
- Java类的方式
注解
注解配置类
配置方式如下代码所示,详细内容请看代码中的注释
package com.example.config;

import io.swagger.v3.oas.annotations.OpenAPIDefinition;
import io.swagger.v3.oas.annotations.enums.SecuritySchemeType;
import io.swagger.v3.oas.annotations.info.Info;
import io.swagger.v3.oas.annotations.info.License;
import io.swagger.v3.oas.annotations.security.OAuthFlow;
import io.swagger.v3.oas.annotations.security.OAuthFlows;
import io.swagger.v3.oas.annotations.security.OAuthScope;
import io.swagger.v3.oas.annotations.security.SecurityRequirement;
import io.swagger.v3.oas.annotations.security.SecurityScheme;
import io.swagger.v3.oas.annotations.security.SecuritySchemes;
import org.springframework.context.annotation.Configuration;

/**
 * Spring Doc OpenApi 注解配置
 *
 * @author vains
 */
@Configuration
@OpenAPIDefinition(
        info = @Info(
                // 标题
                title = "${custom.info.title}",
                // 版本
                version = "${custom.info.version}",
                // 描述
                description = "${custom.info.description}",
                // 首页
                termsOfService = "${custom.info.termsOfService}",
                // license
                license = @License(
                        name = "${custom.license.name}",
                        // license 地址
                        url = "http://127.0.0.1:8080/example/test01"
                )
        ),
        // 这里的名字是引用下边 @SecurityScheme 注解中指定的名字,指定后发起请求时会在请求头中按照OAuth2的规范添加token
        security = @SecurityRequirement(name = "${custom.security.name}")
)
@SecuritySchemes({@SecurityScheme(
        // 指定 SecurityScheme 的名称(OpenAPIDefinition注解中的security属性中会引用该名称)
        name = "${custom.security.name}",
        // 指定认证类型为oauth2
        type = SecuritySchemeType.OAUTH2,
        // 设置认证流程
        flows = @OAuthFlows(
                // 设置授权码模式
                authorizationCode = @OAuthFlow(
                        // 获取token地址
                        tokenUrl = "${custom.security.token-url}",
                        // 授权申请地址
                        authorizationUrl = "${custom.security.authorization-url}",
                        // oauth2的申请的scope(需要在OAuth2客户端中存在)
                        scopes = {
                                @OAuthScope(name = "openid", description = "OpenId登录"),
                                @OAuthScope(name = "profile", description = "获取用户信息"),
                                @OAuthScope(name = "message.read", description = "读"),
                                @OAuthScope(name = "message.write", description = "写")
                        }
                )
        )
)})
public class SpringDocAnnoConfig {
}
yml中的配置
custom:
  info:
    title: example-api
    version: 0.0.1
    description: 这是一个使用SpringDoc生成的在线文档.
    terms-of-service: http://127.0.0.1:8080/example/test01
  license:
    name: Apache 2.0
  security:
    name: Authenticate
    token-url: http://kwqqr48rgo.cdhttp.cn/oauth2/token
    authorization-url: http://kwqqr48rgo.cdhttp.cn/oauth2/authorize
注意:要想请求时携带登录获取的access_token,@OpenAPIDefinition注解中必须指定security属性,并且name值要和@SecurityScheme注解中的name属性一致。
还有一件事,@SecuritySchemes注解可以直接替换为@SecurityScheme注解,只指定一种认证方式。
还有一件事,使用注解的方式可以直接从yml中获取yml配置文件中的值,当然也可以直接使用具体的常量值(e.g. @License注解中的url属性)。
还有一件事,如果该配置类上只有@OpenAPIDefinition或 @SecurityScheme注解,并且该配置类中没有任何实现,则该配置类会在本机编译时消失,请添加@Configuration注解避免这种情况。
官网原文:If you give @OpenAPIDefinition or @SecurityScheme to a class that has no implementation, that class will disappear when you natively compile. To avoid this, give the class a @Configuration.
还有一件事…
Java代码配置
这里的注意事项和上边注解配置是一样的,不过由注解转为了Java类。
配置方式如下代码所示,详细内容请看代码中的注释
package com.example.config;

import io.swagger.v3.oas.models.Components;
import io.swagger.v3.oas.models.OpenAPI;
import io.swagger.v3.oas.models.info.Info;
import io.swagger.v3.oas.models.info.License;
import io.swagger.v3.oas.models.security.OAuthFlow;
import io.swagger.v3.oas.models.security.OAuthFlows;
import io.swagger.v3.oas.models.security.Scopes;
import io.swagger.v3.oas.models.security.SecurityRequirement;
import io.swagger.v3.oas.models.security.SecurityScheme;
import org.springframework.context.annotation.Bean;
import org.springframework.context.annotation.Configuration;

/**
 * Spring Doc OpenApi Java代码配置
 *
 * @author vains
 */
@Configuration
public class SpringDocBeanConfig {

    @Bean
    public OpenAPI customOpenAPI() {
        // 基础信息
        Info info = new Info()
                .title("example-api-java")
                .version("0.0.1")
                .description("这是一个使用SpringDoc生成的在线文档.")
                .termsOfService("http://127.0.0.1:8080/example/test01")
                .license(new License().name("Apache 2.0").url("http://127.0.0.1:8080/example/test01"));

        // 组件
        Components components = new Components();
        // 安全认证组件
        SecurityScheme securityScheme = new SecurityScheme();

        // 创建一个oauth认证流程
        OAuthFlows oAuthFlows = new OAuthFlows();
        // 设置OAuth2流程中认证服务的基本信息
        OAuthFlow oAuthFlow = new OAuthFlow()
                // 授权申请地址
                .authorizationUrl("http://kwqqr48rgo.cdhttp.cn/oauth2/authorize")
                // 获取token地址
                .tokenUrl("http://kwqqr48rgo.cdhttp.cn/oauth2/token")
                .scopes(new Scopes()
                        .addString("openid", "OpenId登录")
                        .addString("profile", "获取用户信息")
                        .addString("message.read", "读")
                        .addString("message.write", "写")
                );
        // 使用授权码模式
        oAuthFlows.authorizationCode(oAuthFlow);

        // OAuth2流程
        securityScheme.flows(oAuthFlows)
                .type(SecurityScheme.Type.OAUTH2);

        // 安全认证名
        String securityName = "Authenticate";
        // 将认证配置加入组件中
        components.addSecuritySchemes(securityName, securityScheme);

        SecurityRequirement securityRequirement = new SecurityRequirement();
        // 将安全认证和swagger-ui关联起来
        securityRequirement.addList(securityName);
        return new OpenAPI()
                // 基础描述信息
                .info(info)
                // 添加OAuth2认证流程组件
                .components(components)
                // 添加请求时携带OAuth2规范的请求头(通过OAuth2流程获取token后发请求时会自动携带Authorization请求头)
                .addSecurityItem(securityRequirement);
    }

}
效果预览
启动项目后打开提供的在线文档地址:
http://127.0.0.1:8080/swagger-ui/index.html
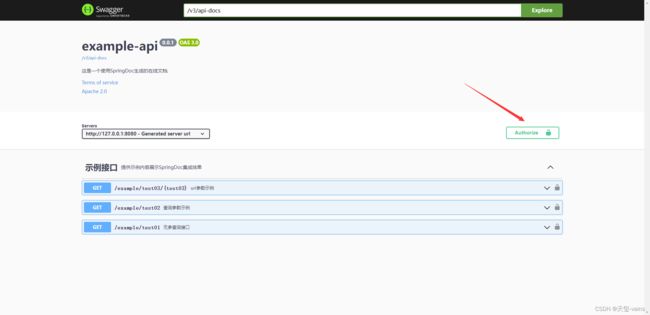
右侧多了一个Authorize按钮。
操作演示流程如下
其它基础配置
关于springdoc-openapi-core-properties和swagger-ui properties在官网中有详细的介绍了,就不展开说明了,读者可以对照文档在yml中添加自己的相关配置。
附录
- SpringDoc官网
- 代码仓库:Gitee、Github