Vue2.x 源码学习(二) - 数据驱动
学习解读来自于:Vue.js 技术揭秘
仅用于自我学习内容
介绍
Vue.js 一个核心思想是数据驱动。所谓数据驱动,是指视图是由数据驱动生成的,我们对视图的修改,不会直接操作 DOM ,而是通过修改数据。它相比我们传统的前端开发,如使用 jQuery 等前端库直接修改 DOM ,大大简化了代码量。特别是当交互复杂的时候,只关心数据的修改会让代码的逻辑变得非常清晰,因为 DOM 变成了数据的映射,我们所有的逻辑都是对数据的修改,而不用触碰 DOM, 这样的代码非常利于维护。
在 Vue.js 中我们可以采用简洁的模块语法来声明式的将数据渲染为 DOM:
<div id="app">
{{ message }}
</div>
var app = new Vue({
	el:'#app',
	data: {
		message: 'Hello Vue!'
	}
})
最终它会在页面上渲染出 Hello Vue 。接下来,我们会从源码角度分析 Vue 是如何实现的,分析过程会以主线代码为主,重要的分支逻辑会放在之后单独分析。数据驱动还有一部分是数据更新驱动视图变化,这一块内容后续更新,这一部分我们的目标是弄清楚模板和数据如何渲染成最终的 DOM。
下图为 vue-cli 建立的 vue 项目


new Vue 发生了什么
从入口代码开始分析,我们先来分析 new Vue 背后发生了哪些事情。我们都知道, new 关键字在 JavaScript 语言中代表实例化是一个对象,而 Vue 实际上是一个类, 类在 JavaScript 中是用 Function 来实现的,来看一下源码,在 src/core/instance/index.js 中。
function Vue (options) {
	if(process.env.NODE_ENV !== 'production' && !(this instanceof Vue)){
		warn('Vue is a constructor and should be called with the `new` keyword')
	}
	this._init(options)
}
可以看到 Vue 只能通过 new 关键字初始化,然后调用 this._init 方法,该方法在 src/core/instance/init.js 中定义。
Vue.prototype._init = function (options?: Object) {
  const vm: Component = this
  // a uid
  vm._uid = uid++

  let startTag, endTag
  /* istanbul ignore if */
  if (process.env.NODE_ENV !== 'production' && config.performance && mark) {
    startTag = `vue-perf-start:${vm._uid}`
    endTag = `vue-perf-end:${vm._uid}`
    mark(startTag)
  }

  // a flag to avoid this being observed
  vm._isVue = true
  // merge options
  if (options && options._isComponent) {
    // optimize internal component instantiation
    // since dynamic options merging is pretty slow, and none of the
    // internal component options needs special treatment.
    initInternalComponent(vm, options)
  } else {
    vm.$options = mergeOptions(
      resolveConstructorOptions(vm.constructor),
      options || {},
      vm
    )
  }
  /* istanbul ignore else */
  if (process.env.NODE_ENV !== 'production') {
    initProxy(vm)
  } else {
    vm._renderProxy = vm
  }
  // expose real self
  vm._self = vm
  initLifecycle(vm)
  initEvents(vm)
  initRender(vm)
  callHook(vm, 'beforeCreate')
  initInjections(vm) // resolve injections before data/props
  initState(vm)
  initProvide(vm) // resolve provide after data/props
  callHook(vm, 'created')

  /* istanbul ignore if */
  if (process.env.NODE_ENV !== 'production' && config.performance && mark) {
    vm._name = formatComponentName(vm, false)
    mark(endTag)
    measure(`vue ${vm._name} init`, startTag, endTag)
  }

  if (vm.$options.el) {
    vm.$mount(vm.$options.el)
  }
}
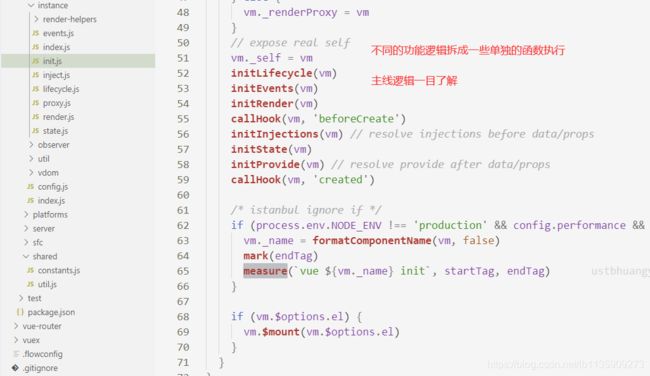
Vue 初始化主要就干了几件事情,合并配置,初始化生命周期,初始化时间中心,初始化渲染,初始化 data、props、computed、watcher 等等。

总结:
Vue 的初始化逻辑写的非常清楚,把不同的功能逻辑拆成一些单独的函数执行,让主线逻辑一目了然,这样的编程思想是非常值得借鉴和学习的。
由于这一部分的目标是弄清楚模版和数据如何渲染成最终的 DOM ,所以各种初始化逻辑我们先不看。在初始化的最后,检测到如果有 el 属性,则调用 vm.$mount 方法挂载 vm ,挂载的目标就是把模版渲染成最终的 DOM ,那么接下来我们分析 Vue 的挂载过程。
Vue 实例挂载的实现
Vue 中我们通过 $mount 实例方法挂载 vm , $mount 方法在多个文件中都有定义,如 src/platforms/web/entry-runtime-with-compiler.js 、 src/platforms/web/runtime/index.js 、 src/platforms/weex/runtime/index.js 。因为 m o u n t 这 个 方 法 的 实 现 是 和 平 台 、 构 建 方 式 都 相 关 的 。 接 下 来 我 们 重 点 分 析 带 ‘ c o m p i l e r ‘ 版 本 的 ‘ mount 这个方法的实现是和平台、构建方式都相关的。接下来我们重点分析带 `compiler` 版本的 ` mount这个方法的实现是和平台、构建方式都相关的。接下来我们重点分析带‘compiler‘版本的‘mount` 实现,因为抛开 webpack 的 vue-loader,我们在纯前端浏览器环境分析 Vue 的工作原理,有助于我们对原理理解的深入。
注:这里官网提供的是 platform , 经过对文档的查看应该是 platforms 文件夹

compiler 版本的 $mount 实现非常有意思,先来看一下 src/platforms/web/entry-runtime-with-compiler.js 文件中的定义:
const mount = Vue.prototype.$mount
Vue.prototype.$mount = function (
  el?: string | Element,
  hydrating?: boolean
): Component {
  el = el && query(el)

  /* istanbul ignore if */
  if (el === document.body || el === document.documentElement) {
    process.env.NODE_ENV !== 'production' && warn(
      `Do not mount Vue to  or  - mount to normal elements instead.`
    )
    return this
  }

  const options = this.$options
  // resolve template/el and convert to render function
  if (!options.render) {
    let template = options.template
    if (template) {
      if (typeof template === 'string') {
        if (template.charAt(0) === '#') {
          template = idToTemplate(template)
          /* istanbul ignore if */
          if (process.env.NODE_ENV !== 'production' && !template) {
            warn(
              `Template element not found or is empty: ${options.template}`,
              this
            )
          }
        }
      } else if (template.nodeType) {
        template = template.innerHTML
      } else {
        if (process.env.NODE_ENV !== 'production') {
          warn('invalid template option:' + template, this)
        }
        return this
      }
    } else if (el) {
      template = getOuterHTML(el)
    }
    if (template) {
      /* istanbul ignore if */
      if (process.env.NODE_ENV !== 'production' && config.performance && mark) {
        mark('compile')
      }

      const { render, staticRenderFns } = compileToFunctions(template, {
        shouldDecodeNewlines,
        shouldDecodeNewlinesForHref,
        delimiters: options.delimiters,
        comments: options.comments
      }, this)
      options.render = render
      options.staticRenderFns = staticRenderFns

      /* istanbul ignore if */
      if (process.env.NODE_ENV !== 'production' && config.performance && mark) {
        mark('compile end')
        measure(`vue ${this._name} compile`, 'compile', 'compile end')
      }
    }
  }
  return mount.call(this, el, hydrating)
}
这段代码首先缓存了原型上的 $mount 方法,再重新定义该方法,我们先来分析这段代码。首先,它对 el 做了限制,Vue 不能挂载在 body 、html 这样的根节点上。接下来的是很关键的逻辑 —— 如果没有定义 render 方法,则会把 el 或者 template 字符串转化成 render 方法。这里我们要牢记,在 Vue2.0 版本中,所有 Vue 的组件的渲染最终都需要 render 方法,无论我们使用单文件 .vue 方式开发组件,还是写了 el 或者 template 属性,最终都会转换成 render 方法,那么这个过程是 Vue 的一个“在线编译”的过程,它是调用 compileToFunctions 方法实现的,编译过程我们之后介绍。最后,调用原先原型上的 $mount 方法挂载。

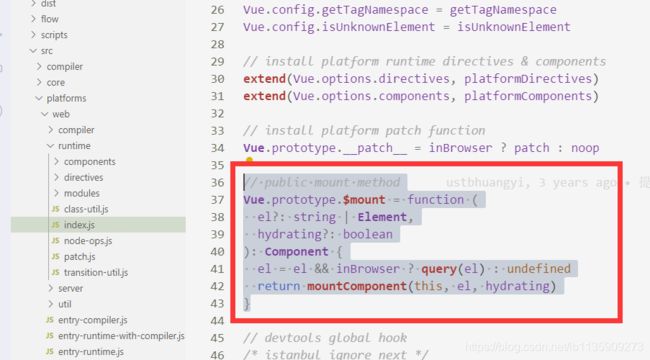
原先原型上的 $mount 方法在 src/platforms/web/runtime/index.js 中定义,之所以这么设计完全是为了复用,因为它是可以被 runtime only 版本的 Vue 直接使用的。
// public mount method
Vue.prototype.$mount = function (
  el?: string | Element,
  hydrating?: boolean
): Component {
  el = el && inBrowser ? query(el) : undefined
  return mountComponent(this, el, hydrating)
}
$mount 方法支持传入2个参数,第一个是 el,它表示挂载的元素,可以是字符串,也可以是 DOM 对象,如果是字符串在浏览器环境下会调用 query 方法转换成 DOM 对象的。第二个参数是和服务器端渲染相关,在浏览器环境下我们不需要传第二个参数。
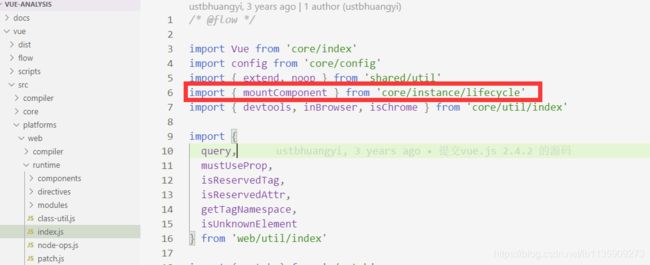
$mount 方法实际上回去调用 mountComponent 方法,这个方法定义在 src/core/instance/lifecycle.js 文件中:
export function mountComponent (
  vm: Component,
  el: ?Element,
  hydrating?: boolean
): Component {
  vm.$el = el
  if (!vm.$options.render) {
    vm.$options.render = createEmptyVNode
    if (process.env.NODE_ENV !== 'production') {
      /* istanbul ignore if */
      if ((vm.$options.template && vm.$options.template.charAt(0) !== '#') ||
        vm.$options.el || el) {
        warn(
          'You are using the runtime-only build of Vue where the template ' +
          'compiler is not available. Either pre-compile the templates into ' +
          'render functions, or use the compiler-included build.',
          vm
        )
      } else {
        warn(
          'Failed to mount component: template or render function not defined.',
          vm
        )
      }
    }
  }
  callHook(vm, 'beforeMount')

  let updateComponent
  /* istanbul ignore if */
  if (process.env.NODE_ENV !== 'production' && config.performance && mark) {
    updateComponent = () => {
      const name = vm._name
      const id = vm._uid
      const startTag = `vue-perf-start:${id}`
      const endTag = `vue-perf-end:${id}`

      mark(startTag)
      const vnode = vm._render()
      mark(endTag)
      measure(`vue ${name} render`, startTag, endTag)

      mark(startTag)
      vm._update(vnode, hydrating)
      mark(endTag)
      measure(`vue ${name} patch`, startTag, endTag)
    }
  } else {
    updateComponent = () => {
      vm._update(vm._render(), hydrating)
    }
  }

  // we set this to vm._watcher inside the watcher's constructor
  // since the watcher's initial patch may call $forceUpdate (e.g. inside child
  // component's mounted hook), which relies on vm._watcher being already defined
  new Watcher(vm, updateComponent, noop, {
    before () {
      if (vm._isMounted) {
        callHook(vm, 'beforeUpdate')
      }
    }
  }, true /* isRenderWatcher */)
  hydrating = false

  // manually mounted instance, call mounted on self
  // mounted is called for render-created child components in its inserted hook
  if (vm.$vnode == null) {
    vm._isMounted = true
    callHook(vm, 'mounted')
  }
  return vm
}
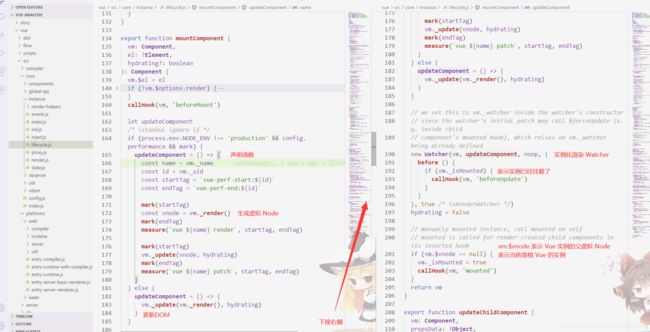
从上面的代码可以看到, mountComponent 核心就是先实例化一个渲染 Watcher ,在它的回调函数中会调用 updateComponent 方法,在此方法中调用 vm._render 方法先生成虚拟 Node,最终调用 vm._update 更新 DOM。
Watcher 在这里起到两个作用,一个是初始化的时候会执行回调函数,另一个是当 vm 实例中的监测的数据发生变化的时候执行回调函数。
函数最后判断为根节点的时候设置 vm.$isMounted 为 true ,表示这个实例已经挂载了,同时执行 mounted 钩子函数。这里注意 vm.$vnode 表示 Vue 实例的父虚拟 Node,所以它为 Null 则表示当前是根 Vue 的实例。
总结:
mountComponent 方法的逻辑也是非常清晰的,它会完成整个渲染工作,接下来我们要重点分析其中的细节,也就是最核心的2个方法:vm._render 和 vm._update 。
render
Vue 的 _render 方法是实例的一个私有方法,它用来把实例渲染成一个虚拟 Node。它的定义在 src/core/instance/render.js 文件中。
Vue.prototype._render = function (): VNode {
  const vm: Component = this
  const { render, _parentVnode } = vm.$options

  // reset _rendered flag on slots for duplicate slot check
  if (process.env.NODE_ENV !== 'production') {
    for (const key in vm.$slots) {
      // $flow-disable-line
      vm.$slots[key]._rendered = false
    }
  }

  if (_parentVnode) {
    vm.$scopedSlots = _parentVnode.data.scopedSlots || emptyObject
  }

  // set parent vnode. this allows render functions to have access
  // to the data on the placeholder node.
  vm.$vnode = _parentVnode
  // render self
  let vnode
  try {
    vnode = render.call(vm._renderProxy, vm.$createElement)
  } catch (e) {
    handleError(e, vm, `render`)
    // return error render result,
    // or previous vnode to prevent render error causing blank component
    /* istanbul ignore else */
    if (process.env.NODE_ENV !== 'production') {
      if (vm.$options.renderError) {
        try {
          vnode = vm.$options.renderError.call(vm._renderProxy, vm.$createElement, e)
        } catch (e) {
          handleError(e, vm, `renderError`)
          vnode = vm._vnode
        }
      } else {
        vnode = vm._vnode
      }
    } else {
      vnode = vm._vnode
    }
  }
  // return empty vnode in case the render function errored out
  if (!(vnode instanceof VNode)) {
    if (process.env.NODE_ENV !== 'production' && Array.isArray(vnode)) {
      warn(
        'Multiple root nodes returned from render function. Render function ' +
        'should return a single root node.',
        vm
      )
    }
    vnode = createEmptyVNode()
  }
  // set parent
  vnode.parent = _parentVnode
  return vnode
}
这段代码最关键的是 render 方法的调用,我们在平时的开发工作中手写 render 方法的场景比较少,而写的比较多的是 template 模版,在之前的 mounted 方法的实现中,会把 template 编译成 render 方法,但这个编译过程是非常复杂的,后面的部分在分析 Vue 的编译过程。
在 Vue 的官方文档中介绍了 render 函数的第一个参数是 createElement ,那么结合之前的例子:
<div id="app">
  {{ message }}
</div>
相当于我们编写如下 render 函数:
render: function (createElement) {
  return createElement('div', {
     attrs: {
        id: 'app'
      },
  }, this.message)
}
再回到 _render 函数中的 render 方法的调用:
vnode = render.call(vm._renderProxy, vm.$createElement)
可以看到,render 函数中的 createElement 方法就是 vm.$createElement 方法:
export function initRender (vm: Component) {
  // ...
  // bind the createElement fn to this instance
  // so that we get proper render context inside it.
  // args order: tag, data, children, normalizationType, alwaysNormalize
  // internal version is used by render functions compiled from templates
  vm._c = (a, b, c, d) => createElement(vm, a, b, c, d, false)
  // normalization is always applied for the public version, used in
  // user-written render functions.
  vm.$createElement = (a, b, c, d) => createElement(vm, a, b, c, d, true)
}
实际上, vm.$createElement 方法定义是在执行 initRender 方法的时候,可以看到除了 vm.$createElement 方法,还有一个 vm.$_c 方法,它是被模版编译成 render 函数使用,而 vm.$createElement 是用户手写 render 方法使用的,这两个方法支持的参数相同,并且内部都调用了 createElement 方法。
总结:
vm._render 最终是通过执行 createElement 方法并返回的是 vnode ,它是一个虚拟 Node。Vue2.0 相比 Vue1.0 最大升级就是利用了 Virtual DOM。因此在分析 createElement 的实现前,我们先了解一下 Virtual DOM 的概念。
Virtual DOM
Virtual DOM 这个概念相信大部分人不会陌生,它产生的前提是浏览器中的 DOM 是很“昂贵”的,为了更直观的感受,我们可以简单的把一个简单的 div 元素的属性都打印出来,如图所示:
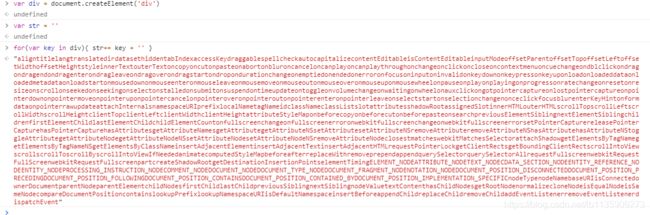
可以看到,真正的 DOM 元素是非常庞大的,因为浏览器的标准就是把 DOM 设计的非常复杂。当我们频繁的去做 DOM 更新,会产生一定的性能问题。
而 Virtual DOM 就是用一个原生的 JS 对象去描述一个 DOM 节点,所以它比创建一个 DOM 的代价要小很多。在 Vue.js 中,Virtual DOM 是用 VNode 这么一个 Class 去描述,它是定义在 src/core/vdom/vnode.js 中的。
export default class VNode {
  tag: string | void;
  data: VNodeData | void;
  children: ?Array<VNode>;
  text: string | void;
  elm: Node | void;
  ns: string | void;
  context: Component | void; // rendered in this component's scope
  key: string | number | void;
  componentOptions: VNodeComponentOptions | void;
  componentInstance: Component | void; // component instance
  parent: VNode | void; // component placeholder node

  // strictly internal
  raw: boolean; // contains raw HTML? (server only)
  isStatic: boolean; // hoisted static node
  isRootInsert: boolean; // necessary for enter transition check
  isComment: boolean; // empty comment placeholder?
  isCloned: boolean; // is a cloned node?
  isOnce: boolean; // is a v-once node?
  asyncFactory: Function | void; // async component factory function
  asyncMeta: Object | void;
  isAsyncPlaceholder: boolean;
  ssrContext: Object | void;
  fnContext: Component | void; // real context vm for functional nodes
  fnOptions: ?ComponentOptions; // for SSR caching
  fnScopeId: ?string; // functional scope id support

  constructor (
    tag?: string,
    data?: VNodeData,
    children?: ?Array<VNode>,
    text?: string,
    elm?: Node,
    context?: Component,
    componentOptions?: VNodeComponentOptions,
    asyncFactory?: Function
  ) {
    this.tag = tag
    this.data = data
    this.children = children
    this.text = text
    this.elm = elm
    this.ns = undefined
    this.context = context
    this.fnContext = undefined
    this.fnOptions = undefined
    this.fnScopeId = undefined
    this.key = data && data.key
    this.componentOptions = componentOptions
    this.componentInstance = undefined
    this.parent = undefined
    this.raw = false
    this.isStatic = false
    this.isRootInsert = true
    this.isComment = false
    this.isCloned = false
    this.isOnce = false
    this.asyncFactory = asyncFactory
    this.asyncMeta = undefined
    this.isAsyncPlaceholder = false
  }

  // DEPRECATED: alias for componentInstance for backwards compat.
  /* istanbul ignore next */
  get child (): Component | void {
    return this.componentInstance
  }
}
如下图是项目中生成的一个VNode:
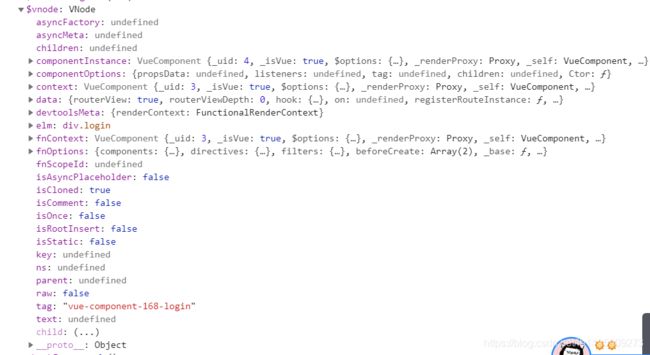
可以看到 Vue.js 中的 Virtual DOM 的定义还是略微复杂一些的,因为它这里包含了很多 Vue.js 的特性。这里千万不要被这么多的属性吓到,实际上 Vue.js 中的 Virtual DOM 是借鉴了一个开源库 snabbdom 的实现,然后加入了一些 Vue.js 特色的东西。可以先阅读这个库的源码,因为它更加简单和纯粹。
总结:
其实 VNode 是对真实 DOM 的一种抽象描述,它的核心定义无非就几个关键属性,标签名、数据、子结点、键值等,其它属性都是用来扩展 VNode 的灵活性以及实现一些特殊 feature 的。由于 VNode 只是用来映射到真实 DOM 的渲染,不需要包含操作 DOM 的方法,因此它是非常轻量和简单的。
Virtual DOM 除了它的数据结构的定义,映射到真实的 DOM 实际上要经历 VNode 的 create、diff、patch 等过程。那么在 Vue.js 中, VNode 的 create 是通过之前提到的 createElement 方法创建的,接下来,我们分析这部分的实现。
createElement
Vue.js 利用 createElement 方法创建 VNode,它定义在 src/core/vdom/create-element.js 中:
// wrapper function for providing a more flexible interface
// without getting yelled at by flow
export function createElement (
  context: Component,
  tag: any,
  data: any,
  children: any,
  normalizationType: any,
  alwaysNormalize: boolean
): VNode | Array<VNode> {
  if (Array.isArray(data) || isPrimitive(data)) {
    normalizationType = children
    children = data
    data = undefined
  }
  if (isTrue(alwaysNormalize)) {
    normalizationType = ALWAYS_NORMALIZE
  }
  return _createElement(context, tag, data, children, normalizationType)
}
createElement 方法实际上是对 _createElement 方法的封装,它允许传入的参数更加灵活,在处理这些参数后,调用真正创建 VNode 的函数 _createElement :
export function _createElement (
context: Component,
tag?: string | Class<Component> | Function | Object,
data?: VNodeData,
children?: any,
normalizationType?: number
): VNode | Array<VNode> {
if (isDef(data) && isDef((data: any).__ob__)) {
process.env.NODE_ENV !== 'production' && warn(
`Avoid using observed data object as vnode data: ${JSON.stringify(data)}\n` +
'Always create fresh vnode data objects in each render!',
context
)
return createEmptyVNode()
}
// object syntax in v-bind
if (isDef(data) && isDef(data.is)) {
tag = data.is
}
if (!tag) {
// in case of component :is set to falsy value
return createEmptyVNode()
}
// warn against non-primitive key
if (process.env.NODE_ENV !== 'production' &&
isDef(data) && isDef(data.key) && !isPrimitive(data.key)
) {
if (!__WEEX__ || !('@binding' in data.key)) {
warn(
'Avoid using non-primitive value as key, ' +
'use string/number value instead.',
context
)
}
}
// support single function children as default scoped slot
if (Array.isArray(children) &&
typeof children[0] === 'function'
) {
data = data || {}
data.scopedSlots = { default: children[0] }
children.length = 0
}
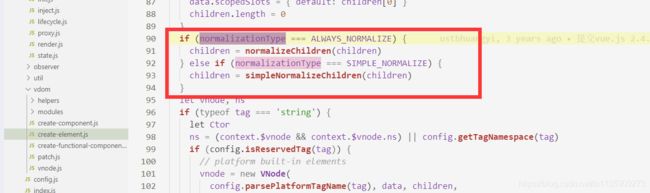
if (normalizationType === ALWAYS_NORMALIZE) {
children = normalizeChildren(children)
} else if (normalizationType === SIMPLE_NORMALIZE) {
children = simpleNormalizeChildren(children)
}
let vnode, ns
if (typeof tag === 'string') {
let Ctor
ns = (context.$vnode && context.$vnode.ns) || config.getTagNamespace(tag)
if (config.isReservedTag(tag)) {
// platform built-in elements
vnode = new VNode(
config.parsePlatformTagName(tag), data, children,
undefined, undefined, context
)
} else if (isDef(Ctor = resolveAsset(context.$options, 'components', tag))) {
// component
vnode = createComponent(Ctor, data, context, children, tag)
} else {
// unknown or unlisted namespaced elements
// check at runtime because it may get assigned a namespace when its
// parent normalizes children
vnode = new VNode(
tag, data, children,
undefined, undefined, context
)
}
} else {
// direct component options / constructor
vnode = createComponent(tag, data, context, children)
}
if (Array.isArray(vnode)) {
return vnode
} else if (isDef(vnode)) {
if (isDef(ns)) applyNS(vnode, ns)
if (isDef(data)) registerDeepBindings(data)
return vnode
} else {
return createEmptyVNode()
}
}
_createElement 方法有 5 个参数, context 表示 VNode 的上下文环境,它是 Component 类型; tag 表示标签,它可以是一个字符串,也可以是一个 Component ;data 表示 VNode 的数据,它是一个 VNodeData 类型,可以在 flow/vnode.js 中找到它的定义,这里先不展开说; children 表示当前 VNode 的子结点,它是任意类型的,它接下来需要被规范为标准的 VNode 数组; normalizationType 表示子节点规范的类型,类型不同规范的方法也就不一样,它主要参考 render 函数是编译生成的还是用户手写的。
createElement 函数的流程比较多,我们接下来分析两个重点流程—— children 的规范化以及 VNode 的创建。
children 的规范化
由于 Virtual DOM 实际上是一个树状结构,每一个 VNode 可能会有若干个子节点,这些子节点应该也是 VNode 的类型。 _createElement 接收的第 4 个参数 children 是任意类型的,因此我们需要把它们规范成 VNode 类型。
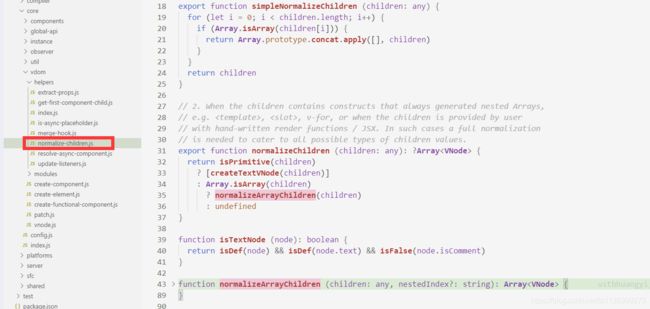
这里根据 normaliztionType 的不同,调用了 normalizeChildren(children) 和 simpleNormalizeChildren(children) 方法,它们的定义都在 src/core/vdom/helpers/normalzie-children.js 中:
// The template compiler attempts to minimize the need for normalization by
// statically analyzing the template at compile time.
//
// For plain HTML markup, normalization can be completely skipped because the
// generated render function is guaranteed to return Array. There are
// two cases where extra normalization is needed:

// 1. When the children contains components - because a functional component
// may return an Array instead of a single root. In this case, just a simple
// normalization is needed - if any child is an Array, we flatten the whole
// thing with Array.prototype.concat. It is guaranteed to be only 1-level deep
// because functional components already normalize their own children.
export function simpleNormalizeChildren (children: any) {
  for (let i = 0; i < children.length; i++) {
    if (Array.isArray(children[i])) {
      return Array.prototype.concat.apply([], children)
    }
  }
  return children
}

// 2. When the children contains constructs that always generated nested Arrays,
// e.g. , , v-for, or when the children is provided by user
// with hand-written render functions / JSX. In such cases a full normalization
// is needed to cater to all possible types of children values.
export function normalizeChildren (children: any): ?Array<VNode> {
  return isPrimitive(children)
    ? [createTextVNode(children)]
    : Array.isArray(children)
      ? normalizeArrayChildren(children)
      : undefined
}
simpleNormalizeChildren 方法调用场景是 render 函数是编译生成的。理论上编译生成的 children 都已经是 VNode 类型的,但这里有一个例外,就是 functional component 函数式组件返回的是一个数组而不是一个根结点,所以会通过 Array.prototype.concat 方法把整个 children 数组打平,让它的深度只有一层。
normalizeChildren 方法的调用场景有两种,一个场景是 render 函数是用户手写的,当 children 只有一个节点的时候, Vue.js 从接口层面允许用户把 children 写成基础类型用来创建单个简单的文本节点,这种情况会调用 createTextVNode 创建一个文本节点的 VNode;另一个场景是当编译 slot、v-for 的时候会产生嵌套数组的情况,会调用 normalizeArrayChildren 方法,接下来看一下它的实现:
function normalizeArrayChildren (children: any, nestedIndex?: string): Array<VNode> {
  const res = []
  let i, c, lastIndex, last
  for (i = 0; i < children.length; i++) {
    c = children[i]
    if (isUndef(c) || typeof c === 'boolean') continue
    lastIndex = res.length - 1
    last = res[lastIndex]
    //  nested
    if (Array.isArray(c)) {
      if (c.length > 0) {
        c = normalizeArrayChildren(c, `${nestedIndex || ''}_${i}`)
        // merge adjacent text nodes
        if (isTextNode(c[0]) && isTextNode(last)) {
          res[lastIndex] = createTextVNode(last.text + (c[0]: any).text)
          c.shift()
        }
        res.push.apply(res, c)
      }
    } else if (isPrimitive(c)) {
      if (isTextNode(last)) {
        // merge adjacent text nodes
        // this is necessary for SSR hydration because text nodes are
        // essentially merged when rendered to HTML strings
        res[lastIndex] = createTextVNode(last.text + c)
      } else if (c !== '') {
        // convert primitive to vnode
        res.push(createTextVNode(c))
      }
    } else {
      if (isTextNode(c) && isTextNode(last)) {
        // merge adjacent text nodes
        res[lastIndex] = createTextVNode(last.text + c.text)
      } else {
        // default key for nested array children (likely generated by v-for)
        if (isTrue(children._isVList) &&
          isDef(c.tag) &&
          isUndef(c.key) &&
          isDef(nestedIndex)) {
          c.key = `__vlist${nestedIndex}_${i}__`
        }
        res.push(c)
      }
    }
  }
  return res
}
normalizeArrayChildren 接受 2 个参数,children 表示要规范的子节点, nestedIndex 表示嵌套的索引,因为单个 child 可能是一个数组类型。 normalizeArrayChildren 主要的逻辑就是遍历 children ,获得单个节点 c ,然后对 c 的类型判断,如果是一个数组类型,则调用递归 normalizeArrayChildren ;如果是基础类型,则通过 createTextVNode 方法转换成 VNode 类型;否则就已经是 VNode 类型了,如果 children 是一个列表并且列表还存在嵌套的情况,则根据 nestedIndex 去更新它的 key。这里需要注意一点,在遍历的过程中,对这 2 中情况都做了如下处理:如果存在两个连续的 text 节点,会把他们合并成一个 text 节点。
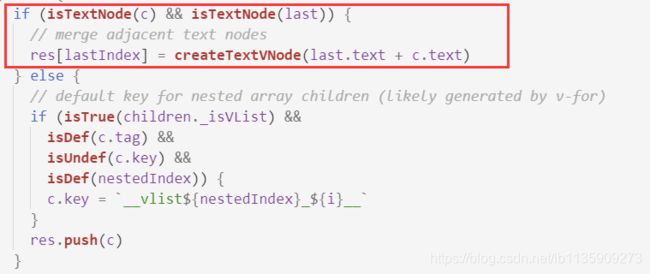
经过对 children 的规范化, children 变成了一个类型为 VNode 的 Array 。
VNode 的创建
回到 createElement 函数,规范化 children 后,接下来回去创建一个 VNode 的实例:
let vnode, ns
if (typeof tag === 'string') {
  let Ctor
  ns = (context.$vnode && context.$vnode.ns) || config.getTagNamespace(tag)
  if (config.isReservedTag(tag)) {
    // platform built-in elements
    vnode = new VNode(
      config.parsePlatformTagName(tag), data, children,
      undefined, undefined, context
    )
  } else if (isDef(Ctor = resolveAsset(context.$options, 'components', tag))) {
    // component
    vnode = createComponent(Ctor, data, context, children, tag)
  } else {
    // unknown or unlisted namespaced elements
    // check at runtime because it may get assigned a namespace when its
    // parent normalizes children
    vnode = new VNode(
      tag, data, children,
      undefined, undefined, context
    )
  }
} else {
  // direct component options / constructor
  vnode = createComponent(tag, data, context, children)
}
这里先对 tag 做判断,如果是 string 类型,则接着判断如果是内置的一些节点,则直接创建一个普通 VNode,如果是为已注册的组件名,则通过 createElement 创建一个组件类型的 VNode ,否则创建一个未知标签的 VNode。如果是 tag 一个 Component 类型,则直接调用 createComponent 创建一个组件类型的 VNode 节点。对于 createComponent 创建组件类型的 VNode 的过程,我们后续介绍,本质上它还是返回了一个 VNode。

总结
那么至此,我们大致了解了 createElement 创建 VNode 的过程,每个 VNode 有 children, children 每个元素也是一个 VNode,这样就形成了一个 VNode Tree,它很好的描述了我们的 DOM Tree。
回到 mountComponent 函数的过程,我们已经知道 vm._render 是如何创建了一个 VNode,接下来就是要把这个 VNode 渲染成一个真实的 DOM 并渲染出来,这个过程是通过 vm._update 完成的,接下来分析这个过程。
update
Vue 的 _update 是实例的一个私有方法,它被调用的时机有 2 个,一个是首次渲染,一个是数据更新的时候;由于我们这一章节只分析首次渲染部分,数据更新部分会在之后分析响应式原理的时候涉及。
_update 方法的作用是把 VNode 渲染成真实的 DOM,它的定义 src/core/instance/lifecycle.js 中:
Vue.prototype._update = function (vnode: VNode, hydrating?: boolean) {
  const vm: Component = this
  const prevEl = vm.$el
  const prevVnode = vm._vnode
  const prevActiveInstance = activeInstance
  activeInstance = vm
  vm._vnode = vnode
  // Vue.prototype.__patch__ is injected in entry points
  // based on the rendering backend used.
  if (!prevVnode) {
    // initial render
    vm.$el = vm.__patch__(vm.$el, vnode, hydrating, false /* removeOnly */)
  } else {
    // updates
    vm.$el = vm.__patch__(prevVnode, vnode)
  }
  activeInstance = prevActiveInstance
  // update __vue__ reference
  if (prevEl) {
    prevEl.__vue__ = null
  }
  if (vm.$el) {
    vm.$el.__vue__ = vm
  }
  // if parent is an HOC, update its $el as well
  if (vm.$vnode && vm.$parent && vm.$vnode === vm.$parent._vnode) {
    vm.$parent.$el = vm.$el
  }
  // updated hook is called by the scheduler to ensure that children are
  // updated in a parent's updated hook.
}
_update 的核心就是调用 vm.__patch__ 方法,这个方法实际上在不同的平台,比如 web 和 weex 上的定义是不一样的,因此在 web 平台中它的定义在 src/platforms/web/runtime/index.js 中:
Vue.prototype.__patch__ = inBrowser ? patch : noop
可以看到,甚至在 web 平台上,是否是服务端渲染也会对这个方法产生影响。因为在服务端渲染中,没有真实的浏览器 DOM 环境,所以不需要把 VNode 最终转换成 DOM,因此是一个空函数,而在浏览器端渲染中,它指向了 patch 方法,它的定义在 src/platforms/web/runtime/patch.js中:
import * as nodeOps from 'web/runtime/node-ops'
import { createPatchFunction } from 'core/vdom/patch'
import baseModules from 'core/vdom/modules/index'
import platformModules from 'web/runtime/modules/index'

// the directive module should be applied last, after all
// built-in modules have been applied.
const modules = platformModules.concat(baseModules)

export const patch: Function = createPatchFunction({ nodeOps, modules })
该方法的定义是调用 createPatchFunction 方法的返回值,这里传入了一个对象,包含 nodeOps 参数和 modules 参数。其中,nodeOps 封装了一系列 DOM 操作的方法,modules 定义了一些模块的钩子函数的实现,我们这里先不详细介绍,来看一下 createPatchFunction 的实现,它定义在 src/core/vdom/patch.js 中:
const hooks = ['create', 'activate', 'update', 'remove', 'destroy']
export function createPatchFunction (backend) {
let i, j
const cbs = {}
const { modules, nodeOps } = backend
for (i = 0; i < hooks.length; ++i) {
cbs[hooks[i]] = []
for (j = 0; j < modules.length; ++j) {
if (isDef(modules[j][hooks[i]])) {
cbs[hooks[i]].push(modules[j][hooks[i]])
}
}
}
// ...
return function patch (oldVnode, vnode, hydrating, removeOnly) {
if (isUndef(vnode)) {
if (isDef(oldVnode)) invokeDestroyHook(oldVnode)
return
}
let isInitialPatch = false
const insertedVnodeQueue = []
if (isUndef(oldVnode)) {
// empty mount (likely as component), create new root element
isInitialPatch = true
createElm(vnode, insertedVnodeQueue)
} else {
const isRealElement = isDef(oldVnode.nodeType)
if (!isRealElement && sameVnode(oldVnode, vnode)) {
// patch existing root node
patchVnode(oldVnode, vnode, insertedVnodeQueue, removeOnly)
} else {
if (isRealElement) {
// mounting to a real element
// check if this is server-rendered content and if we can perform
// a successful hydration.
if (oldVnode.nodeType === 1 && oldVnode.hasAttribute(SSR_ATTR)) {
oldVnode.removeAttribute(SSR_ATTR)
hydrating = true
}
if (isTrue(hydrating)) {
if (hydrate(oldVnode, vnode, insertedVnodeQueue)) {
invokeInsertHook(vnode, insertedVnodeQueue, true)
return oldVnode
} else if (process.env.NODE_ENV !== 'production') {
warn(
'The client-side rendered virtual DOM tree is not matching ' +
'server-rendered content. This is likely caused by incorrect ' +
'HTML markup, for example nesting block-level elements inside ' +
', or missing
. Bailing hydration and performing ' +
'full client-side render.'
)
}
}
// either not server-rendered, or hydration failed.
// create an empty node and replace it
oldVnode = emptyNodeAt(oldVnode)
}
// replacing existing element
const oldElm = oldVnode.elm
const parentElm = nodeOps.parentNode(oldElm)
// create new node
createElm(
vnode,
insertedVnodeQueue,
// extremely rare edge case: do not insert if old element is in a
// leaving transition. Only happens when combining transition +
// keep-alive + HOCs. (#4590)
oldElm._leaveCb ? null : parentElm,
nodeOps.nextSibling(oldElm)
)
// update parent placeholder node element, recursively
if (isDef(vnode.parent)) {
let ancestor = vnode.parent
const patchable = isPatchable(vnode)
while (ancestor) {
for (let i = 0; i < cbs.destroy.length; ++i) {
cbs.destroy[i](ancestor)
}
ancestor.elm = vnode.elm
if (patchable) {
for (let i = 0; i < cbs.create.length; ++i) {
cbs.create[i](emptyNode, ancestor)
}
// #6513
// invoke insert hooks that may have been merged by create hooks.
// e.g. for directives that uses the "inserted" hook.
const insert = ancestor.data.hook.insert
if (insert.merged) {
// start at index 1 to avoid re-invoking component mounted hook
for (let i = 1; i < insert.fns.length; i++) {
insert.fns[i]()
}
}
} else {
registerRef(ancestor)
}
ancestor = ancestor.parent
}
}
// destroy old node
if (isDef(parentElm)) {
removeVnodes(parentElm, [oldVnode], 0, 0)
} else if (isDef(oldVnode.tag)) {
invokeDestroyHook(oldVnode)
}
}
}
invokeInsertHook(vnode, insertedVnodeQueue, isInitialPatch)
return vnode.elm
}
}
createPatchFunction 内部定义了一系列的辅助方法,最终返回了一个 patch 方法,这个方法就赋值给了 vm._update 函数里调用的 vm.__patch__。
在介绍 patch 的方法实现之前,我们可以思考一下为何 Vue.js 源码绕了这么一大圈,把相关代码分散到各个目录。因为前面介绍过,patch 是平台相关的,在 Web 和 Weex 环境,它们把虚拟 DOM 映射到 “平台 DOM” 的方法是不同的,并且对 “DOM” 包括的属性模块创建和更新也不尽相同。因此每个平台都有各自的 nodeOps 和 modules,它们的代码需要托管在 src/platforms 这个大目录下。
而不同平台的 patch 的主要逻辑部分是相同的,所以这部分公共的部分托管在 core 这个大目录下。差异化部分只需要通过参数来区别,这里用到了一个函数柯里化的技巧,通过 createPatchFunction 把差异化参数提前固化,这样不用每次调用 patch 的时候都传递 nodeOps 和 modules 了,这种编程技巧也非常值得学习。
注:函数柯里化:英语:Currying(果然是满满的英译中的既视感),是把接受多个参数的函数变换成接受一个单一参数(最初函数的第一个参数)的函数,并且返回接受余下的参数而且返回结果的新函数的技术。
在这里,nodeOps 表示对 “平台 DOM” 的一些操作方法,modules 表示平台的一些模块,它们会在整个 patch 过程的不同阶段执行相应的钩子函数。这些代码的具体实现会在之后的章节介绍。
回到 patch 方法本身,它接收 4个参数,oldVnode 表示旧的 VNode 节点,它也可以不存在或者是一个 DOM 对象;vnode 表示执行 _render 后返回的 VNode 的节点;hydrating 表示是否是服务端渲染;removeOnly 是给 transition-group 用的,之后会介绍。
patch 的逻辑看上去相对复杂,因为它有着非常多的分支逻辑,为了方便理解,我们并不会在这里介绍所有的逻辑,仅会针对我们之前的例子分析它的执行逻辑。之后我们对其它场景做源码分析的时候会再次回顾 patch 方法。
先来回顾我们的例子:
var app = new Vue({
el: '#app',
render: function (createElement) {
return createElement('div', {
attrs: {
id: 'app'
},
}, this.message)
},
data: {
message: 'Hello Vue!'
}
})
然后我们在 vm._update 的方法里是这么调用 patch 方法的:
// initial render
vm.$el = vm.__patch__(vm.$el, vnode, hydrating, false /* removeOnly */)
结合我们的例子,我们的场景是首次渲染,所以在执行 patch 函数的时候,传入的 vm.$el 对应的是例子中 id 为 app 的 DOM 对象,这个也就是我们在 index.html 模板中写的 , vm.$el 的赋值是在之前 mountComponent 函数做的,vnode 对应的是调用 render 函数的返回值,hydrating 在非服务端渲染情况下为 false,removeOnly 为 false。
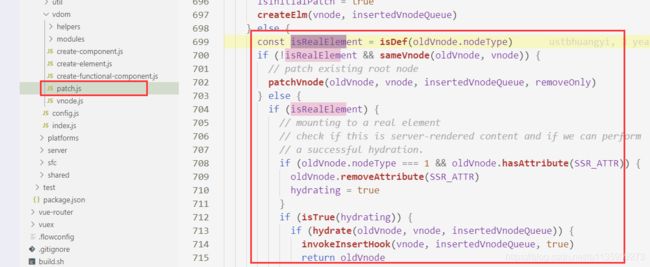
确定了这些入参后,我们回到 patch 函数的执行过程,看几个关键步骤。
const isRealElement = isDef(oldVnode.nodeType)
if (!isRealElement && sameVnode(oldVnode, vnode)) {
// patch existing root node
patchVnode(oldVnode, vnode, insertedVnodeQueue, removeOnly)
} else {
if (isRealElement) {
// mounting to a real element
// check if this is server-rendered content and if we can perform
// a successful hydration.
if (oldVnode.nodeType === 1 && oldVnode.hasAttribute(SSR_ATTR)) {
oldVnode.removeAttribute(SSR_ATTR)
hydrating = true
}
if (isTrue(hydrating)) {
if (hydrate(oldVnode, vnode, insertedVnodeQueue)) {
invokeInsertHook(vnode, insertedVnodeQueue, true)
return oldVnode
} else if (process.env.NODE_ENV !== 'production') {
warn(
'The client-side rendered virtual DOM tree is not matching ' +
'server-rendered content. This is likely caused by incorrect ' +
'HTML markup, for example nesting block-level elements inside ' +
', or missing
. Bailing hydration and performing ' +
'full client-side render.'
)
}
}
// either not server-rendered, or hydration failed.
// create an empty node and replace it
oldVnode = emptyNodeAt(oldVnode)
}
// replacing existing element
const oldElm = oldVnode.elm
const parentElm = nodeOps.parentNode(oldElm)
// create new node
createElm(
vnode,
insertedVnodeQueue,
// extremely rare edge case: do not insert if old element is in a
// leaving transition. Only happens when combining transition +
// keep-alive + HOCs. (#4590)
oldElm._leaveCb ? null : parentElm,
nodeOps.nextSibling(oldElm)
)
}
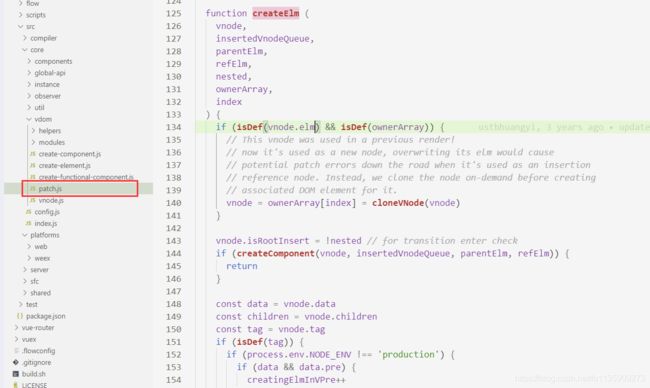
由于我们传入的 oldVnode 实际上是一个 DOM container,所以 isRealElement 为 true,接下来又通过 emptyNodeAt 方法把 oldVnode 转换成 VNode 对象,然后再调用 createElm 方法,这个方法在这里非常重要,来看一下它的实现:
function createElm (
vnode,
insertedVnodeQueue,
parentElm,
refElm,
nested,
ownerArray,
index
) {
if (isDef(vnode.elm) && isDef(ownerArray)) {
// This vnode was used in a previous render!
// now it's used as a new node, overwriting its elm would cause
// potential patch errors down the road when it's used as an insertion
// reference node. Instead, we clone the node on-demand before creating
// associated DOM element for it.
vnode = ownerArray[index] = cloneVNode(vnode)
}
vnode.isRootInsert = !nested // for transition enter check
if (createComponent(vnode, insertedVnodeQueue, parentElm, refElm)) {
return
}
const data = vnode.data
const children = vnode.children
const tag = vnode.tag
if (isDef(tag)) {
if (process.env.NODE_ENV !== 'production') {
if (data && data.pre) {
creatingElmInVPre++
}
if (isUnknownElement(vnode, creatingElmInVPre)) {
warn(
'Unknown custom element: <' + tag + '> - did you ' +
'register the component correctly? For recursive components, ' +
'make sure to provide the "name" option.',
vnode.context
)
}
}
vnode.elm = vnode.ns
? nodeOps.createElementNS(vnode.ns, tag)
: nodeOps.createElement(tag, vnode)
setScope(vnode)
/* istanbul ignore if */
if (__WEEX__) {
// ...
} else {
createChildren(vnode, children, insertedVnodeQueue)
if (isDef(data)) {
invokeCreateHooks(vnode, insertedVnodeQueue)
}
insert(parentElm, vnode.elm, refElm)
}
if (process.env.NODE_ENV !== 'production' && data && data.pre) {
creatingElmInVPre--
}
} else if (isTrue(vnode.isComment)) {
vnode.elm = nodeOps.createComment(vnode.text)
insert(parentElm, vnode.elm, refElm)
} else {
vnode.elm = nodeOps.createTextNode(vnode.text)
insert(parentElm, vnode.elm, refElm)
}
}
createElm 的作用是通过虚拟节点创建真实的 DOM 并插入到它的父节点中。 我们来看一下它的一些关键逻辑,createComponent 方法目的是尝试创建子组件,这个逻辑在之后组件的章节会详细介绍,在当前这个 case 下它的返回值为 false;接下来判断 vnode 是否包含 tag,如果包含,先简单对 tag 的合法性在非生产环境下做校验,看是否是一个合法标签;然后再去调用平台 DOM 的操作去创建一个占位符元素。
vnode.elm = vnode.ns
? nodeOps.createElementNS(vnode.ns, tag)
: nodeOps.createElement(tag, vnode)
接下来调用 createChildren 方法去创建子元素:
createChildren(vnode, children, insertedVnodeQueue)
function createChildren (vnode, children, insertedVnodeQueue) {
if (Array.isArray(children)) {
if (process.env.NODE_ENV !== 'production') {
checkDuplicateKeys(children)
}
for (let i = 0; i < children.length; ++i) {
createElm(children[i], insertedVnodeQueue, vnode.elm, null, true, children, i)
}
} else if (isPrimitive(vnode.text)) {
nodeOps.appendChild(vnode.elm, nodeOps.createTextNode(String(vnode.text)))
}
}
createChildren 的逻辑很简单,实际上是遍历子虚拟节点,递归调用 createElm,这是一种常用的深度优先的遍历算法,这里要注意的一点是在遍历过程中会把 vnode.elm 作为父容器的 DOM 节点占位符传入。
接着再调用 invokeCreateHooks 方法执行所有的 create 的钩子并把 vnode push 到 insertedVnodeQueue 中。
if (isDef(data)) {
invokeCreateHooks(vnode, insertedVnodeQueue)
}
function invokeCreateHooks (vnode, insertedVnodeQueue) {
for (let i = 0; i < cbs.create.length; ++i) {
cbs.create[i](emptyNode, vnode)
}
i = vnode.data.hook // Reuse variable
if (isDef(i)) {
if (isDef(i.create)) i.create(emptyNode, vnode)
if (isDef(i.insert)) insertedVnodeQueue.push(vnode)
}
}
最后调用 insert 方法把 DOM 插入到父节点中,因为是递归调用,子元素会优先调用 insert,所以整个 vnode 树节点的插入顺序是先子后父。来看一下 insert 方法,它的定义在 src/core/vdom/patch.js 上。
insert(parentElm, vnode.elm, refElm)
function insert (parent, elm, ref) {
if (isDef(parent)) {
if (isDef(ref)) {
if (ref.parentNode === parent) {
nodeOps.insertBefore(parent, elm, ref)
}
} else {
nodeOps.appendChild(parent, elm)
}
}
}
insert 逻辑很简单,调用一些 nodeOps 把子节点插入到父节点中,这些辅助方法定义在 src/platforms/web/runtime/node-ops.js 中:
export function insertBefore (parentNode: Node, newNode: Node, referenceNode: Node) {
parentNode.insertBefore(newNode, referenceNode)
}
export function appendChild (node: Node, child: Node) {
node.appendChild(child)
}
其实就是调用原生 DOM 的 API 进行 DOM 操作,看到这里,很多同学恍然大悟,原来 Vue 是这样动态创建的 DOM。
在 createElm 过程中,如果 vnode 节点不包含 tag,则它有可能是一个注释或者纯文本节点,可以直接插入到父元素中。在我们这个例子中,最内层就是一个文本 vnode,它的 text 值取的就是之前的 this.message 的值 Hello Vue!。
再回到 patch 方法,首次渲染我们调用了 createElm 方法,这里传入的 parentElm 是 oldVnode.elm 的父元素,在我们的例子是 id 为 #app div 的父元素,也就是 Body;实际上整个过程就是递归创建了一个完整的 DOM 树并插入到 Body 上。
最后,我们根据之前递归 createElm 生成的 vnode 插入顺序队列,执行相关的 insert 钩子函数,这部分内容我们之后会详细介绍。
总结
那么至此我们从主线上把模板和数据如何渲染成最终的 DOM 的过程分析完毕了,我们可以通过下图更直观地看到从初始化 Vue 到最终渲染的整个过程。
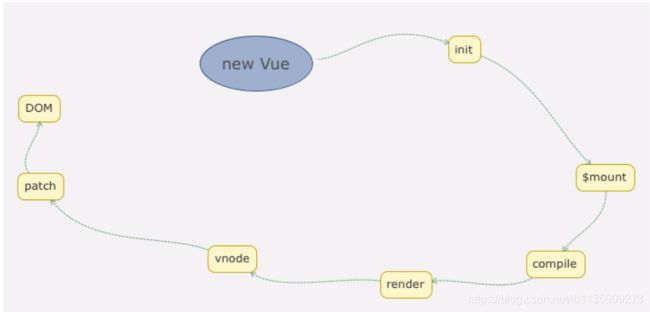
我们这里只是分析了最简单和最基础的场景,在实际项目中,我们是把页面拆成很多组件的,Vue 另一个核心思想就是组件化。
欢迎提出您宝贵的意见!
你可能感兴趣的:(vue源码,vue,vue源码解析,数据驱动,vue源码解析数据驱动,vue源码render)