C#和WPF入门教程
目录
- 0. 来点鸡汤
- 1. 概念
-
- 1.1 C#能做什么
- 1.2 为什么要选择C#,而不是QT或者其它?
- 1.3 winform 和 wpf有什么区别
- 1.4 .net Framework 和 .net Core联系
- 1.5 WPF各个组成部分
- 2. xaml
-
- 2.1 xaml中的对象和属性
- 2.2 xaml页面布局
-
- 2.2.1 层级概念
- 2.2.2 使用 Grid 定义行和列
- 2.2.3 设置行和列
- 2.3 xaml样式
-
- 2.3.1 方法一:不给样式命名
- 2.3.2 方法二:给样式命名
- 2.3.3 给样式命名同时继承基础样式
- 2.4 在资源字典定义样式
-
- 2.4.1 添加资源字典
- 2.4.2 全局引用资源字典
- 2.5 控件模板重写
- 3. C# 代码语法规则
-
- 3.1 变量 、属性、字段分别是什么?
- 3.2 变量和属性的定义
- 3.3 set{}、get{}用法
- 3.4 App.config用法
- 3.5 将一个类拆开写在多处
- 4. 数据绑定
-
- 4.1 原理
- 4.2 xaml 实现数据绑定
-
- 案例一
- 案例二
- 4.3 C#代码实现数据绑定
- 4.4 PropertyChanged实现数据绑定
-
- (1)原理
- (2) 界面
- (3) xaml
- (4) c#
- 5 c#中的委托
-
- 5.1 如何理解委托?
- 5.2 系统自带的两种委托 Action<> 和Func<>
- 5.3 简写委托的形式
- LINQ的用法
-
- LINQ中where用法和原理
- LINQ常用扩展方法
- split方法可能会掉入的陷阱
- 通过Linq读取配置文件
- linq常见问题
- 注册服务
-
- 依赖注入 : 接口 + 实现
- 通过构造函数依赖注入
- 接收和发送数据架构
- 配置读取
-
- 配置容器
-
- 步骤
- 实例
- 注册服务
-
- 步骤
- 实例1
- 实例2
- 扁平化配置
- 日志系统
-
- 日志级别
- 日志记录到控制台
-
- 核心代码:
- 完整代码
- 日志记录到文本: NLog
-
- 官网查看例程
- Nlog核心代码
- 实例
- SeriLog: 结构化日志
- Entity Framework Core
-
- 通过C#代码创建表
- 通过C#对表进行怎删改查
- C#中的事件
- C#不同界面之间互相操作控件
- MVVM
- WPF 定时器
- 配置文件读取
- UI线程
-
- 2.5 辨识attribute和property
0. 来点鸡汤
时不时看看自己以前写的博客,感触很多。已经快一年多没有认真写博客了,今天重新开张,希望以此为契机,重拾生活的信心。
去年研究生毕业,去了北京,年薪拿到了30万。但只在山巅呆了四个月,便草草结束,离开北京各中原由无从说起,家庭和事业那时候只能选一个。虽然选了家庭,但现在想起北京的那份工作,也觉得可惜。离开北京之后,“安安心心”拿5000的月薪又快一年了,岗位也从原来的算法工程师变成程序员,这就是上帝给你开了个窗户,你刚看到一丝希望,谁知上帝开窗就给你一个大逼兜,然后关上窗户,留下你在风中凌乱。刚去北京时,我以为命运的齿轮开始转动,我真正的人生正式开始,原来只是去看了一遭那水中花、镜中月,留存脑海中的北京梦,与现在的满地鸡毛,讽刺啊。
哈哈哈,生活还要继续呢!原来京东买东西,现在拼多多、咸鱼也能凑合,玩算法换成写代码就当给自己夯实基础,领导原来是博士、硕士,现在的领导清一色中专,这不工作上更容易忽悠领导了吗?这样想,好多了。![]() 。
。
听我叨逼叨那么多,哈哈,那我顺便说点关于C#的事情吧,也当做我成长的一个记录。这份教程不会每一步都去截图,如果你是小白,建议花个10分钟快速入门一下C#的基本概念,这个链接: C#菜鸟教程 带你快速入门。我写的虽然是WPF入门教程,但是C#遇到的问题我都会记录下来,直到把整个大楼给造好。
1. 概念
C# 怎么读? 读C井?读c星?哈哈
正确读音 C Sharp 音标: [ʃɑːrp]
1.1 C#能做什么
上位机软件、桌面显示软件、unity 3D游戏、网页开发等
1.2 为什么要选择C#,而不是QT或者其它?
(1)C# 简单易上手。qt 基本就C++的语法,用起来很复杂。
别扯什么运行速度,内存那些有的没的,那些东西全是扯犊子,对于新手或者绝大多数人,那些东西可能写一辈子代码也不用考虑,现在的计算机不缺算力和存储空间。主要精力应该是保证功能的实现和稳定运行。
(2)C# 是微软创造出来的,背靠宇宙第一强编辑器 visual studio,对于代码的调试,兼容,有着无可比拟的优势。
我举个例子,每台Windows电脑都有个事件查看器,它记录了电脑的各种异常事件。我们知道,写代码的时间是远远没有调试的时间长的,而用C#写的程序,通过Windows自带的事件查看器就能定位到异常代码是第几行,你就说这点,选不选C#。
(3)学会C# 会的是一类东西。
比如你是用C#写桌面应用程序(winform、WPF),你还可以用C#写网页 (asp.net),现在火热的Unity3D脚本也是通过C#来完成的,只要微软不跨,你说为啥不选一劳永逸的语言。
老子就不听傻逼博主的意见,我就要学qt。
宝啊,你看看我写的其他文章,也是鬼话连篇,但是我写博客没有糊弄各位宝,no copy,no paste.(是不是不知道啥意思,哈哈,快去百度翻译一下再和我犟)。如果你还是不选择C#,我只能画个圈诅咒你 —你写的代码如果有bug,永远也找不到。
1.3 winform 和 wpf有什么区别
C#有控制台应用程序Console,也有桌面应用程序(图形界面),现在主要就是用来展示数据的。
c#有两种方式写桌面应用程序:WPF、winform。我们来看看它们有什么不同。
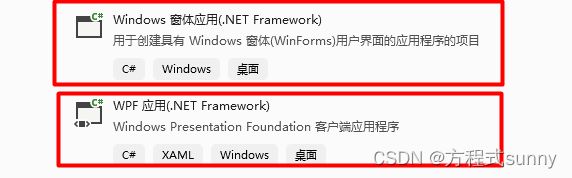
- winform老,wpf新;
- winform窗体的控件属性是在C#里实现的,WPF则是在XAML里面实现的
- winform修改控件复杂,wpf简单
- winform入门简单,wpf入门难
宝啊,你读到此处想说什么?
什么傻逼博主,说了好像又啥都没说,都是些什么鬼啊?
我就想和你说,winform过时了,要学WPF。
1.4 .net Framework 和 .net Core联系
讲个小插曲,有一次其他部门的一个同事台上发言,原话:“我们这个程序是用 dot net core 开发的”,听到这句话时,我有点懵逼,什么人这是,你就说用C#开发的不就完了么,还tmd左一句dot net core,右一句dot net core,啥也不是。
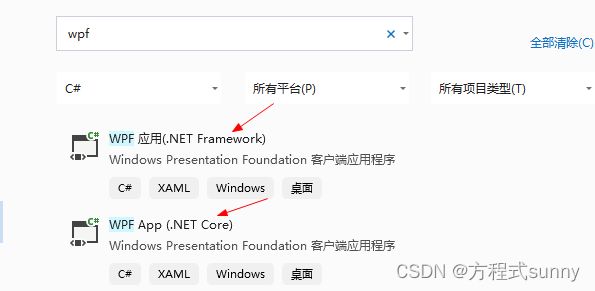
看上面这张图片,我选的都是WPF,但是它们的架构不一样。
- .net Framework老, .net Core新
- .net Framework只针对windows平台,但包含了Windows平台的所有特性, .net Core 支持多个平台,但没有前者全面.如果要用xp系统,则使用framework是更好的选择
顺便说一嘴:咱可不是喜欢背后说人坏话,我批评甚至是鄙视我那个说dot net core 的同事,原因是他不写任何代码,也不会写,却总是装逼,咱讨厌这样的人。
1.5 WPF各个组成部分

分为XAML文件和cs文件,XAML文件用来处理界面,cs文件处理后台逻辑
App.xaml 指定系统启动界面,资源,引入的程序集
=======现在是 北京时间2023年9月27日 23:13,小傲娇的博主困了,不想写了
2. xaml
wpf有两部分构成,一部分是界面(前端设计),负责界面的设计和数据展示。另一部分是程序逻辑(后端),负责业务流程和数据处理。两部分相互独立,装逼的说法叫前后端分离。前端和后端会存在数据交互,可以通过事件或者绑定等方法来实现。
2.1 xaml中的对象和属性
=======现在是 北京时间2023年10月1日 20:41,小傲娇的博主今天没事,接着写。
xaml是xml的扩展,很多用法和想xml是一致的,如果你学过html,那应该会很快入门xaml,这东西只要入门了,写桌面应用程序布局时很爽,你用了这个,基本不会再用回winform了。
-
- 对象元素
这里的对象和面向对象编程的概念基本一致。面向对象编程的对象是对一类具有相同属性的物体进行抽象,比如有个Dog类、CAT类,这里的对象是逻辑层面上的。
xaml 中也有对象,比如按钮utton、文本框TextBox等都是对象,这里的对象是布局上的概念,更多是文法层面,不是逻辑上的概念。
在WPF中,xmal代码也称作前端代码(控件),而以.cs结尾的代码叫做 “C#代码”(也叫后端代码或者代码隐藏)。
- 对象元素
-
- 属性
在C#中(其他编程语言也一样),一个类中往往有各种属性,比如学生类中有姓名属性、年纪属性等等。在xaml中,这个概念有点类似,比如有个按钮控件(按钮类),那它也有自己的属性,比如行高、行宽、背景颜色等等。下面这个示例,Grid.Row、Grid.Column都是属性。
- 属性
-
- 属性元素
属性元素是对象中的属性的属性,比如Button是一个对象,background是一个属性,对属性再设置就叫属性元素: SolidColorBrush
- 属性元素
2.2 xaml页面布局
2.2.1 层级概念
- xaml设计是按照行和列的概念设计的;
- xaml是树形结构,在使用前先对Grid进行设计(几行几列);
- 在每个层级下面对界面进行设计
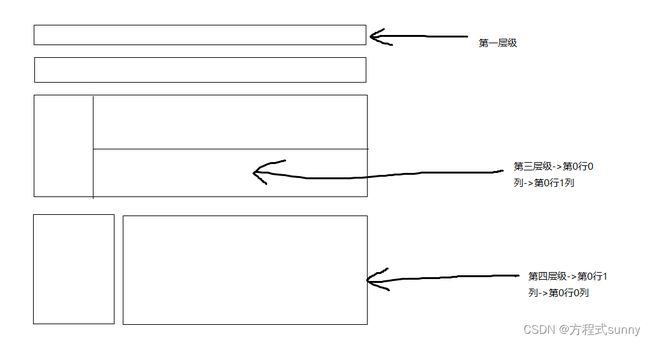
可能看了上面的图片也觉得一头雾水,我们现在从网页上随便截图一张,结合WPF看看到底什么是层级结构
我们把这个界面先整体分成三个区域, 即3行1列
第1行第1列 所有的图标依次用stackPanel放置控件就可以了
在第2行第1列 里面进一步切割,可在分成 2行1列

在第3行第1列 里面进一步切割,可在分成 1行3列

这样一个界面就被切割好了, 理解上面这个例子,应该就知道WPF层级的概念了
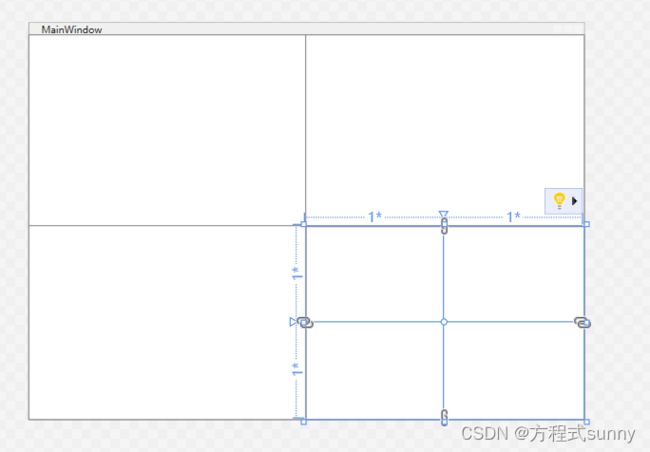
2.2.2 使用 Grid 定义行和列
根据上面层级的概念,将界面划分区域,接下来就可以用< Grid >来实现了. 下面的代码定义2行2列的布局
我们还可以在第2行第2列里再布置2行2列,代码实现如下
<Grid>
        <Grid.RowDefinitions>
            <RowDefinition/>
            <RowDefinition/>
        </Grid.RowDefinitions>

        <Grid.ColumnDefinitions>
            <ColumnDefinition/>
            <ColumnDefinition/>
        </Grid.ColumnDefinitions>

        <Grid Grid.Row="1" Grid.Column="1">
            <Grid.RowDefinitions>
                <RowDefinition/>
                <RowDefinition/>
            </Grid.RowDefinitions>

            <Grid.ColumnDefinitions>
                <ColumnDefinition/>
                <ColumnDefinition/>
            </Grid.ColumnDefinitions>
        </Grid>
    </Grid>
2.2.3 设置行和列
-
绝对值
-
按比例
-
auto
2.3 xaml样式
2.3.1 方法一:不给样式命名
直接在wpf控件前面写某类控件的样式,该方法不给样式起名字,后面使用该类控件时不需要引用,默认会使用该类样式。如下面代码,当我创建一个按钮是就会使用
=======现在是 北京时间2023年10月1日 22:38,小傲娇的博主累了,不想写了
2.3.2 方法二:给样式命名
2.3.3 给样式命名同时继承基础样式
2.4 在资源字典定义样式
在项目管理文件中添加一个资源字典Dictionary,对不同的控件进行样式设计. 在App.xaml中添加一个全局的资源字典, 将Dictionary的文件路径添加进去
2.4.1 添加资源字典
//在项目管理文件中添加一个资源字典Dictionary
2.4.2 全局引用资源字典
2.5 控件模板重写
当你创建一个控件时,这个控件有自己的背景、颜色,这都是系统自定义好的,但是这并不是我们需要的,我们不可能每一次创建时都去修改,所以需要对控件模版改造,这个过程就就叫做控件模版重写。
3. C# 代码语法规则
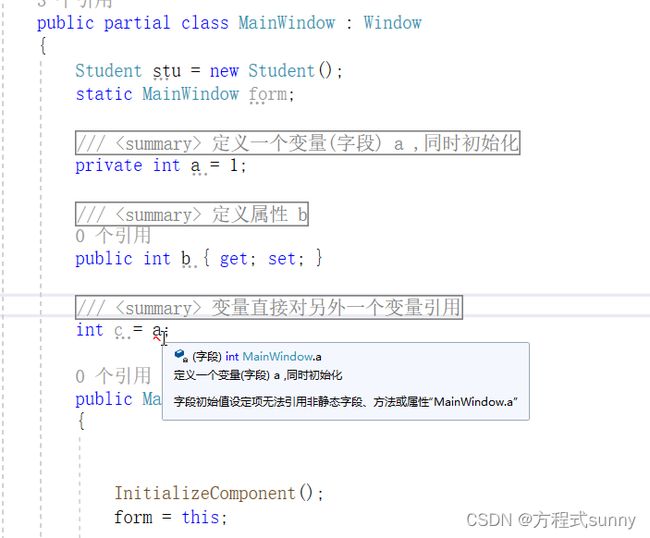
3.1 变量 、属性、字段分别是什么?
这个概念特别重要,搞不懂不行
类内部的私有变量即为字段,如代码中的变量 a;
属性向外暴露接口(公有部分),使外部能够通过属性访问内部字段, 属性本身不保存数据, 对属性操作实际是对属性对应字段操作; 如代码中对属性b操作,其实是对a操作;
        ///
        /// 定义一个变量(字段) a ,同时初始化
        ///
        private int a = 1;

        ///
        /// 定义属性 b
        ///
        public int b
        {
            get { return a; }
            set { a = value; }
        }
3.2 变量和属性的定义
在C#中, 只能在类内定义变量和属性,同时允许对改变量或者属性进行初始化, 但不允许一个变量直接引用另外一个变量,如下所示,这是新人经常犯的一个错误。
3.3 set{}、get{}用法
在类Test中设置一个私有变量name,同时设置一个公有变量,通过公有变量name对私有变量NAME操作
    public class Test
    {
        ///
        /// 字段:一般私有,不对外开放, 首字母一般小写
        ///
        private string name;

        ///
        /// 属性:一般为共有,作为外部访问对应字段的一个接口, 首字母一般大写
        ///
        public string NAME
        {
            get { return name; }    //通过NAME返回name的值
            set
            {
                if (value == "keson")
                {
                    Console.WriteLine("hello,keson!");
                }
                else
                {
                    name = value; //通过NAME设置name的值
                    Console.WriteLine("that is not keson,is "+ name);
                }
            }
        }
    }

    class Program
    {
        static void Main()
        {
            Test test = new Test();
            test.NAME = "孙悟空";


        }
    }
3.4 App.config用法
App.config文件是系统默认的配置文件, 使用时需要添加引用 System.Configuration.dll, 该配置文件用于修改数据库连接字符串/窗口日志的信息.
App.config代码:
-
C# 代码
拿到配置文件里的内容
    public partial class MainWindow : Window
    {
        public MainWindow()
        {
            InitializeComponent();
            string settingValue = 					System.Configuration.ConfigurationManager.AppSettings["keyName"];
        }
    }
3.5 将一个类拆开写在多处
calss1.cs和class2.cs同属于一个类,c#允许一个类拆开写,这样防止写在一处,不方便阅读。
public partial class Window1 : Window
    {
        public Window1()
        {
            InitializeComponent();
        }
    }

public partial class Window1 : Window
    {
        public Window1()
        {
            fun();
        }
}
4. 数据绑定
4.1 原理
通常是指将目标源(具有依赖属性的对象)绑定到 目标数据上(通常是控件)
数据绑定分为4种:

4.2 xaml 实现数据绑定
案例一
绑定源:代码隐藏 绑定目标: TextBox
    public partial class MainWindow : Window
    {

        public MainWindow()
        {
            InitializeComponent();

            //设置窗体上下文对象   这里设置的是MyClass
            DataContext = new MyClass();
        }
    }

    public class MyClass
    {
        public int hight { get; set; } = 100;
        public int width { get; set; } = 101;
    }
案例二
绑定源:TextBox 绑定目标: TextBox
4.3 C#代码实现数据绑定
        public MainWindow()
        {
            InitializeComponent();

            BindingData();
        }

        private void BindingData()
        {
            //1 创建绑定对象
            var binding = new Binding("Text");
            //2 设置绑定源
            binding.Source = this.keson;
            //3 设置绑定目标
            keson_copy.SetBinding(TextBlock.TextProperty, binding);
        }
namespace WpfApp1
{
    ///
    /// Window1.xaml 的交互逻辑
    ///
    public partial class Window1 : Window
    {
        LoginModel loginModel = new LoginModel();

        public Window1()
        {
            InitializeComponent();

            //数据绑定
            this.DataContext = loginModel;
            loginModel.user_name = "keson";
        }

        private void Button_Click(object sender, RoutedEventArgs e)
        {
            图书馆主界面 lib = new 图书馆主界面();

            if(loginModel.user_name == "张三")   //这里的textbox_userName就是xaml里的x:Name
            {
                lib.Show();
            }
            else
            {
                MessageBox.Show("账号错误");
                loginModel.user_name = "";   //账号不是"张三"时,textbox里的内容会清空
            }

        }
    }

    public class LoginModel: INotifyPropertyChanged
    {
        private string _user_name;
        public string user_name
        {
            get { return _user_name; }
            set
            {
                _user_name = value;
                RaisePropertyChanged("user_name");
            }
        }

        public event PropertyChangedEventHandler PropertyChanged;       //1 申明一个事件

        private void RaisePropertyChanged(string propertyName)
        {
            PropertyChanged?.Invoke(this, new PropertyChangedEventArgs(propertyName));//3 事件绑定一个方法
        }

    }
}
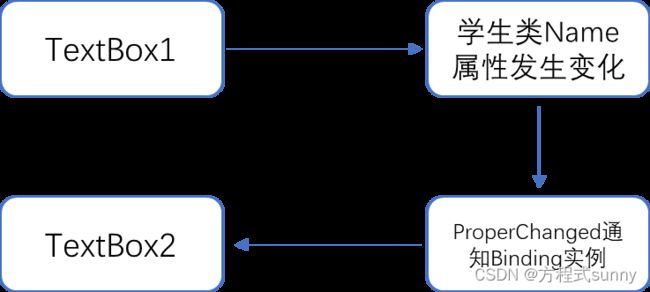
4.4 PropertyChanged实现数据绑定
(1)原理
(2) 界面
(3) xaml
(4) c#
using System;
using System.Collections.Generic;
using System.ComponentModel;
using System.Linq;
using System.Text;
using System.Threading.Tasks;
using System.Windows;
using System.Windows.Controls;
using System.Windows.Data;
using System.Windows.Documents;
using System.Windows.Input;
using System.Windows.Media;
using System.Windows.Media.Imaging;
using System.Windows.Navigation;
using System.Windows.Shapes;

namespace WpfApp2
{
    ///
    /// MainWindow.xaml 的交互逻辑
    ///
    public partial class MainWindow : Window
    {
        Student stu;
        public MainWindow()
        {

            InitializeComponent();

            stu = new Student();

            // 准备Binding
            Binding binding = new Binding();
            binding.Source = stu;
            binding.Path = new PropertyPath("Name");

            //使用Binding连接数据源于Binding目标
            BindingOperations.SetBinding(tbx, TextBox.TextProperty, binding);
        }


        private void Tbx2_TextChanged(object sender, TextChangedEventArgs e)
        {
            stu.Name = tbx2.Text;
        }
    }

    class Student : INotifyPropertyChanged
    {
        public event PropertyChangedEventHandler PropertyChanged;

        private string name;

        public string Name
        {
            get { return name; }
            set
            {
                name = value;
                if(PropertyChanged != null)
                {
                    PropertyChanged.Invoke(this,new PropertyChangedEventArgs("Name"));
                }
            }
        }
    }

}
5 c#中的委托
5.1 如何理解委托?
这个名词困惑了了我好久,应该对比C++中的函数指针(一个指向函数的指针),理解了函数指针就理解委托了.
函数指针的就是一个指针变量指向函数,例子如下,定义了一个*pf的函数指针,入参是两个int,返回值也是int,将pf的地址指向max函数,这样pf也能使用max函数.
int max(int a,int b){
    return a>b?a;b;
}
int (*pf)(int, int);
pf = max;
不同的是委托可以挂载多个方法。
委托是一个容器,这个容器可以挂载不同的方法。先简单说如何使用:定义一个委托,并给改委托挂载方法,执行委托。
具体步骤:
- 声明委托;
- 创建委托实例;
- 委托绑定方法;
- 调用委托
        public delegate int Calculate(int a, int b); //委托相当于函数指针

        ///
        /// 为委托创建一个加法计算方法
        ///
        ///
        public static int addMethod(int a, int b)
        {
            return a + b;
        }

        ///
        /// 为委托创建一个乘法计算方法
        ///
        ///
        public static int MutilMethod(int a, int b)
        {
            return a * b;
        }
        static void Main(string[] args)
        {

            ///
            /// 将加法计算方法赋值给委托
            ///
            Calculate cal = addMethod;
            cal += MutilMethod;

            //调用委托(依次调用)
            int a = cal(22, 2);
            int b = cal(2, 9);
            int c = cal(22, 2);
            int d = cal(2, 9);
            Console.WriteLine(a);
            Console.WriteLine(b);
            Console.WriteLine(c);
            Console.WriteLine(d);
运行结果:
44
18
44
18
请按任意键继续. . .
5.2 系统自带的两种委托 Action<> 和Func<>
Action<> 用于挂载无返回值的方法
Func<> 用于挂载有返回值的方法
static void Main(string[] args)
        {
            delegateFun DF = F1;
            DF();

            //内置的委托

            //1 指向无返回值方法
            Action a = F1;
            a();


            //2 指向有返回值方法
            Func func = Paremeters_fun;
            Console.WriteLine("2 指向有返回值方法,返回值为:" + func(2, 6));

            //3 指向无返回值无入参 匿名方法
            Action a2 = delegate ()
            {
                Console.WriteLine("3 指向无返回值无入参 匿名方法");
            };
            a2();

            //4 指向无返回值有入参 匿名方法
            Action a3 = delegate (int i,string s)
            {
                Console.WriteLine($"4 指向无返回值有入参 匿名方法: i = {i},s = {s}");
            };
            a3(1,"keson");

            //5 指向有返回值方法 匿名方法
            Func func2 = delegate (int i, int j)
            {
                return i + j;
            };
            Console.WriteLine("5 指向有返回值方法 匿名方法: " + func2(50, 6));

            //6 指向有返回值lamda表达式
            Func func3 =(int i, int j)=>
            {
                return i + j;
            };
            Console.WriteLine("6 指向有返回值lamda表达式:" + func3(50, 6));

            //7 指向有返回值lamda表达式(省略入参类型)
            Func func4 = (i,j) =>
            {
                return i + j;
            };
            Console.WriteLine("7 指向有返回值lamda表达式(省略入参类型):" + func3(50, 6));

        }
5.3 简写委托的形式
委托经常伴随着Lambda表达式, Lambda表达式变化很多,有时候看到别人用的时候经常觉得莫名奇妙,我们从基本的开始,看看他们是一步步被简化的.
        static void Main(string[] args)
        {
            int[] nums = { 11, 52, 69, 33, 54, 2, 9, 23, 66, 45 };
            //IEnumerable result = nums.Where(a=>a > 10);

            //演变顺序
            // 1 先写一个匿名方法
            Action action = delegate (int i) { Console.WriteLine(i); };
            // Action action2 = delegate (i) { Console.WriteLine(i); };   //匿名方法数据类型不能省略
            // Action action3 = delegate (int i)  Console.WriteLine(i); ;  //匿名方法大括号不能省略

            // 2 换成lamada表达式
            Action action4 = (int i) => { Console.WriteLine(i); };  //完整写法
            Action action5 = (i) => { Console.WriteLine(i); };      //数据类型省略
            Action action6 = (i) => Console.WriteLine(i); ;        //大括号省略
            Action action7 = (i) => Console.WriteLine(i);          //分号省略
            Action action8 = i => Console.WriteLine(i);          //入参只有一个时,入参的小括号省略

            //3 如果是有返回值
            Func func1 = delegate (int i)     //先写个匿名方法
            {
                if (i > 0)
                    { return true; }
                else
                {
                    return false;
                }
            };

            Func func2 = (int i) =>      //换成lamada表达式
            {
                if (i > 0)
                { return true; }
                else
                {
                    return false;
                }
            };

            Func func3 = (i) =>      //数据类型省略
            {
                if (i > 0)
                { return true; }
                else
                {
                    return false;
                }
            };

            Func func4 = (i) =>      //优化返回代码
            {
                return i > 0;
            };

            Func func5 = (i) =>      //返回语句只有一条语句,省略大括号和return关键字

                 i > 0;

            Func func6 = i =>      //入参只有一个,省略入参的括号

                 i > 0;

        }
LINQ的用法
这部分内容借鉴了杨中科老师的很多东西,大家可以去b站找他的视频学习真的值得一看. 链接: 杨中科老师视频链接
LINQ中where用法和原理
        static void Main(string[] args)
        {
            int[] nums = { 11, 52, 69, 33, 54, 2, 9, 23, 66, 45 };

            // 1. 调用系统的方法
            IEnumerable result = nums.Where(a => a > 20 && a < 40);  //where后面的是lamada表达式的简写形式
            foreach(var i in result)
            {
                Console.WriteLine(i);
            }
            Console.WriteLine(" ");

            // 2. 调用自己写的方法1
            IEnumerable result2 = SelectNums(nums, a => a > 20);
            foreach (var i in result2)
            {
                Console.WriteLine(i);
            }
            Console.WriteLine(" ");

            // 3. 调用自己写的方法2
            IEnumerable result3 = SelectNums2(nums, a => a > 30);
            foreach (var i in result3)    //foreach (var i in SelectNums2(nums, a => a > 20))
            {
                Console.WriteLine(i);
            }

        }

        static IEnumerable SelectNums(IEnumerable items, Func func)
        {
            List list = new List();
            foreach(int item in items)
            {
                if(func(item) == true)
                {
                    list.Add(item);
                }
            }
            return list;
        }

        static IEnumerable SelectNums2(IEnumerable items, Func func)
        {
            foreach (int item in items)
            {
                if (func(item) == true)
                {
                    yield return item;
                }
            }
        }
LINQ常用扩展方法
        static void Main(string[] args)
        {
            List list = new List();
            list.Add(new Employee { Id = 1, Name = "张三", Age = 50, Gender = true, Salary = 50000 });
            list.Add(new Employee { Id = 2, Name = "李四", Age = 40, Gender = false, Salary = 90000 });
            list.Add(new Employee { Id = 3, Name = "赵六", Age = 30, Gender = false, Salary = 30000 });

            IEnumerable employee = list.Where((e) => { return e.Age > 30; });   // employees.Where(e =>  return e.Age > 30 );
            foreach(var i in employee)
            {
                Console.WriteLine(i);
            }

            Console.WriteLine(list.Count(e => e.Salary > 50000));
            Console.WriteLine(list.Any(e => e.Gender == true));


            // 防御性编程
            Console.WriteLine(list.Single(e => e.Name == "张三"));
            // Console.WriteLine(list.Single(e => e.Name == "孙悟空"));//没有该条信息,会报异常
            Console.WriteLine(list.SingleOrDefault(e => e.Name == "孙悟空"));
        }
class Employee
{
public long Id { get; set; }
public string Name { get; set; }
public int Age { get; set; }
public bool Gender { get; set; }
public int Salary{ get; set; }
///
/// C#所有的class和struct都会继承object,而每一个object都会有一个ToString的方法,这里重写该方法
///
/// class Dog
{
public string nickName { get; set; }
public int age { get; set; }
public override string ToString()
{
return $"nickName = {nickName},age={age}";
}
}
static void Main(string[] args)
        {
            List list = new List();
            list.Add(new Employee { Id = 1, Name = "张三", Age = 50, Gender = true, Salary = 50000 });
            list.Add(new Employee { Id = 2, Name = "李四", Age = 40, Gender = false, Salary = 90000 });
            list.Add(new Employee { Id = 3, Name = "赵六", Age = 30, Gender = false, Salary = 30000 });
            list.Add(new Employee { Id = 4, Name = "gati", Age = 34, Gender = true, Salary = 6000 });
            list.Add(new Employee { Id = 5, Name = "jim", Age = 40, Gender = false, Salary = 7000 });
            list.Add(new Employee { Id = 6, Name = "ancle", Age = 24, Gender = false, Salary = 2000 });

            Console.WriteLine("where:");
            IEnumerable employee = list.Where((e) => { return e.Age > 30; });   // employees.Where(e =>  e.Age > 30 );
            foreach(var i in employee)
            {
                Console.WriteLine(i);
            }

            Console.WriteLine("count:");
            Console.WriteLine(list.Count(e => e.Salary > 50000));
            Console.WriteLine(list.Any(e => e.Gender == true));


            // 防御性编程
            Console.WriteLine("single:");
            Console.WriteLine(list.Single(e => e.Name == "张三"));
            // Console.WriteLine(list.Single(e => e.Name == "孙悟空"));//没有该条信息,会报异常
            Console.WriteLine(list.SingleOrDefault(e => e.Name == "孙悟空"));

            //排序
            Console.WriteLine("order:");
            foreach (var i in list.OrderBy(e => e.Salary))
            {
                Console.WriteLine(i);
            }

            //跳过和取
            Console.WriteLine("skip and take:");
            foreach (var i in list.Skip(2).Take(30))
            {
                Console.WriteLine(i);
            }

            //分组
            Console.WriteLine("\r\n groupby:");
            var groupItem = list.GroupBy(e => e.Age);
            foreach(var i in groupItem)
            {
                Console.WriteLine(i.Key);
                foreach(var j in i)
                {
                    Console.WriteLine(j);
                }
                Console.WriteLine("");
            }

            //投影  类似数据库的select
            IEnumerable age_select = list.Select(e => e.Age);   //把所有的年龄取出来
            IEnumerable name_select = list.Select(e => e.Name);
            Console.WriteLine("\r\n 投影:");
            foreach (var i in age_select)
            {
                Console.WriteLine(i);
            }

            IEnumerable dogs = list.Select(e => new Dog { nickName = e.Name, age = e.Age });
            Console.WriteLine("\r\n 投影dog类:");
            foreach (var i in dogs)
            {
                Console.WriteLine(i);
            }

            Console.WriteLine("\r\n 匿名类型:");
            var items = list.Select(e => new{ 姓名 = e.Name,性别 = e.Gender?"男":"女"});
            foreach (var i in items)
            {
                Console.WriteLine(i.姓名+"  "+i.性别);
            }

            //综合语法
            Console.WriteLine("\r\n 综合语法:");
            var items2 = list.GroupBy(e => e.Age).Select(g => new { 年龄 = g.Key, MaxSalary = g.Max(e => e.Salary), minSalary = g.Min(e => e.Salary),人数 = g.Count()});
            foreach (var i in items2)
            {
                Console.WriteLine(i. 年龄 + "  " + i.MaxSalary+ "  " + i.minSalary + "  " + i.人数);

            }
        }

            //类型转化
            IEnumerable items = list.Where(e => e.Salary > 6000);
            List L1 = items.ToList();
            Employee[] arry = items.ToArray();

            //链式语法
            Console.WriteLine("\r\n 链式语法:");
            var list2 = list.Where(e => e.Id > 2).GroupBy(e => e.Age).OrderBy(g => g.Key).Take(3).
                Select(g => new { 年龄 = g.Key, 平均工资 = g.Average(e => e.Salary) });
            foreach(var i in list2)
            {
                Console.WriteLine(i.年龄 + " " + i.平均工资);
            }
split方法可能会掉入的陷阱
split会按照特定字符进行分割,同时返回分割后的字符数组.分割后一定要注意字符前后端是否存在空格,不然会掉入大坑.
通过Linq读取配置文件
  //配置文件接口类
    public interface IConfigService
    {
        string GetValue(string name);
    }

//配置文件实现类
public class IniFileConfig : IConfigService
    {
        public string FilePath { get; set; }
        public string GetValue(string name)
        {
            var kv = File.ReadAllLines(FilePath).Select(s => s.Split('=')).Select(strs => new { Name = strs[0].Trim(), value = strs[1].Trim() }).SingleOrDefault(keyValue => keyValue.Name == name);
            //var kv2 = kv.Select(s => s.Split('='));

            if (kv != null)
            {
                return kv.value;
            }
            else
            {
                return null;
            }
        }
    }

//调用配置文件
   IniFileConfig config = new IniFileConfig();
                string SmtpServer = config.GetValue("SmtpServer");
            string UserName = config.GetValue("UserName");
            string Password = config.GetValue("Password");
linq常见问题
//linq解决面试问题
            int i = 4;
            int j = 5;
            int k = 6;
            int[] nums = new int[] { i,j,k };

            //linq求解
            int max = nums.Max();

            //math处理
            int max2 = Math.Max(i, Math.Max(j, k));

            //三元运算法
            int max3 = (i = i > j ? i : j) > k ? i : k;
            int max4 = i > j ? i > k ? i : k : j > k ? j : k;
            Console.WriteLine(max4);

            //求解平均值
            string s = "1,2,3,4,5,6,7,8,9";
            string[] str = s.Split(',');
            IEnumerable arry = str.Select(e => Convert.ToInt32(e));
            Console.WriteLine(arry.Average());

            var avg = s.Split(',').Select(p => Convert.ToInt32(p));

            //统计字符串字母出现的频率
            Console.WriteLine("\r\n 统计字符串字母出现的频率:");
            string s1 = "hello world,keson,hgongnoring";
            var items4 = s1.Where(c => char.IsLetter(c)).Select(c => char.ToLower(c)).GroupBy(c => c).Select(g => new { g.Key, count = g.Count() })
                .OrderByDescending(g=>g.count).Where(g=>g.count>2);
            foreach(var item in items4)
            {
                Console.WriteLine(item);
            }
注册服务
using System;
using System.Collections.Generic;
using System.Threading.Tasks;
using System.Linq;
using Microsoft.Extensions.DependencyInjection;

namespace ConsoleApp1
{
    class Program
    {
        delegate void delegateFun();
        static void Main(string[] args)
        {
            /*
             * 1 ServiceCollection是内置的反转控制容器;services.BuildServiceProvider是使用容器中服务
             * 2 使用步骤:创建控制容器;向容器中注册方法;使用容器的BuildServiceProvider向容器中获取服务
            */

            //注册服务
            ServiceCollection services = new ServiceCollection();
            //services.AddTransient();
            //services.AddSingleton();
            services.AddScoped();      //同一个scope里拿到的对象是一致的
            using (ServiceProvider sp = services.BuildServiceProvider())
            {
                TestServiceImpl testService = sp.GetRequiredService();
                testService.Name = "keson";
                testService.SayHello();

                TestServiceImpl testService2 = sp.GetRequiredService();
                //Console.WriteLine("testService, testService2:" + object.ReferenceEquals(testService, testService2));

                using (IServiceScope scope1 = sp.CreateScope())
                {
                    TestServiceImpl t = scope1.ServiceProvider.GetService();
                    t.Name = "张三";
                    t.SayHello();

                    TestServiceImpl t1 = scope1.ServiceProvider.GetService();
                    //Console.WriteLine("t, t1:" + object.ReferenceEquals(t, t1));
                    //Console.WriteLine("t, testService:" + object.ReferenceEquals(t, testService));
                }

                using (IServiceScope scope2 = sp.CreateScope())
                {
                    TestServiceImpl t = scope2.ServiceProvider.GetService();
                    t.Name = "李四";
                    t.SayHello();
                }
            }


        }
    }


    public interface ITestServic
    {
        string Name { get; set; }
        void SayHello();

    }

    public class TestServiceImpl : ITestServic,IDisposable
    {
        public string Name { get; set; }

        public void Dispose()
        {
            Console.WriteLine("disposable..........");
        }

        public void SayHello()
        {
            Console.WriteLine($"hi,my {Name}");
        }
    }

    public class TestServiceImpl2 : ITestServic
    {
        public string Name { get; set; }
        public void SayHello()
        {
            Console.WriteLine($"你好,我是{Name}");
        }
    }
}
依赖注入 : 接口 + 实现
using System;
using System.Collections.Generic;
using System.Threading.Tasks;
using System.Linq;
using Microsoft.Extensions.DependencyInjection;

namespace ConsoleApp1
{
    class Program
    {
        delegate void delegateFun();
        static void Main(string[] args)
        {
            /*
             * 1 ServiceCollection是内置的反转控制容器;services.BuildServiceProvider是使用容器中服务
             * 2 使用步骤:创建控制容器;向容器中注册方法;使用容器的BuildServiceProvider向容器中获取服务
            */

            //注册服务
            ServiceCollection services = new ServiceCollection();
            services.AddScoped();   // 接口 + 实现
            services.AddScoped();
            using (ServiceProvider sp = services.BuildServiceProvider())   //当然,你也可以用services.BuildServiceProvider(),这里用变量接一下方便用
            {
                //services.BuildServiceProvider().GetService();
                ITestService ITest = sp.GetService();
                ITest.Name = "孙悟空";
                ITest.SayHello();
                //Console.WriteLine(ITest.GetType());

                ITestService ITest1 = sp.GetRequiredService();     //确定一定有这个服务
                IEnumerable ITest2 = sp.GetServices();   //获取多个服务

                foreach(var i in ITest2)
                {
                    Console.WriteLine(ITest2.GetType());
                }
            }


        }
    }

    public interface ITestService
    {
        string Name { get; set; }
        void SayHello();

    }

    public class TestServiceImpl : ITestService,IDisposable
    {
        public string Name { get; set; }

        public void Dispose()
        {
            Console.WriteLine("disposable..........");
        }

        public void SayHello()
        {
            Console.WriteLine($"hi,I am {Name}");
        }
    }

    public class TestServiceImpl2 : ITestService
    {
        public string Name { get; set; }
        public void SayHello()
        {
            Console.WriteLine($"你好,我是{Name}");
        }
    }
}
通过构造函数依赖注入
这里有一个小细节,所有实现的接口的实现必须是公有的
using System;
using System.Collections.Generic;
using System.Threading.Tasks;
using System.Linq;
using Microsoft.Extensions.DependencyInjection;

namespace ConsoleApp1
{
    class Program
    {
        delegate void delegateFun();
        static void Main(string[] args)
        {
            ServiceCollection services = new ServiceCollection();
            services.AddScoped();
            services.AddScoped();
            services.AddScoped();
            services.AddScoped();
            services.AddScoped();

            using(var sp = services.BuildServiceProvider())
            {
                var c = sp.GetRequiredService();
                c.Test();
            }
            Console.ReadKey();


        }
    }

    class Controller
    {
        private readonly ILog log;
        private readonly IStorage storage;
        public Controller(ILog log,IStorage storage)
        {
            this.log = log;
            this.storage = storage;
        }
        public void Test()
        {
            log.Log("开始上传");
            storage.Save(" 名字 ", " 上传的内容 ");
            log.Log("上传完毕");

        }
    }

    interface ILog
    {
        void Log(string msg);
    }

    class LogImpl : ILog
    {
        public void Log(string msg)
        {
            Console.WriteLine($"日志: {msg}");
        }
    }

    interface IConfig
    {
        string GetValue(string name);
    }

    class ConfigImpl:IConfig
    {
       public string GetValue(string name)
        {
            return "config file";
        }
    }

    interface IStorage
    {
        void Save(string name,string content);
    }

    class StorageImpl:IStorage
    {
        private readonly IConfig config;
        public StorageImpl(IConfig config)
        {
            this.config = config;
        }
        public void Save(string name,string content)
        {
            string server = config.GetValue("server");
            Console.WriteLine($"向服务器为: {server}的文件名为: {name}上传:{content}");
        }
    }

}
接收和发送数据架构

    interface 工业设备
    {
        byte[] ReceiveCanData();
        int SendCanData(byte[] data);
        void ConnectDevice();
    }

    interface 网络设备
    {
        string ReceiveJsonData();
        int SendJsonData();
        void ConnectNet();
    }

    interface 转换站
    {
        string ByteArray2String(byte[] data);

        byte[] String2ByteArray(string s);
    }
配置读取
配置容器
步骤
-
构建配置容器;
-
向配置容器中添加配置文件(json,xml,txt);
-
通过Build()读取配置文件;
            ConfigurationBuilder builder = new();
            builder.AddJsonFile("config.json",optional:true,reloadOnChange:true);
            IConfigurationRoot configRoot = builder.Build();
json文件作为绑定源, 配置类作为绑定目标. 将配置类绑定到配置文件. 配置文件肯定得拿出来才能用, 如果一致放在json文件中,无法用,所以用一个和json配置文件相同的类来接受数据
            //选项类被绑定到 ICconfigurationRoot 接口
            Config config = new Config();
            configurationRoot.Bind(config);

            //选项类被绑定到 ICconfigurationRoot 接口 子类
            Service service = new Service();
            configurationRoot.GetSection("Service").Bind(service);
实例
//json file
{
  "key1": "IamString",
  "key2": 10,
  "key3": true
}
//------------------------------------------------------------------------


using Microsoft.Extensions.Configuration;
using Microsoft.Extensions.Configuration.Json;


class Program
{
    static void Main(string[] args)
    {
        IConfigurationBuilder builder = new ConfigurationBuilder();
        builder.AddJsonFile("appsetting.json", optional: true, reloadOnChange: true);

        var configurationRoot = builder.Build();


        //选项类被绑定到 ICconfigurationRoot 接口
        Config config = new Config();
        configurationRoot.Bind(config);
        Console.WriteLine($"key1:{config.Key1}");
        Console.WriteLine($"key2:{config.Key2}");
        Console.WriteLine($"key3:{config.Key3}");

        //选项类被绑定到 ICconfigurationRoot 接口 子类
        Service service = new Service();
        configurationRoot.GetSection("Service").Bind(service);
        Console.WriteLine($"Service.Host {service.Host}");
        Console.WriteLine($"Service.Host {service.Port}");

        //

        Console.ReadKey();
    }
}

class Config
{
    public string Key1 { get; set; }

    public int Key2 { get; set; }

    public bool Key3 { get; set; }
}

class Service
{
    public string Host { get; set; }

    public string Port { get; set; }

    //不能注入私有属性
    //public string Port { get; private set; } = "999";
}
注册服务
步骤
-
创建一个服务容器;
-
容器对配置类进行注册服务;
services.Configurede{lamda表达式}; -
获取服务
serviceProvider.GetRequiredService>();
//或者
serviceProvider.GetRequiredService>();
实例1
using Microsoft.Extensions.Configuration;
//using Microsoft.Extensions.Configuration.Json;
using Microsoft.Extensions.DependencyInjection;
using Microsoft.Extensions.Options;
using System;


var services = new ServiceCollection();

// 通过.Configure 对选项类进行配置(注册服务)
services.Configure(n =>
{
    n.A = "keson";
    n.B = "";
});

var serviceProvider = services.BuildServiceProvider();

//通过>()获取服务
var myOption = serviceProvider.GetRequiredService>();
MyOption myOptionValue = myOption.Value;
Console.WriteLine(myOptionValue.A);
Console.WriteLine(myOptionValue.B);

public class MyOption
{
    public string A { get; set; }

    public string B { get; set; }
}
实例2
//--------------------------json文件-------------------------------
{
  "name": "keson",
  "age": "28",
  "proxy": {"address": "192.168.1.0","port": "80"}
}


//--------------------------main()-------------------------------
namespace 配置文件
{
    internal class Program
    {
        static void Main(string[] args)
        {
            ServiceCollection services = new();
            services.AddScoped();

            ConfigurationBuilder builder = new();
            /*
             //通过json读取配置文件
             builder.AddJsonFile("config.json",optional:true,reloadOnChange:true);
            */

            //通过命令行读取配置文件 可以在调试中设置 不同参数用空格分开,不能有多余的空格
            builder.AddCommandLine(args);
            IConfigurationRoot configRoot = builder.Build();

            services.AddOptions().Configure(e => configRoot.Bind(e));


            using (var sp= services.BuildServiceProvider())
            {
                //通过一个Controller类来操控Config
                var c2 = sp.GetRequiredService();
                c2.Test();

                //直接操控
                var c = sp.GetRequiredService>();
                c.Value.name = "孙悟空";
                c.Value.age = "500";
                Console.WriteLine(c.Value.name);
                Console.WriteLine("--------------");
                Console.WriteLine(c.Value.age);
            }
        }
    }

    class Config
    {
        public string name { get; set; }
        public string age { get; set; }
        public Proxy proxy { get; set; }
    }

    class Proxy
    {
        public string address { get; set; }
        public int Port { get; set; }
    }
}

//--------------------------Controller-------------------------------
internal class Controller
    {
        //用于访问请求生存期的 TOptions 的值
        private readonly IOptionsSnapshot optconfig;
        public Controller(IOptionsSnapshot optconfig)
        {
            this.optconfig = optconfig;
        }

        public void Test()
        {
            Console.WriteLine(optconfig.Value.name);
            Console.WriteLine("--------------");
            Console.WriteLine(optconfig.Value.age);
        }
    }
扁平化配置
name=如来 age=10000 proxy:address=1.1.1.1 proxy:port=9999 proxy:IDs:0=69 proxy:IDs:1=69
日志系统
日志级别
Trace -> Debug -> Informatio -> Warning -> Error -> Critical
日志记录到控制台
核心代码:
-
引用扩展包
-
将日志记录到控制台
-
设置记录到控制台代码Log Level
using Microsoft.Extensions.Logging;  //记录日志用的扩展包
loggingBuilder.AddConsole();      //将日志记录到控制台
loggingBuilder.SetMinimumLevel(LogLevel.Trace);  //设置最低输出级别信息
完整代码
//----------------Test()类-------------------------
using Microsoft.Extensions.Logging;
using System;
using System.Collections.Generic;
using System.Linq;
using System.Text;
using System.Threading.Tasks;

namespace 日志系统
{
    internal class TestLogging
    {
        private readonly ILogger logger;
        public TestLogging(ILogger logger)
        {
            this.logger = logger;
        }

        public void Test()
        {
            logger.LogDebug("开始执行Logging");
            logger.LogWarning("程序警告");
            logger.LogError("程序失败");

            try
            {
                File.ReadAllText("A://");
                logger.LogDebug("读取文件成功");
            }
            catch (Exception e)
            {
                logger.LogError(e, "读取文件失败");   //将捕获的异常也打印出来
            }
        }
    }
}

//----------------Main()-------------------------
using Microsoft.Extensions.DependencyInjection;
using Microsoft.Extensions.Logging;
using Microsoft.Extensions.Logging.Console;
using 日志系统;

ServiceCollection services = new ServiceCollection();
services.AddLogging(loggingBuilder =>
{
    loggingBuilder.AddConsole();      //将日志记录到控制台
    //loggingBuilder.AddEventLog();  //将日志记录到Windows日志事件中
    loggingBuilder.SetMinimumLevel(LogLevel.Trace);  //设置最低输出级别信息

});

services.AddScoped();

using(var sp = services.BuildServiceProvider())
{
    TestLogging testLogging = sp.GetRequiredService();
    testLogging.Test();
}
日志记录到文本: NLog
官网查看例程
很多时候我们不仅需要从控制台查看日志, 还需要从日志文件上查看, Microsoft.Extensions.Logging不满足需求, 需要引用 NLog.Extensions.Logging . 下面的例图是访问NLog.Extensions.Logging扩展包的方法

复制config代码,注意名字一定要是nlog.config , 存储位置也要修改,直接改为程序的根目录.

Nlog核心代码
NLog是通过Xml实现配置的, 主要有两部分组成: target 和 rules, 先定义目标,通过规则匹配
target:
- type: 输出到文件还是控制台
- name: target的名字,就像你声明一个变量 int a = 5, 引用它的时候,就可以通过name引用.
- filename: 输出文件名字
rules:
- name: 匹配的名字,允许使用正则表达式,例如匹配命名空间的名字
- minlevel: 需要记录的最低日志权限
- wirteTo: 需要输出到的匹配的 target name
<targets>
	<target xsi:type="File" name="allfile" fileName="Test.log"/>
	<target xsi:type="Console" name="lifetimeConsole" />
targets>

<rules>
       	<logger name="*" minlevel="Trace" writeTo="allfile" />
		<logger name="SystemServices.*" minlevel="Warn" writeTo="lifetimeConsole" />
rules>
实例
- Main()
using Microsoft.Extensions.DependencyInjection;
using Microsoft.Extensions.Logging;
//using Microsoft.Extensions.Logging.Console;
using NLog.Extensions.Logging;
using SystemServices;
using 日志系统;

ServiceCollection services = new ServiceCollection();
services.AddLogging(loggingBuilder =>
{
    //loggingBuilder.AddConsole();
    //loggingBuilder.AddEventLog();  //将日志记录到Windows日志事件中
    loggingBuilder.AddNLog();        //日志记录到文本文件
    //loggingBuilder.SetMinimumLevel(LogLevel.Trace);  //设置最低输出级别信息

});

services.AddScoped();
services.AddScoped();

using(var sp = services.BuildServiceProvider())
{
    Test1 test1 = sp.GetRequiredService();
    test1.Test();

    Test2 test2 = sp.GetRequiredService();
    test2.Test();
}
- nlog.config
<nlog xmlns="http://www.nlog-project.org/schemas/NLog.xsd"
      xmlns:xsi="http://www.w3.org/2001/XMLSchema-instance"
      autoReload="true"
      internalLogLevel="Info"
      internalLogFile="internal-nlog-AspNetCore.txt">


	<extensions>
		<add assembly="NLog.Web.AspNetCore"/>
	extensions>


	<targets>

		<target xsi:type="File" archiveAboveSize="100" maxArchiveFiles="10"  name="allfile" fileName="logs/nlog-AspNetCore-all-${shortdate}.log"
				layout="${longdate}|${event-properties:item=EventId_Id:whenEmpty=0}|
				${level:uppercase=true}|${logger}|${message} ${exception:format=tostring}"  />


		<target xsi:type="File" name="ownFile-web" archiveAboveSize="1000" fileName="logs/nlog-AspNetCore-own-${shortdate}.log"
				layout="${longdate}|${event-properties:item=EventId_Id:whenEmpty=0}|
				${level:uppercase=true}|${logger}|${message} ${exception:format=tostring}|url: ${aspnet-request-url}|action: ${aspnet-mvc-action}" />


		<target xsi:type="Console" name="lifetimeConsole" layout="${MicrosoftConsoleLayout}" />
	targets>


	<rules>

		<logger name="*" minlevel="Trace" writeTo="allfile" />

		<logger name="日志系统.*" minlevel="Debug"  writeTo="lifetimeConsole" />

		<logger name="SystemServices.*" minlevel="Warn" maxlevel="Warn" writeTo="lifetimeConsole" />


		<logger name="Microsoft.Hosting.Lifetime" minlevel="Info" writeTo="lifetimeConsole, ownFile-web" final="true" />


		<logger name="Microsoft.*" maxlevel="Info" final="true" />
		<logger name="System.Net.Http.*" maxlevel="Info" final="true" />

		<logger name="*" minlevel="Trace" writeTo="ownFile-web" />
	rules>
nlog>
-
两个Test类
//------------------Test1------------------ using Microsoft.Extensions.Logging; using System; using System.Collections.Generic; using System.Linq; using System.Text; using System.Threading.Tasks; namespace 日志系统 { internal class Test1 { private readonly ILoggerlogger; public Test1(ILogger logger) { this.logger = logger; } public void Test() { logger.LogDebug("Test1开始执行"); logger.LogWarning("Test1程序警告"); logger.LogError("Test1程序失败"); } } } //------------------Test2------------------ using Microsoft.Extensions.Logging; using System; using System.Collections.Generic; using System.Linq; using System.Text; using System.Threading.Tasks; using 日志系统; namespace SystemServices { internal class Test2 { private readonly ILogger logger; public Test2(ILogger logger) { this.logger = logger; } public void Test() { logger.LogDebug("Test2开始执行"); logger.LogWarning("Test2开始执行程序警告"); logger.LogError("Test2开始执行程序失败"); } } }
SeriLog: 结构化日志
以键值对的形式传保存日志
主要代码和Nlog基本一致,只要把 SeriLog添加到容器中就好
using Serilog;
using Serilog.Formatting.Json;

ServiceCollection services = new ServiceCollection();
services.AddLogging(loggingBuilder =>
{
    //loggingBuilder.AddConsole();
    //loggingBuilder.AddEventLog();  //将日志记录到Windows日志事件中
    //loggingBuilder.AddNLog();        //日志记录到文本文件
    //loggingBuilder.SetMinimumLevel(LogLevel.Trace);  //设置最低输出级别信息

    //使用SeriLog
    Serilog.Log.Logger = new LoggerConfiguration()
    .MinimumLevel.Debug()
    .WriteTo.Console(new JsonFormatter())
    .WriteTo.File(new JsonFormatter(), "logs/SeriLog.log")
    .CreateLogger();
    loggingBuilder.AddSerilog();

});
Entity Framework Core
通过C#代码创建表
假设我们要设计这样一张表,我们是不是得一句一句的去写sql语句

操作步骤:
-
先建实体类, 再建实体配置类, 再建数据库配置
-
控制台迁移数据: Add-Migration Init
-
将数据写入数据库: update-database
// 1.建立实体类 internal class Person { public int Id { get; set; } public string Name { get; set; } public int Age { get; set; } public DateTime Birthday { get; set;} public string BirthPlace { get; set; } } //2.配置实体类 internal class PersonEntityConfig:IEntityTypeConfiguration{ public void Configure(EntityTypeBuilder builder) { builder.ToTable("T_Persons"); } } //3.也可以只定义实体类,但不配置,系统会默认配置 internal class Dog { public int Id { get; set; } public string Name { get; set; } } //4.写个数据库配置类 将要写入数据库的类用DbSet 在这里声明,同时该类继承自DbContext.类里重写两个方法,OnConfiguring用啦配置数据的连接 OnModelCreating组装数据模型 internal class MyDbContext:DbContext { public DbSet Books { get; set; } public DbSet Persons { get; set; } public DbSet Dog { get; set; } protected override void OnConfiguring(DbContextOptionsBuilder optionsBuilder) { string connStr = "Server=.;Database=demo1;Trusted_Connection=True;Encrypt=false;"; optionsBuilder.UseSqlServer(connStr); optionsBuilder.LogTo(Console.WriteLine); } protected override void OnModelCreating(ModelBuilder modelBuilder) { base.OnModelCreating(modelBuilder); modelBuilder.ApplyConfigurationsFromAssembly(this.GetType().Assembly); } } //5. 控制台迁移数据: Add-Migration Init; 将数据写入数据库: update-database
通过C#对表进行怎删改查
上面的内容是对数据库的表进行设计, 怎么实现对设计好的表进行增删改查
-------------------------main()-----------------------------

using EF_Core;

using (MyDbContext ctx = new MyDbContext())
{
    //ctx相当于逻辑上的数据库
    Dog d = new Dog();
    d.Name = "旺财";
    ctx.Dog.Add(d);   //把d对象加入Dog这个逻辑上的表里
     //ctx.SaveChanges();
     await ctx.SaveChangesAsync();
}
C#中的事件
- 在类内声明委托
- 在类内声明事件
namespace ConsoleApp1
{
    ///
    /// 事件发布者
    ///
    public class GreetingManager
    {
        ///
        /// 声明一个委托变量
        ///
        ///
        public delegate void display(string name);

        ///
        /// 声明一个事件
        ///
        public event display display_event;  //相当于对委托类型的变量进行封装

        ///
        /// 创建一个处理方法
        ///
        ///
        public void show(string name)
        {
            if (display_event != null)
            {
                display_event(name);
            }
        }
    }

    ///
    /// 订阅者
    ///
    public class GreetWays
    {
        public void EnglishGreeting(string name)
        {
            Console.WriteLine("good moring, " + name);
        }
        public void ChineseGreeting(string name)
        {
            Console.WriteLine("早上好, " + name);
        }
    }


    class Program
    {
        static void Main()
        {
            GreetingManager greetingManager = new GreetingManager();
            GreetWays greetWays = new GreetWays();

            greetingManager.display_event += greetWays.EnglishGreeting;  //事件绑定方法
            greetingManager.display_event += greetWays.ChineseGreeting;
            greetingManager.show("keson"); //调用了show就触发了display_event事件
            Console.ReadKey();
        }
    }
}
    static void Main(string[] args)
    {
        int[] nums = { 11, 52, 69, 33, 54, 2, 9, 23, 66, 45 };
        //IEnumerable result = nums.Where(a=>a > 10);

        //演变顺序
        // 1 先写一个匿名方法
        Action action = delegate (int i) { Console.WriteLine(i); };
        // Action action2 = delegate (i) { Console.WriteLine(i); };   //匿名方法数据类型不能省略
        // Action action3 = delegate (int i)  Console.WriteLine(i); ;  //匿名方法大括号不能省略

        // 2 换成lamada表达式
        Action action4 = (int i) => { Console.WriteLine(i); };  //完整写法
        Action action5 = (i) => { Console.WriteLine(i); };      //数据类型省略
        Action action6 = (i) => Console.WriteLine(i); ;        //大括号省略
        Action action7 = (i) => Console.WriteLine(i);          //分号省略
        Action action8 = i => Console.WriteLine(i);          //入参只有一个时,入参的小括号省略

        //3 如果是有返回值
        Func func1 = delegate (int i)     //先写个匿名方法
        {
            if (i > 0)
                { return true; }
            else
            {
                return false;
            }
        };

        Func func2 = (int i) =>      //换成lamada表达式
        {
            if (i > 0)
            { return true; }
            else
            {
                return false;
            }
        };

        Func func3 = (i) =>      //数据类型省略
        {
            if (i > 0)
            { return true; }
            else
            {
                return false;
            }
        };

        Func func4 = (i) =>      //优化返回代码
        {
            return i > 0;
        };

        Func func5 = (i) =>      //返回语句只有一条语句,省略大括号和return关键字

             i > 0;

        Func func6 = i =>      //入参只有一个,省略入参的括号

             i > 0;


    }
C#不同界面之间互相操作控件
- 主界面可以操作子界面,子界面不可以操作主界面
    //主界面窗口
	public partial class Form1 : Form
    {
        public delegate void Del_main();
        static public Form1 form1 = new Form1();

        public Form1()
        {
            form1 = this;
            InitializeComponent();
        }

        private void button_ok_Click(object sender, EventArgs e)
        {
            Form2.form2.Show();
        }

        private void Form1_FormClosing(object sender, FormClosingEventArgs e)
        {
            Form2.form2.Close();
            Environment.Exit(0);
        }
    }
    public partial class Form2 : Form
    {
        static public Form2 form2 = new Form2();
        public Form2()
        {
            form2 = this;
            InitializeComponent();
        }

        private void form2_button_Click(object sender, EventArgs e)
        {
            Update_textBox_rcvCanData("测试");
        }
        private void Update_textBox_rcvCanData(string text)
        {
            if (Form1.form1.textBox.InvokeRequired)
            {
                //确保是在UI线程调用控件
                Form1.form1.textBox.Invoke(new Action(Update_textBox_rcvCanData), text);

                return;
            }
            Form1.form1.textBox.AppendText(text);
        }

    }
MVVM
-
M model 数据模型
-
V View 界面
-
VM ViewModel 整合业务
WPF 定时器
(System.Threading.Timer)的使用
using System;
using System.Collections.Generic;
using System.ComponentModel;
using System.Linq;
using System.Text;
using System.Threading.Tasks;
using System.Windows;
using System.Windows.Controls;
using System.Windows.Data;
using System.Windows.Documents;
using System.Windows.Input;
using System.Windows.Media;
using System.Windows.Media.Imaging;
using System.Windows.Navigation;
using System.Windows.Shapes;

using System.Windows.Threading;
//using System.Timers;
using System.Threading;

namespace WpfApp2
{
    private Timer timer;
    public partial class MainWindow : Window
    {
        public MainWindow()
        {
            InitializeComponent();
            timer = new Timer(new TimerCallback(timerCall), null, 0, 5000);
        }

        private void timerCall(object state)
        {
            this.Dispatcher.BeginInvoke(new Action(() =>
            {
                tbx3.AppendText("定时器时间到 ");
            }));
        }
    }
}
配置文件读取
public partial class MainWindow : Window
    {
        public string path;
        public MainWindow()
        {
            InitializeComponent();

            path = System.AppDomain.CurrentDomain.BaseDirectory + "Config.ini";
            CreateFile(path);
            ReadConfigFile(path);
        }

        Dictionary DictInitData = new Dictionary();
        public void ReadConfigFile(string path)
        {
            //读取配置文件并保存到字典中
            StreamReader sr = new StreamReader(path);
            string line;
            while ((line = sr.ReadLine()) != null)
            {
                line = line.Trim();
                if (line.StartsWith("#"))
                {
                    continue;
                }

                if (!string.IsNullOrEmpty(line) && line.Contains("="))
                {
                    int equalsIndex = line.IndexOf('=');
                    if (equalsIndex > 0)
                    {
                        string key = line.Substring(0, equalsIndex).Trim();
                        string value = line.Substring(equalsIndex + 1).Trim();
                        DictInitData.Add(key, value);
                    }
                }
            }
            sr.Close();

            if (DictInitData.Count != 3)
            {
                File.Delete(path);
                CreateFile(path);
            }


        }

        private void CreateFile(string path)
        {
            //判断配置文件是否存在,不存在创建一个
            if (!File.Exists(path))
            {
                StreamWriter sw = File.CreateText(path);
                sw.WriteLine("ip=192.168.0.1");
                sw.WriteLine("port=80");
                sw.Flush();
                sw.Close();
            }
        }


    }
UI线程
        private void Update_textBox_rcvGuideData(string text)
        {
            if (this.IsHandleCreated)
                textBox_rcvGuideData.BeginInvoke(new Action(() =>
                {
                    textBox_rcvGuideData.AppendText(text + "\r\n");
                    if (textBox_rcvGuideData.Lines.Length > 500)
                    {
                        textBox_rcvGuideData.Clear();
                    }
                }));
        }
2.5 辨识attribute和property
- property
property针对类和对象来说(C#代码),下面这个类中的name,fun2都叫property
class Person()
{
    string name;
    int age;
    void fun1(){
        //吃饭
    }
        void fun2(){
        //睡觉
    }
}
- attribute
attribute是编程语言文法层面的东西(针对xaml来说),比如button按钮的宽度/高度
链接: link