Spring Boot第五篇 -整合Spring Security
1.环境搭建:JDK1.8+IDEA+Mybatis
1.1 数据库搭建

1.2 映射类Person
package com.example.demo.pojo;

import lombok.AllArgsConstructor;
import lombok.Data;
import lombok.NoArgsConstructor;

@Data
@NoArgsConstructor
@AllArgsConstructor
public class Person {
    //get和set方法,构造器
    private String username;
    private  String password;
    private  String auth;
}
这里需要导入lombok依赖,
			org.projectlombok
			lombok
			true
1.3 Mapper接口personMapper
package com.example.demo.Mapper;

import com.example.demo.pojo.Person;
import org.apache.ibatis.annotations.Mapper;
import org.springframework.stereotype.Component;

import java.util.List;

@Mapper//表示Mapper类接口,表示创建Mapper时需要扫这个接口
@Component
public interface personMapper {
    //根据用户名查询用户
    public Person showuser(String name);

}
1.4配置数据源.yml文件
spring:
  datasource:
    username: root
    password: 123456
    url: jdbc:mysql://localhost:3306/book
    driver-class-name: com.mysql.cj.jdbc.Driver
1.5配置Mapper.xml文件mapper.xml
注:resultType:表示返回类型
id要与Mapper接口中的方法名相同
parameterType是参数类型,要与方法中的参数类型相同,SQL语句中采用#{。。。}引用
在SQL优化中不建议使用 select * 查询,注意namespace中的路径是Mapper接口的类,即 @Mapper注解所在类。
1.6 整合Mybatis和类(在.yml文件中)
mybatis:
  type-aliases-package: com.example.demo.pojo
  mapper-locations: classpath:mapper/*.xml
注意接着行写,.yml文件要求很高,区分大小写,行与行之间不能空
1.7完整的.yml文件
spring:
  datasource:
    username: root
    password: 123456
    url: jdbc:mysql://localhost:3306/book
    driver-class-name: com.mysql.cj.jdbc.Driver
mybatis:
  type-aliases-package: com.example.demo.pojo
  mapper-locations: classpath:mapper/*.xml
2.java代码结构(三层)
web 层 web/servlet/controller
service 层 service
dao 持久层 dao
实体 bean 对象 pojo/entity
JavaBean 类 测试包 test
工具类 utils
分层的目的是为了解耦,降低代码的耦合度
2.1结构图

2.2config包--SecurityConfig类
package com.example.demo.config;
import org.springframework.beans.factory.annotation.Autowired;
import org.springframework.beans.factory.annotation.Qualifier;
import org.springframework.context.annotation.Bean;
import org.springframework.security.config.annotation.authentication.builders.AuthenticationManagerBuilder;
import org.springframework.security.config.annotation.web.builders.HttpSecurity;
import org.springframework.security.config.annotation.web.configuration.EnableWebSecurity;
import org.springframework.security.config.annotation.web.configuration.WebSecurityConfigurerAdapter;
import org.springframework.security.core.userdetails.User;
import org.springframework.security.core.userdetails.UserDetailsService;
import org.springframework.security.crypto.bcrypt.BCryptPasswordEncoder;
import org.springframework.security.crypto.password.PasswordEncoder;
import javax.sql.DataSource;
@EnableWebSecurity // 开启WebSecurity模式
public class SecurityConfig extends WebSecurityConfigurerAdapter {
@Autowired//注入service层配置
private UserDetailsService userDetailsService;
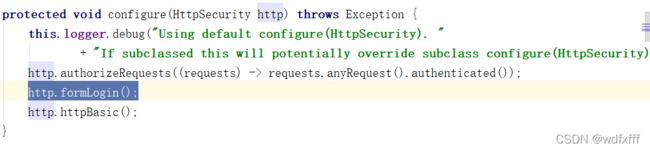
@Override// 请求授权规则
protected void configure(HttpSecurity http) throws Exception {
// index所有人可以访问
//add页面只能具有vip1角色访问
//update页面只能具有vip2角色访问
http.authorizeRequests().antMatchers("/index").permitAll()
.antMatchers("/add").hasRole("vip1")
.antMatchers ( "/update" ).hasRole ( "vip2" );
//Security内置的登录页
http.formLogin ();
//开启记住我功能
http.rememberMe();
//开启注销功能
http.logout ();
}
@Override
protected void configure(AuthenticationManagerBuilder auth) throws Exception {
//用数据库验证用户
auth.userDetailsService ( userDetailsService ).passwordEncoder ( password() );
//自定义用户
/* auth.inMemoryAuthentication().passwordEncoder ( new BCryptPasswordEncoder ( ) )
.withUser("wang").password(new BCryptPasswordEncoder().encode("123456")).roles("vip2")
.and()
.withUser("root").password(new BCryptPasswordEncoder().encode("123456")).roles("vip1","vip2");*/
}
@Bean
public PasswordEncoder password(){
//密码加密
return new BCryptPasswordEncoder ( );
}
}
这些方法在源码中有定义,需要看源码
 BCryptPasswordEncoder这部分的源码介绍我也没看懂,百度了一下,encode方法这个方法中先基于某种规则得到了一个盐值,然后在调用BCrypt.hashpw方法,传入明文密码和盐值salt。

@EnableWebSecurity这个需要看下官方文档,看完照着写就行
注销的动作,起初我是自己写的,但总是报错,看了下源码,它把请求写好了

2.3controller层--MyController
package com.example.demo.controller;

import org.springframework.stereotype.Controller;
import org.springframework.ui.Model;
import org.springframework.web.bind.annotation.RequestMapping;

@Controller
public class MyController {
    @RequestMapping({"/","/index"})
    public String show(Model model){
            model.addAttribute ( "msg","错误" );
            return "index";
        }
      @RequestMapping("/add")
        public String add(){
        return "user/add";
        }

    @RequestMapping("/login")
    public  String login()
    {
        return "views/login";
    }

    @RequestMapping("/update")
        public String update(){
        return "user/update";
        }


}
注意:返回的是请求,不是路径。。。
2.4 service层--MyDetailsService
package com.example.demo.service;

import com.example.demo.Mapper.personMapper;
import com.example.demo.pojo.Person;
import org.springframework.beans.factory.annotation.Autowired;
import org.springframework.security.core.GrantedAuthority;
import org.springframework.security.core.authority.AuthorityUtils;
import org.springframework.security.core.userdetails.User;
import org.springframework.security.core.userdetails.UserDetails;
import org.springframework.security.core.userdetails.UserDetailsService;
import org.springframework.security.core.userdetails.UsernameNotFoundException;
import org.springframework.security.crypto.bcrypt.BCryptPasswordEncoder;
import org.springframework.stereotype.Service;

import java.util.List;

@Service("userDetailsService")
public class MyDetailsService implements UserDetailsService {
    @Autowired   //注入mapper配置信息
    private personMapper personMapper;
    @Override
    public UserDetails loadUserByUsername(String username) throws UsernameNotFoundException {
        Person showuser = personMapper.showuser ( username );
        System.out.println (showuser );
        if (showuser==null)
        {
            System.out.println ("不存在该用户");
        }


        List auths= AuthorityUtils.commaSeparatedStringToAuthorityList ( "vip1" );
        return new User ( showuser.getUsername (),new BCryptPasswordEncoder ().encode ( showuser.getPassword ()),auths );
    }
}
loadUserByUsernam返回的是当前用户信息

@Service("userDetailsService")注意名称要与SecurityConfig类中的@Autowired注入的要相同。不然@Autowired会报错。
3.静态页资源
3.1add.html
    Title


add
3.2update.html
    Title


update
3.3index.html
    Title


首页

add
update
注销
登录页内置了,故当前登录页没啥用。。。
如果运行名称没在数据库找到时,运行会报空指针,但程序时对的,我没有写处理。。。
类似

而且我数据库也没加上角色,只实现了验证登录,角色的话就是表多个属性,感兴趣可以自己完善一下。shiro和Security流行的两大安全框架写完了。。。推荐看狂神的博客。。。
4.完整依赖
			org.springframework.boot
			spring-boot-starter-security


			org.springframework.boot
			spring-boot-starter-jdbc


			org.mybatis.spring.boot
			mybatis-spring-boot-starter
			2.2.1


			org.springframework.boot
			spring-boot-starter-jdbc


			org.springframework.boot
			spring-boot-starter-thymeleaf


			org.springframework.boot
			spring-boot-starter-web


			mysql
			mysql-connector-java
			runtime


			org.projectlombok
			lombok
			true


			org.springframework.boot
			spring-boot-starter-test
			test