MyBatisPlus入门介绍
目录
一、MyBatisPlus介绍
润物无声
效率至上
丰富功能
二、Spring集成MyBatisPlus
三、SpringBoot集成MyBatisPlus
一、MyBatisPlus介绍
MyBatis-Plus(简称 MP)是一个MyBatis的增强工具,在MyBatis的基础上只做增强不做改变,为简化开发、提高效率而生。MyBatisPlus的愿景是成为MyBatis最好的搭档。
官方网址:https://baomidou.com/
下面就是官网的三大小点的介绍了
润物无声
只做增强不做改变,引入它不会对现有工程产生影响,如丝般顺滑。
效率至上
只需简单配置,即可快速进行单表 CRUD 操作,从而节省大量时间。
丰富功能
代码生成、自动分页、逻辑删除、自动填充等功能一应俱全。
以及一些其他的
苞米豆生态圈
- MybatisX (opens new window)- 一款全免费且强大的 IDEA 插件,支持跳转,自动补全生成 SQL,代码生成。
- Mybatis-Mate (opens new window)- 为 MyBatis-Plus 企业级模块,支持分库分表、数据审计、字段加密、数据绑定、数据权限、表结构自动生成 SQL 维护等高级特性。
- Dynamic-Datasource (opens new window)- 基于 SpringBoot 的多数据源组件,功能强悍,支持 Seata 分布式事务。
- Shuan (opens new window)- 基于 Pac4J-JWT 的 WEB 安全组件, 快速集成。
- Kisso (opens new window)- 基于 Cookie 的单点登录组件。
- Lock4j (opens new window)- 基于 SpringBoot 同时支持 RedisTemplate、Redission、Zookeeper 的分布式锁组件。
- Kaptcha (opens new window)- 基于 SpringBoot 和 Google Kaptcha 的简单验证码组件,简单验证码就选它。
- Aizuda 爱组搭 (opens new window)- 低代码开发平台组件库。
二、Spring集成MyBatisPlus
MyBatisPlus官方推荐在SpringBoot工程中使用,Spring工程也可以使用MyBatisPlus,首先我们在Spring中使用MyBatisPlus。
1. 在Mysql中准备数据:
DROP DATABASE IF EXISTS `school`;

CREATE DATABASE `school`;

USE `school`;
DROP TABLE IF EXISTS `student`;
CREATE TABLE `student` (
 `id` int(11) NOT NULL AUTO_INCREMENT,
 `name` varchar(255) DEFAULT NULL,
 `email` varchar(255) DEFAULT NULL,
`gender` varchar(255) DEFAULT NULL,
 `age` int(11) DEFAULT NULL,
 PRIMARY KEY (`id`)
) ENGINE=InnoDB DEFAULT CHARSET=utf8mb4;
创建Maven项目,引入依赖
            com.baomidou
            mybatis-plus
            3.4.2


            mysql
            mysql-connector-java
            8.0.27


            junit
            junit
            4.12
            test


            com.alibaba
            druid
            1.2.6


            org.springframework
            spring-context
            5.3.9


            org.springframework
            spring-orm
            5.3.9


            org.springframework
            spring-test
            5.3.9


            org.projectlombok
            lombok
            1.18.22
创建实体类
import lombok.AllArgsConstructor;
import lombok.Data;
import lombok.NoArgsConstructor;

@Data
@NoArgsConstructor
@AllArgsConstructor
public class Student {
    private Integer id;
    private String name;
    private String email;
    private String gender;
    private Integer age;
}
创建Mapper接口。
使用MyBatis时,在编写Mapper接口后,需要手动编写CRUD方法,并需要在Mapper映射文件中手动编写每个方法对应的SQL语句。而在MyBatisPlus中,只需要创建Mapper接口并继承
BaseMapper,此时该接口获得常用增删改查功能,不需要自己手动编写Mapper配置文件
public interface StudentMapper extends
BaseMapper {
}
创建Spring配置文件applicationContext.xml
测试Mapper方法
import com.example.mpdemo1.pojo.Student;
import org.junit.Test;
import org.junit.runner.RunWith;
import org.springframework.beans.factory.annotation.Autowired;
import org.springframework.test.context.ContextConfiguration;
import org.springframework.test.context.junit4.SpringJUnit4ClassRunner;


@RunWith(SpringJUnit4ClassRunner.class)
@ContextConfiguration(locations = "classpath:applicationContext.xml")
public class MpTest {
    @Autowired
    private StudentMapper studentMapper;

    @Test
    public void testFindAll(){
        Student students = studentMapper.selectById(3);
        System.out.println(students);
    }
}
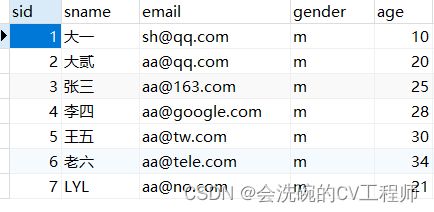
测试结果:
OK,和数据库一模一样。
三、SpringBoot集成MyBatisPlus
接下来我们在SpringBoot项目中使用MyBatisPlus
创建SpringBoot项目,添加MyBatisPlus起步依赖
            mysql
            mysql-connector-java


            com.baomidou
            mybatis-plus-boot-starter
            3.5.0


            org.projectlombok
            lombok


            org.springframework.boot
            spring-boot-starter-test
            test
在SpringBoot配置文件中配置数据源
# 配置数据源
spring:
  datasource:
    driver-class-name: com.mysql.cj.jdbc.Driver
    url: jdbc:mysql:///school?serverTimezone=UTC
    username: root
    password: 666666
创建实体类
import lombok.AllArgsConstructor;
import lombok.Data;
import lombok.NoArgsConstructor;

@Data
@NoArgsConstructor
@AllArgsConstructor
public class Student {
    private Integer id;
    private String name;
    private String email;
    private String gender;
    private Integer age;
}
创建Mapper接口。
同样使用MyBatisPlus时,在编写Mapper接口后,不需要手动编写CRUD方法,并不需要在Mapper映射文件中手动编写每个方法对应的SQL语句。因此MyBatisPlus中,只需要创建Mapper接口并继承BaseMapper,此时该接口获得常用增删改查功能,不需要自己手动编写Mapper配置文件
import com.baomidou.mybatisplus.core.mapper.BaseMapper;
import com.example.mpdemo2.pojo.Student;

public interface StudentMapper extends BaseMapper {
}
在 SpringBoot启动类中添加 @MapperScan 注解,扫描Mapper文件夹
@MapperScan("com.example.mpdemo2.mapper")
测试Mapper方法
@SpringBootTest
class Mpdemo2ApplicationTests {

    @Autowired
    private StudentMapper studentMapper;

    @Test
    public void testFind() {
        Student student = studentMapper.selectById(1);
        System.out.println(student);
    }
}
看运行结果已经非常明了。


