Ceph----CephFS文件系统的使用:详细实践过程实战版
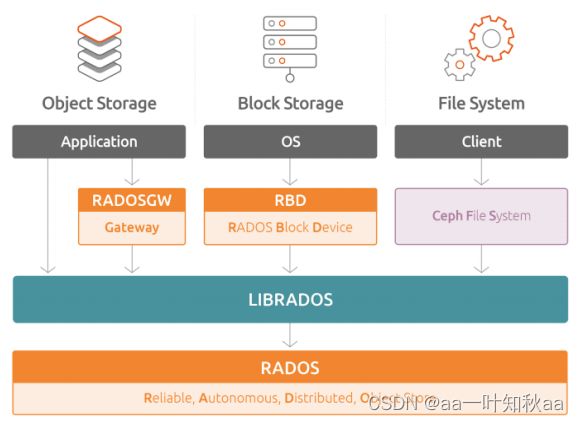
CephFS 介绍
是一个基于 ceph 集群 且兼容 POSIX 标准的文件系统。
创建 cephfs 文件系统时 需要在 ceph 集群中添加 mds 服务,该服务 负责处理 POSIX 文件系统中的 metadata 部分,
实际的数据部分交由 ceph 集群中的 OSD 处理。
cephfs 支持以内核模块方式加载 也支持 fuse(普通用户) 方式加载。无论是内核 模式还是 fuse 模式,
都是通过调用 lib cephfs 库来实现 cephfs 文件 系统的加载,
而 libcephfs 库又调用 librados 库与 ceph 集群进行通 信,从而实现 cephfs 的加载
实验环境
服务器:153 IP:192.168.121.153 系统:Centos7.9 角色:ceph-deploy,osd
服务器:154 IP:192.168.121.154 系统:Centos7.9 角色:osd
服务器:155 IP:192.168.121.155 系统:Centos7.9 角色:osd
服务器:151 IP:192.168.121.151 系统:Centos7.9 角色:客户端
实验步骤
从MDS的部署开始,ceph的部署我前面的博文有详细介绍过,忘记了的话可以去看看
在cepe-deploy节点执行下面的命令在每个节点部署MDS
[root@server153 ceph-cluster]# ceph-deploy mds create server153 server154 server155
然后查看MDS的服务是否启动
[root@server153 ceph-cluster]# ps axu | grep mds
查看mds节点的状况,如下是3个节点都已启动
[root@server153 ceph-cluster]# ceph mds stat
 3 up:standby
然后创建两个新的存储池,一个存储数据,一个存储元数据
需要注意一个存储池只能创建一个cephfs
[root@server153 ceph-cluster]# ceph osd pool create cephfs-test 128 128
pool 'cephfs-test' created
但是多个cephfs可以共用一个元数据的 存储池
[root@server153 ceph-cluster]# ceph osd pool create cephfs-metadata 128 128
pool 'cephfs-metadata' created
查看创建的存储池
[root@server153 ceph-cluster]# ceph osd pool ls
device_health_metrics
cephfs-test
cephfs-metadata
[root@server153 ceph-cluster]# ceph df
--- RAW STORAGE ---
CLASS  SIZE    AVAIL   USED     RAW USED  %RAW USED
hdd    60 GiB  57 GiB  276 MiB   3.3 GiB       5.45
TOTAL  60 GiB  57 GiB  276 MiB   3.3 GiB       5.45

--- POOLS ---
POOL                   ID  PGS  STORED  OBJECTS  USED  %USED  MAX AVAIL
device_health_metrics   1    1     0 B        0   0 B      0     18 GiB
cephfs-test             6  102     0 B        0   0 B      0     18 GiB
cephfs-metadata         7  117     0 B        0   0 B      0     18 GiB
目前我们只是创建了存储池,文件系统还是空的
[root@server153 ceph-cluster]# ceph  fs  ls
No filesystems enabled
接下来创建文件系统
[root@server153 ceph-cluster]# ceph fs ls
name: testfs, metadata pool: cephfs-metadata, data pools: [cephfs-test
Cephfs 有 用户态 fuse 和 内核态 mount 两种使用方式:
接下来两种都实验一遍
用户态fush
在测试服务器客户端151先下载 fuse
[root@server151 ~]# yum install -y ceph-fuse
下载完毕就可以直接挂载使用了
[root@server151 ~]# df | grep /mnt
[root@server151 ~]#  ceph-fuse  -m 192.168.121.153:6789,192.168.121.154:6789,192.168.121.155:6789    /mnt
ceph-fuse[2023-11-22T20:04:20.596+0800 7fe5152aaf40 -1 init, newargv = 0x561047ec4920 newargc=9
107213]: starting ceph client
ceph-fuse[107213]: starting fuse
[root@server151 ~]# df | grep /mnt
ceph-fuse                   18788352       0  18788352   0% /mnt

然后再用服务器155来挂载相同的目录
先在服务器151往挂载的目录中添加点数据
[root@server151 ~]# echo aaaaaaa > /mnt/test.txt
[root@server151 ~]# ls /mnt/
test.txt

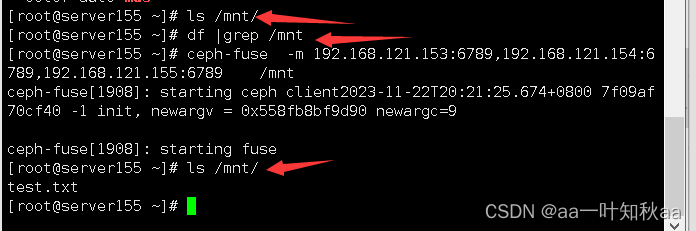
可以看到一开始没有挂载的时候/mnt目录下是没有文件的,挂载上去以后就看到了测试的文件
然后也添加一个文件数据
[root@server155 ~]# ls /mnt/
test.txt
[root@server155 ~]# echo bbbbbbbb > /mnt/bbbbbb.test
去刚才挂载的151服务器查看
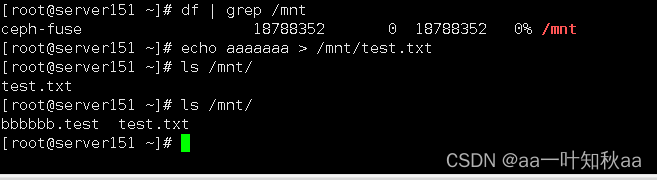
由结果可以看出,cephfs是可以被多台服务器挂载同一个目录和读写的
内核态挂载
现在到内核态的挂载
在需要挂载的服务器安装 ceph-common 包
[root@server151 ~]# yum install ceph-common
然后在服务端创建客户端的认证,注意是在服务端
ceph auth get-or-create client.cephfs-user \
    mon 'allow r' osd 'allow rwx pool=cephfs_data' mds 'allow'  \
    -o /etc/ceph/ceph.client.cephfs-user.keyring

然后查看创建的身份认证信息
[root@server153 ceph-cluster]# ceph auth  list  | grep -A 5 cephfs-user
installed auth entries:

client.cephfs-user
	key: AQDK1l1lhM2kCBAAjVDVQJO022R3cBUMeVrFUQ==
	caps: [mds] allow
	caps: [mon] allow r
	caps: [osd] allow rwx pool=cephfs_data
将认证用户的key输出为文件,并将配置文件及key文件复制到客户端
[root@server153 ceph-cluster]# ceph auth print-key client.cephfs-user -o /etc/ceph/cephfs-user.key
[root@server153 ceph-cluster]# scp  /etc/ceph/ceph.conf   /etc/ceph/cephfs-user.key   192.168.121.151:/etc/ceph/
[email protected]'s password:
ceph.conf                             100%  292   316.0KB/s   00:00
cephfs-user.key                       100%   40    54.3KB/s   00:00
然后就去客户端挂载测试
[root@server151 ~]# mkdir /mounttest
[root@server151 ~]# mount -t ceph 192.168.121.153:6789,192.168.121.154:6789,192.168.121.155:6789:/     /mounttest  -o name=cephfs-user,secretfile=/etc/ceph/cephfs-user.key
[root@server151 ~]# ls /mounttest/
bbbbbb.test  test.txt
这里我先创建了一个测试目录,然后挂载到该目录,可以看到刚才我们添加的测试数据都在
我们只是挂载方式不同,但是文件系统是不变的
cephfs的时候大概就是这样子,希望对大家有帮助