canvas自定义多边形
前言
canvas相对于大家日常开发中已经不陌生, 不管你有没有使用过它的api, 但项目中多多少少都有它的影子, 大致如下
- 炫酷动画的背景, 图形验证码
- 可以捕获窗口中的img, video生成图像, 实时生成海报
- captureStream方法可以实时捕获canvas画布上的变化, 可以搭配直播画板使用
- 在线编辑器
- 画板
今天想分享一个最基础利用canvas绘制多边形的子
思路
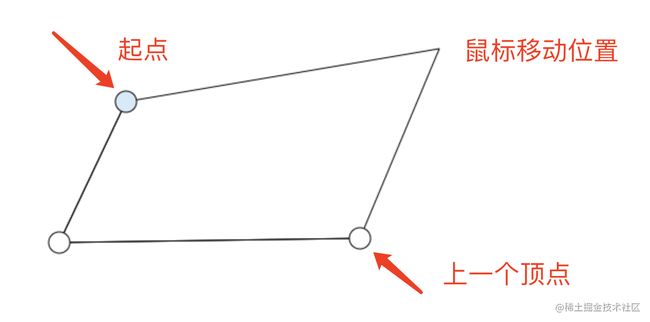
canvas默认自带了绘制矩形和圆形的方法,但你想要自定义图形的话, 只能使用线条连接的方法,我们来定义一下规则,在绘制模式下,鼠标点击的第一点是起点,鼠标在画布中的位置始终和起点相连, 当绘制点超过两个的时候在点击起点的坐标直接定型, 所谓两点成一线, 三点可以形成一个图形, 基本效果如下图所示:
Path2D 和 isPointInPath
Path2D这个是canvas 2D API 的接口用来声明路径, 这个接口相当重要, 因为canvas不像svg能支持dom操作, 自然而然交互性就差了很多, 所以我门更加需要保存路径来为之后的操作做准备。然后你光储存路径是没用的, 这时候isPointInPath就派上用场了, 这个api顾名思义就是判断画布上某个坐标是否在一个图形封闭路径中,返回值false或者true 所以我们在鼠标点击的点为原点, 画一个半径为10的圆(只为了方便点击), 下面统一称呼为锚点, 然后记录下画布上的锚点的路径, 只要鼠标再次回到起点, 当isPointInPath返回为true和点击事件同时触发时候, 不再绘画多边形的点上层的锚点, 图形构建完成。
构建路径
 function draw() {
        ctx.beginPath();
        if (pointArr.length === 0) return

        for (let i = 0; i < pointArr.length; i++) {
          // pointArr保存所有鼠标点击的点
          const { coordinate, status } = pointArr[i]
          if (coordinate.length === 0) return
          // 路径开始
          ctx.beginPath()
          // 将路径中所有坐标连接起来
          for (let j = 0; j < coordinate.length; j++) {
            const { x, y } = coordinate[j]
            ctx.lineTo(x, y)
          }
          // 路径闭合
          ctx.stroke()

          if (status === 'draw') {
            // currentX, currentY是鼠标的实时位置, value由onmousemove赋值
            ctx.lineTo(currentX, currentY)
            // 坐标数组的起点
            ctx.lineTo(coordinate[0].x, coordinate[0].y)
            // 闭合路径
            ctx.stroke()
            // 绘画好线段然后在绘制锚点,注意顺序,反过来的话两条线会展示在圆上
            for (let k = 0; k < coordinate.length; k++) {
              const { x, y } = coordinate[k]
              // 起点的锚点颜色区别于其他锚点
              ctx.fillStyle = k === 0 ? '#D6EAF8' : '#fff'
              // 路径开始
              ctx.beginPath()
              //
              ctx.arc(x, y, 10, 0, 2 * Math.PI)
              ctx.fill()
              ctx.stroke()
            }
          }
        }
      }

const t = setInterval(() => {
        if (currentIndex === -1) return
        // 因为鼠标移动的时候会有N条路径连向起点,但我们只需要最新的点,所以需要不断清空画板然后重绘
        ctx.clearRect(0, 0, window.innerWidth, window.innerHeight)
        draw()
      }, 10)
鼠标的交互
这里的例子关于鼠标的事件有三种, onmousemove和onclick、onmouseup, onclick是确定多边形的各个顶点, onmouseup作用是为了改变鼠标的cursor, onmousemove仪式为了动态绘制鼠标坐标与起点坐标, 上一个顶点坐标的路径
const path1 = new Path2D()

canvas.onmouseup = e => {
        clickToDrag = false
        canvas.style = 'cursor:default'
        pointCanDrag = false
}

canvas.onmousemove = (e) => {
        const { x, y } = e
        if (mode === 'draw') {
          if (
            currentIndex !== -1 &&
            pointArr[currentIndex]?.coordinate?.length > 2
          ) {
            // 每次鼠标移动都判断是否处理在起点的锚点中
            path1.arc(
              pointArr[currentIndex].coordinate[0].x,
              pointArr[currentIndex].coordinate[0].y,
              10,
              0,
              2 * Math.PI
            )
            ctx.stroke()
            isInStartPoint = ctx.isPointInPath(path1, x, y)
          }
        }

        // 实时把鼠标坐标赋值给全局变量
        currentX = x
        currentY = y
      }

canvas.onclick = function (e) {
        // 监听到鼠标点击事件, 鼠标移入起点锚点并且坐标点超过两个, 直接修改status为display, 也就是多边形构建完成
        if (mode === 'draw' && isInStartPoint && pointArr[currentIndex]?.coordinate?.length > 2) {
          const path = new Path2D()
          for (let i = 0; i < pointArr[currentIndex].coordinate.length; i++) {
            const { x, y } = pointArr[currentIndex].coordinate[i]
            path.lineTo(x, y)
          }
          ctx.stroke()
          pointArr[currentIndex] = {
            ...pointArr[currentIndex],
            coordinate: [
              ...pointArr[currentIndex].coordinate,
              {
                x: pointArr[currentIndex].coordinate[0].x,
                y: pointArr[currentIndex].coordinate[0].y,
              },
            ],
            status: 'display',
            path2d: path,
          }
          // currentIndex等于-1代表没有正在操作的图形
          const t1 = setTimeout(() => {
            currentIndex = -1
            clearTimeout(t1)
          }, 11)
        }
      }
后序
关于canvas对图形的涉及的操作内容还是很多的, 这次只是分享了绘制多边形的思路,接下来的话就是对绘制好的图形进行整体拖拽和对图形顶点的拉伸, 有兴趣的同学可以关注一下
代码传送门
