前后端分离-----登录--shiro
一.基础登录
1. 前端布局
(1)进行登录页面的布局

登录
(2)路由配置
将登录页面的跳转路径配置在路由界面,并设置默认进入的首页为登录页面
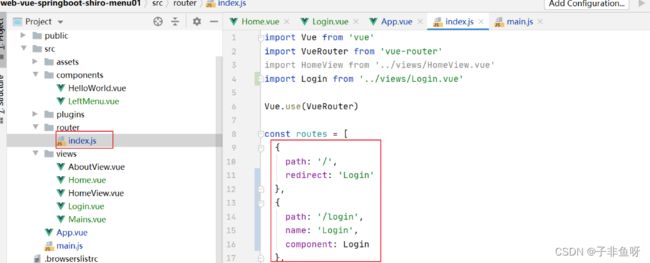
(3)路由渲染
在App.vue页面进行路由渲染--------

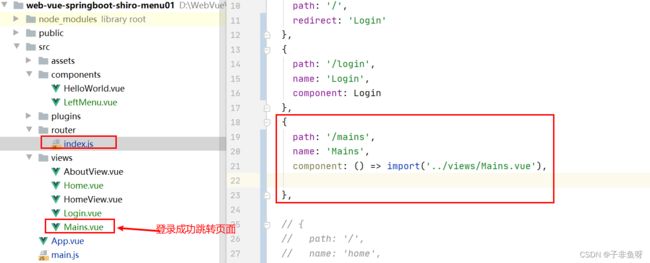
(4)建立登录成功跳转页面并挂载到路由
       获取登录信息


export default {
        name: "Mains",
        components: {

        },
        method:{
            getLogin(){
                var item = sessionStorage.getItem("token");
                console.log(item)
            }
        }

    }
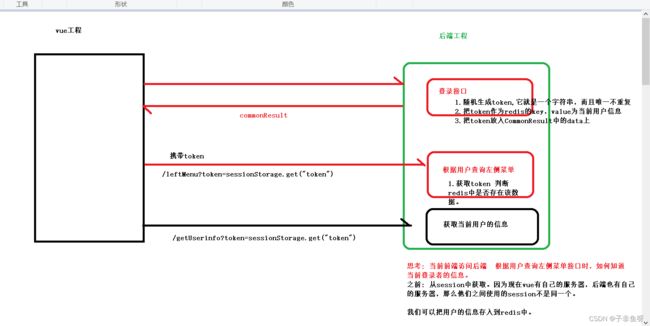
2.后端登录接口
(1) 创建springboot项目

(2)引入相关依赖
            org.apache.shiro
            shiro-spring-boot-starter
            1.7.0


            com.fasterxml.jackson.datatype
            jackson-datatype-jsr310


            org.redisson
            redisson
            3.13.4


            org.springframework.boot
            spring-boot-starter-data-redis


            com.baomidou
            mybatis-plus-generator
            3.5.2


            org.freemarker
            freemarker
            2.3.31


            com.baomidou
            mybatis-plus-boot-starter
            3.5.2


            com.alibaba
            druid-spring-boot-starter
            1.2.8


            com.github.xiaoymin
            swagger-bootstrap-ui
            1.9.6


            com.spring4all
            swagger-spring-boot-starter
            1.9.1.RELEASE


            org.springframework.boot
            spring-boot-starter-web


            org.mybatis.spring.boot
            mybatis-spring-boot-starter
            2.2.2


            mysql
            mysql-connector-java
            runtime


            org.projectlombok
            lombok
            true


            org.springframework.boot
            spring-boot-starter-test
            test
(3)使用mybatis-plus代码生成器自动生成
package com.wt;

import com.baomidou.mybatisplus.generator.FastAutoGenerator;
import com.baomidou.mybatisplus.generator.config.OutputFile;
import com.baomidou.mybatisplus.generator.engine.FreemarkerTemplateEngine;

import java.util.Collections;

public class Generator {
	public static void main(String[] args) {
		//配置相关的数据库连接
		FastAutoGenerator.create("jdbc:mysql://localhost:3306/acl_permission?serverTimezone=Asia/Shanghai", "root", "root")
				.globalConfig(builder -> {
					builder.author("wt") // 设置作者
						.enableSwagger() // 开启 swagger 模式
						.fileOverride() // 覆盖已生成文件
						.outputDir(".\\src\\main\\java\\"); // 指定输出目录
				})
				.packageConfig(builder -> {
					builder.parent("com") // 设置父包名
						.moduleName("wt") // 设置父包模块名
						.pathInfo(Collections.singletonMap(OutputFile.xml, "src\\main\\resources\\mapper\\")); // 设置mapperXml生成路径
				})
				.strategyConfig(builder -> {
					builder.addInclude("acl_role,acl_permission,acl_user,acl_role_permission")// 设置需要生成的表名
						   .addTablePrefix("acl_"); // 设置过滤表前缀
				})
				.templateEngine(new FreemarkerTemplateEngine()) // 使用Freemarker引擎模板,默认的是Velocity引擎模板
				.execute();

	}
}
(4) 配置application文件
server.port=7788

spring.datasource.druid.driver-class-name=com.mysql.cj.jdbc.Driver
spring.datasource.druid.url=jdbc:mysql://localhost:3306/acl_permission?serverTimezone=Asia/Shanghai
spring.datasource.druid.username=root
spring.datasource.druid.password=root


mybatis.mapper-locations=classpath:mapper/*.xml


#日志
mybatis-plus.configuration.log-impl=org.apache.ibatis.logging.stdout.StdOutImpl
(5) controoler层创建接口
@RestController
@RequestMapping("/system")
public class LoginController {

    @Autowired
    private IUserService userService;

    @PostMapping("login")
    public CommonResult login(@RequestBody LoginVo loginVo){
        QueryWrapper wrapper = new QueryWrapper<>();
        wrapper.eq("username",loginVo.getName());
        wrapper.eq("password",loginVo.getPassword());
        wrapper.eq("isdeleted",0);
        User one = userService.getOne(wrapper);
        if(one!=null){
            return new CommonResult(2000,"登录成功",null);
        }else{
            return new CommonResult(5000,"登录失败",null);
        }

    }
}
(6) 测试----解决跨域问题
发现:前端调用后端登录接口时出现如下的错误
 什么是跨域问题:
当使用异步请求从一个网址访问另一个网址时可能会出现跨域问题。
前提:
1. 必须为异步请求
2. 当端口号或协议或ip不同时则会出现跨域
通过Vue前端向后端发送请求会出现两个请求: OPTIONS 请求和真实的请求方式
OPTIONS 请求可以理解为先头部队。---查看后台有没有解决跨域。
如何解决跨域:
1.后端解决:
【1】可以借助nginx.
【2】在代码中解决
6.1 在控制层接口上添加@CrossOrigin 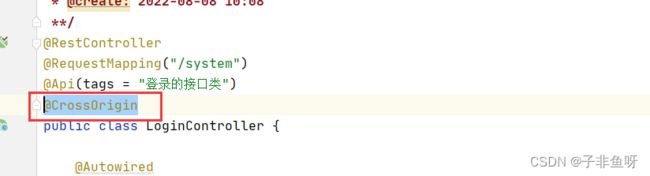
该注解可以配置以下内容:
(origins = {"192.168.0.111:8080","192.168.0.120:8081"},allowedHeaders="运行哪些请求头跨域",methods={"GET","POST"})
origins: 允许哪些域可以跨域访问我这个接口
allowedHeaders:允许哪些请求头信息跨域
methods: 允许哪些请求方式跨域
上面在控制层接口处加上注解的方式虽然解决了跨域问题,但麻烦的地方就需要对每个控制类都加该注解。
6.2 设置一个全局跨域配置类
package com.wt.config;

import org.springframework.context.annotation.Bean;
import org.springframework.context.annotation.Configuration;
import org.springframework.web.cors.CorsConfiguration;
import org.springframework.web.cors.UrlBasedCorsConfigurationSource;
import org.springframework.web.filter.CorsFilter;

/**
 * 解决前后端跨域问题
 */

@Configuration
public class CorsConfig {

    // 当前跨域请求最大有效时长。这里默认1天
    private static final long MAX_AGE = 24 * 60 * 60;

    @Bean
    public CorsFilter corsFilter() {
        UrlBasedCorsConfigurationSource source = new UrlBasedCorsConfigurationSource();
        CorsConfiguration corsConfiguration = new CorsConfiguration();
        corsConfiguration.addAllowedOrigin("*"); // 1 设置访问源地址
        corsConfiguration.addAllowedHeader("*"); // 2 设置访问源请求头
        corsConfiguration.addAllowedMethod("*"); // 3 设置访问源请求方法
        corsConfiguration.setMaxAge(MAX_AGE);
        source.registerCorsConfiguration("/**", corsConfiguration); // 4 对接口配置跨域设置
        return new CorsFilter(source);
    }
}
3.登录的bug
上面咱们写的登录,后端没有保存数据 前端也没有拿到数据进行保存
(1) 修改登录的接口
@RestController
@RequestMapping("/system")
@Api(tags = "登录的接口类")
public class LoginController {
@Autowired
private IUserService userService;
@Autowired
private RedisTemplate redisTemplate;
@PostMapping("login")
@ApiOperation(value="登录接口")
public CommonResult login(@RequestBody LoginVo loginVo){
QueryWrapper wrapper = new QueryWrapper<>();
wrapper.eq("username",loginVo.getName());
wrapper.eq("password",loginVo.getPassword());
wrapper.eq("is_deleted",0);
User one = userService.getOne(wrapper);
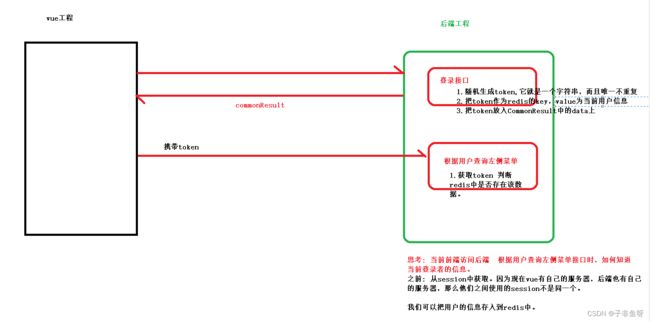
if(one!=null){
//随机生成一个唯一字符串。
String token = UUID.randomUUID().toString();
//把该token作为redis的key value为当前登录用户信息
ValueOperations forValue = redisTemplate.opsForValue();
forValue.set(token,one,24, TimeUnit.HOURS);
return new CommonResult(2000,"登录成功",token);
}else{
return new CommonResult(5000,"登录失败",null);
}
}
} (2) 修改前端登录方法
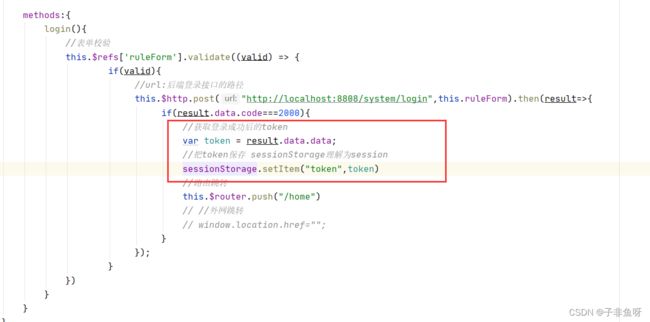
后面每次请求都可以携带该token
(3) 在请求头上添加token
每次请求都得要人为添加参数token. 我们可以使用axios的请求拦截器。
//设置axios的请求拦截器----在请求头上添加token
axios.interceptors.request.use(config=>{
  //从session中获取token的值
  var token = sessionStorage.getItem("token");
  if (token){
    config.headers.token=token
  }
  return config;
})
4. 前置路由守卫
前置路由守卫:就是在路由跳转前加上自己得一些业务代码。

//设置前置路由守卫 to:到哪个路由  from:从哪个路由来  next():放行到指定路由
router.beforeEach((to,from,next)=>{
      //获取跳转得路径
      var path = to.path;
      //判断是否为登录路由路径
      if(path==="/login"){
          console.log("~~~~~~~~~~~~~~~~~~~~~~~~~~~~~~~~~~")
          //放行
          return next();
      }
      //其他路由路径 判断是否登录过
      var token = sessionStorage.getItem("token");
      if(token){
          return next();
      }
      //跳转登录
     return next("/login");
})
二.登录整合shiro
1.引入相关依赖
org.apache.shiro
shiro-spring-boot-starter
1.7.0
2. shiro的配置类
(1) shiro的映射文件配置类 shiroConfig
package com.wt.config;


import com.wt.filter.LoginFilter;
import com.wt.realm.MyRealm;
import org.apache.shiro.authc.credential.CredentialsMatcher;
import org.apache.shiro.authc.credential.HashedCredentialsMatcher;
import org.apache.shiro.realm.Realm;
import org.apache.shiro.spring.web.ShiroFilterFactoryBean;
import org.apache.shiro.web.mgt.DefaultWebSecurityManager;
import org.springframework.beans.factory.annotation.Autowired;
import org.springframework.boot.web.servlet.FilterRegistrationBean;
import org.springframework.context.annotation.Bean;
import org.springframework.context.annotation.Configuration;
import org.springframework.data.redis.core.RedisTemplate;
import org.springframework.web.filter.DelegatingFilterProxy;

import javax.servlet.Filter;
import java.util.HashMap;

/**
 * @Author wt
 * @Date 2022/8/5 15:39
 * @PackageName:com.wt.config
 * @ClassName: ShiroConfig
 * @Description: shiro对应的映射文件
 * @Version 1.0
 */
@Configuration

public class ShiroConfig {
    @Bean
    public DefaultWebSecurityManager securityManager(){
        DefaultWebSecurityManager securityManager=new DefaultWebSecurityManager();
        securityManager.setRealm(realm());
        return securityManager;

    }

    //引入自定义Realm文件
    @Bean
    public Realm realm(){
        MyRealm myRealm=new MyRealm();
        myRealm.setCredentialsMatcher(credentialsMatcher());
        return myRealm;
    }

    //加密配置
    @Bean
    public CredentialsMatcher credentialsMatcher(){
        HashedCredentialsMatcher credentialsMatcher=new HashedCredentialsMatcher();
        credentialsMatcher.setHashAlgorithmName("MD5");
        credentialsMatcher.setHashIterations(1024);
        return credentialsMatcher;
    }

    @Autowired
    private RedisTemplate redisTemplate;
//    拦截器映射
    @Bean(value = "shiroFilter")
    public ShiroFilterFactoryBean filterFactoryBean(){
        ShiroFilterFactoryBean factoryBean = new ShiroFilterFactoryBean();
        factoryBean.setSecurityManager(securityManager());

        //设置拦截规则
        HashMap map=new HashMap<>();
        //登录路径
        map.put("/wt/user/login","anon");
        map.put("/*.html","anon");
//        map.put("*.css","anon");
//        map.put("*.js:*","anon");
//        map.put("*.png","anon");
        map.put("/swagger/**","anon");
        map.put("/v2/api-docs","anon");
        map.put("/swagger-ui.html","anon");
        map.put("/swagger-resources/**","anon");
        map.put("/webjars/**","anon");
        map.put("/favicon.ico","anon");
        map.put("/captcha.jpg","anon");
        map.put("/csrf","anon");

        map.put("/**","authc");
        factoryBean.setFilterChainDefinitionMap(map);

        //设置自定义认证过滤器
        HashMap filterMap=new HashMap();
        filterMap.put("authc",new LoginFilter(redisTemplate));
        factoryBean.setFilters(filterMap);

        return factoryBean;
    }

    @Bean //注册filter
    public FilterRegistrationBean filterRegistrationBean(){
        FilterRegistrationBean filterRegistrationBean=new FilterRegistrationBean<>();
        filterRegistrationBean.setFilter(new DelegatingFilterProxy());
        filterRegistrationBean.setName("shiroFilter");

        filterRegistrationBean.addUrlPatterns("/*");
        return filterRegistrationBean;
    }


}
(2)创建realm对象 ----- MyRealm类
package com.wt.realm;


import com.baomidou.mybatisplus.core.conditions.query.QueryWrapper;
import com.wt.entity.User;
import com.wt.service.IUserService;
import org.apache.shiro.authc.AuthenticationException;
import org.apache.shiro.authc.AuthenticationInfo;
import org.apache.shiro.authc.AuthenticationToken;
import org.apache.shiro.authc.SimpleAuthenticationInfo;
import org.apache.shiro.authz.AuthorizationInfo;
import org.apache.shiro.realm.AuthorizingRealm;
import org.apache.shiro.subject.PrincipalCollection;
import org.apache.shiro.util.ByteSource;
import org.springframework.beans.factory.annotation.Autowired;

/**
 * @Author wt
 * @Date 2022/8/4 15:29
 * @PackageName:com.wt.demo03
 * @ClassName: MyRealm
 * @Description: TODO
 * @Version 1.0
 */
public class MyRealm extends AuthorizingRealm {
    @Autowired
    private IUserService userService;


    //进行权限校验时会执行该方法
    @Override
    protected AuthorizationInfo doGetAuthorizationInfo(PrincipalCollection principalCollection) {
        User primaryPrincipal = (User) principalCollection.getPrimaryPrincipal();
        //根据账号查询该用户具有哪些权限
//        List list = userService.finByPermissionByUsername(primaryPrincipal.getUserid());
//        System.out.println("=============="+list);
//        if (list!=null&&list.size()>0){
//            SimpleAuthorizationInfo info = new SimpleAuthorizationInfo();
//            info.addStringPermissions(list);
//            return info;
//        }
        return null;
    }

    @Override
    protected AuthenticationInfo doGetAuthenticationInfo(AuthenticationToken authenticationToken) throws AuthenticationException {
        //获取账号
        String username = (String) authenticationToken.getPrincipal();
        //通过账号查询数据库内的信息
        QueryWrapper wrapper = new QueryWrapper<>();
        wrapper.eq("username",username);
        wrapper.eq("is_deleted",0);
        User one = userService.getOne(wrapper);
        if (one!=null){
            ByteSource bytes = ByteSource.Util.bytes(one.getSalt());
            SimpleAuthenticationInfo info = new SimpleAuthenticationInfo(one,one.getPassword(),bytes,this.getName());
            return info;
        }
        return null;
    }
}
(3)拦截器
package com.wt.filter;

import com.fasterxml.jackson.databind.ObjectMapper;
import com.wt.vo.CommonResult;
import org.apache.shiro.web.filter.authc.FormAuthenticationFilter;
import org.springframework.beans.factory.annotation.Autowired;
import org.springframework.data.redis.core.RedisTemplate;

import javax.servlet.ServletRequest;
import javax.servlet.ServletResponse;
import javax.servlet.http.HttpServletRequest;
import java.io.PrintWriter;


public class LoginFilter extends FormAuthenticationFilter {


    //当没有登录时会经过该方法、如果想让他返回json数据必须重写该方法
    protected boolean onAccessDenied(ServletRequest request, ServletResponse response) throws Exception {
        response.setContentType("application/json;charset=utf-8");
        PrintWriter writer = response.getWriter();
        CommonResult result = new CommonResult(5001,"请先登录",null);
        ObjectMapper objectMapper = new ObjectMapper();
        String json = objectMapper.writeValueAsString(result);
        writer.print(json); //响应给客户json数据
        writer.flush();
        writer.close();

        System.out.println("================");
        return false;
    }
}
3.修改controller层
package com.wt.controller;

import com.baomidou.mybatisplus.core.conditions.query.QueryWrapper;
import com.wt.entity.User;
import com.wt.service.IUserService;
import com.wt.vo.CommonResult;
import com.wt.vo.LoginForm;
import org.apache.shiro.SecurityUtils;
import org.apache.shiro.authc.UsernamePasswordToken;
import org.apache.shiro.subject.Subject;
import org.springframework.beans.factory.annotation.Autowired;
import org.springframework.data.redis.core.RedisTemplate;
import org.springframework.data.redis.core.ValueOperations;
import org.springframework.web.bind.annotation.PostMapping;
import org.springframework.web.bind.annotation.RequestBody;
import org.springframework.web.bind.annotation.RequestMapping;
import org.springframework.stereotype.Controller;
import org.springframework.web.bind.annotation.RestController;

import javax.jws.soap.SOAPBinding;
import javax.servlet.http.HttpServletRequest;
import java.util.UUID;
import java.util.concurrent.TimeUnit;

/**
 *
 * 用户表 前端控制器
 *
 *
 * @author wt
 * @since 2022-08-09
 */
@RestController
@RequestMapping("/wt/user")
public class UserController {
    @Autowired
    private IUserService userService;

    @Autowired
    private RedisTemplate redisTemplate;

    @PostMapping("/login")
    public CommonResult login(@RequestBody LoginForm loginForm){
        System.out.println(loginForm);
        try {
            Subject subject = SecurityUtils.getSubject();
            UsernamePasswordToken token = new UsernamePasswordToken(loginForm.getUsername(),loginForm.getPassword());
            subject.login(token);   //在shiro配置文件中注册自己的realm方法,lgoin方法执行过程中会调用自己的realm类
            //获取登录后查询的数据
            Object principal = subject.getPrincipal();

            String s = UUID.randomUUID().toString();

            ValueOperations forValue = redisTemplate.opsForValue();
            forValue.set(s,principal,24, TimeUnit.HOURS);
            return new CommonResult(2000,"登录成功",s);
        }catch (Exception e){
            e.printStackTrace();
            return new CommonResult(5000,"登录失败",null);
        }

    }


}
4.测试登录 ----------shiro整合
登录成功后获取用户信息时出现如下得错误 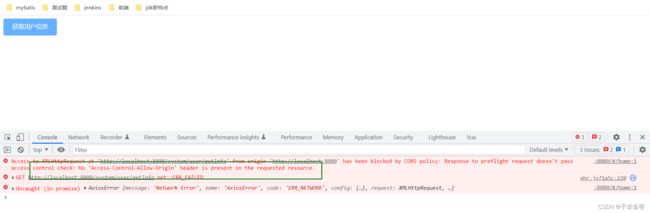
那是因为获取时被shiro的拦截器给拦截了
解决方法---修改拦截器:
import com.fasterxml.jackson.databind.ObjectMapper;
import com.wt.vo.CommonResult;
import org.apache.shiro.web.filter.authc.FormAuthenticationFilter;
import org.springframework.beans.factory.annotation.Autowired;
import org.springframework.data.redis.core.RedisTemplate;

import javax.servlet.ServletRequest;
import javax.servlet.ServletResponse;
import javax.servlet.http.HttpServletRequest;
import java.io.PrintWriter;


//如果类没有交于spring容器来管理 那么该类中得属性也不能让spring帮你注入
public class LoginFilter extends FormAuthenticationFilter {
    @Autowired
    private RedisTemplate redisTemplate;    //LoginFilter必须交于spring容器来管理

    public LoginFilter(RedisTemplate redisTemplate) {
        this.redisTemplate = redisTemplate;
    }

    //当登录成功后执行得方法,如果该方法返回false,则执行onAccessDenied
    @Override
    protected boolean isAccessAllowed(ServletRequest request, ServletResponse response, Object mappedValue) {
        System.out.println(redisTemplate);
        HttpServletRequest req = (HttpServletRequest) request;
        //1.请求方式是否为OPTIONS
        String method = req.getMethod();
        System.out.println("==========="+method);
        if(method!=null && method.equals("OPTIONS")){
            return true;
        }

        //2.判断请求头是否有token值
        String token = req.getHeader("token");
        System.out.println(token);
        if(token!=null && redisTemplate.hasKey(token)){
            return true;
        }
        return false;
    }


    //当没有登录时会经过该方法、如果想让他返回json数据必须重写该方法
    protected boolean onAccessDenied(ServletRequest request, ServletResponse response) throws Exception {
        response.setContentType("application/json;charset=utf-8");
        PrintWriter writer = response.getWriter();
        CommonResult result = new CommonResult(5001,"请先登录",null);
        ObjectMapper objectMapper = new ObjectMapper();
        String json = objectMapper.writeValueAsString(result);
        writer.print(json); //响应给客户json数据
        writer.flush();
        writer.close();

        System.out.println("================");
        return false;
    }
}
shiro映射文件的修改

三.Mains页面的布局----退出登录
1.mains页面的布局

个人信息
退出登录
Footer

2.退出
前端代码:
//下拉得触发事件
            handleCommand(command){
                //退出登录
                if (command==='logout'){
                    this.$http.post("/wt/user/logout").then(result=>{
                        if (result.data.code===2000){
                            sessionStorage.removeItem("token")
                            this.$router.push("/login")
                        }else {
                            this.$message.error(result.data.msg)
                        }

                    })

                }
            },
后端:
//退出方法
@PostMapping("/logout")
public CommonResult logout(HttpServletRequest request){
String token = request.getHeader("token");
System.out.println(token);
if (redisTemplate.hasKey(token)){
redisTemplate.delete(token);
return new CommonResult(2000,"退出成功",null);
}
return new CommonResult(5000,"退出失败",null);
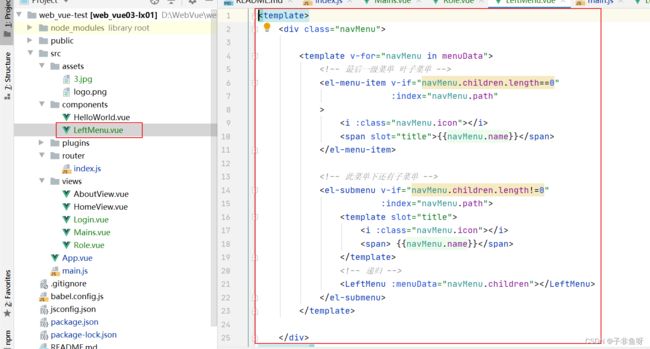
}四.左侧菜单
1.前端
(1) 前端布局
(2) 在components页面创建菜单递归方法
(3) 在mains页面的method中添加查询方法
initLeftMenu(){
                this.$http.post("/wt/permission/leftMenu").then(result=>{
                    if(result.data.code===2000){
                        console.log("=================")
                        console.log(result.data.data)
                        this.leftMenus=result.data.data;
                    }
                })
            },
2. 后端
(1) controller层
package com.wt.controller;

import com.wt.service.IPermissionService;
import com.wt.vo.CommonResult;
import org.springframework.beans.factory.annotation.Autowired;
import org.springframework.data.redis.core.RedisTemplate;
import org.springframework.web.bind.annotation.PostMapping;
import org.springframework.web.bind.annotation.RequestBody;
import org.springframework.web.bind.annotation.RequestMapping;
import org.springframework.stereotype.Controller;
import org.springframework.web.bind.annotation.RestController;

import javax.servlet.http.HttpServletRequest;

/**
 *
 * 权限 前端控制器
 *
 *
 * @author wt
 * @since 2022-08-11
 */
@RestController
@RequestMapping("/wt/permission")
public class PermissionController {

    @Autowired
    private IPermissionService permissionService;

    @Autowired
    RedisTemplate redisTemplate;


    @RequestMapping("leftMenu")
    public CommonResult leftMenu(HttpServletRequest request){
        String token = request.getHeader("token");
        CommonResult result = permissionService.selcByMenuFindAll(token);

        return result;
    }


}
(2) service层
package com.wt.service.impl;

import com.baomidou.mybatisplus.core.conditions.query.QueryWrapper;
import com.wt.entity.Permission;
import com.wt.entity.RolePermission;
import com.wt.entity.User;
import com.wt.mapper.PermissionMapper;
import com.wt.service.IPermissionService;
import com.baomidou.mybatisplus.extension.service.impl.ServiceImpl;
import com.wt.service.IRolePermissionService;
import com.wt.vo.CommonResult;
import org.springframework.beans.factory.annotation.Autowired;
import org.springframework.data.redis.core.RedisTemplate;
import org.springframework.data.redis.core.ValueOperations;
import org.springframework.stereotype.Service;

import java.time.LocalDateTime;
import java.util.ArrayList;
import java.util.HashMap;
import java.util.List;
import java.util.Map;

/**
 *
 * 权限 服务实现类
 *
 *
 * @author wt
 * @since 2022-08-11
 */
@Service
public class PermissionServiceImpl extends ServiceImpl implements IPermissionService {

    @Autowired
    private PermissionMapper permissionMapper;

    @Autowired
    private RedisTemplate redisTemplate;


    @Override
    public CommonResult selcByMenuFindAll(String token) {

        ValueOperations forValue = redisTemplate.opsForValue();
        User tokens = (User) forValue.get(token);
        String id = tokens.getId();
        List list = permissionMapper.seleFindMenuAll(id);

        List firstMenu = new ArrayList<>();
        for (Permission xx:list){
            if (xx.getPid().equals("1")){
                firstMenu.add(xx);
            }
        }

        for (Permission xt: firstMenu){
            xt.setChildren(FindChildren(list,xt.getId()));
        }


        return new CommonResult(2000,"查询成功",firstMenu);
    }


    private Object FindChildren(List list, String id) {
        List secondMenu = new ArrayList<>();
        for (Permission xx:list){
            if (xx.getPid().equals(id)){
                secondMenu.add(xx);
            }
        }
        for (Permission xs:secondMenu){
            xs.setChildren(FindChildren(list,xs.getId()));
        }

        return secondMenu;
    }
}
(3) mapper接口
@Mapper
public interface PermissionMapper extends BaseMapper {

    List seleFindMenuAll(String id);


}
(4) mapper映射文件