ESP32-CAM 在 Web 服务器中拍照和显示
ESP32-CAM 在 Web 服务器中拍照和显示
- 项目简介
-
- 所需部件
- 项目概况
- 安装 ESP32 附加组件
- 安装库
-
- 安装 ESPAsyncWebServer 库
- 安装 ESP32 的异步 TCP 库
- ESP32-CAM 拍摄和显示照片 Web 服务器草图
-
- 代码的工作原理
- 构建网页
- setup()
- 处理 Web 服务器
- loop()
- 拍照
- 示范
项目简介
了解如何使用 ESP32-CAM 开发板构建 Web 服务器,该板允许您发送命令以拍摄照片,并在保存在 SPIFFS 中的浏览器中可视化最新拍摄的照片。我们还添加了在必要时旋转图像的选项。
所需部件
- ESP32-CAM 与 OV2640摄像头模块。
- 母头到母头杜邦线
- CH340G串口下载模块
- 5V电源或移动电源
项目概况
当您访问 Web 服务器时,您将看到三个按钮:
 - 旋转(ROTATE):根据您的 ESP32-CAM 方向,您可能需要旋转照片。
 - 拍摄照片(CAPTURE PHOTO):当您单击此按钮时,ESP32-CAM 会拍摄一张新照片并将其保存在 ESP32SPIFFS 中。
    请至少等待 5 秒钟,然后刷新网页,以确保 ESP32-CAM 拍摄并存储照片;
 - 刷新页面(REFRESH PAGE):单击此按钮时,网页将刷新,并使用最新照片进行更新。
注意:如前所述,拍摄的最新照片存储在 ESP32 SPIFFS 中,因此即使您重新启动开发板,也始终可以访问上次保存的照片。
安装 ESP32 附加组件
我们将使用 Arduino IDE 对 ESP32 开发板进行编程。因此,您需要安装 Arduino IDE 以及 ESP32 附加组件:
打开 Arduino>文件>首选项 在附加开发板管理器网址填写以下网址
https://git.oschina.net/dfrobot/FireBeetle-ESP32/raw/master/package_esp32_index.json
然后打开 Arduino >工具>开发板>开发板管理器 搜索ESP32并下载

如果下载失败 参考这个 :
Arduino–Arduino IDE上安装ESP32开发环境(两种方法)
安装库
要构建 Web 服务器,我们将使用 ESPAsyncWebServer 库。此库还需要异步 TCP 库才能正常工作。请按照以下步骤安装这些库。
安装 ESPAsyncWebServer 库
按照以下步骤安装 ESPAsyncWebServer 库:
- 单击此处下载ESPAsyncWebServer 库。 “下载”文件夹中应该有一个.zip文件夹
- 解压缩.zip文件夹,您应该获得ESPAsyncWebServer-master文件夹
- 将您的文件夹从 ESPAsyncWebServer-master 重命名为 ESPAsyncWebServer
- 将 ESPAsyncWebServer 文件夹移动到 Arduino IDE 安装库文件夹
(下载不成功的话我在下面提供了网盘连接)
或者,下载库后,可以转到 Arduino >项目 >加载库>添加.ZIP 库…,然后选择您刚刚下载的库文件。
安装 ESP32 的异步 TCP 库
ESPAsyncWebServer 库需要 AsyncTCP 库才能工作。请按照以下步骤安装该库:
- 单击此处下载异步 TCP 库。“下载”文件夹中应该有一个.zip文件夹。
- 解压缩.zip文件夹,您应该获得异步TCP主文件夹
- 将文件夹从 AsyncTCP-master 重命名为 AsyncTCP
- 将 AsyncTCP 文件夹移动到 Arduino IDE 安装库文件夹
- 最后,重新打开您的Arduino IDE
(下载不成功的话我在下面提供了网盘连接)
或者,下载库后,可以转到 Arduino >项目 >加载库>添加.ZIP 库…,然后选择您刚刚下载的库文件。
ESP32-CAM 拍摄和显示照片 Web 服务器草图
将以下代码复制到您的 Arduino IDE。此代码构建一个 Web 服务器,允许您使用 ESP32-CAM 拍摄照片并显示最后拍摄的照片。根据 ESP32-CAM 的方向,您可能需要旋转图片,因此我们还包含了该功能。
Rui Santos
Complete project details at https://RandomNerdTutorials.com/esp32-cam-take-photo-display-web-server/
IMPORTANT!!!
- Select Board "AI Thinker ESP32-CAM"
- GPIO 0 must be connected to GND to upload a sketch
- After connecting GPIO 0 to GND, press the ESP32-CAM on-board RESET button to put your board in flashing mode
The above copyright notice and this permission notice shall be included in all
copies or substantial portions of the Software.
*********/
#include "WiFi.h"
#include "esp_camera.h"
#include "esp_timer.h"
#include "img_converters.h"
#include "Arduino.h"
#include "soc/soc.h" // Disable brownour problems
#include "soc/rtc_cntl_reg.h" // Disable brownour problems
#include "driver/rtc_io.h"
#include 代码的工作原理
首先,包括与摄像机配合使用、构建 Web 服务器和使用 SPIFFS 所需的库。
#include "WiFi.h"
#include "esp_camera.h"
#include "esp_timer.h"
#include "img_converters.h"
#include "Arduino.h"
#include "soc/soc.h" // Disable brownout problems
#include "soc/rtc_cntl_reg.h" // Disable brownout problems
#include "driver/rtc_io.h"
#include 接下来,在以下变量中写入您的网络凭证,以便 ESP32-CAM 可以连接到您的本地网络。
const char* ssid = "REPLACE_WITH_YOUR_SSID";
const char* password = "REPLACE_WITH_YOUR_PASSWORD";
创建一个异步网络服务器端口 80 上的对象。
AsyncWebServer server(80);
这拍摄新照片布尔变量指示何时需要拍摄新照片。
boolean takeNewPhoto = false;
然后,定义要保存在 SPIFFS 中的照片的路径和名称。
#define FILE_PHOTO "/photo.jpg"
接下来,为 ESP32-CAM AI THINKER 模块定义相机引脚。
#define PWDN_GPIO_NUM     32
#define RESET_GPIO_NUM    -1
#define XCLK_GPIO_NUM      0
#define SIOD_GPIO_NUM     26
#define SIOC_GPIO_NUM     27
#define Y9_GPIO_NUM       35
#define Y8_GPIO_NUM       34
#define Y7_GPIO_NUM       39
#define Y6_GPIO_NUM       36
#define Y5_GPIO_NUM       21
#define Y4_GPIO_NUM       19
#define Y3_GPIO_NUM       18
#define Y2_GPIO_NUM        5
#define VSYNC_GPIO_NUM    25
#define HREF_GPIO_NUM     23
#define PCLK_GPIO_NUM     22
构建网页
接下来,我们有HTML来构建网页:
const char index_html[] PROGMEM = R"rawliteral(
DOCTYPE HTML><html>
<head>
  <meta name="viewport" content="width=device-width, initial-scale=1">
  <style>
    body { text-align:center; }
    .vert { margin-bottom: 10%; }
    .hori{ margin-bottom: 0%; }
  style>
head>
<body>
  <div id="container">
    <h2>ESP32-CAM Last Photoh2>
    <p>It might take more than 5 seconds to capture a photo.p>
    <p>
      <button onclick="rotatePhoto();">ROTATEbutton>
      <button onclick="capturePhoto()">CAPTURE PHOTObutton>
      <button onclick="location.reload();">REFRESH PAGEbutton>
    p>
  div>
  <div><img src="saved-photo" id="photo" width="70%">div>
body>
<script>
  var deg = 0;
  function capturePhoto() {
    var xhr = new XMLHttpRequest();
    xhr.open('GET', "/capture", true);
    xhr.send();
  }
  function rotatePhoto() {
    var img = document.getElementById("photo");
    deg += 90;
    if(isOdd(deg/90)){ document.getElementById("container").className = "vert"; }
    else{ document.getElementById("container").className = "hori"; }
    img.style.transform = "rotate(" + deg + "deg)";
  }
  function isOdd(n) { return Math.abs(n % 2) == 1; }
script>
html>)rawliteral";
我不会详细介绍此 HTML 的工作原理。我们只是快速概述一下。
基本上,创建三个按钮:旋转; 拍摄照片和刷新页面。每张照片调用不同的 JavaScript 函数:旋转照片(),捕获照片()和重新加载().
<button onclick="rotatePhoto();">ROTATEbutton>
<button onclick="capturePhoto()">CAPTURE PHOTObutton>
<button onclick="location.reload();">REFRESH PAGEbutton>
这 捕获照片() 函数在/捕获指向 ESP32 的 URL,因此它会拍摄一张新照片。
function capturePhoto() {
  var xhr = new XMLHttpRequest();
  xhr.open('GET', "/capture", true);
  xhr.send();
}
这 旋转照片() 功能旋转照片。
function rotatePhoto() {
  var img = document.getElementById("photo");
  deg += 90;
  if(isOdd(deg/90)){ document.getElementById("container").className = "vert"; }
  else{ document.getElementById("container").className = "hori"; }
  img.style.transform = "rotate(" + deg + "deg)";
}
function isOdd(n) { return Math.abs(n % 2) == 1; }
我们不确定使用JavaScript旋转照片的“最佳”方法是什么。此方法非常有效,但可能有更好的方法可以做到这一点。如果您有任何建议,请与我们分享。
最后,以下部分显示照片。
<div><img src="saved-photo" id="photo" width="70%"></div>
当,您单击 刷新 按钮,它将加载最新的图像。
setup()
在 setup(),初始化串行通信:
Serial.begin(115200);
将 ESP32-CAM 连接到本地网络:
WiFi.begin(ssid, password);
while (WiFi.status() != WL_CONNECTED) {
  delay(1000);
  Serial.println("Connecting to WiFi...");
}
初始化 SPIFFS:
if (!SPIFFS.begin(true)) {
  Serial.println("An Error has occurred while mounting SPIFFS");
  ESP.restart();
}
else {
  delay(500);
  Serial.println("SPIFFS mounted successfully");
}
打印 ESP32-CAM 本地 IP 地址:
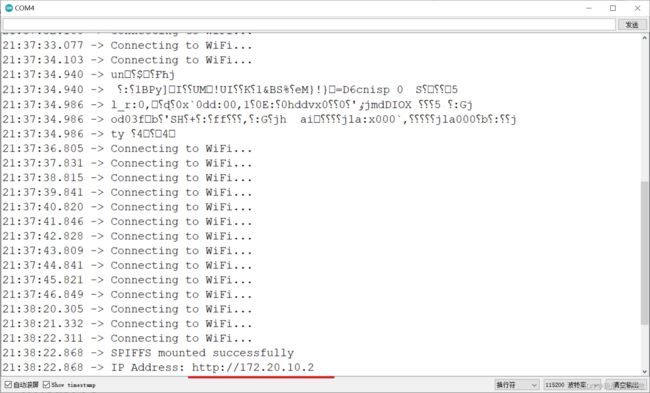
Serial.print("IP Address: http://");
Serial.println(WiFi.localIP());
后面的部分,使用正确的设置配置和初始化相机。
处理 Web 服务器
接下来,我们需要处理当 ESP32-CAM 在 URL 上收到请求时发生的情况。
当 ESP32-CAM 在根 / URL 上收到请求时,我们会发送 HTML 文本来构建网页。
server.on("/", HTTP_GET, [](AsyncWebServerRequest * request) {
  request->send_P(200, "text/html", index_html);
});
当我们按下”捕获“按钮,我们向 ESP32 /capture URL 发送请求。当这种情况发生时,我们设置拍摄新照片变量到真,以便我们知道是时候拍摄新照片了。
server.on("/capture", HTTP_GET, [](AsyncWebServerRequest * request) {
  takeNewPhoto = true;
  request->send_P(200, "text/plain", "Taking Photo");
});
如果 /saved-photo URL 上有请求,请将保存在 SPIFFS 中的照片发送到连接的客户端:
server.on("/saved-photo", HTTP_GET, [](AsyncWebServerRequest * request) {
  request->send(SPIFFS, FILE_PHOTO, "image/jpg", false);
});
最后,启动 Web 服务器。
server.begin();
loop()
在 loop(),如果 拍摄新照片 变量为 True,我们调用 capturePhotoSaveSpiffs() 拍摄新照片并将其保存到 SPIFFS。然后,设置 拍摄新照片 变量到 假 .
void loop() {
  if (takeNewPhoto) {
    capturePhotoSaveSpiffs();
    takeNewPhoto = false;
  }
  delay(1);
}
拍照
草图中还有另外两个函数: 检查照片() 和 capturePhotoSaveSpiffs().
这 检查照片() 函数检查照片是否已成功保存到 SPIFFS。
bool checkPhoto( fs::FS &fs ) {
  File f_pic = fs.open( FILE_PHOTO );
  unsigned int pic_sz = f_pic.size();
  return ( pic_sz > 100 );
}
这 capturePhotoSaveSpiffs() 函数拍摄照片并将其保存到 SPIFFS。
void capturePhotoSaveSpiffs( void ) {
  camera_fb_t * fb = NULL; // pointer
  bool ok = 0; // Boolean indicating if the picture has been taken correctly

  do {
    // Take a photo with the camera
    Serial.println("Taking a photo...");

    fb = esp_camera_fb_get();
    if (!fb) {
      Serial.println("Camera capture failed");
      return;
    }

    // Photo file name
    Serial.printf("Picture file name: %s\n", FILE_PHOTO);
    File file = SPIFFS.open(FILE_PHOTO, FILE_WRITE);

    // Insert the data in the photo file
    if (!file) {
      Serial.println("Failed to open file in writing mode");
    }
    else {
      file.write(fb->buf, fb->len); // payload (image), payload length
      Serial.print("The picture has been saved in ");
      Serial.print(FILE_PHOTO);
      Serial.print(" - Size: ");
      Serial.print(file.size());
      Serial.println(" bytes");
    }
    // Close the file
    file.close();
    esp_camera_fb_return(fb);

    // check if file has been correctly saved in SPIFFS
    ok = checkPhoto(SPIFFS);
  } while ( !ok );
}

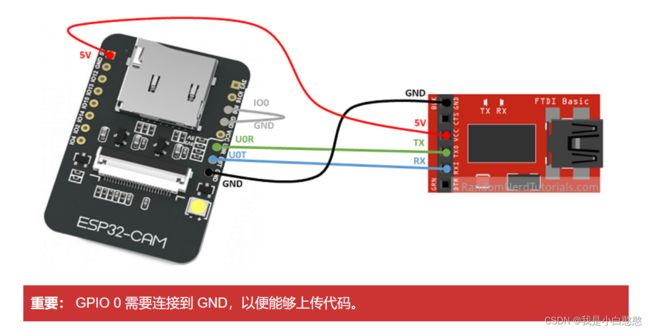
实际上应该CH340G的5V接ESP32-CAM的5V,如图只用3.3V供电电压不稳会报错
要上传代码,请按照以下步骤操作:
- 转到 Arduino >工具>开发板,然后选择 AI-Thinker ESP32-CAM。
- 转到工具>端口,然后选择 ESP32 连接到的 COM 端口。
- 然后,单击上传按钮以上传代码。

- 当您开始在调试窗口中看到这些点(如下所示)时,请按 ESP32-CAM 板载 RST 按钮。

几秒钟后,代码应成功上传到您的开发板。
示范
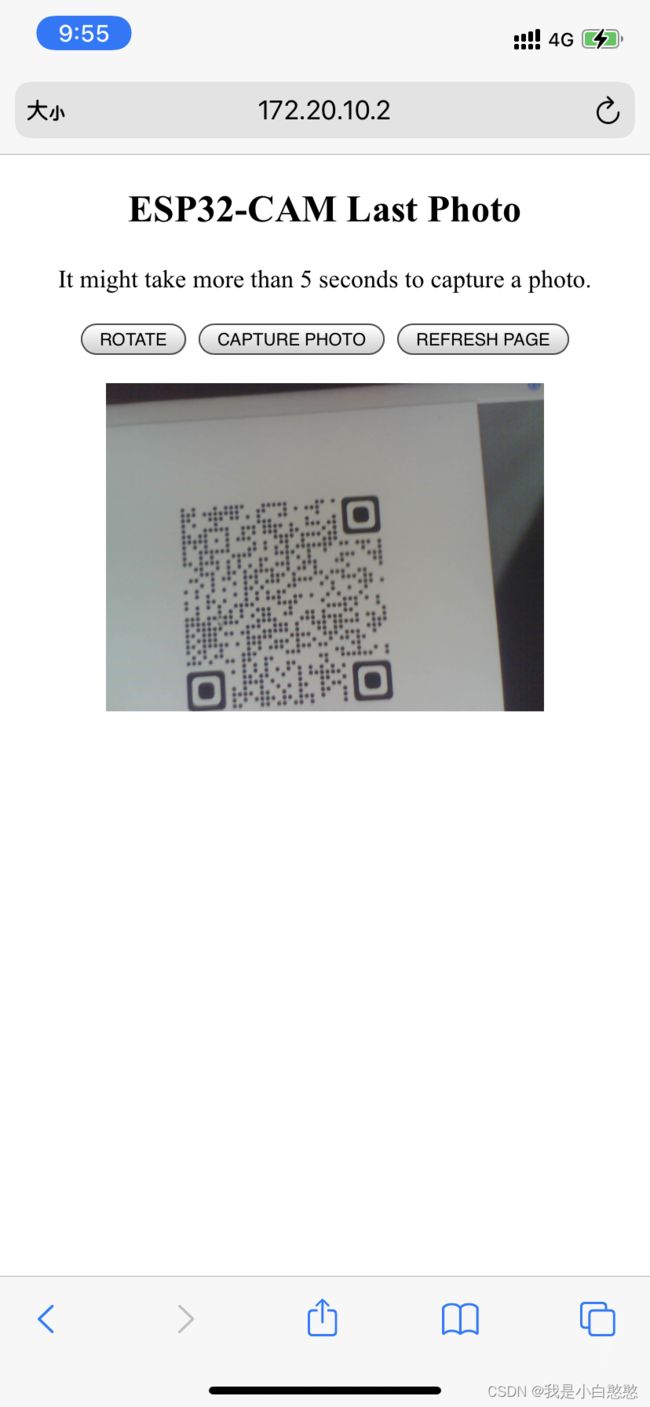
打开浏览器并输入 ESP32-CAM IP 地址。然后,单击“捕获照片”(CAPTURE PHOTO)以拍摄新照片,并等待几秒钟,以便将照片保存在SPIFFS中。

此时在Arduino IDE Serial Monitor窗口中,您应该看到类似的消息:
希望对你有用
我没有撕掉ESP32-CAM 摄像头上的膜,所以照片不是那么清晰。
第一次写文章请多多指教。
库文件下载 提取码:csdn
来源出处


