PySide6 QGraphicsItem paint绘图演示与说明
文章目录
- 前言
- 一、QGraphicsItem是什么?
- 二、使用步骤
-
- - 通过参数painter进行绘制
- - 通过设置子类item绘制
- 小提示:
- 总结
前言
这是一篇关于QGraphicsItem的paint方法重写的详细记录,使用Python和PySide6
一、QGraphicsItem是什么?
它是PySide6中QGraphicsWidget体系的图元,通过场景(scene)管理并使用视图(view)显示它,它可以实现复杂的图形交互,甚至开发游戏
二、使用步骤
首先我们需要定义Item的重绘的区域,调用boundingRect可以实现定义
def boundingRect(self) -> QRectF:
	return QRectF(0, 0, self.width, self.height)
对于boundingRect,我们需要返回应该QRectF对象参数如下:
(left,top)item左上角坐标,正常设置为(0,0)
接下来传入,item的宽和高(width,height)
def paint(self, painter: PySide6.QtGui.QPainter, option: PySide6.QtWidgets.QStyleOptionGraphicsItem, widget: Optional[PySide6.QtWidgets.QWidget] = ...) -> None:
对于paint函数的调用我们需要传入三个参数:
- painter :QPainter对象
- option :QStyleOptionGraphicsItem对象,提供item的基本绘制信息和风格
- widget :QWidget对象(该Item所绘制在的widget对象)
下面是实际上最终调用的代码:(widget=0是绘制在缓存区,似乎None也可以)
def paint(self, painter: QPainter, option, widget=0) -> None:
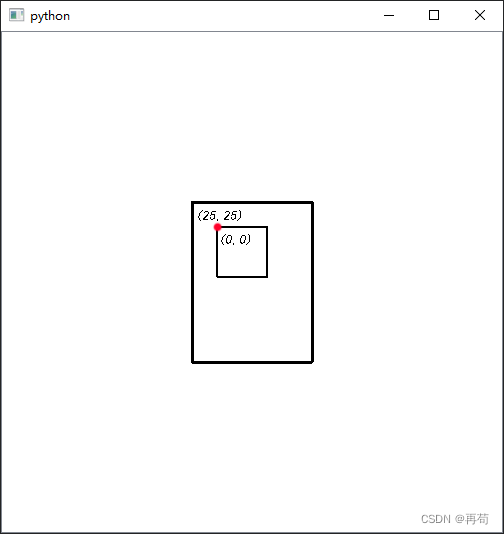
需要注意的是:在paint中绘制的图形坐标和大小尽量不超过boundingRect定义的大小,下面是示意图:(left,top)是item相对圆点(0,0),箭头指向的是正方向+

其次,paint重绘的是item的背景(底层)图形
此时我们开始进行绘制:
- 通过参数painter进行绘制
from PySide6.QtWidgets import QApplication, QGraphicsItem, QGraphicsScene, QGraphicsView
from PySide6.QtGui import QPainter, QPainterPath, QPen
from PySide6.QtCore import Qt, QRectF, QRect


class item(QGraphicsItem):
    def __init__(self, parent=None):
        super().__init__(parent)
        self.width = 120
        self.height = 160
        self.setPos(190, 170)

    def boundingRect(self) -> QRectF:
        return QRectF(0, 0, self.width, self.height)

    def paint(self, painter: QPainter, option, widget=None) -> None:
        painter.setPen(QPen(Qt.black, 3))  # 设置画笔
        # 方法一
        painter.drawRect(0, 0, 120, 160)

        # 方法二
        rectPath = QPainterPath()
        rectPath.addRect(0, 0, 120, 160)
        # 剪切
        # clipPath = QPainterPath()
        # clipPath.addRect(-25,-25,50,50)
        # rectPath = rectPath.subtracted(clipPath)

        painter.drawPath(rectPath)

        # 需要注意的是,Qt 中的角度单位是以 1/16 度为单位的,因此在设置起始角度和弧度时需要将角度值乘以 16。
        # painter.drawArc(0, 0, 25, 25, 90 * 16, 90 * 16)


if __name__ == '__main__':
    app = QApplication([])
    scene = QGraphicsScene()
    scene.setSceneRect(0, 0, 500, 500)
    view = QGraphicsView(scene)
    scene.addItem(item())
    view.show()
    app.exec()
运行结果:

剪切结果:

注意:此时通过painter绘制的图形坐标圆点是相对于item的
- 通过设置子类item绘制
from PySide6.QtWidgets import QApplication, QGraphicsItem, QGraphicsRectItem, QGraphicsScene, QGraphicsView
from PySide6.QtGui import QPainter, QPainterPath, QPen
from PySide6.QtCore import Qt, QRectF, QRect


class item(QGraphicsItem):
    def __init__(self, parent=None):
        super().__init__(parent)
        self.width = 120
        self.height = 160
        self.setPos(190, 170)

    def boundingRect(self) -> QRectF:
        return QRectF(0, 0, self.width, self.height)

    def paint(self, painter: QPainter, option, widget=None) -> None:
        rect = QGraphicsRectItem(0,0,120,160,self)
        rect.setPen(QPen(Qt.black, 3))

        rect_2 = QGraphicsRectItem(25,25,50,50)
        rect_2.setPen(QPen(Qt.black,2))
        rect_2.setParentItem(self)
        # rect_2.setPos(50,50)


if __name__ == '__main__':
    app = QApplication([])
    scene = QGraphicsScene()
    scene.setSceneRect(0, 0, 500, 500)
    view = QGraphicsView(scene)
    scene.addItem(item())
    view.show()
    app.exec()
运行结果图:(红点和坐标为后期P上的)
#设置坐标后:
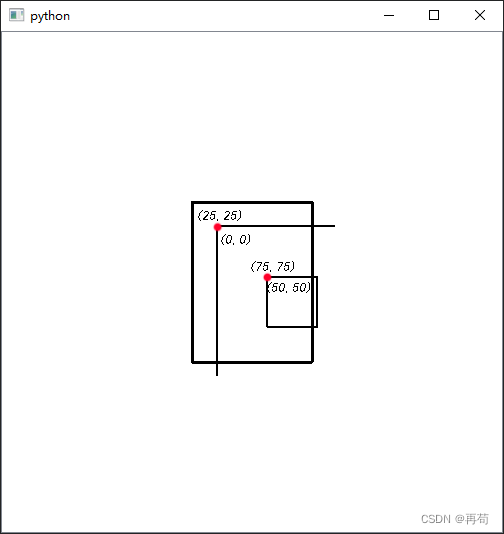
对于此方法:QGraphics_**Item实例化传入的坐标参数,使用的坐标系是相对于父类item(self)的
但如果实例化传入的不是(0,0)是可能会影响的坐标系转换函数,可以理解为使用的是以新坐标(25,25)为圆点,计算设置产生坐标(50,50),但转换函数map_**使用的还是(0,0)所以需要在map_*函数中加上新圆点(25,25)值,才可以得到正确的坐标
print(rect_2.mapToItem(self,0,0)) --> (50,50)
print(rect_2.mapToItem(self,25,25)) --> (75,75)
这里建议是:item实例化参数坐标尽量传入(0,0)与父类item的圆点重合,
统一使用父类item的坐标系
通过设置坐标setPos(),实现上述效果(较统一的坐标系可以提高开发效率和质量)
以下是标准写法:
    def paint(self, painter: QPainter, option, widget=None) -> None:
        rect = QGraphicsRectItem(0,0,120,160,self)
        rect.setPen(QPen(Qt.black, 3))

        rect_2 = QGraphicsRectItem(0,0,50,50)
        rect_2.setPen(QPen(Qt.black,2))
        rect_2.setParentItem(self)
        rect_2.setPos(75,75)
小提示:
- 这两种方法使用场景,大概总结一下:如果想要动态的更新图形建议是不要使用子类item,不然你还需要手动的更新(updata)它们,直接使用painter绘制只需调用一次
- 对于子类item不需要再paint绘制,可以再父类item的其他地方实现,可以实现较高的自定义性(class重写)
- 可能导致图形绘制不正常的原因有:超出boundingRect方法定义的范围,场景(scene)没有定义大小范围(setSceneRect())
- 如果item的图形需要发生改变,或者改变不及时,可以调用update()更新它
- 以下是需要调用和不需要的两种情况:
class item(QGraphicsItem):
    def __init__(self, parent=None):
        super().__init__(parent)
        self.width = 120
        self.height = 160
        self.setPos(190, 170)
        self.isPress = False

    def mousePressEvent(self, event:QGraphicsSceneMouseEvent) -> None:
        super().mousePressEvent(event)
        if event.button() == Qt.MouseButton.LeftButton:#点击左键时
            self.isPress = True
            self.update()
        elif event.button() == Qt.MouseButton.RightButton:#点击右键时
            self.isPress = False
            self.update()

    def boundingRect(self) -> QRectF:
        return QRectF(0, 0, self.width, self.height)

    def paint(self, painter: QPainter, option, widget=None) -> None:
        painter.setPen(QPen(Qt.black,3))
        painter.drawRoundedRect(0,0,120,160,20,20)
        # QGraphicsRectItem(0,0,120,160,self)

        if self.isPress is False:
            painter.drawText(50,50,'请点击')
        else:
            painter.drawText(50,50,'鼠标已点击')
上面代码你可以看到:当我们把self.update()去除时,点击它不会有效果。
但去除QGraphicsRectItem(0,0,120,160,self)的注释,它又可以运行了。通过print()调试,可以观察到没有子类_*item时paint只调用了一次,但有子类item时它不断执行的自我更新重绘,此时可能会导致性能问题。
建议:实例化子类Item尽量不要再paint方法里,除非item本身需要不断动态更新
总结
方法paint重实现虽简单,但也充满了小细节,一不留神就掉进坑里。
多尝试,多踩坑是唯一的办法