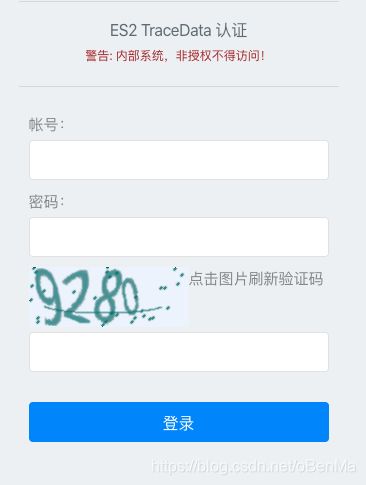
Nginx + Flask搭建LDAP认证--nginx-auth-request-module 的使用
Nginx + Flask搭建LDAP认证--nginx-auth-request-module 的使用
- 需求由来
- 参考
-
- Nginx 的 auth_request 模块
- nginx安装
-
- /etc/nginx/conf.d/auth.conf
需求由来
kibana,Elasticsearch 等业务需要对外服务的时候,头痛了把。传统方法 使用basic认真。用户管理起来麻烦。
公司内部有多个业务开发部门,为了保证这些员工能正常访问 内部一些无法提供认证服务的应用兼顾到系统安全。通过nginx-auth-request-module来实现认证转移。
参考
https://www.cnblogs.com/vipzhou/p/8420808.html
https://github.com/perusio/nginx-auth-request-module
https://www.jianshu.com/p/9f2da3cf5579 (大思路)
Nginx 的 auth_request 模块
auth_request 大抵就是在你访问 Nginx 中受 auth_reuqest 保护的路径时,去请求一个特定的服务。根据这个服务返回的状态码,auth_request 模块再进行下一步的动作,允许访问或者重定向跳走什么的。因此我们可以在上面去定制我们所有个性化的需求。
假定我们的环境是 centos ,yum 安装 nginx 就略了。由于通过 yum 等安装的 nginx 默认没有编译 auth_request 模块。我们需要重新编译一下。
先运行 nginx -V 来获取当前 nginx 的编译参数
nginx安装
本例子,以centos 7.6
yum install epel-release -y
yum install nginx
nginx -V 确认是否带有auth_request模块
[root@vm188-ai ~]# nginx -V
nginx version: nginx/1.16.1
built by gcc 4.8.5 20150623 (Red Hat 4.8.5-39) (GCC)
built with OpenSSL 1.0.2k-fips  26 Jan 2017
TLS SNI support enabled
configure arguments: --prefix=/usr/share/nginx --sbin-path=/usr/sbin/nginx --modules-path=/usr/lib64/nginx/modules --conf-path=/etc/nginx/nginx.conf --error-log-path=/var/log/nginx/error.log --http-log-path=/var/log/nginx/access.log --http-client-body-temp-path=/var/lib/nginx/tmp/client_body --http-proxy-temp-path=/var/lib/nginx/tmp/proxy --http-fastcgi-temp-path=/var/lib/nginx/tmp/fastcgi --http-uwsgi-temp-path=/var/lib/nginx/tmp/uwsgi --http-scgi-temp-path=/var/lib/nginx/tmp/scgi --pid-path=/run/nginx.pid --lock-path=/run/lock/subsys/nginx --user=nginx --group=nginx --with-file-aio --with-ipv6 --with-http_ssl_module --with-http_v2_module --with-http_realip_module --with-stream_ssl_preread_module --with-http_addition_module --with-http_xslt_module=dynamic --with-http_image_filter_module=dynamic --with-http_sub_module --with-http_dav_module --with-http_flv_module --with-http_mp4_module --with-http_gunzip_module --with-http_gzip_static_module --with-http_random_index_module --with-http_secure_link_module --with-http_degradation_module --with-http_slice_module --with-http_stub_status_module --with-http_perl_module=dynamic --with-http_auth_request_module --with-mail=dynamic --with-mail_ssl_module --with-pcre --with-pcre-jit --with-stream=dynamic --with-stream_ssl_module --with-google_perftools_module --with-debug --with-cc-opt='-O2 -g -pipe -Wall -Wp,-D_FORTIFY_SOURCE=2 -fexceptions -fstack-protector-strong --param=ssp-buffer-size=4 -grecord-gcc-switches -specs=/usr/lib/rpm/redhat/redhat-hardened-cc1 -m64 -mtune=generic' --with-ld-opt='-Wl,-z,relro -specs=/usr/lib/rpm/redhat/redhat-hardened-ld -Wl,-E'
Nginx 认证
主要利用nginx-auth-request-module 进行鉴权
- 1、auth_request对应的路由返回401 or 403时,会拦截请求直接nginx返回前台401 or 403信息;
- 2、auth_request对应的路由返回2xx状态码时,不会拦截请求,而是构建一个subrequest请求再去请求真实受保护资源的接口;
graph LR
a[client]-->B[NGINX plus]
B-->c[backend]
c-->B
B-->D(ldap_auth daemon)
D-->E(ldap server)
E-->D
D-->B
graph TB
a[用户请求]-->B[nginx转发请求ldap]
B-->c[LDAP 401]
c-->d[后端发送登录表单]
d-->e[用户提交认证信息]
e-->f[nginx转发cookie给ldap_auth]
f-->g[ldap_auth请求ldap认证]
g-->h{认证成功}
h-.no.->c
h-.yes.->C[LDAP 200]
C-->END
1. 客户端发送 HTTP 请求,以获取 Nginx 上反向代理的受保护资源。

2. Nginx 的 auth_request 模块 将请求转发给 ldap-auth 这个服务(对应 nginx-ldap-auth-daemon.py),首次肯定会给个 401 .

3. Nginx 将请求转发给 http://backend/login,后者对应于这里的后端服务。它将原始请求的 uri 写入X-Target ,以便于后面跳转。

4. 后端服务向客户端发送登录表单(表单在 demo 代码中定义)。根据 error_page 的配置,Nginx 将登录表单的 http 状态码返回 200。

5. 用户填写表单上的用户名和密码字段并单击登录按钮,从向 / login 发起 POST 请求,Nginx 将其转发到后端的服务上。

6. 后端服务把用户名密码以 base64 方式写入 cookie。

7. 客户端重新发送其原始请求(来自步骤1),现在有 cookie 了 。Nginx 将请求转发给 ldap-auth 服务(如步骤2所示)。

8. ldap-auth 服务解码 cookie,然后做 LDAP 认证。

9. 下一个操作取决于 LDAP 认证是否成功
/etc/nginx/conf.d/auth.conf
proxy_cache_path cache/  keys_zone=auth_cache:10m;
server {
        listen       80;
        server_name  xxx.xxx.xxx.xxx;

        location / {
            auth_request /auth;
            error_page 401 = @error401;
            set $mysitename 'ES1 warehouse staff';   # 自定义变量
            auth_request_set $user $upstream_http_x_forwarded_user;
            proxy_set_header X-Forwarded-User $user;
           root /var/www/html;
            proxy_pass http://xxx.xxx.xxx.xxx:33307;   # 认证后目标服务器
            allow 192.168.0.0/16;  # 增加白名单
            allow 10.0.0.0/8;
            deny all;
        }


        location @error401 {
             add_header Set-Cookie "NSREDIRECT=$scheme://$http_host$request_uri;Path=/";
             add_header Set-Cookie "NSREDIRECTSITENAME=$mysitename";
              return 302  /login;
        }

       location /login {
          proxy_pass http://127.0.0.1:8001/login;
        }

    	location /logout {
    	    proxy_pass http://127.0.0.1:8001/logout;
    	    }
        location /auth {
          internal;
            proxy_pass http://127.0.0.1:8001/auth;
            proxy_set_header Host $host;
            proxy_pass_request_body off;
            proxy_set_header Content-Length "";
        }
      location /static { proxy_pass http://127.0.0.1:8001/static;}
      location /captcha { proxy_pass http://127.0.0.1:8001/captcha;}


}
Flask
目录架构
.
├── app.py
├── config.py
├── mycaptcha.py
├── run.py
├── static
│   ├── captcha
│   ├── favicon.ico
│   ├── images
│   │   ├── avatar.png
│   │   ├── bg.svg
│   │   ├── login-bg.jpg
│   │   ├── loginbg.jpg
│   │   └── logo.png
│   ├── js
│   │   ├── jquery-3.3.1.min.js
│   │   ├── main.js
│   │   └── template-web.js
│   └── style
│       └── style.css
├── templates
│   └── login.html
└── views.py
run.py
#!`which python`

from app import app

app.run(host='0.0.0.0',port=8001)
app.py
# coding: utf-8
import json

from flask import Flask, url_for, request, session, make_response, abort
from flask_ldap3_login import LDAP3LoginManager
from flask_login import LoginManager, login_user, UserMixin, current_user, logout_user, login_required
from flask import render_template_string, redirect, render_template, flash, get_flashed_messages
from flask_ldap3_login.forms import LDAPLoginForm
import re
import ldap3
from config import *

import string, random, time
from mycaptcha import Captcha
import os
from datetime import timedelta
import hashlib

app = Flask(__name__)
app.config['SECRET_KEY'] = 'secret'
app.config['DEBUG'] = True

# Setup LDAP Configuration Variables. Change these to your own settings.
# All configuration directives can be found in the documentation.


# session
app.config['SECRET_KEY'] = os.urandom(24)
app.config['PERMANENT_SESSION_LIFETIME'] = timedelta(minutes=30)

# Hostname of your LDAP Server
app.config['LDAP_HOST'] = LDAPURL

# Base DN of your directory
app.config['LDAP_BASE_DN'] = 'dc=xxx,dc=cn'

# Users DN to be prepended to the Base DN
app.config['LDAP_USER_DN'] = 'ou=staff'

# Groups DN to be prepended to the Base DN
app.config['LDAP_GROUP_DN'] = 'ou=g'

# The RDN attribute for your user schema on LDAP
app.config['LDAP_USER_RDN_ATTR'] = 'cn'

# The Attribute you want users to authenticate to LDAP with.
app.config['LDAP_USER_LOGIN_ATTR'] = 'mail'

# The Username to bind to LDAP with
app.config['LDAP_BIND_USER_DN'] = LDAPUSER

# The Password to bind to LDAP with
app.config['LDAP_BIND_USER_PASSWORD'] = LDAPPASSWD

login_manager = LoginManager(app)  # Setup a Flask-Login Manager
ldap_manager = LDAP3LoginManager(app)  # Setup a LDAP3 Login Manager.

login_manager.session_protection = "strong"  # 保护session和cookie 2019-01-16

# Create a dictionary to store the users in when they authenticate
# This example stores users in memory.
users = {}


# Declare an Object Model for the user, and make it comply with the
# flask-login UserMixin mixin.
class User(UserMixin):
    def __init__(self, dn, username, data):
        self.dn = dn
        self.username = username
        self.data = data

    def __repr__(self):
        return self.dn

    def get_id(self):
        return self.dn


# Declare a User Loader for Flask-Login.
# Simply returns the User if it exists in our 'database', otherwise
# returns None.
@login_manager.user_loader
def load_user(id):
    if id in users:
        return users[id]
    return None


# Declare The User Saver for Flask-Ldap3-Login
# This method is called whenever a LDAPLoginForm() successfully validates.
# Here you have to save the user, and return it so it can be used in the
# login controller.
@ldap_manager.save_user
def save_user(dn, username, data, memberships):
    user = User(dn, username, data)
    users[dn] = user
    return user


@app.route('/ip')
def ip():
    return request.remote_addr


# Declare some routes for usage to show the authentication process.
@app.route('/')
def home():
    # Redirect users who are not logged in.
    if not current_user or current_user.is_anonymous:
        return redirect(url_for('login'))
    resp = make_response('欢迎你 ' + current_user.displayName )
    return resp, 200


@app.route('/captcha', methods=['GET', 'POST'])
def get_captcha():
    mc = Captcha()
    session['captcha'] = mc.code
    print(session['captcha'])
    return '/' + mc.img


@app.route('/auth')
def auth():
    # Redirect users who are not logged in.
    if not current_user or current_user.is_anonymous:
        app.logger.info('you not auth, please login')
        resp= make_response('系统找不到你的登陆信息,请重新登陆')
        return resp, 401

    html = '''
    欢迎你 +  ''' +  current_user.data['displayname'] +'''
    '''
    return html


@app.route('/login', methods=['GET', 'POST'])
def login():
    sitename = ''
    if 'NSREDIRECTSITENAME' in request.cookies:
        sitename = request.cookies.get('NSREDIRECTSITENAME')
    url = ''
    if 'NSREDIRECT' in request.cookies:
        url = request.cookies.get('NSREDIRECT')

    if current_user and not current_user.is_anonymous :
        resp = make_response('+url+'" />你已经登陆过!不要重复登陆!')
        return resp, 200
    form = LDAPLoginForm()
    if 'captcha' not in session:
        mc = Captcha()
        session['captcha'] = mc.code
    if request.method == 'GET':
        mc = Captcha()
        session['captcha'] = mc.code

        user = ''
        if request.args:
            # for r in request.args:
            user = request.args.get('username')
            if not re.search('@',user):
                user += '@sxxxs.com'

        return render_template('login.html', user=user, form=form, img_captcha=mc.img,sitename=sitename,url=url)

    if request.method == 'POST':
        user = ''
        passwd = ''
        if 'username' in request.form:
            user = request.form['username']
            if request.form['username'] and not re.search(r'@',user):
                user += '@sxxxs.com'

        if not request.form['captcha'].upper() == session['captcha'].upper():

            print('request : ' + request.form['captcha'].upper())
            print('session: ' + session['captcha'].upper())
            flash('验证码错误,请重新输入','danger')

            mc = Captcha()
            session['captcha'] = mc.code

            return render_template('login.html', form=form, img_captcha=mc.img, user=user, sitename=sitename,url=url)

        if form.validate_on_submit():
            # Successfully logged in, We can now access the saved user object
            # via form.user.
            login_user(form.user)  # Tell flask-login to log them in.
            resp = make_response("")
            resp.set_cookie('Name', user)
            app.logger.info('user ' + user + ' login!')

            if 'NSREDIRECT' in request.cookies:
                url = request.cookies.get('NSREDIRECT')

                app.logger.info('redirect to url: ' + url)
                #request.headers.set('Location',url)
                return redirect(url)
            return 'you login!'


        else:
            mc = Captcha()
            session['captcha'] = mc.code
            flash('登陆失败,请重试!','danger')
            app.logger.warn(request.form['username'] + ' login error')
            return render_template('login.html', form=form, img_captcha=mc.img, user=user, password=passwd,
                                   sitename=sitename, url=url)

    # mc = Captcha()
    # session['captcha'] = mc.code
    # return redirect('/login')


@app.route('/logout')
def logout():
    flash(' 注销成功!','success')
    url = request.cookies.get('NSREDIRECT')
    logout_user()

    return redirect(url)


if __name__ == '__main__':
    app.debug = True
    app.run(host='0.0.0.0', port=8000)
config.py
DEBUG = True
LDAPUSER='[email protected]'
LDAPPASSWD='xxxxxx'
LDAPURL='dc.xxx.xxx.cn'
LDAPBASE='OU=staff,DC=xxx,DC=cn'
LDAPGROUPBASE='OU=g,DC=xxx,DC=cn'

CAPTCHA_LEN=4
# 验证码类型 1 数字,2 数字+大写字母
CAPTCHA_TYPE=1
mycaptcha.py
from captcha.image import ImageCaptcha
import random
from config import CAPTCHA_TYPE, CAPTCHA_LEN
import time
import os
from flask import current_app

class Captcha:
    code = None
    def __init__(self):
        '''

        '''
        if CAPTCHA_TYPE == 1:
            self.ca = '02345689'
        else:
            self.ca = '02345689abcdefghjkmnpqrstuvwxyzABCDEFGHJKMNPQRSTUVWXYZ'
        self.create()

    def create(self):
        self.code = ''.join(random.sample(self.ca, CAPTCHA_LEN))
        now=time.time()

        path=  './static/captcha/'

        if not os.path.exists( path):
            os.makedirs(path)
        self.img =  path  + str(now)+ '.png'
        image = ImageCaptcha()
        image.write(self.code,  self.img)
views.py
from flask_login import  login_required, login_fresh, LoginManager
from flask import  Flask

app=Flask(__name__)
LoginManager.init_app(app)
templates/login.html
<html>
<head>
    <meta charset="utf-8"/>
    <meta http-equiv="X-UA-Compatible" content="IE=edge">

    <title>xxxx登陆认证系统title>
    <meta name="viewport" content="width=device-width, initial-scale=1">

    <link href="https://cdn.bootcss.com/bootstrap/4.1.1/css/bootstrap.min.css" rel="stylesheet">
head>
<body>
<div class="main">
    <div class="login-bg">div>
    <div class="login-box">
        <div class="logo">
        <hr>
             <p class="text-muted">
            {% if sitename %}
                {{ sitename }} 认证<br/>
            {% endif %}
                <span style="color:brown;font-size:12px">警告: 内部系统,非授权不得访问!span>
            p>
        div>
        <hr>
        {% if  get_flashed_messages() %}
        <p class="error-text" id="error">
         <ul style="list-style: none;">
            {% with messages = get_flashed_messages(with_categories=true) %}
                {% if messages %}

                        {% for cat,message in messages %}
                            <li class="{% if cat %} text-{{ cat }} {% else %}text-danger{% endif %}" >{{ message }}
                        {% endfor %}

                {% endif %}
            {% endwith %}
        {% for k,v in form.errors.items() %}
            <li class="text-danger">
            {% if v[0] == 'Invalid Username/Password.' %}
                用户名或密码错误,或者未授权,请找运维开通权限
            {% endif %}
        {% endfor %}
            ul>
        p>
        {% endif %}
        <div class="login-form">
            <form method="POST">
                <div class="form-item">
                    {% if username %}
                        <label >帐号: <input id='username' name='username' value="{{ username }}"
                                                                readonly>label>
                        <label style="color:darkgreen">密码: <input id='password' name='password' value='{{ password }}'
                                                                  type="password">label>
                    {% elif user %}
                        <label>帐号: <input id='username' name='username' value='{{ user }}'>label>
                        <label >密码: <input id='password' name='password' value='{{ password }}'
                                                                 type="password">label>
                    {% else %}
                        <label >帐号: <input id='username' name='username' value="">label>

                        <label >密码: <input id='password' name='password' value=''
                                                                  type="password">label>

                    {% endif %}
                    <label> <img id='img_captcha' src="{{ img_captcha }}" style="display: block;float:left;"
                                 onclick="change_img()"/>

                        点击图片刷新验证码 <input id='captcha' name='captcha'>
                        <script>
                            function change_img() {
                                var img = document.getElementById('img_captcha')
                                var ajax = new XMLHttpRequest()
                                ajax.open('get', '/captcha')
                                ajax.send()
                                ajax.onreadystatechange = function () {
                                    if (ajax.readyState == 4 && ajax.status == 200) {
                                        //步骤五 如果能够进到这个判断 说明 数据 完美的回来了,并且请求的页面是存在的
                                        console.log(ajax.responseText);//输入相应的内容
                                        img.src = ajax.responseText
                                    }
                                }
                            }
                        script>
                    label>
                div>

                <div class="form-item">
                    <input id="submit" name="submit" type="submit" value="登录">


                    {{ form.hidden_tag() }}
                div>

            form>
        div>
    div>
div>
<script src="./static/js/jquery-3.3.1.min.js">script>
<script src="./static/js/main.js">script>
body>

html>
<hr>
<p class="text-muted">
{% if sitename %}
{{ sitename }} 认证<br/>
{% endif %}
<span style="color:brown;font-size:12px">警告: 内部系统,非授权不得访问!span>
p>
div>
<hr>
{% if get_flashed_messages() %}
<p class="error-text" id="error">
<ul style="list-style: none;">
{% with messages = get_flashed_messages(with_categories=true) %}
{% if messages %}
{% for cat,message in messages %}
<li class="{% if cat %} text-{{ cat }} {% else %}text-danger{% endif %}" >{{ message }}
{% endfor %}
{% endif %}
{% endwith %}
{% for k,v in form.errors.items() %}
<li class="text-danger">
{% if v[0] == 'Invalid Username/Password.' %}
用户名或密码错误,或者未授权,请找运维开通权限
{% endif %}
{% endfor %}
ul>
p>
{% endif %}
<div class="login-form">
<form method="POST">
<div class="form-item">
{% if username %}
<label >帐号: <input id='username' name='username' value="{{ username }}"
readonly>label>
<label style="color:darkgreen">密码: <input id='password' name='password' value='{{ password }}'
type="password">label>
{% elif user %}
<label>帐号: <input id='username' name='username' value='{{ user }}'>label>
<label >密码: <input id='password' name='password' value='{{ password }}'
type="password">label>
{% else %}
<label >帐号: <input id='username' name='username' value="">label>
<label >密码: <input id='password' name='password' value=''
type="password">label>
{% endif %}
<label> <img id='img_captcha' src="{{ img_captcha }}" style="display: block;float:left;"
onclick="change_img()"/>
点击图片刷新验证码 <input id='captcha' name='captcha'>
<script>
function change_img() {
var img = document.getElementById('img_captcha')
var ajax = new XMLHttpRequest()
ajax.open('get', '/captcha')
ajax.send()
ajax.onreadystatechange = function () {
if (ajax.readyState == 4 && ajax.status == 200) {
//步骤五 如果能够进到这个判断 说明 数据 完美的回来了,并且请求的页面是存在的
console.log(ajax.responseText);//输入相应的内容
img.src = ajax.responseText
}
}
}
script>
label>
div>
<div class="form-item">
<input id="submit" name="submit" type="submit" value="登录">
{{ form.hidden_tag() }}
div>
form>
div>
div>
div>
<script src="./static/js/jquery-3.3.1.min.js">script>
<script src="./static/js/main.js">script>
body>
html>

