3000字让你掌握ElasticSearch入门到熟练使用
ElasticSearch
大家需要本文学习的源码可添加我的V:eleven_id_best
概述
是什么
ElasticSearch是基于Lucene 做了封装和增强的一款全文检索引擎,她是开源的、高扩展的、分布式的。具有近乎实时的存储、检索数据的特点。
她的目的是通过简单的restful api来隐藏Lucene的复杂性,从而使得全局检索变得更加方便。目前已成为排名第一的搜索引擎类应用。
创建的历史
多年前,一个叫做Shay Banon的刚结婚不久的失业开发者,由于妻子要去伦敦学习厨师,他便跟着也去了。在他找工作的过程中,为了给妻子构建一个食谱的搜索引擎,他开始构建一个早期版本的Lucene。
直接基于Lucene工作会比较困难,所以Shay开始抽象Lucene代码以便lava程序员可以在应用中添加搜索功能。他发布了他的第一个开源项目,叫做“Compass”。
后来Shay找到一份工作,这份工作处在高性能和内存数据网格的分布式环境中,因此高性能的、实时的、分布式的搜索引擎也是理所当然需要的。然后他决定重写Compass库使其成为一个独立的服务叫做Elasticsearch。
被用来做什么
可以把她理解成数据库,用来存储和查询数据,只是她比mysql等数据库性能要高的多,近乎实时的检索速率。
入门
注意:我们在学习一项技术的入门阶段尽量在windows下,尽量减少一些不必要的学习成本
安装ElasticSearch
下载
官网下载:https://www.elastic.co/cn/elasticsearch/
bin 启动文件目录
config 配置文件目录
    1og4j2 日志配置文件
    jvm.options java 虚拟机相关的配置(默认启动占1g内存,内容不够需要自己调整)
    elasticsearch.ym1 elasticsearch 的配置文件! 默认9200端口!跨域!
1ib
    相关jar包
modules 功能模块目录
plugins 插件目录
    ik分词器
启动
注意:elasticsearch依赖java环境,要保证自己的java环境配置好。
执行 bin目录下的elasticsearch.bat即可启动。
启动完成后,浏览器访问:localhost:9200,如下图即为启动成功。

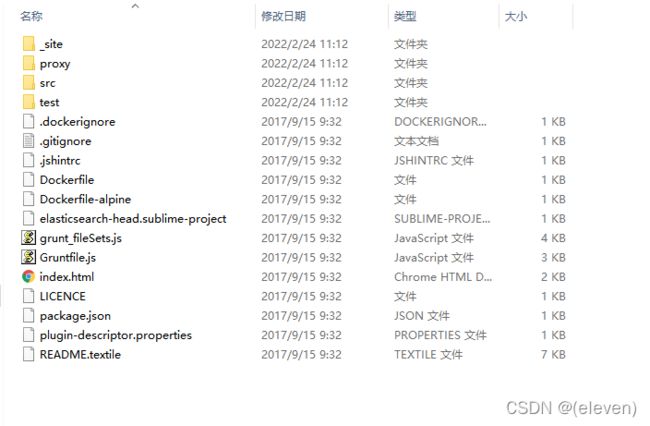
安装elasticsearch-head
下载
这个文件我没找到解压版,哈哈哈,大家需要的可添加我的v:eleven_is_best 索要
解压
使用
使用elasticsearch-head连接elasticsearch

填写ip端口,点击连接即可。
可能会存在问题:
-
跨域问题:
elasticsearch解压目录config下elasticsearch.yml中添加
# 开启跨域 http.cors.enabled: true # 所有人访问 http.cors.allow-origin: "*" -
远程连接失败问题:
elasticsearch解压目录config下elasticsearch.yml中添加
network-host:0.0.0.0
缺点:
这个工具比较小,使用起来比较方便,但是做数据查询没有任何语句提示,体验性不好,所以该工具我们只做数据可视化使用,所有的数据操作我们使用kabana
安装Kabana
下载
下载地址:https://www.elastic.co/cn/downloads/kibana
注意:kabana必须和elasticsearch版本一致,否则不能使用。
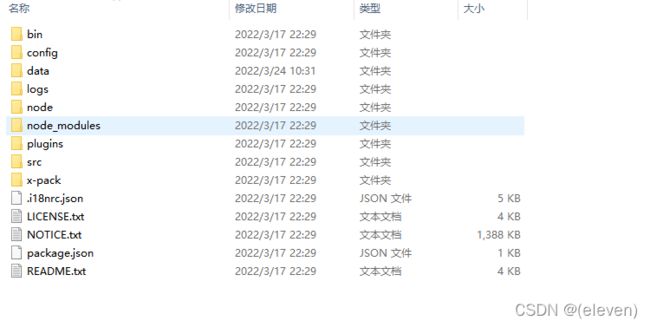
解压
启动
双击执行bin路径下面的kibana.bat即可
运行成功后访问:localhost:5601
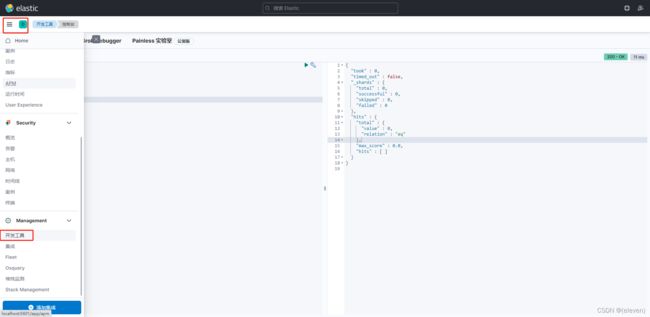
使用
kibana汉化
kibana解压目录/config/kibana.yml,添加:
i18n.locale: "zh-CN"
重启kibana
中级
从这里开始我们将ElasticSearch简称为ES
在ES中我们需要了解一句话:一切皆json
学习一门技术最好的途径就是阅读官方文档:
英文:https://www.elastic.co/guide/en/elasticsearch/reference/8.1/index.html
中文:https://www.elastic.co/guide/cn/elasticsearch/guide/current/index.html
如果能看得懂英文,最好还是通读一下官方文档,知识点比较齐全。

概述
ES是面向文档document的,下面我们将ES和数据库来做一个对比
| 数据库 | ElasticSearch |
|---|---|
| 数据库(database) | 索引(indices) |
| 表(tables) | types <新版本已经被弃用!>有一些es内置的类型字段_doc _create _update等 |
| 行(rows) | documents |
| 字段(columns) | fields |
ES中可以包含多个索引,一个所以中可以包含多个类型,一个类型中可以有多个文档documents,一个文档中可以有多个字段field
倒排索引
在ES中又倒排索引的概念,我们可以理解倒排索引为一个字典,数据在向ES中存储的时候并不是只存在普通的数据索引中,还会往倒排索引中插入一条规则的数据,类似一个字典的作用。
基本Rest命令说明
| method | url地址 | 描述 |
|---|---|---|
| PUT(创建,修改) | localhost:9200/索引名称/类型名称/文档id | 创建文档(指定文档id) |
| POST(创建) | localhost:9200/索引名称/类型名称 | 创建文档(随机文档id) |
| POST(修改) | localhost:9200/索引名称/类型名称/文档id/_update | 修改文档 |
| DELETE(删除) | localhost:9200/索引名称/类型名称/文档id | 删除文档 |
| GET(查询) | localhost:9200/索引名称/类型名称/文档id | 查询文档通过文档ID |
| POST(查询) | localhost:9200/索引名称/类型名称/文档id/_search | 查询所有数据 |
数据类型
这里不写了 你们去百度
应用
简单操作
1.创建索引(创建数据库)
PUT /test1
{
  "mappings": {
    "properties": {
      "name":{
        "type": "text"
      },
      "age":{
        "type": "integer"
      }
    }
  }
}
2.获取索引结构
GET /test1
3.删除索引(删除数据库)
DELETE /test2
4.更新索引
4.1更新已存在的字段类型
没有办法更改,因为这会导致现有的数据丢失
4.2新增字段
//给test1索引新增一个cont字段,字段类型是keyword
PUT /test1/_mapping
{
  "properties": {
    "cont1": {
      "type": "keyword"
    }
  }
}
5.添加文档(插入数据)
//type使用_create或者_doc都行
POST /test1/_create/1
{
  "name":"eleven",
  "age":12
}
6.查询文档(查询数据根据id)
GET /test1/_doc/1
7.修改文档(修改数据)
方法一:使用post或者put直接更改,会覆盖这条数据,从而导致字段丢失。
POST /test1/_doc/1
{
  "name":"haha"
}
再次查询这条数据发现age字段没了。
方法二:局部更新,不会覆盖这条数据,不会导致字段丢失,只更新age字段。
POST /test1/_update/1
{
  "doc":{
    "age":22
  }
}
8.删除文档(根据id删除数据)
DELETE /test1/_doc/2
9.查询文档(简单条件查询)
//查询test1索引中name字段为eleven的数据
GET /test1/_search?q=name:eleven
10.查询所有文档
GET /test1/_search
复杂操作
关键字说明
query块:构建查询条件
match块:匹配条件
match_all块:查询所有
_source块:设置返回字段
sort块:排序,是个数组
from:从第几条返回
size:返回多少条,from和size使用可相当于mysql中的limit
bool块:条件池,用来构建多条件查询,联合must,should,must not等条件块使用。
must块:是个数组,相当于and条件
should块:相当于or条件
must_not块:相当于not (... and ...)
filter块:数据过滤
ES可查看的信息
执行
GET _cat

结果
/_cat/allocation
/_cat/shards
/_cat/shards/{index}
/_cat/master
/_cat/nodes
/_cat/tasks
/_cat/indices
/_cat/indices/{index}
/_cat/segments
/_cat/segments/{index}
/_cat/count
/_cat/count/{index}
/_cat/recovery
/_cat/recovery/{index}
/_cat/health
/_cat/pending_tasks
/_cat/aliases
/_cat/aliases/{alias}
/_cat/thread_pool
/_cat/thread_pool/{thread_pools}
/_cat/plugins
/_cat/fielddata
/_cat/fielddata/{fields}
/_cat/nodeattrs
/_cat/repositories
/_cat/snapshots/{repository}
/_cat/templates
/_cat/ml/anomaly_detectors
/_cat/ml/anomaly_detectors/{job_id}
/_cat/ml/trained_models
/_cat/ml/trained_models/{model_id}
/_cat/ml/datafeeds
/_cat/ml/datafeeds/{datafeed_id}
/_cat/ml/data_frame/analytics
/_cat/ml/data_frame/analytics/{id}
/_cat/transforms
/_cat/transforms/{transform_id}
查询所有
GET /test1/_search
{
  "query": {
    "match_all": {}
  }
}
效果等同于
GET /test1/_search
条件匹配:等于
一、match
GET /test1/_search
{
  "query": {
    "match": {
      "name": "我爱中国"
    }
  }
}
二、term精确查询
GET /test1/_search
{
  "query": {
    "term": {
      "cont": {
        "name": "我爱中国1"
      }
    }
  }
}
解释:
term表示精确匹配,value值不会被分词器拆分,按照倒排索引匹配 。
match表示全文检索,value值会被分词器拆分,然后去倒排索引中匹配 。

注意term适合查询 number、date、keyword ,不适合text类型的字段,因为text类型的字段在存储时会先分词在存储,因此用term去查找可能获取不到值
在多个字段上进行match查询
只要其中一个字段满足条件就能查询出来
//需求:同时在name和cont字段上做match匹配操作

GET /test1/_search
{
  "query": {
    "multi_match": {
      "query": "我爱中国1",
      "fields": ["name","cont"]
    }
  }
}
设置返回字段:_source
//需求:查询test1索引中cont值为“我爱中国1”的数据,只返回age和name字段
GET /test1/_search
{
  "query": {
    "term": {
      "cont": {
        "value": "我爱中国1"
      }
    }
  },
  "_source": ["age","name"]
}

解释:_source可用来设置返回的字段
排序:没有配置排序的情况下,默认按照评分降序排列
//需求:查询test1索引中的所有age字段,并按照age字段倒序返回
GET /test1/_search
{
  "query": {
    "match_all": {}
  },
  "_source": ["age"],
  "sort": [
    {
      "age": {
        "order": "desc"
      }
    }
  ]
}
from和size使用
//需求:查询test1索引中的全部数据,返回从2条开始之后的3条数据
GET /test1/_search
{
  "query": {
    "match_all": {}
  },
  "from": 1,
  "size": 3
}
//注意下标是从0开始的
range范围限制
GET /test1/_search
{
  "query": {
    "range": {
      "age": {
        "gte": 10,
        "lte": 20
      }
    }
  }
}
通配符模糊匹配 wildcard
wildcard能够实现类似mysql中like的操作。
//wildcard适合用在keyword类型的字段上
//需求:查询test1索引中cont字段模糊匹配包含“中国”的数据
GET /test1/_search
{
  "query": {
    "wildcard": {
      "cont": {
        "value": "*中国*"
      }
    }
  }
}
fuzzy(模糊)查询
待补充
bool条件池
逻辑查询
逻辑查询是使用 and 、 or、 not and等方式
must
//需求:查询test1索引中,age=19 and name=我爱中国4
GET /test1/_search
{
  "query": {
    "bool": {
      "must": [
        {
          "match": {
            "name": "我爱中国4"
          }
        },
        {
          "match": {
            "age": "19"
          }
        }
      ]
    }
  }
}
//解释:must块就是将里面的条件做and 拼接
should
//需求:查询test1索引中,age=19 or age =20的数据
GET /test1/_search
{
  "query": {
    "bool": {
      "should": [
        {
          "match": {
            "age": "19"
          }
        },
        {
          "match": {
            "age": "20"
          }
        }
      ]
    }
  }
}
//解释:should就是将里面的条件做or拼接
must_not
//需求:查询test1索引中age!=19 and age!=20的数据
GET /test1/_search
{
  "query": {
    "bool": {
        "must_not": [
        {
          "match": {
            "age": "19"
          }
        },
        {
          "match": {
            "age": "20"
          }
        }
      ]
    }
  }
}
//解释:must_not操作就是 not (...  and ...)
过滤查询
filter
//需求:查询test1索引中的所有 age=>10 age<=20的数据
GET /test1/_search
{
  "query": {
    "bool": {
      "filter": [
        {
          "range": {
            "age": {
              "gte": 10,
              "lte": 20
            }
          }
        }
      ]
    }
  }
}
逻辑查询和过滤查询的区别
从效果上讲过滤查询和检索查询能做一样的效果,区别在于过滤查询不评分,结果能缓存,检索查询要评分,结果不缓存。 一般是不会直接使用过滤查询,都是在检索了一定数据的基础上再使用
//需求:查询test1索引中20>=age>=10的name为"我爱中国"的数据
GET /test1/_search
{
  "query": {
    "bool": {
      "must": [
        {
          "match": {
            "name": "我爱中国"
          }
        }
      ],
      "filter": [
        {
          "range": {
            "age": {
              "gte": 10,
              "lte": 20
            }
          }
        }
      ]
    }
  }
}
分组查询
group by操作
//需求:查询test1索引中group by  age的数据
GET /test1/_search
{
  "aggs": {
    "test": {
      "terms": {
        "field": "age"
      }
    }
  }
}
//解释:test是为该聚合查询设置的名称
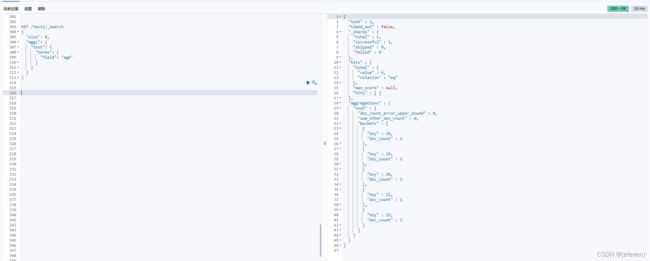
这样的查询结果中会将所有的数据也会展示出来,因为group by操作我们不需要知道具体的数据,所以可以不展示,使用size关键字。
GET /test1/_search
{
  "size": 0, //设置size的值为0即可
  "aggs": {
    "test": {
      "terms": {
        "field": "age"
      }
    }
  }
}
添加度量指标
指在分组的前提下,对分组的数据进行处理
//需求:查询test1索引下每类cont的平均年龄
GET /test1/_search
{
  "size": 0,
  "aggs": {
    "test": {
      "terms": {
        "field": "cont"
      },
      "aggs": {
        "avg_age": {
          "avg": {
            "field": "age"
          }
        }
      }
    }
  }
}
//解释:首先根据cont做分组查询,然后再对分组后的数据做求平均值操作。
//查询test1索引中每类cont的最小age
GET /test1/_search
{
  "size": 0,
  "aggs": {
    "test": {
      "terms": {
        "field": "cont"
      },
      "aggs": {
        "min_age": {
          "min": {
            "field": "age"
          }
        }
      }
    }
  }
}


