【Spring Security OAuth】--- 获取token核心源码解读
文章目录
- 1 明确目标 + 获取token核心流程梳理
- 2 源码解读
- 3 读后感+闲扯
1 明确目标 + 获取token核心流程梳理
在《从cookie/session和token的角度来认识一下spring security oauth》那篇文章里我们讲到要想开发基于token的认证方式,我们可以借助大牛们造好的轮子 — Spring Security OAuth。Spring Security OAuth的原理大致如下图左半部分,而我们的目标就是将Spring Security OAuth默认的走授权流程后发放token的步骤替换成走我们自定义的认证方式后发放token,除此之外,其他的认证校验步骤(如访问资源服务器的认证、授权等)仍然可以使用Spring Security OAuth提供的默认实现来完成。
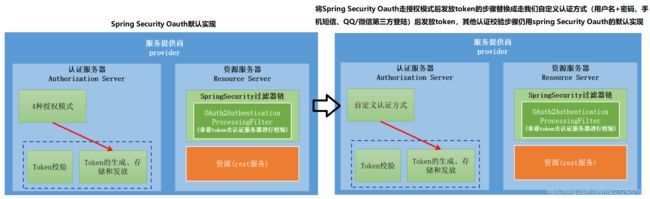
为了达到这个目的,我们肯定要对Spring Security OAuth发放token的源码进行剖析。下面是其主要流程:

2 源码解读
- 获取token的整体流程 — 所在类TokenEndpoint
	@RequestMapping(value = "/oauth/token", method=RequestMethod.POST)
	public ResponseEntity<OAuth2AccessToken> postAccessToken(Principal principal, @RequestParam
	Map<String, String> parameters) throws HttpRequestMethodNotSupportedException {

		if (!(principal instanceof Authentication)) {
			throw new InsufficientAuthenticationException(
					"There is no client authentication. Try adding an appropriate authentication filter.");
		}
		//从请求头中获取到clientId
		String clientId = getClientId(principal);
		//根据clientId获取ClientDetails
		ClientDetails authenticatedClient = getClientDetailsService().loadClientByClientId(clientId);
		//将获取的第三方应用的信息和grant_type、scope等参数封装成一个TokenRequest对象---该对象其实是new 出来的
		TokenRequest tokenRequest = getOAuth2RequestFactory().createTokenRequest(parameters, authenticatedClient);

		if (clientId != null && !clientId.equals("")) {
			// Only validate the client details if a client authenticated during this
			// request. --- 英文注释的很详细,这里不再多解释
			if (!clientId.equals(tokenRequest.getClientId())) {
				// double check to make sure that the client ID in the token request is the same as that in the
				// authenticated client
				throw new InvalidClientException("Given client ID does not match authenticated client");
			}
		}
		//校验请求中的scope是否合法
		if (authenticatedClient != null) {
			oAuth2RequestValidator.validateScope(tokenRequest, authenticatedClient);
		}
		//没传哪种授权模式 ---> 直接抛异常
		if (!StringUtils.hasText(tokenRequest.getGrantType())) {
			throw new InvalidRequestException("Missing grant type");
		}
		//简化模式在用户请求授权时就获取到令牌了,不会进到该方法里,所以直接抛异常
		if (tokenRequest.getGrantType().equals("implicit")) {
			throw new InvalidGrantException("Implicit grant type not supported from token endpoint");
		}
		//是否为授权码模式的请求
		if (isAuthCodeRequest(parameters)) {
			// The scope was requested or determined during the authorization step
			//授权码模式在获取授权码的过程中需要传递scope参数,那个参数就是用来获取授权的,
			//也就是说授权码模式请求的授权是在获取授权码的过程中就已经定了---因为此步是用户真正在授权
			//在获取token的过程中只能使用获取授权码时得到的权限
			//因此这里的scope置空,稍后通过申请到的授权码获取其在授权过程中所请求的权限
			if (!tokenRequest.getScope().isEmpty()) {
				logger.debug("Clearing scope of incoming token request");
				tokenRequest.setScope(Collections.<String> emptySet());
			}
		}
		//如果是刷新令牌的请求 --- 重新设置其scope
		if (isRefreshTokenRequest(parameters)) {
			// A refresh token has its own default scopes, so we should ignore any added by the factory here.
			tokenRequest.setScope(OAuth2Utils.parseParameterList(parameters.get(OAuth2Utils.SCOPE)));
		}
		//真正生成token的步骤
		OAuth2AccessToken token = getTokenGranter().grant(tokenRequest.getGrantType(), tokenRequest);
		if (token == null) {
			throw new UnsupportedGrantTypeException("Unsupported grant type: " + tokenRequest.getGrantType());
		}
		//将生成的token返回
		return getResponse(token);

	}
- TokenRequest 的生成 — 很简单,其实是通过ClientDetails 和其他请求参数new出来的
— 所在类DefaultOAuth2RequestFactory - 本段代码对应主流程图中的第③步
	public TokenRequest createTokenRequest(Map<String, String> requestParameters, ClientDetails authenticatedClient) {
		//获取clientId并校验其是否合法
		String clientId = requestParameters.get(OAuth2Utils.CLIENT_ID);
		if (clientId == null) {
			// if the clientId wasn't passed in in the map, we add pull it from the authenticated client object
			clientId = authenticatedClient.getClientId();
		}
		else {
			// otherwise, make sure that they match
			if (!clientId.equals(authenticatedClient.getClientId())) {
				throw new InvalidClientException("Given client ID does not match authenticated client");
			}
		}
		//从请求参数中获取到grant_type
		String grantType = requestParameters.get(OAuth2Utils.GRANT_TYPE);
		//从请求中根据clientId获取到所有的权限 即 scopes
		Set<String> scopes = extractScopes(requestParameters, clientId);
		//利用请求参数,clientId,scopes和grantType  new出一个TokenRequest
		TokenRequest tokenRequest = new TokenRequest(requestParameters, clientId, scopes, grantType);
		//将token返回给请求端
		return tokenRequest;
	}
-
下面真正生成token步1-3对应了主流程图中的第④步
-
真正生成token的步骤1— getTokenGranter().grant(tokenRequest.getGrantType(), tokenRequest)具体实现
— 所在类CompositeTokenGranter

真正生成token的步骤2— 上图中OAuth2AccessToken grant = granter.grant(grantType, tokenRequest); 的具体实现
— 所在类ClientCredentialsTokenGranter
@Override
public OAuth2AccessToken grant(String grantType, TokenRequest tokenRequest) {
	//去具体的实现类里去拿token
	OAuth2AccessToken token = super.grant(grantType, tokenRequest);
	//如果获取到token--对刷新令牌进行处理 --- >不过多解释
	if (token != null) {
		DefaultOAuth2AccessToken norefresh = new DefaultOAuth2AccessToken(token);
		// The spec says that client credentials should not be allowed to get a refresh token
		if (!allowRefresh) {
			norefresh.setRefreshToken(null);
		}
		token = norefresh;
	}
	//无论拿到没拿到都返回,如果拿到的token为null,则上图中的grant就是null,然后就会再利用其他的具体实现类尝试获取token,
	//一旦获取成功,就会将token返回给请求端
	return token;
}
真正生成token的步骤3— 上面OAuth2AccessToken token = super.grant(grantType, tokenRequest);的具体实现
— 所在类AbstractTokenGranter
	public OAuth2AccessToken grant(String grantType, TokenRequest tokenRequest) {
		//判断当前grantType是否为本实现类指定要处理的grantType---如果不是直接返回null
		if (!this.grantType.equals(grantType)) {
			return null;
		}
		//获取clientId
		String clientId = tokenRequest.getClientId();
		//通过clientId再获取一遍ClientDetails对象
		ClientDetails client = clientDetailsService.loadClientByClientId(clientId);
		//判断grantType是否合法
		validateGrantType(grantType, client);
		//打个注释
		if (logger.isDebugEnabled()) {
			logger.debug("Getting access token for: " + clientId);
		}
		//真正去具体的实现类里去拿token
		return getAccessToken(client, tokenRequest);

	}
	//上面的getAccessToken方法的具体实现
	protected OAuth2AccessToken getAccessToken(ClientDetails client, TokenRequest tokenRequest) {
		return tokenServices.createAccessToken(getOAuth2Authentication(client, tokenRequest));
	}
	//上面getOAuth2Authentication方法的具体实现 --- 生成OAuth2Authentication,
	//但是按照方法的加载机制如果具体实现里有该方法会先走实现类里的
	//在简化+授权码+密码模式的情况下不会走下面的方法  =======================《 特别注意 》===================
	protected OAuth2Authentication getOAuth2Authentication(ClientDetails client, TokenRequest tokenRequest) {
		OAuth2Request storedOAuth2Request = requestFactory.createOAuth2Request(client, tokenRequest);
		return new OAuth2Authentication(storedOAuth2Request, null);
	}
注意:上面的方法其实写在了package org.springframework.security.oauth2.provider.token下的抽像类AbstractTokenGranter里,其子类才是四种授权模式+RefreshToken的具体实现类 — 模版模式
真正生成token的步骤4— 上面getOAuth2Authentication(client, tokenRequest);方法的具体实现 — 不同授权模式具体实现不一样- 本段代码对应主流程图中的第⑤、⑥两步
— 所在类ResourceOwnerPasswordTokenGranter
这里分析的是密码模式的下的代码:
	@Override
	protected OAuth2Authentication getOAuth2Authentication(ClientDetails client, TokenRequest tokenRequest) {

		Map<String, String> parameters = new LinkedHashMap<String, String>(tokenRequest.getRequestParameters());
		String username = parameters.get("username");
		String password = parameters.get("password");
		// Protect from downstream leaks of password
		parameters.remove("password");
		//下面这部分代码在用户名+密码登陆时其实我们已经见过了,就是利用请求中的用户名+密码进行认证+授权校验
		//校验成功后会生成一个已经认证了的Authentication对象  --- 这里不细分析了
		//与之对应的是授权码模式会利用授权码进行校验并生成一个认证成功的Authentication对象

		Authentication userAuth = new UsernamePasswordAuthenticationToken(username, password);
		((AbstractAuthenticationToken) userAuth).setDetails(parameters);
		try {
			userAuth = authenticationManager.authenticate(userAuth);
		}
		catch (AccountStatusException ase) {
			//covers expired, locked, disabled cases (mentioned in section 5.2, draft 31)
			throw new InvalidGrantException(ase.getMessage());
		}
		catch (BadCredentialsException e) {
			// If the username/password are wrong the spec says we should send 400/invalid grant
			throw new InvalidGrantException(e.getMessage());
		}
		if (userAuth == null || !userAuth.isAuthenticated()) {
			throw new InvalidGrantException("Could not authenticate user: " + username);
		}
		//将ClientDetails 对象和TokenRequest 对象封装成一个OAuth2Request 对象
		OAuth2Request storedOAuth2Request = getRequestFactory().createOAuth2Request(client, tokenRequest);
		//利用OAuth2Request和已经认证校验成功的Authentication 对象new 一个OAuth2Authentication对象
		return new OAuth2Authentication(storedOAuth2Request, userAuth);
	}
真正生成token的步骤5— tokenServices.createAccessToken(getOAuth2Authentication(client, tokenRequest));createAccessToken具体实现- 本段代码对应主流程图中的第⑦步
TokenStore的具体实现(为了方便看,放在了这里)
— 所在类DefaultTokenServices
@Transactional
public OAuth2AccessToken createAccessToken(OAuth2Authentication authentication) throws AuthenticationException {
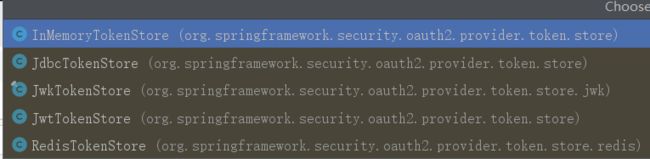
//先去存储里看有没有已经存在的token --- 存储可以有多种,上图是TokenStore的具体实现类,可以看到既有内存、Jdbc、也有redis
//并且还有Jwt --- 》 这是用Jwt替换spring security oauth中默认token的依据
OAuth2AccessToken existingAccessToken = tokenStore.getAccessToken(authentication);
OAuth2RefreshToken refreshToken = null;
//如果从存储里找到了已经存在的token
if (existingAccessToken != null) {
//如果找到的token已经过期 -- 》在tokenStore里将其RefreshToken和该token删掉
if (existingAccessToken.isExpired()) {
if (existingAccessToken.getRefreshToken() != null) {
refreshToken = existingAccessToken.getRefreshToken();
// The token store could remove the refresh token when the
// access token is removed, but we want to
// be sure...
tokenStore.removeRefreshToken(refreshToken);
}
tokenStore.removeAccessToken(existingAccessToken);
}
else {
// Re-store the access token in case the authentication has changed
//重新存一下获取到的token,因为你有可能是之前用授权码模式获取的token,但现在用密码模式获取的token,
//这时要存的信息是不一样的
tokenStore.storeAccessToken(existingAccessToken, authentication);
//将没过期的token返回给请求
return existingAccessToken;
}
}
// Only create a new refresh token if there wasn't an existing one
// associated with an expired access token.
// Clients might be holding existing refresh tokens, so we re-use it in
// the case that the old access token
// expired.
//首先看看有没有刷新令牌,如果没有就新建一个,注意一下上面的英文注释
if (refreshToken == null) {
refreshToken = createRefreshToken(authentication);
}
// But the refresh token itself might need to be re-issued if it has
// expired.
//如果有刷新令牌,但是已经过期,需要重新发放一个刷新令牌
else if (refreshToken instanceof ExpiringOAuth2RefreshToken) {
ExpiringOAuth2RefreshToken expiring = (ExpiringOAuth2RefreshToken) refreshToken;
if (System.currentTimeMillis() > expiring.getExpiration().getTime()) {
refreshToken = createRefreshToken(authentication);
}
}
//真正生成token的逻辑
OAuth2AccessToken accessToken = createAccessToken(authentication, refreshToken);
//将生成的token存入到存储里
tokenStore.storeAccessToken(accessToken, authentication);
//重生成的令牌里取出刷新令牌,将刷新令牌存到存储里,防止它在上一步被改变
// In case it was modified
refreshToken = accessToken.getRefreshToken();
if (refreshToken != null) {
tokenStore.storeRefreshToken(refreshToken, authentication);
}
return accessToken;
}
真正生成token的逻辑— OAuth2AccessToken accessToken = createAccessToken(authentication, refreshToken);的具体实现 — 所在类DefaultTokenServices- 本段代码对应主流程图中的第⑦步下面的TokenStore和TokenEnhancer
private OAuth2AccessToken createAccessToken(OAuth2Authentication authentication, OAuth2RefreshToken refreshToken) {
	//利用UUID当成构造函数的参数生成一个令牌
	DefaultOAuth2AccessToken token = new DefaultOAuth2AccessToken(UUID.randomUUID().toString());
	//获取过期时间并设置到token里
	int validitySeconds = getAccessTokenValiditySeconds(authentication.getOAuth2Request());
	if (validitySeconds > 0) {
		token.setExpiration(new Date(System.currentTimeMillis() + (validitySeconds * 1000L)));
	}
	//设置刷新令牌
	token.setRefreshToken(refreshToken);
	//设置令牌的权限
	token.setScope(authentication.getOAuth2Request().getScope());
	//看是否配置了AccessTokenEnhancer的具体实现
	//如果配置了对生成的token进行增强 --- 设置Jwt时会讲
	return accessTokenEnhancer != null ? accessTokenEnhancer.enhance(token, authentication) : token;
}
至此Spring Security OAuth获取token的核心源码已经解读完毕,从下文开始将参考这些核心源码将我们自定义的认证方式嫁接到spring security oauth框架上。
3 读后感+闲扯
感觉源码写的真好!!!
以前看到源码时总是很恐慌,觉得一团乱码,满脸懵逼 — 》 甚至跟着人家的视频打断点,代码都能跟丢!!!
现在已经达到了这样一种状态:可以很快理清一块逻辑的大致脉络,并由此脉络进行细化阅读;
下一步我应该会在某个时间点开始好好的整理一下设计模式,因为现在虽然在自己的代码里偶尔会借鉴一下自己看过的源码的设计方式,但却仅仅是偶尔,根本还没形成体系,写出的代码欠优雅!!!