elasticsearch
ElasticSearch安装与介绍
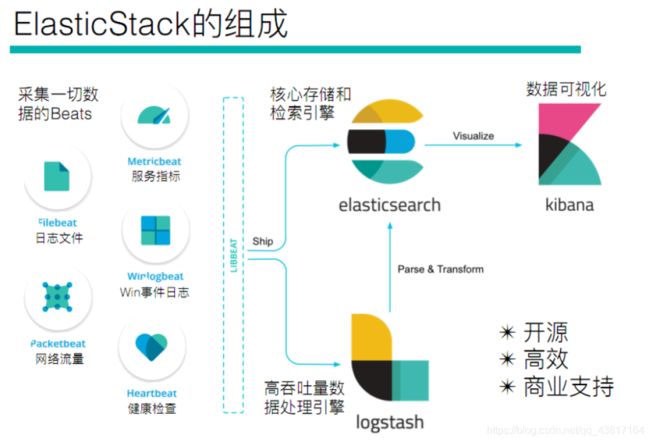
Elastic Stack简介
如果你没有听说过Elastic Stack,那你一定听说过ELK,实际上ELK是三款软件的简称,分别是Elasticsearch、
Logstash、Kibana组成,在发展的过程中,又有新成员Beats的加入,所以就形成了Elastic Stack。所以说,ELK是旧的称呼,Elastic Stack是新的名字。
全系的Elastic Stack技术栈包括:
Elasticsearch
Elasticsearch 基于java,是个开源分布式搜索引擎,它的特点有:分布式,零配置,自动发现,索引自动分片,索引副本机制,restful风格接口,多数据源,自动搜索负载等。
Logstash
Logstash 基于java,是一个开源的用于收集,分析和存储日志的工具。
Kibana
Kibana 基于nodejs,也是一个开源和免费的工具,Kibana可以为 Logstash 和 ElasticSearch 提供的日志分析友好的Web 界面,可以汇总、分析和搜索重要数据日志。
Beats
Beats是elastic公司开源的一款采集系统监控数据的代理agent,是在被监控服务器上以客户端形式运行的数据收集器的统称,可以直接把数据发送给Elasticsearch或者通过Logstash发送给Elasticsearch,然后进行后续的数据分析活动。Beats由如下组成:
- Packetbeat:是一个网络数据包分析器,用于监控、收集网络流量信息,Packetbeat嗅探服务器之间的流量,解析应用层协议,并关联到消息的处理,其支 持ICMP (v4 and v6)、DNS、HTTP、Mysql、PostgreSQL、Redis、MongoDB、Memcache等协议;
- Filebeat:用于监控、收集服务器日志文件,其已取代 logstash forwarder;
- Metricbeat:可定期获取外部系统的监控指标信息,其可以监控、收集 Apache、HAProxy、MongoDB
MySQL、Nginx、PostgreSQL、Redis、System、Zookeeper等服务;
Beats和Logstash其实都可以进行数据的采集,但是目前主流的是使用Beats进行数据采集,然后使用 Logstash进行数据的分割处理等,早期没有Beats的时候,使用的就是Logstash进行数据的采集。
ElasticSearch快速入门
简介
官网:https://www.elastic.co/
ElasticSearch是一个基于Lucene的搜索服务器。它提供了一个分布式多用户能力的全文搜索引擎,基于RESTful web接口。Elasticsearch是用Java开发的,并作为Apache许可条款下的开放源码发布,是当前流行的企业级搜索引擎。设计用于云计算中,能够达到实时搜索,稳定,可靠,快速,安装使用方便。
我们建立一个网站或应用程序,并要添加搜索功能,但是想要完成搜索工作的创建是非常困难的。我们希望搜索解决方案要运行速度快,我们希望能有一个零配置和一个完全免费的搜索模式,我们希望能够简单地使用JSON通过HTTP来索引数据,我们希望我们的搜索服务器始终可用,我们希望能够从一台开始并扩展到数百台,我们要实时搜索,我们要简单的多租户,我们希望建立一个云的解决方案。因此我们利用Elasticsearch来解决所有这些问题及可能出现的更多其它问题。
ElasticSearch是Elastic Stack的核心,同时Elasticsearch 是一个分布式、RESTful风格的搜索和数据分析引擎,能够解决不断涌现出的各种用例。作为Elastic Stack的核心,它集中存储您的数据,帮助您发现意料之中以及意料之外的情况。
前言
Elasticsearch的发展是非常快速的,所以在ES5.0之前,ELK的各个版本都不统一,出现了版本号混乱的状态,所以从5.0开始,所有Elastic Stack中的项目全部统一版本号。目前最新版本是6.5.4,我们将基于这一版本进行学习。
下载
到官网下载:https://www.elastic.co/cn/downloads/
选择对应版本的数据,这里我使用的是Linux来进行安装,所以就先下载好ElasticSearch的Linux安装包
拉取Docker容器
因为我们需要部署在Linux下,为了以后迁移ElasticStack环境方便,我们就使用Docker来进行部署,首先我们拉取一个带有ssh的centos docker镜像
# 拉取镜像
docker pull moxi/centos_ssh
# 制作容器
docker run --privileged -d -it -h ElasticStack --name ElasticStack -p 11122:22 -p 9200:9200 -p 5601:5601 -p 9300:9300 -v /etc/localtime:/etc/localtime:ro  moxi/centos_ssh /usr/sbin/init
然后直接远程连接11122端口即可
单机版安装
--笔者使用docker
docker run -e ES_JAVA_OPTS="-Xms256m -Xmx256m" -d -p 9200:9200 -p 9300:9300 --name es elasticsearch:6.7.1
因为ElasticSearch不支持Root用户直接操作,因此我们需要创建一个elsearch用户
# 添加新用户
useradd elsearch

# 创建一个soft目录,存放下载的软件
mkdir /soft

# 进入,然后通过xftp工具,将刚刚下载的文件拖动到该目录下
cd /soft

# 解压缩
tar -zxvf elasticsearch-7.9.1-linux-x86_64.tar.gz

#重命名
mv elasticsearch-7.9.1/ elsearch
因为刚刚我们是使用root用户操作的,所以我们还需要更改一下/soft文件夹的所属,改为elsearch用户
chown elsearch:elsearch /soft/ -R
然后在切换成elsearch用户进行操作
# 切换用户
su - elsearch
然后我们就可以对我们的配置文件进行修改了
# 进入到 elsearch下的config目录
cd /soft/elsearch/config
然后找到下面的配置
#打开配置文件
vim elasticsearch.yml

#设置ip地址,任意网络均可访问
network.host: 0.0.0.0
在Elasticsearch中如果,network.host不是localhost或者127.0.0.1的话,就会认为是生产环境,会对环境的要求比较高,我们的测试环境不一定能够满足,一般情况下需要修改2处配置,如下:
# 修改jvm启动参数
vim conf/jvm.options

#根据自己机器情况修改
-Xms128m
-Xmx128m
然后在修改第二处的配置,这个配置要求我们到宿主机器上来进行配置
# 到宿主机上打开文件
vim /etc/sysctl.conf
# 增加这样一条配置,一个进程在VMAs(虚拟内存区域)创建内存映射最大数量
vm.max_map_count=655360
# 让配置生效
sysctl -p
启动ElasticSearch
首先我们需要切换到 elsearch用户
su - elsearch
然后在到bin目录下,执行下面
# 进入bin目录
cd /soft/elsearch/bin
# 后台启动
./elasticsearch -d
启动成功后,访问下面的URL
http://202.193.56.222:9200/
如果出现了下面的信息,就表示已经成功启动了
如果你在启动的时候,遇到过问题,那么请参考下面的错误分析~
错误分析
错误情况1
如果出现下面的错误信息
java.lang.RuntimeException: can not run elasticsearch as root
	at org.elasticsearch.bootstrap.Bootstrap.initializeNatives(Bootstrap.java:111)
	at org.elasticsearch.bootstrap.Bootstrap.setup(Bootstrap.java:178)
	at org.elasticsearch.bootstrap.Bootstrap.init(Bootstrap.java:393)
	at org.elasticsearch.bootstrap.Elasticsearch.init(Elasticsearch.java:170)
	at org.elasticsearch.bootstrap.Elasticsearch.execute(Elasticsearch.java:161)
	at org.elasticsearch.cli.EnvironmentAwareCommand.execute(EnvironmentAwareCommand.java:86)
	at org.elasticsearch.cli.Command.mainWithoutErrorHandling(Command.java:127)
	at org.elasticsearch.cli.Command.main(Command.java:90)
	at org.elasticsearch.bootstrap.Elasticsearch.main(Elasticsearch.java:126)
	at org.elasticsearch.bootstrap.Elasticsearch.main(Elasticsearch.java:92)
For complete error details, refer to the log at /soft/elsearch/logs/elasticsearch.log
[root@e588039bc613 bin]# 2020-09-22 02:59:39,537121 UTC [536] ERROR CLogger.cc@310 Cannot log to named pipe /tmp/elasticsearch-5834501324803693929/controller_log_381 as it could not be opened for writing
2020-09-22 02:59:39,537263 UTC [536] INFO  Main.cc@103 Parent process died - ML controller exiting
就说明你没有切换成 elsearch用户,因为不能使用root操作es
su - elsearch
错误情况2
[1]:max file descriptors [4096] for elasticsearch process is too low, increase to at least[65536]
解决方法:切换到root用户,编辑limits.conf添加如下内容
vi /etc/security/limits.conf

# ElasticSearch添加如下内容:
* soft nofile 65536
* hard nofile 131072
* soft nproc 2048
* hard nproc 4096
错误情况3
[2]: max number of threads [1024] for user [elsearch] is too low, increase to at least
[4096]
也就是最大线程数设置的太低了,需要改成4096
#解决:切换到root用户,进入limits.d目录下修改配置文件。
vi /etc/security/limits.d/90-nproc.conf
#修改如下内容:
* soft nproc 1024
#修改为
* soft nproc 4096
错误情况4
[3]: system call filters failed to install; check the logs and fix your configuration
or disable system call filters at your own risk
解决:Centos6不支持SecComp,而ES5.2.0默认bootstrap.system_call_filter为true
vim config/elasticsearch.yml
# 添加
bootstrap.system_call_filter: false
bootstrap.memory_lock: false
错误情况5
[elsearch@e588039bc613 bin]$ Exception in thread "main" org.elasticsearch.bootstrap.BootstrapException: java.nio.file.AccessDeniedException: /soft/elsearch/config/elasticsearch.keystore
Likely root cause: java.nio.file.AccessDeniedException: /soft/elsearch/config/elasticsearch.keystore
	at java.base/sun.nio.fs.UnixException.translateToIOException(UnixException.java:90)
	at java.base/sun.nio.fs.UnixException.rethrowAsIOException(UnixException.java:111)
	at java.base/sun.nio.fs.UnixException.rethrowAsIOException(UnixException.java:116)
	at java.base/sun.nio.fs.UnixFileSystemProvider.newByteChannel(UnixFileSystemProvider.java:219)
	at java.base/java.nio.file.Files.newByteChannel(Files.java:375)
	at java.base/java.nio.file.Files.newByteChannel(Files.java:426)
	at org.apache.lucene.store.SimpleFSDirectory.openInput(SimpleFSDirectory.java:79)
	at org.elasticsearch.common.settings.KeyStoreWrapper.load(KeyStoreWrapper.java:220)
	at org.elasticsearch.bootstrap.Bootstrap.loadSecureSettings(Bootstrap.java:240)
	at org.elasticsearch.bootstrap.Bootstrap.init(Bootstrap.java:349)
	at org.elasticsearch.bootstrap.Elasticsearch.init(Elasticsearch.java:170)
	at org.elasticsearch.bootstrap.Elasticsearch.execute(Elasticsearch.java:161)
	at org.elasticsearch.cli.EnvironmentAwareCommand.execute(EnvironmentAwareCommand.java:86)
	at org.elasticsearch.cli.Command.mainWithoutErrorHandling(Command.java:127)
	at org.elasticsearch.cli.Command.main(Command.java:90)
	at org.elasticsearch.bootstrap.Elasticsearch.main(Elasticsearch.java:126)
	at org.elasticsearch.bootstrap.Elasticsearch.main(Elasticsearch.java:92)
我们通过排查,发现是因为 /soft/elsearch/config/elasticsearch.keystore 存在问题
也就是说该文件还是所属于root用户,而我们使用elsearch用户无法操作,所以需要把它变成elsearch
chown elsearch:elsearch elasticsearch.keystore
错误情况6
[1]: the default discovery settings are unsuitable for production use; at least one of [discovery.seed_hosts, discovery.seed_providers, cluster.initial_master_nodes] must be configured
ERROR: Elasticsearch did not exit normally - check the logs at /soft/elsearch/logs/elasticsearch.log
继续修改配置 elasticsearch.yaml
# 取消注释,并保留一个节点
node.name: node-1
cluster.initial_master_nodes: ["node-1"]
ElasticSearchHead可视化工具
由于ES官方没有给ES提供可视化管理工具,仅仅是提供了后台的服务,elasticsearch-head是一个为ES开发的一个页面客户端工具,其源码托管于Github,地址为 传送门
head提供了以下安装方式
- 源码安装,通过npm run start启动(不推荐)
- 通过docker安装(推荐)
- 通过chrome插件安装(推荐)
- 通过ES的plugin方式安装(不推荐)
通过Docker方式安装
#拉取镜像
docker pull mobz/elasticsearch-head:5
#创建容器
docker create --name elasticsearch-head -p 9100:9100 mobz/elasticsearch-head:5
#启动容器
docker start elasticsearch-head
通过浏览器进行访问:
注意:
由于前后端分离开发,所以会存在跨域问题,需要在服务端做CORS的配置,如下:
vim elasticsearch.yml

http.cors.enabled: true http.cors.allow-origin: "*"
通过chrome插件的方式安装不存在该问题
通过Chrome插件安装
打开chrome的应用商店,即可安装 https://chrome.google.com/webstore/detail/elasticsearch-head/ffmkiejjmecolpfloofpjologoblkegm
我们也可以新建索引
建议:推荐使用chrome插件的方式安装,如果网络环境不允许,就采用其它方式安装。
ElasticSearch中的基本概念
索引
- 索引(index)是Elasticsearch对逻辑数据的逻辑存储,所以它可以分为更小的部分。
- 可以把索引看成关系型数据库的表,索引的结构是为快速有效的全文索引准备的,特别是它不存储原始值。
- Elasticsearch可以把索引存放在一台机器或者分散在多台服务器上,每个索引有一或多个分片(shard),每个分片可以有多个副本(replica)。
文档
- 存储在Elasticsearch中的主要实体叫文档(document)。用关系型数据库来类比的话,一个文档相当于数据库表中的一行记录。
- Elasticsearch和MongoDB中的文档类似,都可以有不同的结构,但Elasticsearch的文档中,相同字段必须有相同类型。
- 文档由多个字段组成,每个字段可能多次出现在一个文档里,这样的字段叫多值字段(multivalued)。
每个字段的类型,可以是文本、数值、日期等。字段类型也可以是复杂类型,一个字段包含其他子文档或者数
组。
映射
所有文档写进索引之前都会先进行分析,如何将输入的文本分割为词条、哪些词条又会被过滤,这种行为叫做
映射(mapping)。一般由用户自己定义规则。
文档类型
- 在Elasticsearch中,一个索引对象可以存储很多不同用途的对象。例如,一个博客应用程序可以保存文章和评
论。 - 每个文档可以有不同的结构。
- 不同的文档类型不能为相同的属性设置不同的类型。例如,在同一索引中的所有文档类型中,一个叫title的字段必须具有相同的类型。
RESTful API
在Elasticsearch中,提供了功能丰富的RESTful API的操作,包括基本的CRUD、创建索引、删除索引等操作。
创建非结构化索引
在Lucene中,创建索引是需要定义字段名称以及字段的类型的,在Elasticsearch中提供了非结构化的索引,就是不需要创建索引结构,即可写入数据到索引中,实际上在Elasticsearch底层会进行结构化操作,此操作对用户是透明的。
创建空索引
PUT /haoke
{
    "settings": {
        "index": {
        "number_of_shards": "2", #分片数
        "number_of_replicas": "0" #副本数
        }
    }
}
删除索引
#删除索引
DELETE /haoke
{
	"acknowledged": true
}
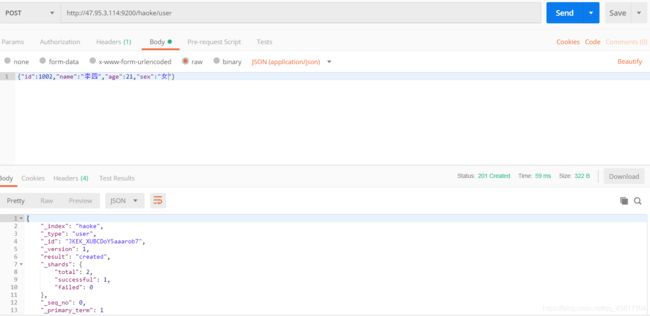
插入数据
URL规则:
POST /{索引}/{类型}/{id}
POST /haoke/user/1001
#数据
{
"id":1001,
"name":"张三",
"age":20,
"sex":"男"
}
使用postman操作成功后
我们通过ElasticSearchHead进行数据预览就能够看到我们刚刚插入的数据了
说明:非结构化的索引,不需要事先创建,直接插入数据默认创建索引。不指定id插入数据:
更新数据
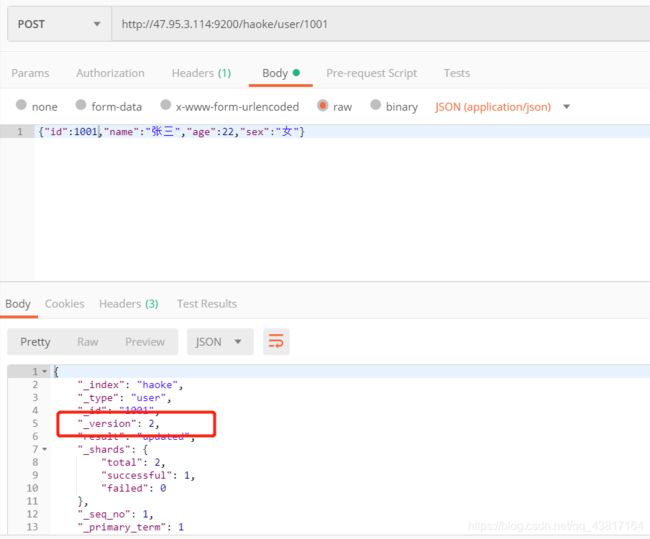
在Elasticsearch中,文档数据是不为修改的,但是可以通过覆盖的方式进行更新。
PUT /haoke/user/1001
{
"id":1001,
"name":"张三",
"age":21,
"sex":"女"
}
更新结果如下:
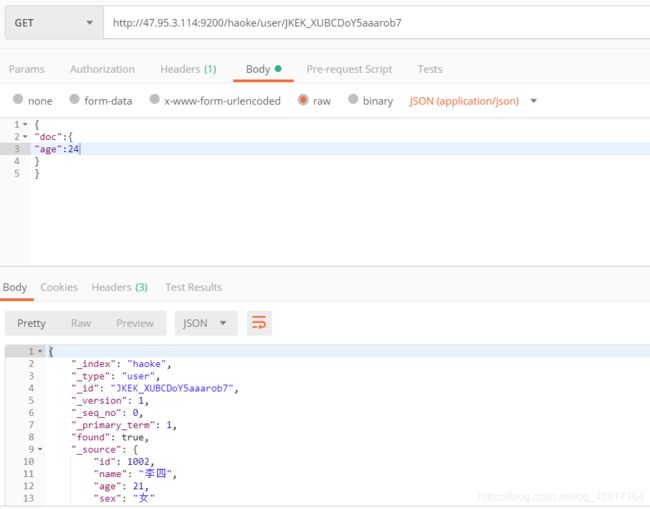
可以看到数据已经被覆盖了。问题来了,可以局部更新吗? – 可以的。前面不是说,文档数据不能更新吗? 其实是这样的:在内部,依然会查询到这个文档数据,然后进行覆盖操作,步骤如下:
- 从旧文档中检索JSON
- 修改它
- 删除旧文档
- 索引新文档
#注意:这里多了_update标识
POST /haoke/user/1001/_update
{
"doc":{
"age":23
}
}
可以看到,数据已经是局部更新了
删除索引
在Elasticsearch中,删除文档数据,只需要发起DELETE请求即可,不用额外的参数
DELETE 1 /haoke/user/1001
需要注意的是,result表示已经删除,version也增加了。
如果删除一条不存在的数据,会响应404
删除一个文档也不会立即从磁盘上移除,它只是被标记成已删除。Elasticsearch将会在你之后添加更多索引的时候才会在后台进行删除内容的清理。【相当于批量操作】
搜索数据
根据id搜索数据
GET /haoke/user/BbPe_WcB9cFOnF3uebvr
#返回的数据如下
{
    "_index": "haoke",
    "_type": "user",
    "_id": "BbPe_WcB9cFOnF3uebvr",
    "_version": 8,
    "found": true,
    "_source": { #原始数据在这里
        "id": 1002,
        "name": "李四",
        "age": 40,
        "sex": "男"
        }
}
搜索全部数据
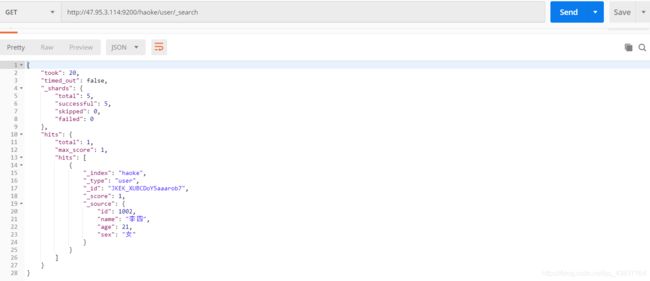
GET /haoke/user/_search
关键字搜索数据
#查询年龄等于20的用户
GET /haoke/user/_search?q=age:20
结果如下:
DSL搜索
Elasticsearch提供丰富且灵活的查询语言叫做DSL查询(Query DSL),它允许你构建更加复杂、强大的查询。
DSL(Domain Specific Language特定领域语言)以JSON请求体的形式出现。
POST /haoke/user/_search
#请求体
{
    "query" : {
        "match" : { #match只是查询的一种
        	"age" : 20
        }
    }
}
POST /haoke/user/_search
#请求数据
{
    "query": {
        "bool": {
            "filter": {
                    "range": {
                        "age": {
                        "gt": 30
                    }
                }
            },
            "must": {
                "match": {
                	"sex": "男"
                }
            }
        }
    }
}
查询出来的结果
全文搜索
POST /haoke/user/_search
#请求数据
{
    "query": {
        "match": {
        	"name": "张三 李四"
        }
    }
}
高亮显示,只需要在添加一个 highlight即可
POST /haoke/user/_search
#请求数据
{
    "query": {
        "match": {
        	"name": "张三 李四"
        }
    }
    "highlight": {
        "fields": {
        	"name": {}
        }
    }
}
聚合
在Elasticsearch中,支持聚合操作,类似SQL中的group by操作。
POST /haoke/user/_search
{
    "aggs": {
        "all_interests": {
            "terms": {
                "field": "age"
            }
        }
    }
}
结果如下,我们通过年龄进行聚合
{
    "took": 42,
    "timed_out": false,
    "_shards": {
        "total": 5,
        "successful": 5,
        "skipped": 0,
        "failed": 0
    },
    "hits": {
        "total": 4,
        "max_score": 1,
        "hits": [
            {
                "_index": "haoke",
                "_type": "user",
                "_id": "1001",
                "_score": 1,
                "_source": {
                    "id": 1001,
                    "name": "张三",
                    "age": 40,
                    "sex": "男"
                }
            },
            {
                "_index": "haoke",
                "_type": "user",
                "_id": "1002",
                "_score": 1,
                "_source": {
                    "id": 1002,
                    "name": "王五",
                    "age": 40,
                    "sex": "男"
                }
            },
            {
                "_index": "haoke",
                "_type": "user",
                "_id": "1003",
                "_score": 1,
                "_source": {
                    "query": {
                        "bool": {
                            "filter": {
                                "range": {
                                    "age": {
                                        "gt": 30
                                    }
                                }
                            },
                            "must": {
                                "match": {
                                    "sex": "男"
                                }
                            }
                        }
                    }
                }
            },
            {
                "_index": "haoke",
                "_type": "user",
                "_id": "JKEK_XUBCDoY5aaarob7",
                "_score": 1,
                "_source": {
                    "id": 1002,
                    "name": "李四",
                    "age": 21,
                    "sex": "女"
                }
            }
        ]
    },
    "aggregations": {
        "all_interests": {
            "doc_count_error_upper_bound": 0,
            "sum_other_doc_count": 0,
            "buckets": [
                {
                    "key": 40,
                    "doc_count": 2
                },
                {
                    "key": 21,
                    "doc_count": 1
                }
            ]
        }
    }
}
从结果可以看出,年龄30的有2条数据,20的有一条,40的一条。
ElasticSearch核心详解
文档
在Elasticsearch中,文档以JSON格式进行存储,可以是复杂的结构,如:
{
    "_index": "haoke",
    "_type": "user",
    "_id": "1005",
    "_version": 1,
    "_score": 1,
    "_source": {
        "id": 1005,
        "name": "孙七",
        "age": 37,
        "sex": "女",
        "card": {
            "card_number": "123456789"
         }
    }
}
其中,card是一个复杂对象,嵌套的Card对象
元数据(metadata)
一个文档不只有数据。它还包含了元数据(metadata)——关于文档的信息。三个必须的元数据节点是:
index
索引(index)类似于关系型数据库里的“数据库”——它是我们存储和索引关联数据的地方。
提示:事实上,我们的数据被存储和索引在分片(shards)中,索引只是一个把一个或多个分片分组在一起的逻辑空间。然而,这只是一些内部细节——我们的程序完全不用关心分片。对于我们的程序而言,文档存储在索引(index)中。剩下的细节由Elasticsearch关心既可。
_type
在应用中,我们使用对象表示一些“事物”,例如一个用户、一篇博客、一个评论,或者一封邮件。每个对象都属于一个类(class),这个类定义了属性或与对象关联的数据。user 类的对象可能包含姓名、性别、年龄和Email地址。
在关系型数据库中,我们经常将相同类的对象存储在一个表里,因为它们有着相同的结构。同理,在Elasticsearch
中,我们使用相同类型(type)的文档表示相同的“事物”,因为他们的数据结构也是相同的。
每个类型(type)都有自己的映射(mapping)或者结构定义,就像传统数据库表中的列一样。所有类型下的文档被存储在同一个索引下,但是类型的映射(mapping)会告诉Elasticsearch不同的文档如何被索引。
_type 的名字可以是大写或小写,不能包含下划线或逗号。我们将使用blog 做为类型名。
_id
id仅仅是一个字符串,它与_index 和_type 组合时,就可以在Elasticsearch中唯一标识一个文档。当创建一个文
档,你可以自定义_id ,也可以让Elasticsearch帮你自动生成(32位长度)
查询响应
pretty
可以在查询url后面添加pretty参数,使得返回的json更易查看。
![]()
指定响应字段
在响应的数据中,如果我们不需要全部的字段,可以指定某些需要的字段进行返回。通过添加 _source
GET /haoke/user/1005?_source=id,name
#响应
{
    "_index": "haoke",
    "_type": "user",
    "_id": "1005",
    "_version": 1,
    "found": true,
    "_source": {
        "name": "孙七",
        "id": 1005
     }
}
如不需要返回元数据,仅仅返回原始数据,可以这样:
GET /haoke/1 user/1005/_source
还可以这样:
GET /haoke/user/1005/_source?_source=id,name
判断文档是否存在
如果我们只需要判断文档是否存在,而不是查询文档内容,那么可以这样:
HEAD /haoke/user/1005
通过发送一个head请求,来判断数据是否存在
HEAD 1 /haoke/user/1006
当然,这只表示你在查询的那一刻文档不存在,但并不表示几毫秒后依旧不存在。另一个进程在这期间可能创建新文档。
批量操作
有些情况下可以通过批量操作以减少网络请求。如:批量查询、批量插入数据。
批量查询
POST /haoke/user/_mget
{
	"ids" : [ "1001", "1003" ]
}
结果:
如果,某一条数据不存在,不影响整体响应,需要通过found的值进行判断是否查询到数据。
POST /haoke/user/_mget
{
	"ids" : [ "1001", "1006" ]
}
结果:
也就是说,一个数据的存在不会影响其它数据的返回
_bulk操作
在Elasticsearch中,支持批量的插入、修改、删除操作,都是通过_bulk的api完成的。
请求格式如下:(请求格式不同寻常)
{ action: { metadata }}
{ request body }
{ action: { metadata }}
{ request body }
...
批量插入数据:
{"create":{"_index":"haoke","_type":"user","_id":2001}}
{"id":2001,"name":"name1","age": 20,"sex": "男"}
{"create":{"_index":"haoke","_type":"user","_id":2002}}
{"id":2002,"name":"name2","age": 20,"sex": "男"}
{"create":{"_index":"haoke","_type":"user","_id":2003}}
{"id":2003,"name":"name3","age": 20,"sex": "男"}
注意最后一行的回车。
批量删除:
{"delete":{"_index":"haoke","_type":"user","_id":2001}}
{"delete":{"_index":"haoke","_type":"user","_id":2002}}
{"delete":{"_index":"haoke","_type":"user","_id":2003}}
由于delete没有请求体,所以,action的下一行直接就是下一个action。
其他操作就类似了。一次请求多少性能最高?
- 整个批量请求需要被加载到接受我们请求节点的内存里,所以请求越大,给其它请求可用的内存就越小。有一
个最佳的bulk请求大小。超过这个大小,性能不再提升而且可能降低。 - 最佳大小,当然并不是一个固定的数字。它完全取决于你的硬件、你文档的大小和复杂度以及索引和搜索的负
载。 - 幸运的是,这个最佳点(sweetspot)还是容易找到的:试着批量索引标准的文档,随着大小的增长,当性能开始
降低,说明你每个批次的大小太大了。开始的数量可以在1000~5000个文档之间,如果你的文档非常大,可以使用较小的批次。 - 通常着眼于你请求批次的物理大小是非常有用的。一千个1kB的文档和一千个1MB的文档大不相同。一个好的
批次最好保持在5-15MB大小间。
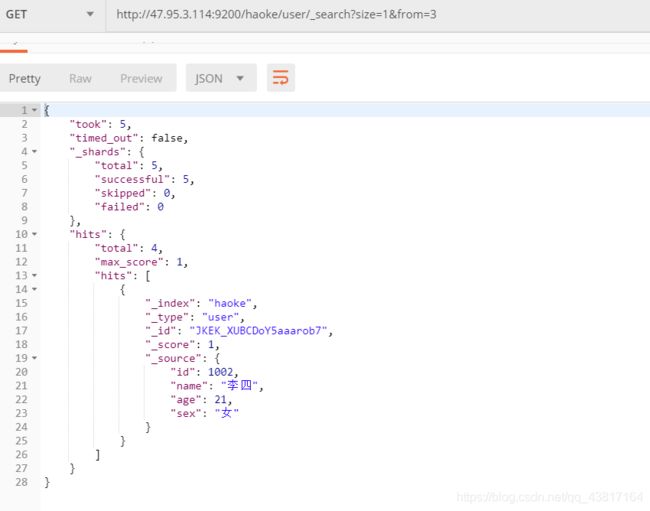
分页
和SQL使用LIMIT 关键字返回只有一页的结果一样,Elasticsearch接受from 和size 参数:
- size: 结果数,默认10
- from: 跳过开始的结果数,默认0
如果你想每页显示5个结果,页码从1到3,那请求如下:
GET /_search?size=5
GET /_search?size=5&from=5
GET /_search?size=5&from=10
应该当心分页太深或者一次请求太多的结果。结果在返回前会被排序。但是记住一个搜索请求常常涉及多个分
片。每个分片生成自己排好序的结果,它们接着需要集中起来排序以确保整体排序正确。
GET /haoke/user/_1 search?size=1&from=3
在集群系统中深度分页
为了理解为什么深度分页是有问题的,让我们假设在一个有5个主分片的索引中搜索。当我们请求结果的第一
页(结果1到10)时,每个分片产生自己最顶端10个结果然后返回它们给请求节点(requesting node),它再
排序这所有的50个结果以选出顶端的10个结果。
现在假设我们请求第1000页——结果10001到10010。工作方式都相同,不同的是每个分片都必须产生顶端的
10010个结果。然后请求节点排序这50050个结果并丢弃50040个!
你可以看到在分布式系统中,排序结果的花费随着分页的深入而成倍增长。这也是为什么网络搜索引擎中任何
语句不能返回多于1000个结果的原因。
映射
前面我们创建的索引以及插入数据,都是由Elasticsearch进行自动判断类型,有些时候我们是需要进行明确字段类型的,否则,自动判断的类型和实际需求是不相符的。
自动判断的规则如下:
Elasticsearch中支持的类型如下:
- string类型在ElasticSearch 旧版本中使用较多,从ElasticSearch 5.x开始不再支持string,由text和
keyword类型替代。 - text 类型,当一个字段是要被全文搜索的,比如Email内容、产品描述,应该使用text类型。设置text类型
以后,字段内容会被分析,在生成倒排索引以前,字符串会被分析器分成一个一个词项。text类型的字段
不用于排序,很少用于聚合。 - keyword类型适用于索引结构化的字段,比如email地址、主机名、状态码和标签。如果字段需要进行过
滤(比如查找已发布博客中status属性为published的文章)、排序、聚合。keyword类型的字段只能通过精
确值搜索到。
创建明确类型的索引:
如果你要像之前旧版版本一样兼容自定义 type ,需要将 **i**nclude_type_name=true 携带
put http://202.193.56.222:9200/itcast?include_type_name=true
{
    "settings":{
        "index":{
            "number_of_shards":"2",
            "number_of_replicas":"0"
        }
    },
    "mappings":{
        "person":{
            "properties":{
                "name":{
                    "type":"text"
                },
                "age":{
                    "type":"integer"
                },
                "mail":{
                    "type":"keyword"
                },
                "hobby":{
                    "type":"text"
                }
            }
        }
    }
}
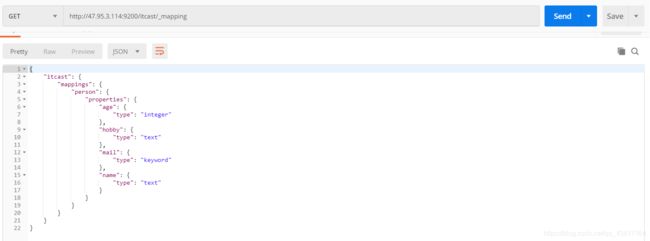
查看映射
GET /itcast/_mapping
插入数据
POST /itcast/_bulk
{"index":{"_index":"itcast","_type":"person"}}
{"name":"张三","age": 20,"mail": "[email protected]","hobby":"羽毛球、乒乓球、足球"}
{"index":{"_index":"itcast","_type":"person"}}
{"name":"李四","age": 21,"mail": "[email protected]","hobby":"羽毛球、乒乓球、足球、篮球"}
{"index":{"_index":"itcast","_type":"person"}}
{"name":"王五","age": 22,"mail": "[email protected]","hobby":"羽毛球、篮球、游泳、听音乐"}
{"index":{"_index":"itcast","_type":"person"}}
{"name":"赵六","age": 23,"mail": "[email protected]","hobby":"跑步、游泳"}
{"index":{"_index":"itcast","_type":"person"}}
{"name":"孙七","age": 24,"mail": "[email protected]","hobby":"听音乐、看电影"}
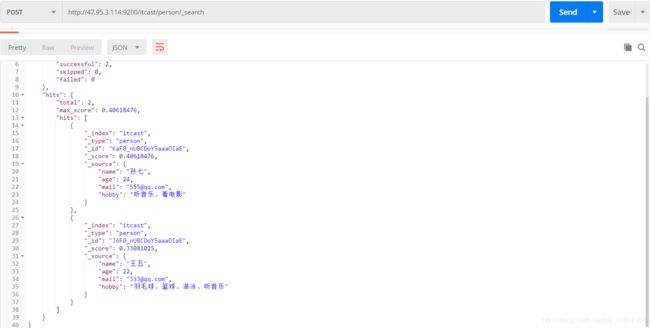
测试搜索
POST /itcast/person/_search
{
    "query":{
        "match":{
            "hobby":"音乐"
        }
    }
}
结构化查询
term查询
term 主要用于精确匹配哪些值,比如数字,日期,布尔值或 not_analyzed 的字符串(未经分析的文本数据类型):
{ "term": { "age": 26 }}
{ "term": { "date": "2014-09-01" }}
{ "term": { "public": true }}
{ "term": { "tag": "full_text" }}
示例
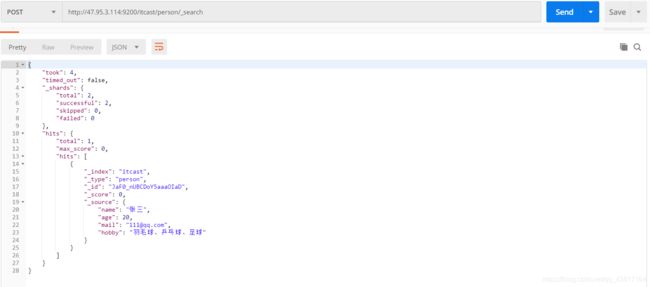
POST /itcast/person/_search
{
    "query":{
        "term":{
            "age":20
        }
    }
}
terms查询
terms 跟 term 有点类似,但 terms 允许指定多个匹配条件。 如果某个字段指定了多个值,那么文档需要一起去
做匹配:
{
    "terms":{
        "tag":[
            "search",
            "full_text",
            "nosql"
        ]
    }
}
示例:
POST /itcast/person/_search
{
    "query":{
        "terms":{
            "age":[
                20,
                21
            ]
        }
    }
}
![]()
range查询
range 过滤允许我们按照指定范围查找一批数据:
{
    "range":{
        "age":{
            "gte":20,
            "lt":30
        }
    }
}
范围操作符包含:
- gt : 大于
- gte:: 大于等于
- lt : 小于
- lte: 小于等于
示例:
POST /itcast/person/_search
{
    "query":{
        "range":{
            "age":{
                "gte":20,
                "lte":22
            }
        }
    }
}
exists 查询
exists 查询可以用于查找文档中是否包含指定字段或没有某个字段,类似于SQL语句中的IS_NULL 条件
{
    "exists": {
    	"field": "title"
    }
}
这两个查询只是针对已经查出一批数据来,但是想区分出某个字段是否存在的时候使用。示例:
POST /haoke/user/_search
{
    "query": {
        "exists": { #必须包含
        	"field": "card"
        }
    }
}
match查询
match 查询是一个标准查询,不管你需要全文本查询还是精确查询基本上都要用到它。
如果你使用 match 查询一个全文本字段,它会在真正查询之前用分析器先分析match 一下查询字符:
{
    "match": {
    	"tweet": "About Search"
    }
}
如果用match 下指定了一个确切值,在遇到数字,日期,布尔值或者not_analyzed 的字符串时,它将为你搜索你
给定的值:
{ "match": { "age": 26 }}
{ "match": { "date": "2014-09-01" }}
{ "match": { "public": true }}
{ "match": { "tag": "full_text" }}
bool查询
- bool 查询可以用来合并多个条件查询结果的布尔逻辑,它包含一下操作符:
- must :: 多个查询条件的完全匹配,相当于 and 。
- must_not :: 多个查询条件的相反匹配,相当于 not 。
- should :: 至少有一个查询条件匹配, 相当于 or 。
这些参数可以分别继承一个查询条件或者一个查询条件的数组:
{
    "bool":{
        "must":{
            "term":{
                "folder":"inbox"
            }
        },
        "must_not":{
            "term":{
                "tag":"spam"
            }
        },
        "should":[
            {
                "term":{
                    "starred":true
                }
            },
            {
                "term":{
                    "unread":true
                }
            }
        ]
    }
}
{
	"query":{
    "bool":{
        "must":{
            "match":{
                "hobby":"足球"
            }
        },
        "must_not":{
            "match":{
                "hobby":"音乐"
            }
        }
    }
}
}
过滤查询
前面讲过结构化查询,Elasticsearch也支持过滤查询,如term、range、match等。
示例:查询年龄为20岁的用户。
POST /itcast/person/_search
{
    "query":{
        "bool":{
            "filter":{
                "term":{
                    "age":20
                }
            }
        }
    }
}
查询和过滤的对比
- 一条过滤语句会询问每个文档的字段值是否包含着特定值。
- 查询语句会询问每个文档的字段值与特定值的匹配程度如何。
- 一条查询语句会计算每个文档与查询语句的相关性,会给出一个相关性评分 _score,并且 按照相关性对匹
配到的文档进行排序。 这种评分方式非常适用于一个没有完全配置结果的全文本搜索。 - 一个简单的文档列表,快速匹配运算并存入内存是十分方便的, 每个文档仅需要1个字节。这些缓存的过滤结果集与后续请求的结合使用是非常高效的。
- 查询语句不仅要查找相匹配的文档,还需要计算每个文档的相关性,所以一般来说查询语句要比 过滤语句更耗时,并且查询结果也不可缓存。
建议:
做精确匹配搜索时,最好用过滤语句,因为过滤语句可以缓存数据。
中文分词
什么是分词
分词就是指将一个文本转化成一系列单词的过程,也叫文本分析,在Elasticsearch中称之为Analysis。
举例:我是中国人 --> 我/是/中国人
分词api
指定分词器进行分词
POST /_analyze
{
    "analyzer":"standard",
    "text":"hello world"
}
结果如下
在结果中不仅可以看出分词的结果,还返回了该词在文本中的位置。
指定索引分词
POST /itcast/_analyze
{
    "analyzer": "standard",
    "field": "hobby",
    "text": "听音乐"
}
中文分词难点
中文分词的难点在于,在汉语中没有明显的词汇分界点,如在英语中,空格可以作为分隔符,如果分隔不正确就会造成歧义。如:
- 我/爱/炒肉丝
- 我/爱/炒/肉丝
常用中文分词器,IK、jieba、THULAC等,推荐使用IK分词器。
IK Analyzer是一个开源的,基于java语言开发的轻量级的中文分词工具包。从2006年12月推出1.0版开始,IKAnalyzer已经推出了3个大版本。最初,它是以开源项目Luence为应用主体的,结合词典分词和文法分析算法的中文分词组件。新版本的IK Analyzer 3.0则发展为面向Java的公用分词组件,独立于Lucene项目,同时提供了对Lucene的默认优化实现。
采用了特有的“正向迭代最细粒度切分算法“,具有80万字/秒的高速处理能力 采用了多子处理器分析模式,支持:英文字母(IP地址、Email、URL)、数字(日期,常用中文数量词,罗马数字,科学计数法),中文词汇(姓名、地名处理)等分词处理。 优化的词典存储,更小的内存占用。
IK分词器 Elasticsearch插件地址:https://github.com/medcl/elasticsearch-analysis-ik
docker安装IK分词器
安装分词器
docker安装IK分词器
首先下载到最新的ik分词器:下载地址
下载完成后,使用xftp工具,拷贝到服务器上
#安装方法:将下载到的 es/plugins/ik 目录下
mkdir es/plugins/ik

#解压
unzip elasticsearch-analysis-ik-7.9.1.zip

#重启
./bin/elasticsearch
我们通过日志,发现它已经成功加载了ik分词器插件
测试
POST /_analyze
{
    "analyzer": "ik_max_word",
    "text": "我是中国人"
}
我们发现ik分词器已经成功分词完成
全文搜索
全文搜索两个最重要的方面是:
- 相关性(Relevance) 它是评价查询与其结果间的相关程度,并根据这种相关程度对结果排名的一种能力,这
种计算方式可以是 TF/IDF 方法、地理位置邻近、模糊相似,或其他的某些算法。 - 分词(Analysis) 它是将文本块转换为有区别的、规范化的 token 的一个过程,目的是为了创建倒排索引以及查询倒排索引。
构造数据
ES 7.4 默认不在支持指定索引类型,默认索引类型是_doc
PUT http://202.193.56.222:9200/itcast
{
    "settings":{
        "index":{
            "number_of_shards":"1",
            "number_of_replicas":"0"
        }
    },
    "mappings":{
        "person":{
            "properties":{
                "name":{
                    "type":"text"
                },
                "age":{
                    "type":"integer"
                },
                "mail":{
                    "type":"keyword"
                },
                "hobby":{
                    "type":"text",
                    "analyzer":"ik_max_word"
                }
            }
        }
    }
}
然后插入数据
POST http://202.193.56.222:9200/itcast/_bulk
{"index":{"_index":"itcast","_type":"person"}}
{"name":"张三","age": 20,"mail": "[email protected]","hobby":"羽毛球、乒乓球、足球"}
{"index":{"_index":"itcast","_type":"person"}}
{"name":"李四","age": 21,"mail": "[email protected]","hobby":"羽毛球、乒乓球、足球、篮球"}
{"index":{"_index":"itcast","_type":"person"}}
{"name":"王五","age": 22,"mail": "[email protected]","hobby":"羽毛球、篮球、游泳、听音乐"}
{"index":{"_index":"itcast","_type":"person"}}
{"name":"赵六","age": 23,"mail": "[email protected]","hobby":"跑步、游泳、篮球"}
{"index":{"_index":"itcast","_type":"person"}}
{"name":"孙七","age": 24,"mail": "[email protected]","hobby":"听音乐、看电影、羽毛球"}
单词搜索
POST /itcast/person/_search
{
    "query":{
        "match":{
            "hobby":"音乐"
        }
    },
    "highlight":{
        "fields":{
            "hobby":{

            }
        }
    }
}
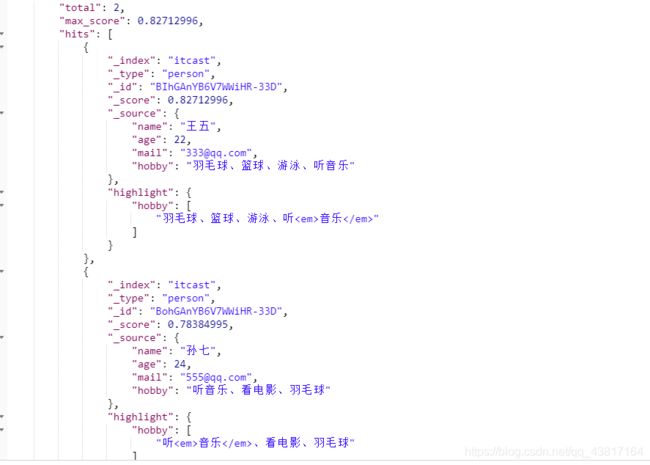
查询出来的结果如下,并且还带有高亮
过程说明:
- 检查字段类型
- 爱好 hobby 字段是一个 text 类型( 指定了IK分词器),这意味着查询字符串本身也应该被分词。
- 分析查询字符串 。
- 将查询的字符串 “音乐” 传入IK分词器中,输出的结果是单个项 音乐。因为只有一个单词项,所以 match 查询执行的是单个底层 term 查询。
- 查找匹配文档 。
- 用 term 查询在倒排索引中查找 “音乐” 然后获取一组包含该项的文档,本例的结果是文档:3 、5 。
- 为每个文档评分 。
- 用 term 查询计算每个文档相关度评分 _score ,这是种将 词频(term frequency,即词 “音乐” 在相关文档的hobby 字段中出现的频率)和 反向文档频率(inverse document frequency,即词 “音乐” 在所有文档的hobby 字段中出现的频率),以及字段的长度(即字段越短相关度越高)相结合的计算方式。
多词搜索
POST /itcast/person/_search
{
    "query":{
        "match":{
            "hobby":"音乐 篮球"
        }
    },
    "highlight":{
        "fields":{
            "hobby":{

            }
        }
    }
}
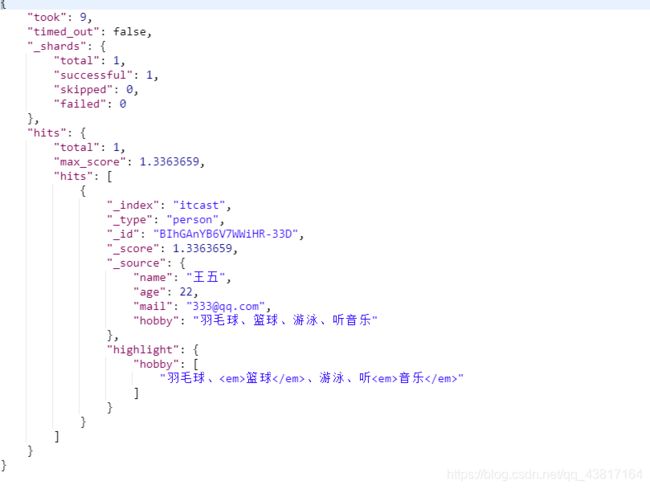
可以看到,包含了“音乐”、“篮球”的数据都已经被搜索到了。可是,搜索的结果并不符合我们的预期,因为我们想搜索的是既包含“音乐”又包含“篮球”的用户,显然结果返回的“或”的关系。在Elasticsearch中,可以指定词之间的逻辑关系,如下:
POST /itcast/person/_search
{
    "query":{
        "match":{
            "hobby":{
            	"operator":"and",
            	"query": "音乐 篮球"
            }
        }
    },
    "highlight":{
        "fields":{
            "hobby":{

            }
        }
    }
}
通过这样的话,就会让两个关键字之间存在and关系了
可以看到结果符合预期。
前面我们测试了“OR” 和 “AND”搜索,这是两个极端,其实在实际场景中,并不会选取这2个极端,更有可能是选取这种,或者说,只需要符合一定的相似度就可以查询到数据,在Elasticsearch中也支持这样的查询,通过
minimum_should_match来指定匹配度,如:70%;
示例:
{
    "query":{
        "match":{
            "hobby":{
            "minimum_should_match":"80%",
            	"query": "游泳 羽毛球"
            }
        }
    },
    "highlight":{
        "fields":{
            "hobby":{

            }
        }
    }
}
#结果:省略显示
"hits": {
"total": 4, #相似度为80%的情况下,查询到4条数据
"max_score": 1.621458,
"hits": [

}
#设置40%进行测试:
{
    "query":{
        "match":{
            "hobby":{
            "query":"游泳 羽毛球",
            "minimum_should_match":"40%"
            }
            }
            },
            "highlight": {
            "fields": {
            "hobby": {}
        }
    }
}

#结果:
"hits": {
"total": 5, #相似度为40%的情况下,查询到5条数据
"max_score": 1.621458,
"hits": [

}
相似度应该多少合适,需要在实际的需求中进行反复测试,才可得到合理的值。
组合搜索
在搜索时,也可以使用过滤器中讲过的bool组合查询,示例:
POST /itcast/person/_search
{
    "query":{
        "bool":{
            "must":{
                "match":{
                    "hobby":"篮球"
                }
            },
            "must_not":{
                "match":{
                    "hobby":"音乐"
                }
            },
            "should":[
                {
                    "match":{
                        "hobby":"游泳"
                    }
                }
            ]
        }
    },
    "highlight":{
        "fields":{
            "hobby":{

            }
        }
    }
}
上面搜索的意思是:
搜索结果中必须包含篮球,不能包含音乐,如果包含了游泳,那么它的相似度更高。
结果:
评分的计算规则
bool 查询会为每个文档计算相关度评分 _score , 再将所有匹配的 must 和 should 语句的分数 _score 求和,最后除以 must 和 should 语句的总数。
must_not 语句不会影响评分; 它的作用只是将不相关的文档排除。
默认情况下,should中的内容不是必须匹配的,如果查询语句中没有must,那么就会至少匹配其中一个。当然了,也可以通过minimum_should_match参数进行控制,该值可以是数字也可以的百分比。
示例:
POST /itcast/person/_search
{
    "query":{
        "bool":{
            "should":[
                {
                    "match":{
                        "hobby":"游泳"
                    }
                },
                {
                    "match":{
                        "hobby":"篮球"
                    }
                },
                {
                    "match":{
                        "hobby":"音乐"
                    }
                }
            ],
            "minimum_should_match":2
        }
    },
    "highlight":{
        "fields":{
            "hobby":{

            }
        }
    }
}
minimum_should_match为2,意思是should中的三个词,至少要满足2个。
权重
有些时候,我们可能需要对某些词增加权重来影响该条数据的得分。如下:
搜索关键字为“游泳篮球”,如果结果中包含了“音乐”权重为10,包含了“跑步”权重为2。
POST /itcast/person/_search
{
    "query":{
        "bool":{
            "must":{
                "match":{
                    "hobby":{
                        "query":"游泳篮球",
                        "operator":"and"
                    }
                }
            },
            "should":[
                {
                    "match":{
                        "hobby":{
                            "query":"音乐",
                            "boost":10
                        }
                    }
                },
                {
                    "match":{
                        "hobby":{
                            "query":"跑步",
                            "boost":2
                        }
                    }
                }
            ]
        }
    },
    "highlight":{
        "fields":{
            "hobby":{

            }
        }
    }
}
ElasticSearch集群
集群节点
ELasticsearch的集群是由多个节点组成的,通过cluster.name设置集群名称,并且用于区分其它的集群,每个节点通过node.name指定节点的名称。
在Elasticsearch中,节点的类型主要有4种:
- master节点
- 配置文件中node.master属性为true(默认为true),就有资格被选为master节点。master节点用于控制整个集群的操作。比如创建或删除索引,管理其它非master节点等。
- data节点
- 配置文件中node.data属性为true(默认为true),就有资格被设置成data节点。data节点主要用于执行数据相关的操作。比如文档的CRUD。
- 客户端节点
- 配置文件中node.master属性和node.data属性均为false。
- 该节点不能作为master节点,也不能作为data节点。
- 可以作为客户端节点,用于响应用户的请求,把请求转发到其他节点
- 部落节点
- 当一个节点配置tribe.*的时候,它是一个特殊的客户端,它可以连接多个集群,在所有连接的集群上执行
搜索和其他操作。
- 当一个节点配置tribe.*的时候,它是一个特殊的客户端,它可以连接多个集群,在所有连接的集群上执行
搭建集群
#启动3个虚拟机,分别在3台虚拟机上部署安装Elasticsearch
mkdir /itcast/es-cluster

#分发到其它机器
scp -r es-cluster [email protected]:/itcast

#node01的配置:
cluster.name: es-itcast-cluster
node.name: node01
node.master: true
node.data: true
network.host: 0.0.0.0
http.port: 9200
discovery.zen.ping.unicast.hosts: ["192.168.40.133","192.168.40.134","192.168.40.135"]
# 最小节点数
discovery.zen.minimum_master_nodes: 2
# 跨域专用
http.cors.enabled: true
http.cors.allow-origin: "*"

#node02的配置:
cluster.name: es-itcast-cluster
node.name: node02
node.master: true
node.data: true
network.host: 0.0.0.0
http.port: 9200
discovery.zen.ping.unicast.hosts: ["192.168.40.133","192.168.40.134","192.168.40.135"]
discovery.zen.minimum_master_nodes: 2
http.cors.enabled: true
http.cors.allow-origin: "*"

#node03的配置:
cluster.name: es-itcast-cluster
node.name: node02
node.master: true
node.data: true
network.host: 0.0.0.0
http.port: 9200
discovery.zen.ping.unicast.hosts: ["192.168.40.133","192.168.40.134","192.168.40.135"]
discovery.zen.minimum_master_nodes: 2
http.cors.enabled: true
http.cors.allow-origin: "*"

#分别启动3个节点
./elasticsearch
查看集群
创建索引:
查询集群状态:/_cluster/health
响应:
集群中有三种颜色
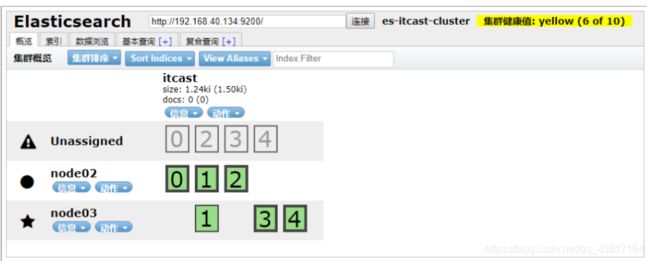
分片和副本
为了将数据添加到Elasticsearch,我们需要索引(index)——一个存储关联数据的地方。实际上,索引只是一个用来指向一个或多个分片(shards)的“逻辑命名空间(logical namespace)”.
- 一个分片(shard)是一个最小级别“工作单元(worker unit)”,它只是保存了索引中所有数据的一部分。
- 我们需要知道是分片就是一个Lucene实例,并且它本身就是一个完整的搜索引擎。应用程序不会和它直接通
信。 - 分片可以是主分片(primary shard)或者是复制分片(replica shard)。
- 索引中的每个文档属于一个单独的主分片,所以主分片的数量决定了索引最多能存储多少数据。
- 复制分片只是主分片的一个副本,它可以防止硬件故障导致的数据丢失,同时可以提供读请求,比如搜索或者从别的shard取回文档。
- 当索引创建完成的时候,主分片的数量就固定了,但是复制分片的数量可以随时调整。
故障转移
将data节点停止
这里选择将node02停止:
当前集群状态为黄色,表示主节点可用,副本节点不完全可用,过一段时间观察,发现节点列表中看不到node02,副本节点分配到了node01和node03,集群状态恢复到绿色。
将node02恢复: ./node02/1 bin/elasticsearch
可以看到,node02恢复后,重新加入了集群,并且重新分配了节点信息。
将master节点停止
接下来,测试将node01停止,也就是将主节点停止。
从结果中可以看出,集群对master进行了重新选举,选择node03为master。并且集群状态变成黄色。
等待一段时间后,集群状态从黄色变为了绿色:
恢复node01节点:
./node01/1 bin/elasticsearch
重启之后,发现node01可以正常加入到集群中,集群状态依然为绿色:
特别说明:
如果在配置文件中discovery.zen.minimum_master_nodes设置的不是N/2+1时,会出现脑裂问题,之前宕机
的主节点恢复后不会加入到集群。
分布式文档
路由
首先,来看个问题:
如图所示:当我们想一个集群保存文档时,文档该存储到哪个节点呢? 是随机吗? 是轮询吗?实际上,在ELasticsearch中,会采用计算的方式来确定存储到哪个节点,计算公式如下:
shard = hash(routing) % number_1 of_primary_shards
其中:
- routing值是一个任意字符串,它默认是_id但也可以自定义。
- 这个routing字符串通过哈希函数生成一个数字,然后除以主切片的数量得到一个余数(remainder),余数
的范围永远是0到number_of_primary_shards - 1,这个数字就是特定文档所在的分片
这就是为什么创建了主分片后,不能修改的原因。
文档的写操作
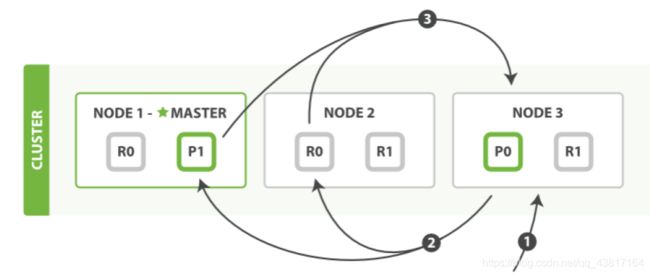
新建、索引和删除请求都是写(write)操作,它们必须在主分片上成功完成才能复制分片上
下面我们罗列在主分片和复制分片上成功新建、索引或删除一个文档必要的顺序步骤:
- 客户端给Node 1 发送新建、索引或删除请求。
- 节点使用文档的_id 确定文档属于分片0 。它转发请求到Node 3 ,分片0 位于这个节点上。
- Node 3 在主分片上执行请求,如果成功,它转发请求到相应的位于Node 1 和Node 2 的复制节点上。当所有
的复制节点报告成功, Node 3 报告成功到请求的节点,请求的节点再报告给客户端。
客户端接收到成功响应的时候,文档的修改已经被应用于主分片和所有的复制分片。你的修改生效了。
搜索文档
文档能够从主分片或任意一个复制分片被检索。
下面我们罗列在主分片或复制分片上检索一个文档必要的顺序步骤:
- 客户端给Node 1 发送get请求。
- 节点使用文档的_id 确定文档属于分片0 。分片0 对应的复制分片在三个节点上都有。此时,它转发请求到
Node 2 。 - Node 2 返回文档(document)给Node 1 然后返回给客户端。对于读请求,为了平衡负载,请求节点会为每个请求选择不同的分片——它会循环所有分片副本。可能的情况是,一个被索引的文档已经存在于主分片上却还没来得及同步到复制分片上。这时复制分片会报告文档未找到,主分片会成功返回文档。一旦索引请求成功返回给用户,文档则在主分片和复制分片都是可用的。
全文搜索
对于全文搜索而言,文档可能分散在各个节点上,那么在分布式的情况下,如何搜索文档呢?
搜索,分为2个阶段,
- 搜索(query)
- 取回(fetch)
搜索(query)
查询阶段包含以下三步:
- 客户端发送一个search(搜索) 请求给Node 3 , Node 3 创建了一个长度为from+size 的空优先级队
- Node 3 转发这个搜索请求到索引中每个分片的原本或副本。每个分片在本地执行这个查询并且结果将结果到
一个大小为from+size 的有序本地优先队列里去。 - 每个分片返回document的ID和它优先队列里的所有document的排序值给协调节点Node 3 。Node 3 把这些
值合并到自己的优先队列里产生全局排序结果。
取回 fetch
分发阶段由以下步骤构成:
- 协调节点辨别出哪个document需要取回,并且向相关分片发出GET 请求。
- 每个分片加载document并且根据需要丰富(enrich)它们,然后再将document返回协调节点。
- 一旦所有的document都被取回,协调节点会将结果返回给客户端。
Java客户端
在Elasticsearch中,为java提供了2种客户端,一种是REST风格的客户端,另一种是Java API的客户端
REST客户端
Elasticsearch提供了2种REST客户端,一种是低级客户端,一种是高级客户端。
- Java Low Level REST Client:官方提供的低级客户端。该客户端通过http来连接Elasticsearch集群。用户在使
用该客户端时需要将请求数据手动拼接成Elasticsearch所需JSON格式进行发送,收到响应时同样也需要将返回的JSON数据手动封装成对象。虽然麻烦,不过该客户端兼容所有的Elasticsearch版本。 - Java High Level REST Client:官方提供的高级客户端。该客户端基于低级客户端实现,它提供了很多便捷的
API来解决低级客户端需要手动转换数据格式的问题。
构造数据
POST /haoke/house/_bulk

{"index":{"_index":"haoke","_type":"house"}}
{"id":"1001","title":"整租 · 南丹大楼 1居室 7500","price":"7500"}
{"index":{"_index":"haoke","_type":"house"}}
{"id":"1002","title":"陆家嘴板块,精装设计一室一厅,可拎包入住诚意租。","price":"8500"}
{"index":{"_index":"haoke","_type":"house"}}
{"id":"1003","title":"整租 · 健安坊 1居室 4050","price":"7500"}
{"index":{"_index":"haoke","_type":"house"}}
{"id":"1004","title":"整租 · 中凯城市之光+视野开阔+景色秀丽+拎包入住","price":"6500"}
{"index":{"_index":"haoke","_type":"house"}}
{"id":"1005","title":"整租 · 南京西路品质小区 21213三轨交汇 配套齐* 拎包入住","price":"6000"}
{"index":{"_index":"haoke","_type":"house"}}
{"id":"1006","title":"祥康里 简约风格 *南户型 拎包入住 看房随时","price":"7000"}
REST低级客户端
创建项目,加入依赖
<project xmlns="http://maven.apache.org/POM/4.0.0"
         xmlns:xsi="http://www.w3.org/2001/XMLSchema-instance"
         xsi:schemaLocation="http://maven.apache.org/POM/4.0.0 http://maven.apache.org/xsd/maven-4.0.0.xsd">
    <modelVersion>4.0.0modelVersion>

    <groupId>org.examplegroupId>
    <artifactId>Study_ElasticSearch_CodeartifactId>
    <version>1.0-SNAPSHOTversion>
    <build>
        <plugins>
            <plugin>
                <groupId>org.apache.maven.pluginsgroupId>
                <artifactId>maven-compiler-pluginartifactId>
                <configuration>
                    <source>7source>
                    <target>7target>
                configuration>
            plugin>
        plugins>
    build>

    <dependencies>
        <dependency>
            <groupId>org.elasticsearch.clientgroupId>
            <artifactId>elasticsearch-rest-clientartifactId>
            <version>6.8.5version>
        dependency>
        <dependency>
            <groupId>junitgroupId>
            <artifactId>junitartifactId>
            <version>4.12version>
            <scope>testscope>
        dependency>
        <dependency>
            <groupId>com.fasterxml.jackson.coregroupId>
            <artifactId>jackson-databindartifactId>
            <version>2.11.1version>
        dependency>
    dependencies>
project>
编写测试类
import com.fasterxml.jackson.core.JsonProcessingException;
import com.fasterxml.jackson.databind.ObjectMapper;
import org.apache.http.HttpHost;
import org.apache.http.util.EntityUtils;
import org.elasticsearch.client.Request;
import org.elasticsearch.client.Response;
import org.elasticsearch.client.RestClient;
import org.elasticsearch.client.RestClientBuilder;

import java.io.IOException;
import java.util.HashMap;
import java.util.Map;

/**
 * 使用低级客户端 访问
 *
 * @author: 陌溪
 * @create: 2020-09-23-16:33
 */
public class ESApi {
    private RestClient restClient;
    private static final ObjectMapper MAPPER = new ObjectMapper();

    /**
     * 初始化
     */
    public void init() {
        RestClientBuilder restClientBuilder = RestClient.builder(new HttpHost("202.193.56.222", 9200, "http"));
        this.restClient = restClientBuilder.build();
    }

    /**
     * 查询集群状态
     */
    public void testGetInfo() throws IOException {
        Request request = new Request("GET", "/_cluster/state");
        request.addParameter("pretty", "true");
        Response response = this.restClient.performRequest(request);
        System.out.println(response.getStatusLine());
        System.out.println(EntityUtils.toString(response.getEntity()));
    }

    /**
     * 根据ID查询数据
     * @throws IOException
     */
    public void testGetHouseInfo() throws IOException {
        Request request = new Request("GET", "/haoke/house/Z3CduXQBYpWein3CRFug");
        request.addParameter("pretty", "true");
        Response response = this.restClient.performRequest(request);
        System.out.println(response.getStatusLine());
        System.out.println(EntityUtils.toString(response.getEntity()));
    }

    public void testCreateData() throws IOException {
        Request request = new Request("POST", "/haoke/house");
        Map<String, Object> data = new HashMap<>();
        data.put("id", "2001");
        data.put("title", "张江高科");
        data.put("price", "3500");
        // 写成JSON
        request.setJsonEntity(MAPPER.writeValueAsString(data));
        Response response = this.restClient.performRequest(request);
        System.out.println(response.getStatusLine());
        System.out.println(EntityUtils.toString(response.getEntity()));

    }

    // 搜索数据
    public void testSearchData() throws IOException {
        Request request = new Request("POST", "/haoke/house/_search");
        String searchJson = "{\"query\": {\"match\": {\"title\": \"拎包入住\"}}}";
        request.setJsonEntity(searchJson);
        request.addParameter("pretty","true");
        Response response = this.restClient.performRequest(request);
        System.out.println(response.getStatusLine());
        System.out.println(EntityUtils.toString(response.getEntity()));
    }

    public static void main(String[] args) throws IOException {
        ESApi esApi = new ESApi();
        esApi.init();
//        esApi.testGetInfo();
//        esApi.testGetHouseInfo();
        esApi.testCreateData();
    }
}
REST高级客户端
创建项目,引入依赖
<dependency>
    <groupId>org.elasticsearch.clientgroupId>
    <artifactId>elasticsearch-rest-high-level-clientartifactId>
    <version>6.8.5version>
dependency>
编写测试用例
import com.fasterxml.jackson.databind.ObjectMapper;
import org.apache.http.HttpHost;
import org.apache.http.util.EntityUtils;
import org.elasticsearch.action.ActionListener;
import org.elasticsearch.action.delete.DeleteRequest;
import org.elasticsearch.action.delete.DeleteResponse;
import org.elasticsearch.action.get.GetRequest;
import org.elasticsearch.action.get.GetResponse;
import org.elasticsearch.action.index.IndexRequest;
import org.elasticsearch.action.index.IndexResponse;
import org.elasticsearch.action.search.SearchRequest;
import org.elasticsearch.action.search.SearchResponse;
import org.elasticsearch.action.update.UpdateRequest;
import org.elasticsearch.action.update.UpdateResponse;
import org.elasticsearch.client.*;
import org.elasticsearch.common.Strings;
import org.elasticsearch.common.unit.TimeValue;
import org.elasticsearch.index.query.QueryBuilders;
import org.elasticsearch.search.SearchHit;
import org.elasticsearch.search.SearchHits;
import org.elasticsearch.search.builder.SearchSourceBuilder;
import org.elasticsearch.search.fetch.subphase.FetchSourceContext;

import java.io.IOException;
import java.util.HashMap;
import java.util.Map;
import java.util.concurrent.TimeUnit;

/**
 * ES高级客户端
 *
 * @author: 陌溪
 * @create: 2020-09-23-16:56
 */
public class ESHightApi {
    private RestHighLevelClient client;

    public void init() {
        RestClientBuilder restClientBuilder = RestClient.builder(
                new HttpHost("202.193.56.222", 9200, "http"));
        this.client = new RestHighLevelClient(restClientBuilder);
    }

    public void after() throws Exception {
        this.client.close();
    }

    /**
     * 新增文档,同步操作
     *
     * @throws Exception
     */
    public void testCreate() throws Exception {
        Map<String, Object> data = new HashMap<>();
        data.put("id", "2002");
        data.put("title", "南京西路 拎包入住 一室一厅");
        data.put("price", "4500");
        IndexRequest indexRequest = new IndexRequest("haoke", "house")
                .source(data);
        IndexResponse indexResponse = this.client.index(indexRequest,
                RequestOptions.DEFAULT);
        System.out.println("id->" + indexResponse.getId());
        System.out.println("index->" + indexResponse.getIndex());
        System.out.println("type->" + indexResponse.getType());
        System.out.println("version->" + indexResponse.getVersion());
        System.out.println("result->" + indexResponse.getResult());
        System.out.println("shardInfo->" + indexResponse.getShardInfo());
    }

    /**
     * 异步创建文档
     * @throws Exception
     */
    public void testCreateAsync() throws Exception {
        Map<String, Object> data = new HashMap<>();
        data.put("id", "2003");
        data.put("title", "南京东路 最新房源 二室一厅");
        data.put("price", "5500");
        IndexRequest indexRequest = new IndexRequest("haoke", "house")
                .source(data);
        this.client.indexAsync(indexRequest, RequestOptions.DEFAULT, new
                ActionListener<IndexResponse>() {
                    @Override
                    public void onResponse(IndexResponse indexResponse) {
                        System.out.println("id->" + indexResponse.getId());
                        System.out.println("index->" + indexResponse.getIndex());
                        System.out.println("type->" + indexResponse.getType());
                        System.out.println("version->" + indexResponse.getVersion());
                        System.out.println("result->" + indexResponse.getResult());
                        System.out.println("shardInfo->" + indexResponse.getShardInfo());
                    }
                    @Override
                    public void onFailure(Exception e) {
                        System.out.println(e);
                    }
                });
        System.out.println("ok");
        Thread.sleep(20000);
    }

    /**
     * 查询
     * @throws Exception
     */
    public void testQuery() throws Exception {
        GetRequest getRequest = new GetRequest("haoke", "house",
                "GkpdE2gBCKv8opxuOj12");
        // 指定返回的字段
        String[] includes = new String[]{"title", "id"};
        String[] excludes = Strings.EMPTY_ARRAY;
        FetchSourceContext fetchSourceContext =
                new FetchSourceContext(true, includes, excludes);
        getRequest.fetchSourceContext(fetchSourceContext);
        GetResponse response = this.client.get(getRequest, RequestOptions.DEFAULT);
        System.out.println("数据 -> " + response.getSource());
    }

    /**
     * 判断是否存在
     *
     * @throws Exception
     */
    public void testExists() throws Exception {
        GetRequest getRequest = new GetRequest("haoke", "house",
                "GkpdE2gBCKv8opxuOj12");
// 不返回的字段
        getRequest.fetchSourceContext(new FetchSourceContext(false));
        boolean exists = this.client.exists(getRequest, RequestOptions.DEFAULT);
        System.out.println("exists -> " + exists);
    }
    /**
     * 删除数据
     *
     * @throws Exception
     */
    public void testDelete() throws Exception {
        DeleteRequest deleteRequest = new DeleteRequest("haoke", "house",
                "GkpdE2gBCKv8opxuOj12");
        DeleteResponse response = this.client.delete(deleteRequest,
                RequestOptions.DEFAULT);
        System.out.println(response.status());// OK or NOT_FOUND
    }
    /**
     * 更新数据
     *
     * @throws Exception
     */
    public void testUpdate() throws Exception {
        UpdateRequest updateRequest = new UpdateRequest("haoke", "house",
                "G0pfE2gBCKv8opxuRz1y");
        Map<String, Object> data = new HashMap<>();
        data.put("title", "张江高科2");
        data.put("price", "5000");
        updateRequest.doc(data);
        UpdateResponse response = this.client.update(updateRequest,
                RequestOptions.DEFAULT);
        System.out.println("version -> " + response.getVersion());
    }
    /**
     * 测试搜索
     *
     * @throws Exception
     */
    public void testSearch() throws Exception {
        SearchRequest searchRequest = new SearchRequest("haoke");
        searchRequest.types("house");
        SearchSourceBuilder sourceBuilder = new SearchSourceBuilder();
        sourceBuilder.query(QueryBuilders.matchQuery("title", "拎包入住"));
        sourceBuilder.from(0);
        sourceBuilder.size(5);
        sourceBuilder.timeout(new TimeValue(60, TimeUnit.SECONDS));
        searchRequest.source(sourceBuilder);
        SearchResponse search = this.client.search(searchRequest,
                RequestOptions.DEFAULT);
        System.out.println("搜索到 " + search.getHits().totalHits + " 条数据.");
        SearchHits hits = search.getHits();
        for (SearchHit hit : hits) {
            System.out.println(hit.getSourceAsString());
        }
    }

    public static void main(String[] args) throws Exception {
        ESHightApi esHightApi = new ESHightApi();
        esHightApi.init();
        esHightApi.testCreate();
    }
}
Beats入门简介
使用Beat收集nginx日志和指标数据
项目需求
Nginx是一款非常优秀的web服务器,往往nginx服务会作为项目的访问入口,那么,nginx的性能保障就变得非常重要了,如果nginx的运行出现了问题就会对项目有较大的影响,所以,我们需要对nginx的运行有监控措施,实时掌握nginx的运行情况,那就需要收集nginx的运行指标和分析nginx的运行日志了。
业务流程
说明:
- 通过Beats采集Nginx的指标数据和日志数据
- Beats采集到数据后发送到Elasticsearch中
- Kibana读取数据进行分析
- 用户通过Kibana进行查看分析报表
部署Nginx
部署教程可以参考这篇博客:CentOS下如何安装Nginx?
部署完成后,我们就可以启动nginx了
启动完成后,我们通过下面命令,就可以获取到nginx中的内容了
tail -f /var/log/nginx/access.log
Beats简介
通过查看ElasticStack可以发现,Beats主要用于采集数据
官网地址:https://www.elastic.co/cn/beats/
Beats平台其实是一个轻量性数据采集器,通过集合多种单一用途的采集器,从成百上千台机器中向Logstash或ElasticSearch中发送数据。
通过Beats包含以下的数据采集功能
- Filebeat:采集日志文件
- Metricbeat:采集指标
- Packetbeat:采集网络数据
如果我们的数据不需要任何处理,那么就可以直接发送到ElasticSearch中
如果们的数据需要经过一些处理的话,那么就可以发送到Logstash中,然后处理完成后,在发送到ElasticSearch
最后在通过Kibana对我们的数据进行一系列的可视化展示
Filebeat
介绍
Filebeat是一个轻量级的日志采集器
为什么要用Filebeat?
当你面对成百上千、甚至成千上万的服务器、虚拟机和溶气气生成的日志时,请告别SSH吧!Filebeat将为你提供一种轻量型方法,用于转发和汇总日志与文件,让简单的事情不再繁华,关于Filebeat的记住以下两点:
- 轻量级日志采集器
- 输送至ElasticSearch或者Logstash,在Kibana中实现可视化
架构
用于监控、收集服务器日志文件.
流程如下:
- 首先是input输入,我们可以指定多个数据输入源,然后通过通配符进行日志文件的匹配
- 匹配到日志后,就会使用Harvester(收割机),将日志源源不断的读取到来
- 然后收割机收割到的日志,就传递到Spooler(卷轴),然后卷轴就在将他们传到对应的地方
下载
官网地址:https://www.elastic.co/cn/downloads/beats/filebeat
选中对应版本的Filebeat,我这里是Centos部署的,所以下载Linux版本
下载后,我们上传到服务器上,然后创建一个文件夹
# 创建文件夹
mkdir -p /soft/beats
# 解压文件
tar -zxvf filebeat-7.9.1-linux-x86_64.tar.gz
# 重命名
mv filebeat-7.9.1-linux-x86_64/ filebeat
然后我们进入到filebeat目录下,创建对应的配置文件
# 进入文件夹
cd filebeats
# 创建配置文件
vim mogublog.yml
添加如下内容
filebeat.inputs: # filebeat input输入
- type: stdin    # 标准输入
  enabled: true  # 启用标准输入
setup.template.settings:
  index.number_of_shards: 3 # 指定下载数
output.console:  # 控制台输出
  pretty: true   # 启用美化功能
  enable: true
启动
在我们添加完配置文件后,我们就可以对filebeat进行启动了
./filebeat -e -c mogublog.yml
然后我们在控制台输入hello,就能看到我们会有一个json的输出,是通过读取到我们控制台的内容后输出的
内容如下
{
    "@timestamp":"2019-01-12T12:50:03.585Z",
    "@metadata":{ #元数据信息
        "beat":"filebeat",
        "type":"doc",
        "version":"6.5.4"
    },
    "source":"",
    "offset":0,
    "message":"hello", #元数据信息
    "prospector":{
        "type":"stdin" #元数据信息
    },
    "input":{ #控制台标准输入
        "type":"stdin"
    },
    "beat":{  #beat版本以及主机信息
        "name":"itcast01",
        "hostname":"ElasticStack",
        "version":"6.5.4"
    },
    "host":{
        "name":"ElasticStack"
    }
}
读取文件
我们需要再次创建一个文件,叫 mogublog-log.yml,然后在文件里添加如下内容
filebeat.inputs:
- type: log
  enabled: true
  paths:
    - /soft/beats/logs/*.log
setup.template.settings:
  index.number_of_shards: 3
output.console:
  pretty: true
  enable: true
添加完成后,我们在到下面目录创建一个日志文件
# 创建文件夹
mkdir -p /soft/beats/logs

# 进入文件夹
cd /soft/beats/logs

# 追加内容
echo "hello" >> a.log
然后我们再次启动filebeat
./filebeat -e -c mogublog-log.yml
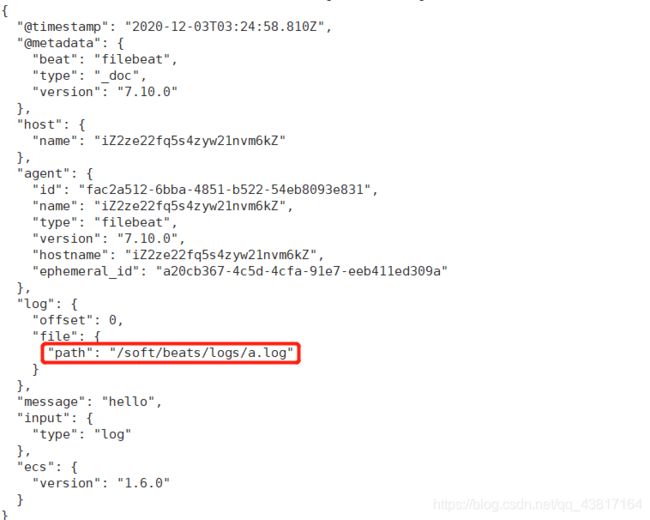
能够发现,它已经成功加载到了我们的日志文件 a.log
同时我们还可以继续往文件中追加内容
echo "are you ok ?" >> a.log
追加后,我们再次查看filebeat,也能看到刚刚我们追加的内容
可以看出,已经检测到日志文件有更新,立刻就会读取到更新的内容,并且输出到控制台。
自定义字段
但我们的元数据没办法支撑我们的业务时,我们还可以自定义添加一些字段
filebeat.inputs:
- type: log
  enabled: true
  paths:
    - /soft/beats/logs/*.log
  tags: ["web", "test"]  #添加自定义tag,便于后续的处理
  fields:  #添加自定义字段
    from: test-web
  fields_under_root: true #true为添加到根节点,false为添加到子节点中
setup.template.settings:
  index.number_of_shards: 3
output.console:
  pretty: true
  enable: true
添加完成后,我们重启 filebeat
./filebeat -e -c mogublog-log.yml
然后添加新的数据到 a.log中
echo "test-web" >> a.log
我们就可以看到字段在原来的基础上,增加了两个
输出到ElasticSearch
我们可以通过配置,将修改成如下所示
filebeat.inputs:
- type: log
  enabled: true
  paths:
    - /soft/beats/logs/*.log
  tags: ["web", "test"]
  fields:
    from: test-web
  fields_under_root: false
setup.template.settings:
  index.number_of_shards: 1
output.elasticsearch:
  hosts: ["127.0.0.1:9200"]
启动成功后,我们就能看到它已经成功连接到了es了
然后我们到刚刚的 logs文件夹向 a.log文件中添加内容
echo "hello mogublog" >> a.log
在ES中,我们可以看到,多出了一个 filebeat的索引库
Filebeat工作原理
Filebeat主要由下面几个组件组成: harvester、prospector 、input
harvester
- 负责读取单个文件的内容
- harvester逐行读取每个文件(一行一行读取),并把这些内容发送到输出
- 每个文件启动一个harvester,并且harvester负责打开和关闭这些文件,这就意味着harvester运行时文件描述符保持着打开的状态。
- 在harvester正在读取文件内容的时候,文件被删除或者重命名了,那么Filebeat就会续读这个文件,这就会造成一个问题,就是只要负责这个文件的harvester没用关闭,那么磁盘空间就不会被释放,默认情况下,Filebeat保存问价你打开直到close_inactive到达
prospector
-
prospector负责管理harvester并找到所有要读取的文件来源
-
如果输入类型为日志,则查找器将查找路径匹配的所有文件,并为每个文件启动一个harvester
-
Filebeat目前支持两种prospector类型:log和stdin
-
Filebeat如何保持文件的状态
- Filebeat保存每个文件的状态并经常将状态刷新到磁盘上的注册文件中
- 该状态用于记住harvester正在读取的最后偏移量,并确保发送所有日志行。
- 如果输出(例如ElasticSearch或Logstash)无法访问,Filebeat会跟踪最后发送的行,并在输出再次可以用时继续读取文件。
- 在Filebeat运行时,每个prospector内存中也会保存的文件状态信息,当重新启动Filebat时,将使用注册文件的数量来重建文件状态,Filebeat将每个harvester在从保存的最后偏移量继续读取
- 文件状态记录在data/registry文件中
input
-
一个input负责管理harvester,并找到所有要读取的源
-
如果input类型是log,则input查找驱动器上与已定义的glob路径匹配的所有文件,并为每个文件启动一个harvester
-
每个input都在自己的Go例程中运行
-
下面的例子配置Filebeat从所有匹配指定的glob模式的文件中读取行
filebeat.inputs:
- type: log
  paths:
    - /var/log/*.log
    - /var/path2/*.log
启动命令
./filebeat -e -c mogublog-es.yml
./filebeat -e -c mogublog-es.yml -d "publish"
参数说明
- **-e:**输出到标准输出,默认输出到syslog和logs下
- **-c:**指定配置文件
- **-d:**输出debug信息
读取Nginx中的配置文件
我们需要创建一个 mogublog-nginx.yml配置文件
filebeat.inputs:
- type: log
  enabled: true
  paths:
    - /soft/nginx/*.log
  tags: ["nginx"]
  fields_under_root: false
setup.template.settings:
  index.number_of_shards: 1
output.elasticsearch:
  hosts: ["127.0.0.1:9200"]
启动后,可以在Elasticsearch中看到索引以及查看数据

可以看到,在message中已经获取到了nginx的日志,但是,内容并没有经过处理,只是读取到原数据,那么对于我们后期的操作是不利的,有办法解决吗?

Module
前面要想实现日志数据的读取以及处理都是自己手动配置的,其实,在Filebeat中,有大量的Module,可以简化我们的配置,直接就可以使用,如下:
./filebeat modules list
得到的列表如下所示
Disabled:
activemq
apache
auditd
aws
azure
barracuda
bluecoat
cef
checkpoint
cisco
coredns
crowdstrike
cylance
elasticsearch
envoyproxy
f5
fortinet
googlecloud
gsuite
haproxy
ibmmq
icinga
iis
imperva
infoblox
iptables
juniper
kafka
kibana
logstash
microsoft
misp
mongodb
mssql
mysql
nats
netflow
netscout
nginx
o365
okta
osquery
panw
postgresql
rabbitmq
radware
redis
santa
sonicwall
sophos
squid
suricata
system
tomcat
traefik
zeek
zscaler
可以看到,内置了很多的module,但是都没有启用,如果需要启用需要进行enable操作:
#启动
./filebeat modules enable nginx
#禁用
./filebeat modules disable nginx
可以发现,nginx的module已经被启用。
nginx module 配置
我们到下面的目录,就能看到module的配置了
# 进入到module目录
cd modules.d/
#查看文件
vim nginx.yml.disabled
得到的文件内容如下所示
# Module: nginx
# Docs: https://www.elastic.co/guide/en/beats/filebeat/7.9/filebeat-module-nginx.html

- module: nginx
  # Access logs
  access:
    enabled: true
    # 添加日志文件
    var.paths: ["/var/log/nginx/access.log*"]

    # Set custom paths for the log files. If left empty,
    # Filebeat will choose the paths depending on your OS.
    #var.paths:

  # Error logs
  error:
    enabled: true
    var.paths: ["/var/log/nginx/error.log*"]
配置filebeat
我们需要修改刚刚的mogublog-nginx.yml文件,然后添加到我们的module
filebeat.inputs:
setup.template.settings:
  index.number_of_shards: 1
output.elasticsearch:
  hosts: ["127.0.0.1:9200"]
filebeat.config.modules:
  path: ${path.config}/modules.d/*.yml
  reload.enabled: false
测试
我们启动我们的filebeat
./filebeat -e -c itcast-nginx.yml
如果启动的时候发现出错了,错误如下所示,执行如图所示的脚本即可 【新版本的ES好像不会出现这个错误】
#启动会出错,如下
ERROR fileset/factory.go:142 Error loading pipeline: Error loading pipeline for
fileset nginx/access: This module requires the following Elasticsearch plugins:
ingest-user-agent, ingest-geoip. You can install them by running the following
commands on all the Elasticsearch nodes:
  sudo bin/elasticsearch-plugin install ingest-user-agent
  sudo bin/elasticsearch-plugin install ingest-geoip
启动成功后,能看到日志记录已经成功刷新进去了
我们可以测试一下,刷新nginx页面,或者向错误日志中,插入数据
echo "err" >> error.log
能够看到,刚刚的记录已经成功插入了
关于module的其它使用,可以参考文档:
https://www.elastic.co/guide/en/beats/filebeat/current/filebeat-modules.html
Metricbeat
- 定期收集操作系统或应用服务的指标数据
- 存储到Elasticsearch中,进行实时分析
Metricbeat组成
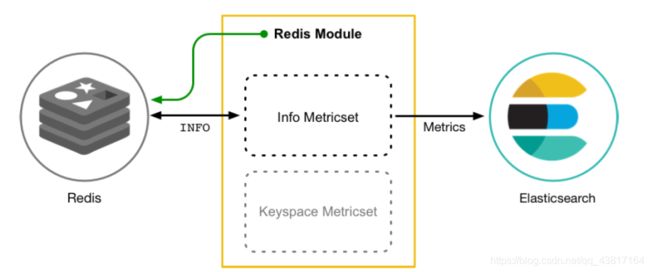
Metricbeat有2部分组成,一部分是Module,另一个部分为Metricset
- Module
- 收集的对象:如 MySQL、Redis、Nginx、操作系统等
- Metricset
- 收集指标的集合:如 cpu、memory,network等
以Redis Module为例:
下载
首先我们到官网,找到Metricbeat进行下载
下载完成后,我们通过xftp工具,移动到指定的目录下
# 移动到该目录下
cd /soft/beats
# 解压文件
tar -zxvf
# 修改文件名
mv  metricbeat
然后修改配置文件
vim metricbeat.yml
添加如下内容
metricbeat.config.modules:
  path: ${path.config}/modules.d/*.yml
  reload.enabled: false
setup.template.settings:
  index.number_of_shards: 1
  index.codec: best_compression
setup.kibana:
output.elasticsearch:
  hosts: [""127.0.0.1:9200"]
processors:
  - add_host_metadata: ~
  - add_cloud_metadata: ~
默认会指定的配置文件,就是在
${path.config}/modules.d/*.yml
也就是 system.yml文件,我们也可以自行开启其它的收集
启动
在配置完成后,我们通过如下命令启动即可
./metricbeat -e
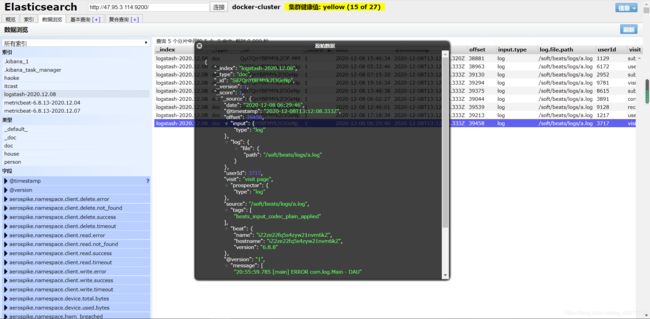
在ELasticsearch中可以看到,系统的一些指标数据已经写入进去了:
system module配置
- module: system
  period: 10s  # 采集的频率,每10秒采集一次
  metricsets:  # 采集的内容
    - cpu
    - load
    - memory
    - network
    - process
    - process_summary
Metricbeat Module
Metricbeat Module的用法和我们之前学的filebeat的用法差不多
#查看列表
./metricbeat modules list
能够看到对应的列表
Enabled:
system #默认启用

Disabled:
aerospike
apache
ceph
couchbase
docker
dropwizard
elasticsearch
envoyproxy
etcd
golang
graphite
haproxy
http
jolokia
kafka
kibana
kubernetes
kvm
logstash
memcached
mongodb
munin
mysql
nginx
php_fpm
postgresql
prometheus
rabbitmq
redis
traefik
uwsgi
vsphere
windows
Nginx Module
开启Nginx Module
在nginx中,需要开启状态查询,才能查询到指标数据。
#重新编译nginx
./configure --prefix=/usr/local/nginx --with-http_stub_status_module
make
make install

./nginx -V #查询版本信息
nginx version: nginx/1.11.6
built by gcc 4.4.7 20120313 (Red Hat 4.4.7-23) (GCC)
configure arguments: --prefix=/usr/local/nginx --with-http_stub_status_module

#配置nginx
vim nginx.conf
location /nginx-status {
    stub_status on;
    access_log off;
}

# 重启nginx
./nginx -s reload
测试
结果说明:
- Active connections:正在处理的活动连接数
- server accepts handled requests
- 第一个 server 表示Nginx启动到现在共处理了9个连接
- 第二个 accepts 表示Nginx启动到现在共成功创建 9 次握手
- 第三个 handled requests 表示总共处理了 21 次请求
- 请求丢失数 = 握手数 - 连接数 ,可以看出目前为止没有丢失请求
- Reading: 0 Writing: 1 Waiting: 1
- Reading:Nginx 读取到客户端的 Header 信息数
- Writing:Nginx 返回给客户端 Header 信息数
- Waiting:Nginx 已经处理完正在等候下一次请求指令的驻留链接(开启keep-alive的情况下,这个值等于
Active - (Reading+Writing))
配置nginx module
#启用redis module
./metricbeat modules enable nginx

#修改redis module配置
vim modules.d/nginx.yml
然后修改下面的信息
# Module: nginx
# Docs: https://www.elastic.co/guide/en/beats/metricbeat/6.5/metricbeat-modulenginx.
html
  - module: nginx
#metricsets:
# - stubstatus
  period: 10s
# Nginx hosts
  hosts: ["http://127.0.0.1"]
# Path to server status. Default server-status
  server_status_path: "nginx-status"
#username: "user"
#password: "secret"
修改完成后,启动nginx
#启动
./metricbeat -e
测试
我们能看到,我们的nginx数据已经成功的采集到我们的系统中了
可以看到,nginx的指标数据已经写入到了Elasticsearch。
更多的Module使用参见官方文档:
https://www.elastic.co/guide/en/beats/metricbeat/current/metricbeat-modules.html
参考
Filebeat 模块与配置
Elastic Stack(ELK)从入门到实践
Kibana入门
Kibana 是一款开源的数据分析和可视化平台,它是 Elastic Stack 成员之一,设计用于和 Elasticsearch 协作。您可以使用 Kibana 对 Elasticsearch 索引中的数据进行搜索、查看、交互操作。您可以很方便的利用图表、表格及地图对数据进行多元化的分析和呈现。
官网:https://www.elastic.co/cn/kibana

配置和安装
到下载地址,选择对应的版本:https://www.elastic.co/cn/downloads/kibana
![]()
下载完成后,将文件拷贝到我们的服务器上,然后解压
# 解压
tar -zxvf kibana-7.9.1-linux-x86_64.tar.gz

# 重命名
mv kibana-7.9.1-linux-x86_64 kibana
然后在进入kibana目录,找到config文件夹下的kibana.yml进行配置的修改
vim /soft/kibana/config/kibana.yml
然后找到下面的内容
#对外暴露服务的地址
server.host: "0.0.0.0"

#配置Elasticsearch
elasticsearch.url: "http://127.0.0.1:9200"
启动
修改配置完成后,我们就可以启动kibana了
#启动
./bin/kibana
点击启动,发现报错了
![]()
原因是kibana不能使用root用户进行启动,所以我们切换到elsearch用户
# 将soft文件夹的所属者改成elsearch
chown elsearch:elsearch /soft/ -R

# 切换用户
su elsearch

# 启动
./bin/kibana
然后打开下面的地址,即可访问我们的kibana了
http://202.193.56.222:5601/
功能说明
- Discover:数据探索
- Visualize:可视化
- Dashboard:仪表盘
- Timelion:时序控件
- Canvas:画布
- Machine Learning:机器学习
- Infrastructure:基本信息
- Logs:数据日志展示
- APM:性能监控
- Dev Tools:开发者工具
- Monitoring:监控
- Management:管理
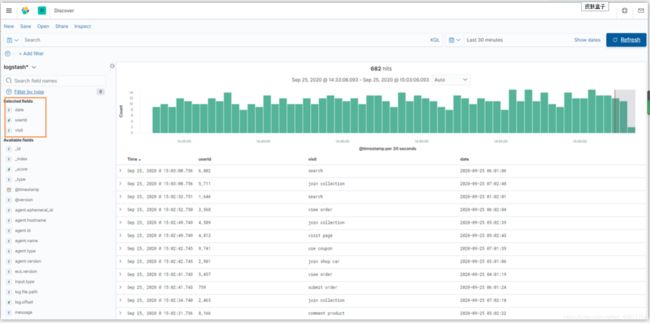
数据探索
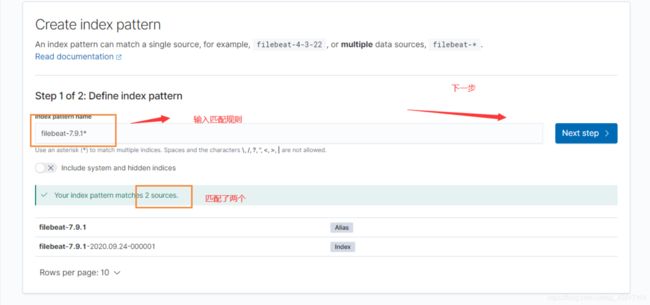
先添加索引信息
然后我们就输入匹配规则进行匹配
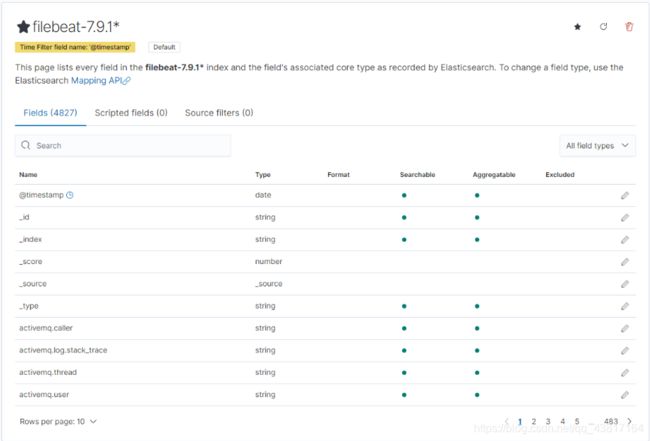
然后选择时间字段,一般选择第一个
索引创建完毕后
然后我们就可以往nginx error.log日志文件中,添加几天错误记录
echo "hello error" >> error.log
我们追加了两条数据,然后到kibana的discover中,刷新页面,就能够看到我们刚添加的日志了,同时我们点击右侧还可以选择需要展示的字段,非常的方便
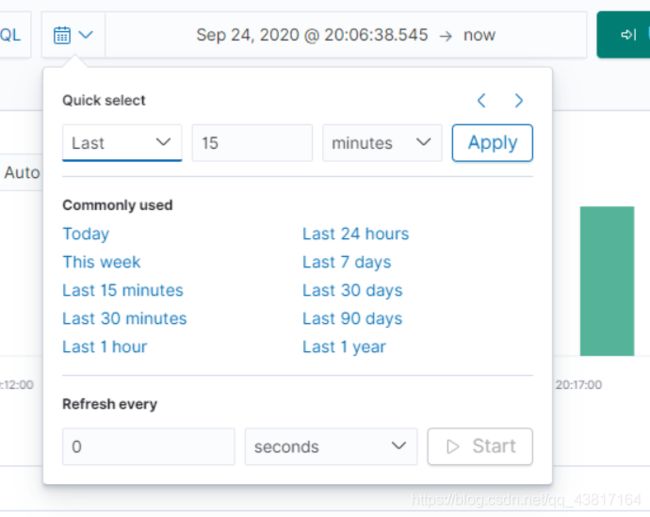
点击右上角,我们还可以针对时间来进行过滤
Metricbeat仪表盘
现在将Metricbeat的数据展示在Kibana中,首先需要修改我们的MetricBeat配置
#修改metricbeat配置
setup.kibana:
  host: "192.168.40.133:5601"

#安装仪表盘到Kibana【需要确保Kibana在正常运行,这个过程可能会有些耗时】
./metricbeat setup --dashboards
安装完成后,如下所示
然后我们启动Metricbeat
./metricbeat -e
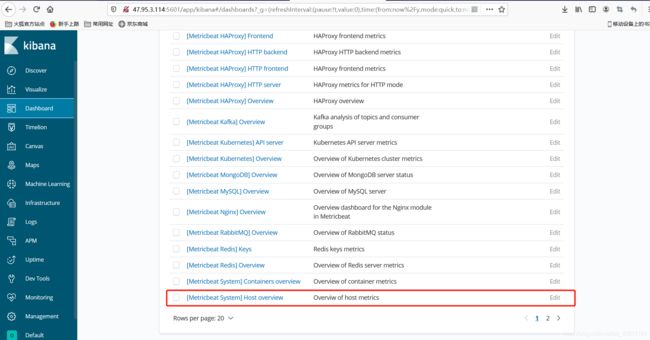
然后到kibana页面下,找到我们刚刚安装的仪表盘
然后我们就能够看到非常多的指标数据了
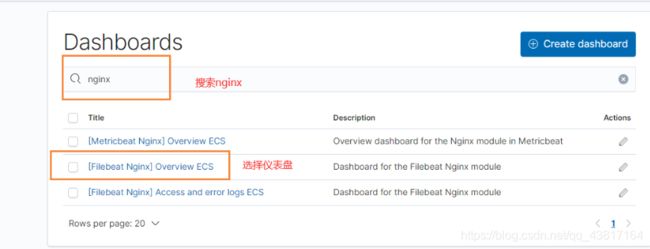
Nginx指标仪表盘【Metricbeat】
选择Metricbeat的nginx仪表盘即可
然后就能够看到Nginx的指标信息了
Nginx日志仪表盘
我们可以和刚刚Metricbeat的仪表盘一样,也可以将filebeat收集的日志记录,推送到Kibana中
首先我们需要修改filebeat的 mogublog-nginx.yml配置文件
filebeat.inputs:
setup.template.settings:
  index.number_of_shards: 1
output.elasticsearch:
  hosts: ["127.0.0.1:9200"]
filebeat.config.modules:
  path: ${path.config}/modules.d/*.yml
  reload.enabled: false
setup.kibana:
  host: "127.0.0.1:5601"
然后按照仪表盘
./filebeat -c mogublog-nginx.yml setup
等待一会后,仪表盘也安装成功了
然后我们启动filebeat即可
./filebeat -e -c mogublog-nginx.yml
启动完成后,我们回到我们的Kibana中,找到Dashboard,添加我们的filebeat - nginx即可
然后就能看到我们的仪表盘了,上图就是请求的来源
需要注意的是,这些仪表盘本身是没有的,我们需要通过filebeat来进行安装
Kibana自定义仪表盘
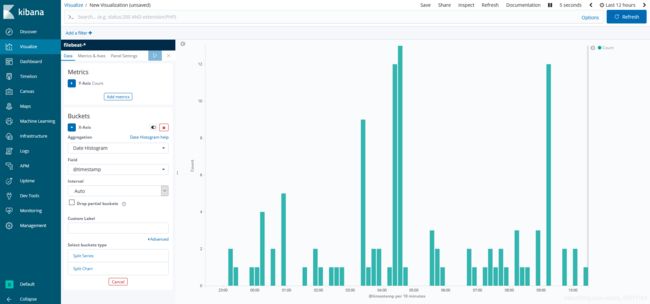
在Kibana中,我们也可以自定义图标,如制作柱形图
我们选择最下面的 Vertical Bar,也就是柱形图,然后在选择我们的索引
这样就出来了
开发者工具
在Kibana中,为开发者的测试提供了便捷的工具使用,如下:
我们就可以在这里面写一些请求了
Logstash入门简介
介绍
Logstash是一个开源的服务器端数据处理管道,能够同时从多个来源采集数据,转换数据,然后将数据发送到最喜欢的存储库中(我们的存储库当然是ElasticSearch)
我们回到我们ElasticStack的架构图,可以看到Logstash是充当数据处理的需求的,当我们的数据需要处理的时候,会将它发送到Logstash进行处理,否则直接送到ElasticSearch中
用途
Logstash可以处理各种各样的输入,从文档,图表中=,数据库中,然后处理完后,发送到
部署安装
Logstash主要是将数据源的数据进行一行一行的处理,同时还直接过滤切割等功能。
首先到官网下载logstash:https://www.elastic.co/cn/downloads/logstash
选择我们需要下载的版本:
下载完成后,使用xftp工具,将其丢入到服务器中
#检查jdk环境,要求jdk1.8+
java -version

#解压安装包
tar -xvf logstash-7.9.1.tar.gz

#第一个logstash示例
bin/logstash -e 'input { stdin { } } output { stdout {} }'
其实原来的logstash的作用,就是为了做数据的采集,但是因为logstash的速度比较慢,所以后面使用beats来代替了Logstash,当我们使用上面的命令进行启动的时候,就可以发现了,因为logstash使用java写的,首先需要启动虚拟机,最后下图就是启动完成的截图

测试
我们在控制台输入 hello,马上就能看到它的输出信息
配置详解
Logstash的配置有三部分,如下所示
input { #输入
stdin { ... } #标准输入
}
filter { #过滤,对数据进行分割、截取等处理
...
}
output { #输出
stdout { ... } #标准输出
}
输入
- 采集各种样式、大小和来源的数据,数据往往以各种各样的形式,或分散或集中地存在于很多系统中。
- Logstash 支持各种输入选择 ,可以在同一时间从众多常用来源捕捉事件。能够以连续的流式传输方式,轻松地从您的日志、指标、Web 应用、数据存储以及各种 AWS 服务采集数据。
过滤
- 实时解析和转换数据
- 数据从源传输到存储库的过程中,Logstash 过滤器能够解析各个事件,识别已命名的字段以构建结构,并将它们转换成通用格式,以便更轻松、更快速地分析和实现商业价值。
输出
Logstash 提供众多输出选择,您可以将数据发送到您要指定的地方,并且能够灵活地解锁众多下游用例。
![]()
读取自定义日志
前面我们通过Filebeat读取了nginx的日志,如果是自定义结构的日志,就需要读取处理后才能使用,所以,这个时候就需要使用Logstash了,因为Logstash有着强大的处理能力,可以应对各种各样的场景。
日志结构
2019-03-15 21:21:21|ERROR|1 读取数据出错|参数:id=1002
可以看到,日志中的内容是使用“|”进行分割的,使用,我们在处理的时候,也需要对数据做分割处理。
编写配置文件
vim mogublog-pipeline.conf
然后添加如下内容
input {
    file {
        path => "/soft/beats/logs/app.log"
        start_position => "beginning"
    }
}
filter {
    mutate {
    	split => {"message"=>"|"}
    }
}
output {
	stdout { codec => rubydebug }
}
启动
#启动
./bin/logstash -f ./mogublog-pipeline.conf
然后我们就插入我们的测试数据
echo "2019-03-15 21:21:21|ERROR|读取数据出错|参数:id=1002" >> app.log
然后我们就可以看到logstash就会捕获到刚刚我们插入的数据,同时我们的数据也被分割了
输出到Elasticsearch
我们可以修改我们的配置文件,将我们的日志记录输出到ElasticSearch中
input {
    file {
        path => "/soft/beats/logs/app.log"
        start_position => "beginning"
    }
}
filter {
    mutate {
    	split => {"message"=>"|"}
    }
}
output {
	elasticsearch {
		hosts => ["127.0.0.1:9200"]
	}
}
然后在重启我们的logstash
./bin/logstash -f ./mogublog-pipeline.conf
然后向日志记录中,插入两条数据
echo "2019-03-15 21:21:21|ERROR|读取数据出错|参数:id=1002" >> app.log
echo "2019-03-15 21:21:21|ERROR|读取数据出错|参数:id=1002" >> app.log
最后就能够看到我们刚刚插入的数据了
ElasticStack综合案例
本篇将我们前面学习到的技术:ElasticSearch、Beats、Kibana、Logstash 整合起来,做一个综合性的学习,目的是为了让小伙伴们能够更加深刻的理解ElasticStack的使用
流程说明
- 应用APP生产日志,用来记录用户的操作
- [INFO] 2019-03-15 22:55:20 [Main] - DAU|5206|使用优惠券|2019-03-15 03:37:20
- [INFO] 2019-03-15 22:55:21 [Main] - DAU|3880|浏览页面|2019-03-15 07:25:09
- 通过Filebeat读取日志文件中的内容,并且将内容发送给Logstash,原因是需要对内容做处理
- Logstash接收到内容后,进行处理,如分割操作,然后将内容发送到Elasticsearch中
- Kibana会读取Elasticsearch中的数据,并且在Kibana中进行设计Dashboard,最后进行展示
说明:日志格式、图表、Dashboard都是自定义的
App介绍
APP在生产环境应该是真实系统,然而,现在我们学习的话,为了简化操作,所以就做数据的模拟生成即可。
业务代码如下:
package com.log;

import lombok.extern.slf4j.Slf4j;
import org.apache.commons.lang3.RandomUtils;
import org.joda.time.DateTime;
import org.springframework.boot.autoconfigure.SpringBootApplication;

@Slf4j
@SpringBootApplication
public class Main {

    public static final String[] VISIT = new String[]{"浏览页面", "评论商品", "加入收藏", "加入购物车", "提交订单", "使用优惠券", "领取优惠券", "搜索", "查看订单"};

    public static void main(String[] args) throws Exception {
        while(true){
            Long sleep = RandomUtils.nextLong(200, 1000 * 5);
            Thread.sleep(sleep);
            Long maxUserId = 9999L;
            Long userId = RandomUtils.nextLong(1, maxUserId);
            String visit = VISIT[RandomUtils.nextInt(0, VISIT.length)];
            DateTime now = new DateTime();
            int maxHour = now.getHourOfDay();
            int maxMillis = now.getMinuteOfHour();
            int maxSeconds = now.getSecondOfMinute();
            String date = now.plusHours(-(RandomUtils.nextInt(0, maxHour)))
                    .plusMinutes(-(RandomUtils.nextInt(0, maxMillis)))
                    .plusSeconds(-(RandomUtils.nextInt(0, maxSeconds)))
                    .toString("yyyy-MM-dd HH:mm:ss");

            String result = "DAU|" + userId + "|" + visit + "|" + date;
            log.error(result);
        }
    }
}
我们可以启动运行,就是不断的生成日志,模拟了我们的实际业务
09:18:32.721 [main] ERROR com.log.Main - DAU|8183|加入购物车|2020-09-25 06:10:25
09:18:33.599 [main] ERROR com.log.Main - DAU|7097|提交订单|2020-09-25 06:18:31
09:18:37.265 [main] ERROR com.log.Main - DAU|1468|查看订单|2020-09-25 02:04:10
09:18:39.634 [main] ERROR com.log.Main - DAU|7821|领取优惠券|2020-09-25 02:04:07
09:18:41.909 [main] ERROR com.log.Main - DAU|7962|提交订单|2020-09-25 03:02:39
09:18:43.596 [main] ERROR com.log.Main - DAU|3358|评论商品|2020-09-25 08:14:19
然后我们将该项目使用下面命令进行打包
mvn clean install
打包完成后,到target目录下,能够看到我们生成的jar包
我们将其复制到我们的服务器上,然后创建一个启动的脚本 startup.sh
#!/bin/bash
nohup java  -Xms256m -Xmx512m -jar  mogu-dashboard-generate-0.0.1-SNAPSHOT.jar  > app.log  2>&1 &
然后就使用脚本进行启动
# 启动
./startup.sh
# 启动成功后,会看到一个日志 app.log,我们可以查看
tail -f app.log
配置Filebeat
在有了不断产生日志的应用程序后,我们就需要创建一个Filebeat的配置文件,用于日志的收集
# 打开配置文件
vim  mogu-dashboard.yml

# 写入数据
filebeat.inputs:
- type: log
  enabled: true
  paths:
    - /soft/app/*.log
setup.template.settings:
  index.number_of_shards: 1
output.logstash:
  hosts: ["127.0.0.1:5044"]
然后我们就可以启动了【需要我们把Logstash启动起来】
./filebeat -e -c mogu-dashboard.yml
配置Logstash
Logstash输出到控制台
Logstash的主要目的就是处理Filebeat发送过来的数据,进行数据的清洗,过滤等,我们首先简单的将logstash获得的数据输出到控制台
# 打开配置文件
vim  mogu-dashboard.conf

# 添加以下内容
input {
	beats {
		port => "5044"
	}
}
output {
	stdout { codec => rubydebug }
}
然后启动我们的logstash 【注意,启动时间比较长,需要我们等待】
./bin/logstash -f mogu-dashboard.conf
启动logstash完成后,我们需要再次启动filebeat,回到上面的启动步骤,然后就能看到logstash输出我们的日志
配置Logstash连接ElasticSearch
上面的数据,其实还是我们的原始数据,并没有经过处理,所以我们这个时候就需要使用到Logstash的其它功能了。我们继续修改配置文件
# 打开配置文件
vim  mogu-dashboard.conf
然后修改一下的值
input {
        beats {
                port => "5044"
        }
}
filter {
        mutate {
                split => {"message"=>"|"}
        }
        mutate {
                add_field => {
                "userId" => "%{[message][1]}"
                "visit" => "%{[message][2]}"
                "date" => "%{[message][3]}"
                }
        }
        mutate {
                convert => {
                "userId" => "integer"
                "visit" => "string"
                "date" => "string"
                }
        }
        mutate {
           remove_field => [ "host" ]
        }
}
#output {
# stdout { codec => rubydebug }
#}

output {
  elasticsearch {
    hosts => [ "127.0.0.1:9200"]
  }
}
然后再次启动
./bin/logstash -f mogu-dashboard.conf
其实能够看到,我们原来的数据,就经过了处理了,产生了新的字段
同时我们还可以对我们的数据,进行类型转换,为了方便我们的下游进行处理
	mutate {
		convert => {
		"userId" => "integer"
		"visit" => "string"
		"date" => "string"
		}
	}
遇到的问题1
[2020-09-25T02:32:44,042][WARN ][logstash.filters.mutate ][main][5fd6a2f2f396816d849f2e3e2e0a53f2500a9b58c6819e23f42d2bfd34cde207] Exception caught while applying mutate filter {:exception=>"Invalid FieldReference: `message[1]`"}
不断的刷这个错误,配置文件没问题,但添加字段那一个mutate需要给message套一层中括号:
mutate {
    add_field => {
        "userId" => "%{[message][1]}"
        "visit" => "%{[message][2]}"
        "date" => "%{[message][3]}"
    }
}
遇到的问题2
filebeat 传输到host的字段中host是一个对象
failed to parse field [host] of type [text] in document
解决方法就是过滤掉host字段
mutate {
	remove_field => [ "host" ]
}
启动ElasticSearch
在我们通过Logstash发送数据到ElasticSearch,所以我们还需要启动我们的ElasticSearch
# 切换到elsearch用户
su elsearch

# 到目录
cd /soft/elsearch/bin

# 启动
./elasticsearch
启动Kibana
我们最后就需要通过Kibana来展示我们的图形化数据
# 启动kibana
./bin/kibana

# 通过浏览器访问
http://202.193.56.222:5601/app/kibana
添加到索引库
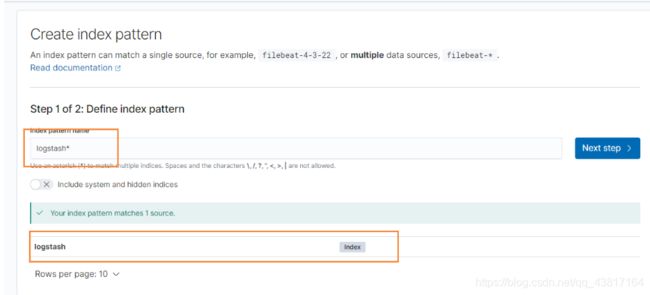
添加Logstash索引到Kibana中:
http://202.193.56.222:5601/app/management/kibana/indexPatterns/create
输入我们的匹配规则,然后匹配到logstash,然后选择时间字段后创建
创建柱形图
我们点击右侧Visualizations,然后开始创建图标
然后选择柱形图
最后我们定义我们的X轴,选择按照时间进行添加
最后更新我们的页面,然后在选择最近的30分钟
就能够看到我们的日志在源源不断的生成了,同时我们可以对我们的这个图表进行保存
创建饼图
我们继续选择饼图
然后选择我们的索引
添加完成后,我们就看到这样一个页面了
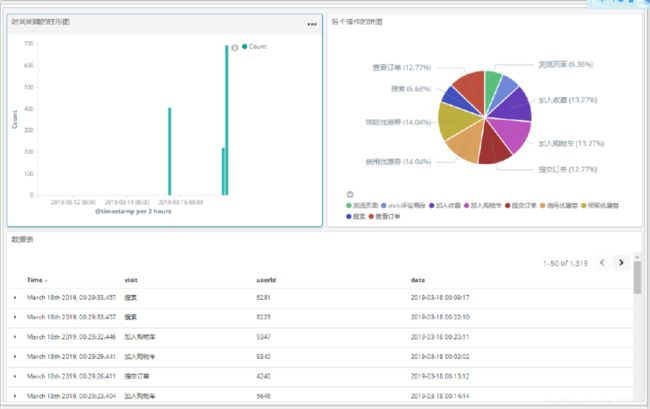
但是这样还不死很直观,所以我们还需要做处理,找到右侧的Buckets,然后选择Split Slices,然后把我们的每个字段都添加上去,其中visit指的是我们es中的属性
最后选择update,得到的效果如下所示
我们还可以继续给每个字段都添加label标签
添加完成后,更新页面,就得到非常不错的效果了~
数据表格
在图标中,选择我们需要显示的字段即可

