Jira Software最新版本(9.11.2)安装
软件获取
Jira Software
历史版本下载地址:Jira Server 下载存档 | Atlassian

Atlassian-agent.jar
https://github.com/haxqer/confluence/releases/download/v1.3.3/atlassian-agent.jar
MySQL 驱动包
MySQL :: Download MySQL Connector/J (Archived Versions)
整合备份下载地址(Atlassian-agent.jar、MySQL 驱动包)
mysql驱动是5.1.42,我的是mysql5.7.42
https://download.csdn.net/download/baidu_35751704/88450016
软件安装
Jira
安装bin文件
cd xxxx  #cd到bin文件所处文件夹
sudo chmod +x XXXXXXXX.bin     #授权文件
sudo ./XXXXXXXX.bin   #执行安装
安装过程 依次输入 o - 1 - i - y
[root@ps-fdcnops-01 confluence]# chmod +x atlassian-confluence-8.6.0-x64.bin
[root@ps-fdcnops-01 confluence]# ./atlassian-confluence-8.6.0-x64.bin
Installing fontconfig and fonts
已加载插件:fastestmirror, langpacks
Loading mirror speeds from cached hostfile
已加载插件:fastestmirror, langpacks
Loading mirror speeds from cached hostfile
软件包 fontconfig-2.13.0-4.3.el7.x86_64 已安装并且是最新版本
无须任何处理
已加载插件:fastestmirror, langpacks
Loading mirror speeds from cached hostfile
软件包 dejavu-sans-fonts-2.33-6.el7.noarch 已安装并且是最新版本
无须任何处理
已加载插件:fastestmirror, langpacks
没有安装组信息文件
Maybe run: yum groups mark convert (see man yum)
Loading mirror speeds from cached hostfile
警告:分组 fonts 不包含任何可安装软件包。
Maybe run: yum groups mark install (see man yum)
指定组中没有可安装或升级的软件包
已加载插件:fastestmirror, langpacks
Loading mirror speeds from cached hostfile
软件包 google-noto-sans-cjk-fonts-20141117-5.el7.noarch 已安装并且是最新版本
无须任何处理
已加载插件:fastestmirror, langpacks
Loading mirror speeds from cached hostfile
没有可用软件包 google-noto-serif-cjk-fonts。
错误:无须任何处理
Regenerating the font cache
Fonts and fontconfig have been installed
Unpacking JRE ...
Starting Installer ...

This will install Confluence 8.6.0 on your computer.
OK [o, Enter], Cancel [c]
o
Click Next to continue, or Cancel to exit Setup.

Choose the appropriate installation or upgrade option.
Please choose one of the following:
Express Install (uses default settings) [1],
Custom Install (recommended for advanced users) [2, Enter],
Upgrade an existing Confluence installation [3]
1

See where Confluence will be installed and the settings that will be used.
Installation Directory: /opt/atlassian/confluence
Home Directory: /var/atlassian/application-data/confluence
HTTP Port: 8090
RMI Port: 8000
Install as service: Yes
Install [i, Enter], Exit [e]
i

Extracting files ...


Please wait a few moments while we configure Confluence.

Start Confluence now?
Yes [y, Enter], No [n]
y

Please wait a few moments while Confluence starts up.
Launching Confluence ...

Your installation of Confluence 8.6.0 is now ready and can be accessed via
your browser.
Confluence 8.6.0 can be accessed at http://localhost:8090
SLF4J: No SLF4J providers were found.
SLF4J: Defaulting to no-operation (NOP) logger implementation
SLF4J: See https://www.slf4j.org/codes.html#noProviders for further details.
Finishing installation ...
停止服务
[root@ps-fdcnops-01 confluence]# cd /opt/atlassian/confluence/bin/
[root@ps-fdcnops-01 bin]# ./stop-confluence.sh将atlassian-agent.jar放入一个不会删除的文件夹,以及mysql驱动
我的 atlassian-agent.jar 的路径是 /opt/atlassian/confluence下
我的 mysql驱动包 的路径是 /opt/atlassian/confluence/confluence/WEB-INF/lib下
修改配置文件setenv.sh
vim setenv.sh在最后面追加
export JAVA_OPTS="-javaagent:/opt/atlassian/confluence/atlassian-agent.jar${JAVA_OPTS}"
启动confluence
cd /opt/atlassian/confluence/bin  #打开安装的bin文件夹
./start-confluence.sh
验证是否成功
ps aux | grep javaagent # 出现-javaagent

java -jar /opt/atlassian/atlassian-agent.jar #出现参数提示
[root@ps-fdcnops-01 confluence]# java -jar atlassian-agent.jar

====================================================
=======     Atlassian Crack Agent v1.3.1     =======
=======           https://zhile.io           =======
=======          QQ Group: 30347511          =======
====================================================

KeyGen usage: java -jar /opt/atlassian/confluence/atlassian-agent.jar [-d] [-h]
       -m  [-n ] -o  -p  -s
 -d,--datacenter           Data center license[default: false]
 -h,--help                 Print help message
 -m,--mail            License email
 -n,--name            License name[default: ]
 -o,--organisation    License organisation
 -p,--product         License product, support:
                           [crowd: Crowd]
                           [jsm: JIRA Service Management]
                           [questions: Questions plugin for Confluence]
                           [crucible: Crucible]
                           [capture: Capture plugin for JIRA]
                           [conf: Confluence]
                           [training: Training plugin for JIRA]
                           [*: Third party plugin key, looks like:
                           com.foo.bar]
                           [bitbucket: Bitbucket]
                           [tc: Team Calendars plugin for Confluence]
                           [bamboo: Bamboo]
                           [fisheye: FishEye]
                           [portfolio: Portfolio plugin for JIRA]
                           [jc: JIRA Core]
                           [jsd: JIRA Service Desk]
                           [jira: JIRA Software(common jira)]
 -s,--serverid        License server ID

================================================================================

# Crack agent usage: append -javaagent arg to system environment: JAVA_OPTS.
# Example(execute this command or append it to setenv.sh/setenv.bat file):

  export JAVA_OPTS="-javaagent:/opt/atlassian/confluence/atlassian-agent.jar ${JAVA_OPTS}"

# Then start your confluence/jira server.
获取授权码
使用下面的命令可以查看附加参数如何写
如果安装的confluence是data center 则需要加上 -d true
java -jar /opt/atlassian/atlassian-agent.jar例子:-s 的值,在下一步配置confluence中获取
java -jar atlassian-agent.jar -d true -p conf -m [email protected] -n my_name -o https://zhile.io -s XXXX-CCCC-QQQQ-DDDD
创建数据库与设定编码集
CREATE DATABASE confluencedb CHARACTER SET utf8mb4 COLLATE utf8mb4_bin;SET GLOBAL TRANSACTION ISOLATION LEVEL READ COMMITTED;[root@ps-fdcnops-01 /]# cat /etc/my.cnf
[mysqld]
basedir=/usr/local/mysql/mysql5.7.42
datadir=/usr/local/mysql/mysql5.7.42/data
port = 3306
sql_mode=NO_ENGINE_SUBSTITUTION,STRICT_TRANS_TABLES
symbolic-links=0
max_connections=400
innodb_file_per_table=1
lower_case_table_names=1
innodb_log_file_size=256M
innodb_buffer_pool_size=128M
key_buffer_size = 64M
max_allowed_packet = 256M
table_open_cache = 256
sort_buffer_size = 1M
net_buffer_length = 8K
read_buffer_size = 1M
read_rnd_buffer_size = 512K
myisam_sort_buffer_size = 16M
thread_cache_size = 32
query_cache_size = 32M
tmp_table_size = 64
character-set-server=utf8
collation-server=utf8_general_ci配置confluence
浏览器打开 http://localhost:8090


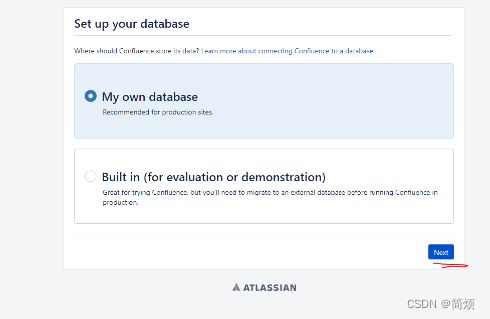
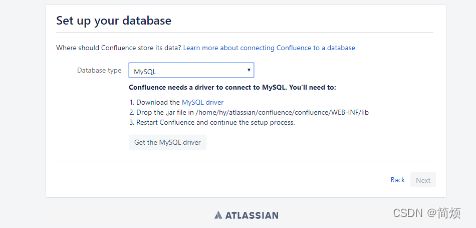
使用简单模式连接,但是如果没有授权指定数据库远程权限,会报错
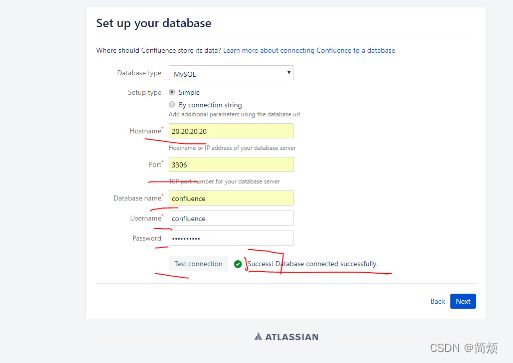
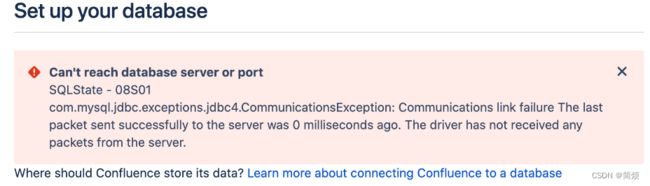
推荐使用第二种方式
jdbc:mysql://127.0.0.1/confluencedb?useSSL=false


插件安装
下载地址: atlassain插件下载地址
获取插件授权码
执行命令和上面的一样,只是把 -p 参数值换成应用密钥,例如
java -jar atlassian-agent.jar -d true -p com.mxgraph.confluence.plugins.diagramly -m [email protected] -n my_name -o https://zhile.io -s XXX-YYYY-DDDD-SSSS
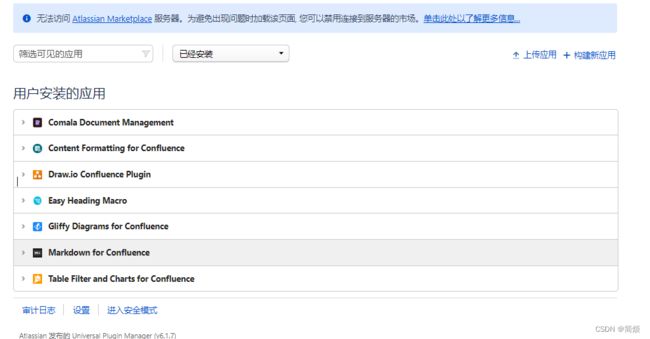
效果