- JSON 与 AJAX
Auscy
jsonajax前端
一、JSON(JavaScriptObjectNotation)1.数据类型与语法细节支持的数据类型:基本类型:字符串(需用双引号)、数字、布尔值(true/false)、null。复杂类型:数组([])、对象({})。严格语法规范:键名必须用双引号包裹(如"name":"张三")。数组元素用逗号分隔,最后一个元素后不能有多余逗号。数字不能以0开头(如012会被解析为12),不支持八进制/十六进制
- C++ 11 Lambda表达式和min_element()与max_element()的使用_c++ lamda函数 min_element((1)
2401_84976182
程序员c语言c++学习
既有适合小白学习的零基础资料,也有适合3年以上经验的小伙伴深入学习提升的进阶课程,涵盖了95%以上CC++开发知识点,真正体系化!由于文件比较多,这里只是将部分目录截图出来,全套包含大厂面经、学习笔记、源码讲义、实战项目、大纲路线、讲解视频,并且后续会持续更新如果你需要这些资料,可以戳这里获取#include#include#includeusingnamespacestd;boolcmp(int
- C++ 11 Lambda表达式和min_element()与max_element()的使用_c++ lamda函数 min_element(
网上学习资料一大堆,但如果学到的知识不成体系,遇到问题时只是浅尝辄止,不再深入研究,那么很难做到真正的技术提升。需要这份系统化的资料的朋友,可以添加戳这里获取一个人可以走的很快,但一群人才能走的更远!不论你是正从事IT行业的老鸟或是对IT行业感兴趣的新人,都欢迎加入我们的的圈子(技术交流、学习资源、职场吐槽、大厂内推、面试辅导),让我们一起学习成长!intmain(){vectormyvec{3,
- JavaScript 树形菜单总结
Auscy
microsoft
树形菜单是前端开发中常见的交互组件,用于展示具有层级关系的数据(如文件目录、分类列表、组织架构等)。以下从核心概念、实现方式、常见功能及优化方向等方面进行总结。一、核心概念层级结构:数据以父子嵌套形式存在,如{id:1,children:[{id:2}]}。节点:树形结构的基本单元,包含自身信息及子节点(若有)。展开/折叠:子节点的显示与隐藏切换,是树形菜单的核心交互。递归渲染:因数据层级不固定,
- 前端项目架构设计要领
1.架构设计的核心目标在设计前端项目架构时,核心目标是模块化、可维护、可扩展、可测试,以及开发效率的最大化。这些目标可以通过以下几个方面来实现:组件化:将UI功能封装为可复用的组件。模块化:将业务逻辑分解为独立的模块或服务。自动化构建与部署:实现自动化构建、测试和部署流程,减少人为操作的错误。代码规范化与检查:确保团队协作时,代码风格和质量一致。2.项目目录结构设计一个清晰合理的目录结构对大型项目
- 精通Canvas:15款时钟特效代码实现指南
烟幕缭绕
本文还有配套的精品资源,点击获取简介:HTML5的Canvas是一个用于绘制矢量图形的API,通过JavaScript实现动态效果。本项目集合了15种不同的时钟特效代码,帮助开发者通过学习绘制圆形、线条、时间更新、旋转、颜色样式设置及动画效果等概念,深化对Canvas的理解和应用。项目中的CSS文件负责时钟的样式设定,而JS文件则包含实现各种特效的逻辑,通过不同的函数或类处理时间更新和动画绘制,提
- 【前端】jQuery数组合并去重方法总结
在jQuery中合并多个数组并去重,推荐使用原生JavaScript的Set对象(高效简单)或$.unique()(仅适用于DOM元素,不适用于普通数组)。以下是完整解决方案:方法1:使用ES6Set(推荐)//定义多个数组constarr1=[1,2,3];constarr2=[2,3,4];constarr3=[3,4,5];//合并数组并用Set去重constmergedArray=[...
- Vue3+Vite+TS+Axios整合详细教程
老马聊技术
VueViteTSvue.js
1.Vite简介Vite是新一代的前端构建工具,在尤雨溪开发Vue3.0的时候诞生。类似于Webpack+Webpack-dev-server。其主要利用浏览器ESM特性导入组织代码,在服务器端按需编译返回,完全跳过了打包这个概念,服务器随起随用。生产中利用Rollup作为打包工具,号称下一代的前端构建工具。vite是一种新型的前端构建工具,能够显著的提升前端开发者的体验。它主要有俩部分组成:一个
- 前端 NPM 包的依赖可视化分析工具推荐
前端视界
前端艺匠馆前端npmarcgisai
前端NPM包的依赖可视化分析工具推荐关键词:NPM、依赖管理、可视化分析、前端工程、包管理、依赖冲突、性能优化摘要:本文将深入探讨前端开发中NPM包依赖可视化分析的重要性,介绍5款主流工具的使用方法和特点,并通过实际案例展示如何利用这些工具优化项目依赖结构、解决版本冲突问题以及提升构建性能。文章将帮助开发者更好地理解和掌控项目依赖关系,提高开发效率和项目可维护性。背景介绍目的和范围本文旨在为前端开
- 日历插件-FullCalendar的详细使用
老马聊技术
JavaScript前端javascript
一、介绍FullCalendar是一个功能强大、高度可定制的JavaScript日历组件,用于在网页中显示和管理日历事件。它支持多种视图(月、周、日等),可以轻松集成各种框架,并提供丰富的事件处理功能。二、实操案例具体代码如下:FullCalendar日期选择body{font-family:Arial,sans-serif;margin:20px;}#calendar{max-width:900
- 数字孪生技术为UI前端注入新活力:实现产品设计的沉浸式体验
ui设计前端开发老司机
ui
hello宝子们...我们是艾斯视觉擅长ui设计、前端开发、数字孪生、大数据、三维建模、三维动画10年+经验!希望我的分享能帮助到您!如需帮助可以评论关注私信我们一起探讨!致敬感谢感恩!一、引言:从“平面交互”到“沉浸体验”的UI革命当用户在电商APP中翻看3D家具模型却无法感知其与自家客厅的匹配度,当设计师在2D屏幕上绘制汽车内饰却难以预判实际乘坐体验——传统UI设计的“平面化、静态化、割裂感”
- Java三年经验程序员技术栈全景指南:从前端到架构,对标阿里美团全栈要求
可曾去过倒悬山
java前端架构
Java三年经验程序员技术栈全景指南:从前端到架构,对标阿里美团全栈要求三年经验是Java程序员的分水岭,技术栈深度决定你成为“业务码农”还是“架构师候选人”。本文整合阿里、美团、滴滴等大厂招聘要求,为你绘制可落地的进阶路线。一、Java核心:从语法糖到JVM底层三年经验与初级的核心差异在于系统级理解,大厂面试常考以下能力:JVM与性能调优内存模型(堆外内存、元空间)、GC算法(G1/ZGC适用场
- javascript高级程序设计第3版——第12章 DOM2与DOM3
weixin_30687587
javascript数据结构与算法ViewUI
12章——DOM2与DOM3为了增强D0M1,DOM级规范定义了一些模块。DOM2核心:为不同的DOM类型引入了一些与XML命名空间有关的方法,还定义了以编程方式创建Document实例的方法;DOM2级样式:针对操作元素的样式而开发;其特性总结:1.每个元素都有一个关联的style对象,可用来确定和修改行内样式;2.要确定某个元素的计算样式,可使用getComgetComputedStyle()
- JavaScript 基础09:Web APIs——日期对象、DOM节点
梦想当全栈
JavaScriptjavascript前端开发语言
JavaScript基础09:WebAPIs——日期对象、DOM节点进一步学习DOM相关知识,实现可交互的网页特效能够插入、删除和替换元素节点。能够依据元素节点关系查找节点。一、日期对象掌握Date日期对象的使用,动态获取当前计算机的时间。ECMAScript中内置了获取系统时间的对象Date,使用Date时与之前学习的内置对象console和Math不同,它需要借助new关键字才能使用。1.实例
- 《Java前端开发全栈指南:从Servlet到现代框架实战》
前言在当今Web开发领域,Java依然是后端开发的主力语言,而随着前后端分离架构的普及,Java开发者也需要掌握前端技术栈。本文将全面介绍JavaWeb前端开发的核心技术,包括传统Servlet/JSP体系、现代前端框架集成方案,以及全栈开发的最佳实践。通过本文,您将了解如何构建现代化的JavaWeb应用前端界面。一、JavaWeb前端技术演进1.1传统技术栈Servlet:JavaWeb基础,处
- Vue3组件库实战: 打造高复用UI系统
武昌库里写JAVA
面试题汇总与解析课程设计springbootvue.jslayui毕业设计
Vue3组件库实战:打造高复用UI系统介绍什么是Vue3组件库在前端开发中,UI组件库是非常重要的一部分。Vue3组件库是基于Vue.js3.x版本开发的一套可用于构建Web应用的UI组件集合,可以帮助开发者快速搭建页面并保证页面的一致性和美观性。目标关键词:Vue3组件库设计与构建设计原则组件库的设计需要遵循一定的原则,比如易用性、可维护性、扩展性等。在设计阶段需要考虑到不同场景的使用,并且保证
- Flutter基础(前端教程⑥-按钮切换)
aaiier
Flutterflutter前端状态模式
1.假设你已有的两个表单组件(示例)//手机号注册表单(示例)classPhoneRegisterFormextendsStatelessWidget{@overrideWidgetbuild(BuildContextcontext){returnColumn(children:[TextField(decoration:InputDecoration(labelText:'手机号')),Text
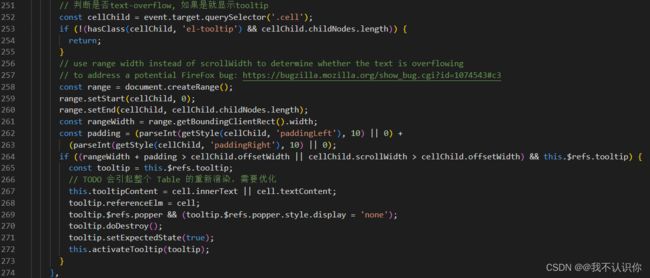
- 为Layui Table组件添加前端搜索功能
caifox菜狐狸
JavaScript学习之旅:从新手到专家前端layuijavascripttable前端搜索表格搜索前端框架
在现代Web开发中,数据展示和交互功能是构建高效、用户友好界面的关键要素之一。Layui作为一款广受欢迎的前端UI框架,以其简洁的代码、丰富的组件和强大的功能,为开发者提供了极大的便利。其中,Layui的Table组件更是以其强大的数据展示能力和灵活的配置选项,成为了许多项目中不可或缺的部分。然而,在实际应用中,仅仅展示数据往往是不够的。用户通常需要根据自己的需求快速查找特定信息,这就需要为表格添
- vue3 + Element Plus 系统主题切换
顾尘眠
vue.js前端javascript
创建主题管理模块(用于配置颜色变量)新建src/utils/theme.tsimport{ref,watchEffect}from'vue'typeThemeType='light'|'dark'|'system'//主题配置constthemeConfig={light:{'--el-color-primary':'#409eff','--bg-color':'#ffffff','--text-
- Vue.js 过渡 & 动画
lsx202406
开发语言
Vue.js过渡&动画引言在Web开发中,过渡与动画是提升用户体验的关键元素。Vue.js作为一款流行的前端框架,提供了强大的过渡与动画功能,使得开发者能够轻松实现丰富的交互效果。本文将深入探讨Vue.js中的过渡与动画,包括其原理、应用场景以及实现方法。一、Vue.js过渡原理Vue.js过渡是利用CSS3的transition属性实现的。当Vue.js侦测到数据变化时,会自动触发过渡效果。过渡
- JavaScript之DOM操作与事件处理详解
AA-代码批发V哥
JavaScriptjavascript
JavaScript之DOM操作与事件处理详解一、DOM基础:理解文档对象模型二、DOM元素的获取与访问2.1基础获取方法2.2集合的区别与注意事项三、DOM元素的创建与修改3.1创建与插入元素3.2修改元素属性与样式3.2.1属性操作3.2.2样式操作3.3元素内容的修改四、DOM元素的删除与替换4.1删除元素4.2替换元素五、事件处理:实现页面交互5.1事件绑定的三种方式5.1.1HTML属性
- V少JS基础班之第五弹
V少在逆向
JS基础班javascript开发语言ecmascript
文章目录一、前言二、本节涉及知识点三、重点内容1-函数的定义2-函数的构成1.函数参数详解1)参数个数不固定2)默认参数3)arguments对象(类数组)4)剩余参数(Rest参数)5)函数参数是按值传递的6)解构参数传递7)参数校验技巧(JavaScript没有类型限制,需要手动校验)2.函数返回值详解3-函数的分类1-函数声明式:2-函数表达式:3-箭头函数:4-构造函数:5-IIFE:6-
- Javaweb学习之Vue模板语法(三)
不要数手指啦
vue.js学习前端
目录学习资料前情回顾本期介绍(vue模板语法)文本插值Vue的Attribute绑定使用JavaScript表达式综合实例代码:学习资料Vue.js-渐进式JavaScript框架|Vue.js(vuejs.org)前情回顾项目的创建大家可以看这篇文章Vue学习之项目的创建-CSDN博客本期介绍(vue模板语法)首先,找到我们编写代码的地方找到自己项目的src文件夹,打开之后点击component
- 深入解析 “void(0);” 的用法与作用_void(0);
关键要点void(0);是JavaScript中的一个表达式,研究表明它通常用于超链接中,防止页面跳转。它通过void运算符计算表达式并返回undefined,常用于创建“死链接”。证据显示,这种用法简单易用,但现代开发更推荐使用事件监听器。基本概念void(0);的作用void(0);是JavaScript的void运算符的一个实例,void运算符会计算一个表达式但不返回任何值,而是始终返回un
- leetcode_27 移除元素
_不会dp不改名_
#双指针leetcode算法职场和发展
1.题意给定一个数组,把不等于val的元素全部移动到数组的前面来。不需要考虑值为val里的元素。2.题解2.1同向双指针我们利用双指针,慢指针指向下一个插入的位置。而快指针不断向前找到首个不为val的值,找到后将快指针位置值赋给慢指针位置,慢指针右移。当快指针遍历完整个数组时,过程结束。classSolution{public:intremoveElement(vector&nums,intval
- GPT实操——利用GPT创建一个应用
狗木马
深度学习gpt-3gpt
功能描述信息查询:用户可以询问各种问题,如天气、新闻、股票等,机器人会返回相关信息。任务执行:用户可以要求机器人执行一些简单的任务,如设置提醒、发送邮件等。情感支持:机器人可以与用户进行情感交流,提供安慰和支持。个性化设置:用户可以自定义机器人的回复风格和偏好。技术栈前端:React.js后端:Node.js+Express数据库:MongoDB自然语言处理:OpenAIGPT-3API其他工具:
- 【JS三兄弟谁是谁】搞懂 splice、slice、split,只需一杯奶茶的时间!
dorabighead
前端八股总结javascript前端开发语言
JavaScript有三兄弟,经常一起“切人”。他们名字相似、功能相关,但性格迥异,常被搞混。今天,就带你喝着奶茶,笑着剖析,帮你彻底搞懂:splice、slice、split到底是谁?干了啥?凭啥这么火?一、三兄弟登场:不同对象,不同任务名称作用对象是否修改原对象返回类型功能简述splice数组✅是被删除元素数组原地删除元素并可插入新元素slice数组/字符串❌否副本(子集)复制选中部分,原体不
- 前端面试题总结——JS篇
又又呢
前端javascript开发语言
一、说说JavaScript中的数据类型?存储上有什么差别?1、数据类型基本类型number:数值类型十进制:letintNum=55八进制(零开头):letnum1=070十六进制(0x开头):lethexNum1=0xANaN:特殊数值,意为“不是数值”string:字符串类型boolean:布尔值,true或falseundefined:表示未定义null:空值symbol:是原始值,且符号
- 前端面试题——5.AjAX的缺点?
浅端
前端面试题前端面试题
①传统的web交互是:用户一个网页动作,就会发送一个http请求到服务器,服务器处理完该请求再返回一个完整的HTML页面,客户端再重新加载,这样极大地浪费了带宽。②AJAX的出现解决了这个问题,它只会向服务器请求用户所需要的数据,并在客户端采用JavaScript处理返回的数据,操作DOM更新页面。③AJXA优点:无刷新更新页面异步服务器通信前端后端负载均衡④AJAX缺点:干掉了Back和Hist
- JavaScript知识归纳——面试题
Dream_Lee_1997
JavaScriptjs面试题
JavaScript面试题总结JavaScript知识点1、JavaScript中settimeout与setinteval两个函数的区别?2、编写JavaScript脚本生成1-6之间的整数?3、在JavaScript脚本中,isNaN的作用是什么?4、JavaScript中获取某个元素有哪几种方式?5、Ajax的优缺点都有什么?6、简述一下Ajax的工作原理。7、JavaScript中的数据类
- Java实现的简单双向Map,支持重复Value
superlxw1234
java双向map
关键字:Java双向Map、DualHashBidiMap
有个需求,需要根据即时修改Map结构中的Value值,比如,将Map中所有value=V1的记录改成value=V2,key保持不变。
数据量比较大,遍历Map性能太差,这就需要根据Value先找到Key,然后去修改。
即:既要根据Key找Value,又要根据Value
- PL/SQL触发器基础及例子
百合不是茶
oracle数据库触发器PL/SQL编程
触发器的简介;
触发器的定义就是说某个条件成立的时候,触发器里面所定义的语句就会被自动的执行。因此触发器不需要人为的去调用,也不能调用。触发器和过程函数类似 过程函数必须要调用,
一个表中最多只能有12个触发器类型的,触发器和过程函数相似 触发器不需要调用直接执行,
触发时间:指明触发器何时执行,该值可取:
before:表示在数据库动作之前触发
- [时空与探索]穿越时空的一些问题
comsci
问题
我们还没有进行过任何数学形式上的证明,仅仅是一个猜想.....
这个猜想就是; 任何有质量的物体(哪怕只有一微克)都不可能穿越时空,该物体强行穿越时空的时候,物体的质量会与时空粒子产生反应,物体会变成暗物质,也就是说,任何物体穿越时空会变成暗物质..(暗物质就我的理
- easy ui datagrid上移下移一行
商人shang
js上移下移easyuidatagrid
/**
* 向上移动一行
*
* @param dg
* @param row
*/
function moveupRow(dg, row) {
var datagrid = $(dg);
var index = datagrid.datagrid("getRowIndex", row);
if (isFirstRow(dg, row)) {
- Java反射
oloz
反射
本人菜鸟,今天恰好有时间,写写博客,总结复习一下java反射方面的知识,欢迎大家探讨交流学习指教
首先看看java中的Class
package demo;
public class ClassTest {
/*先了解java中的Class*/
public static void main(String[] args) {
//任何一个类都
- springMVC 使用JSR-303 Validation验证
杨白白
springmvc
JSR-303是一个数据验证的规范,但是spring并没有对其进行实现,Hibernate Validator是实现了这一规范的,通过此这个实现来讲SpringMVC对JSR-303的支持。
JSR-303的校验是基于注解的,首先要把这些注解标记在需要验证的实体类的属性上或是其对应的get方法上。
登录需要验证类
public class Login {
@NotEmpty
- log4j
香水浓
log4j
log4j.rootCategory=DEBUG, STDOUT, DAILYFILE, HTML, DATABASE
#log4j.rootCategory=DEBUG, STDOUT, DAILYFILE, ROLLINGFILE, HTML
#console
log4j.appender.STDOUT=org.apache.log4j.ConsoleAppender
log4
- 使用ajax和history.pushState无刷新改变页面URL
agevs
jquery框架Ajaxhtml5chrome
表现
如果你使用chrome或者firefox等浏览器访问本博客、github.com、plus.google.com等网站时,细心的你会发现页面之间的点击是通过ajax异步请求的,同时页面的URL发生了了改变。并且能够很好的支持浏览器前进和后退。
是什么有这么强大的功能呢?
HTML5里引用了新的API,history.pushState和history.replaceState,就是通过
- centos中文乱码
AILIKES
centosOSssh
一、CentOS系统访问 g.cn ,发现中文乱码。
于是用以前的方式:yum -y install fonts-chinese
CentOS系统安装后,还是不能显示中文字体。我使用 gedit 编辑源码,其中文注释也为乱码。
后来,终于找到以下方法可以解决,需要两个中文支持的包:
fonts-chinese-3.02-12.
- 触发器
baalwolf
触发器
触发器(trigger):监视某种情况,并触发某种操作。
触发器创建语法四要素:1.监视地点(table) 2.监视事件(insert/update/delete) 3.触发时间(after/before) 4.触发事件(insert/update/delete)
语法:
create trigger triggerName
after/before
- JS正则表达式的i m g
bijian1013
JavaScript正则表达式
g:表示全局(global)模式,即模式将被应用于所有字符串,而非在发现第一个匹配项时立即停止。 i:表示不区分大小写(case-insensitive)模式,即在确定匹配项时忽略模式与字符串的大小写。 m:表示
- HTML5模式和Hashbang模式
bijian1013
JavaScriptAngularJSHashbang模式HTML5模式
我们可以用$locationProvider来配置$location服务(可以采用注入的方式,就像AngularJS中其他所有东西一样)。这里provider的两个参数很有意思,介绍如下。
html5Mode
一个布尔值,标识$location服务是否运行在HTML5模式下。
ha
- [Maven学习笔记六]Maven生命周期
bit1129
maven
从mvn test的输出开始说起
当我们在user-core中执行mvn test时,执行的输出如下:
/software/devsoftware/jdk1.7.0_55/bin/java -Dmaven.home=/software/devsoftware/apache-maven-3.2.1 -Dclassworlds.conf=/software/devs
- 【Hadoop七】基于Yarn的Hadoop Map Reduce容错
bit1129
hadoop
运行于Yarn的Map Reduce作业,可能发生失败的点包括
Task Failure
Application Master Failure
Node Manager Failure
Resource Manager Failure
1. Task Failure
任务执行过程中产生的异常和JVM的意外终止会汇报给Application Master。僵死的任务也会被A
- 记一次数据推送的异常解决端口解决
ronin47
记一次数据推送的异常解决
需求:从db获取数据然后推送到B
程序开发完成,上jboss,刚开始报了很多错,逐一解决,可最后显示连接不到数据库。机房的同事说可以ping 通。
自已画了个图,逐一排除,把linux 防火墙 和 setenforce 设置最低。
service iptables stop
- 巧用视错觉-UI更有趣
brotherlamp
UIui视频ui教程ui自学ui资料
我们每个人在生活中都曾感受过视错觉(optical illusion)的魅力。
视错觉现象是双眼跟我们开的一个玩笑,而我们往往还心甘情愿地接受我们看到的假象。其实不止如此,视觉错现象的背后还有一个重要的科学原理——格式塔原理。
格式塔原理解释了人们如何以视觉方式感觉物体,以及图像的结构,视角,大小等要素是如何影响我们的视觉的。
在下面这篇文章中,我们首先会简单介绍一下格式塔原理中的基本概念,
- 线段树-poj1177-N个矩形求边长(离散化+扫描线)
bylijinnan
数据结构算法线段树
package com.ljn.base;
import java.util.Arrays;
import java.util.Comparator;
import java.util.Set;
import java.util.TreeSet;
/**
* POJ 1177 (线段树+离散化+扫描线),题目链接为http://poj.org/problem?id=1177
- HTTP协议详解
chicony
http协议
引言
- Scala设计模式
chenchao051
设计模式scala
Scala设计模式
我的话: 在国外网站上看到一篇文章,里面详细描述了很多设计模式,并且用Java及Scala两种语言描述,清晰的让我们看到各种常规的设计模式,在Scala中是如何在语言特性层面直接支持的。基于文章很nice,我利用今天的空闲时间将其翻译,希望大家能一起学习,讨论。翻译
- 安装mysql
daizj
mysql安装
安装mysql
(1)删除linux上已经安装的mysql相关库信息。rpm -e xxxxxxx --nodeps (强制删除)
执行命令rpm -qa |grep mysql 检查是否删除干净
(2)执行命令 rpm -i MySQL-server-5.5.31-2.el
- HTTP状态码大全
dcj3sjt126com
http状态码
完整的 HTTP 1.1规范说明书来自于RFC 2616,你可以在http://www.talentdigger.cn/home/link.php?url=d3d3LnJmYy1lZGl0b3Iub3JnLw%3D%3D在线查阅。HTTP 1.1的状态码被标记为新特性,因为许多浏览器只支持 HTTP 1.0。你应只把状态码发送给支持 HTTP 1.1的客户端,支持协议版本可以通过调用request
- asihttprequest上传图片
dcj3sjt126com
ASIHTTPRequest
NSURL *url =@"yourURL";
ASIFormDataRequest*currentRequest =[ASIFormDataRequest requestWithURL:url];
[currentRequest setPostFormat:ASIMultipartFormDataPostFormat];[currentRequest se
- C语言中,关键字static的作用
e200702084
C++cC#
在C语言中,关键字static有三个明显的作用:
1)在函数体,局部的static变量。生存期为程序的整个生命周期,(它存活多长时间);作用域却在函数体内(它在什么地方能被访问(空间))。
一个被声明为静态的变量在这一函数被调用过程中维持其值不变。因为它分配在静态存储区,函数调用结束后并不释放单元,但是在其它的作用域的无法访问。当再次调用这个函数时,这个局部的静态变量还存活,而且用在它的访
- win7/8使用curl
geeksun
win7
1. WIN7/8下要使用curl,需要下载curl-7.20.0-win64-ssl-sspi.zip和Win64OpenSSL_Light-1_0_2d.exe。 下载地址:
http://curl.haxx.se/download.html 请选择不带SSL的版本,否则还需要安装SSL的支持包 2. 可以给Windows增加c
- Creating a Shared Repository; Users Sharing The Repository
hongtoushizi
git
转载自:
http://www.gitguys.com/topics/creating-a-shared-repository-users-sharing-the-repository/ Commands discussed in this section:
git init –bare
git clone
git remote
git pull
git p
- Java实现字符串反转的8种或9种方法
Josh_Persistence
异或反转递归反转二分交换反转java字符串反转栈反转
注:对于第7种使用异或的方式来实现字符串的反转,如果不太看得明白的,可以参照另一篇博客:
http://josh-persistence.iteye.com/blog/2205768
/**
*
*/
package com.wsheng.aggregator.algorithm.string;
import java.util.Stack;
/**
- 代码实现任意容量倒水问题
home198979
PHP算法倒水
形象化设计模式实战 HELLO!架构 redis命令源码解析
倒水问题:有两个杯子,一个A升,一个B升,水有无限多,现要求利用这两杯子装C
- Druid datasource
zhb8015
druid
推荐大家使用数据库连接池 DruidDataSource. http://code.alibabatech.com/wiki/display/Druid/DruidDataSource DruidDataSource经过阿里巴巴数百个应用一年多生产环境运行验证,稳定可靠。 它最重要的特点是:监控、扩展和性能。 下载和Maven配置看这里: http
- 两种启动监听器ApplicationListener和ServletContextListener
spjich
javaspring框架
引言:有时候需要在项目初始化的时候进行一系列工作,比如初始化一个线程池,初始化配置文件,初始化缓存等等,这时候就需要用到启动监听器,下面分别介绍一下两种常用的项目启动监听器
ServletContextListener
特点: 依赖于sevlet容器,需要配置web.xml
使用方法:
public class StartListener implements
- JavaScript Rounding Methods of the Math object
何不笑
JavaScriptMath
The next group of methods has to do with rounding decimal values into integers. Three methods — Math.ceil(), Math.floor(), and Math.round() — handle rounding in differen