【Windows & Esp32】基于 libjpeg-9e 编解码库的视频播放器
目录
- 一、音视频基础
-
- 1.1、图像编码
- 1.2、视频编码
- 1.3、AVI 文件结构
- 二、TF卡基础
- 三、Windows上播放音视频
-
- 3.1、在 Windows 下使用 vs2019 编译 libjpeg 库
- 3.2、创建 libjpeg 解码项目
- 3.3、libjpeg 中 example.c 功能解析
- 3.4、SDL2 库配置与使用
- 3.5、音频部分程序移植
- 3.6、音视频文件格式转换
- 3.7、程序的编写与说明
- 四、Esp32 上播放音视频
-
- 4.1、硬件选用及芯片引脚资源使用
- 4.2、libjpeg 编解码库移植
- 4.3、LCD 库搬移
- 4.4、LCD 显示说明
- 4.5、视频时长计算
- 4.6、Unicode 字符集与 UTF-8 编码
- 4.7、日期获取
- 五、使用前注意事项
-
- 5.1、Windows 上播放音视频
- 5.2、Esp32 上播放音视频
- 六、说明
-
- 6.1、PS 构造纯色图片
- 6.2、图片转为 LCD 显示数据类型
- 6.3、UTF-8 字库获取
- 6.4、数字字模获取
- 6.5、关于 dma_buf_len 和 dma_buf_count 的设置
如理解有误,望不吝指正。
仓库:https://gitee.com/npc-gitee/libjpeg_avi_player.git
一、音视频基础
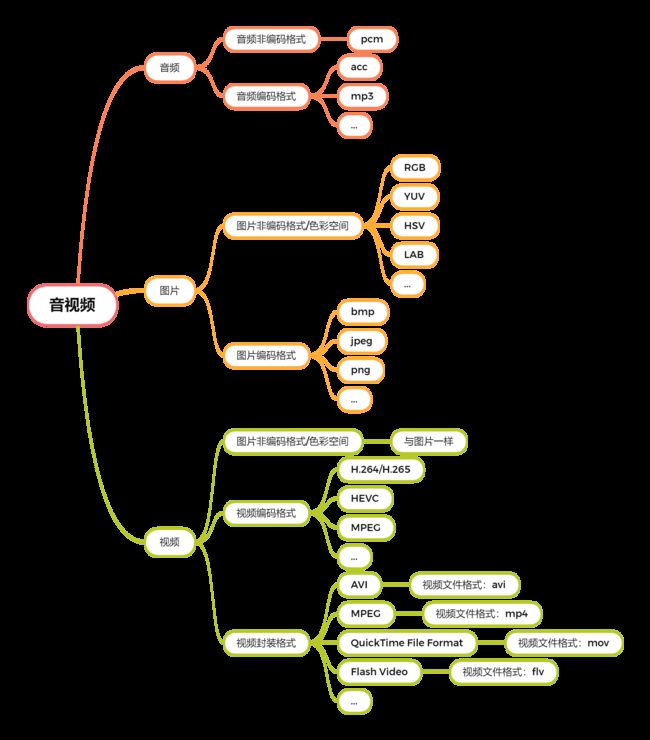
编码的主要目的是减小文件大小,从而减小存储空间与传输带宽,从某种意义上讲就是一种压缩行为,像通过Zip软件对文件进行打包压缩行为类似。在压缩过程中,分为有损压缩和无损压缩。
- 有损压缩:丢弃不敏感信息。
- 无损压缩:保留全部信息。
对于音频数据,按照扬声器的底层工作逻辑,通过改变电压达到改变振动频率,从而发出不同声音。PCM 格式作为一种非编码格式,可通过将 PCM 的数据经过DAC 即可输出音频信号。对于 MP3 等经过编码的音频文件,需要通过解码后,将其转换为PCM数据后,然后输出音频信号。
对于图像数据,按照显示器的底层工作逻辑,显示器由多个像素组成,一个像素由三个发光源(RGB)组合成不同的颜色。RGB 数据格式写入 GRAM 中即可显示图像。RGB 只是图像显示的一种颜色空间,还有YUV、HSV等颜色空间,颜色空间对应的是一个数学概念叫做向量空间,一个非线性相关的向量组,就可以当成线性空间一个基,可通过基来描述空间中任何一个向量,颜色空间与向量空间是一个与之类似的场景。 这些颜色空间之间可以相互转换,比如 YUV 转 RGB,RGB 转 YUV。
对于 jpeg 等经过编码的图像文件,需要经过解码后,转换为相应的颜色空间的数据,然后依据显示器的显示原理,将其转换为 RGB 颜色空间,完成显示任务。
对于视频数据,本质上是多帧图像和音频数据的集合,图像的颜色空间的概念与图像中一样。多张图片在短时间内切换,给人呈现出一种动画的效果。图像的编码针对于帧内的数据进行,而视频的编码除了在帧内完成编码外,还会在帧间完成编码工作。图像所做的是 空间冗余,视频所做的是 空间冗余 和 时间冗余。
参考:
[1]: 音视频基础知识、YUV、H264
1.1、图像编码
bmp格式没有压缩像素格式,存储在文件中时先有文件头、再图像头、后面就都是像素数据了,上下颠倒存储。bmp格式也是可以压缩,bmp格式也可以有颜色板。JPEG是一种静止图像的压缩标准,属于有损压缩,它是一种标准的帧内压缩编码方式。jpeg 编码是通过将RGB数据转换为YUV的色彩空间,然后进行 压缩 的。M-JPEG源于JPEG压缩技术,是一种简单的帧内JPEG压缩,但是由于这种压缩本身技术限制, 无法做到大比例压缩。png是一种无损压缩格式。gif可以保存多帧图像。gif中有个参数可以控制图片变化的快慢。
所谓颜色看板,就是在文件中创建一个颜色索引,图中像素用到的某个颜色则文件中存储的为索引值,而不是之前的 RGB 数值。
1.2、视频编码
MPEG是压缩运动图像及其伴音的视音频编码标准,它采用了帧间压缩,仅存储连续帧之间有差别的地方 ,从而达到较大的压缩比。H264视频帧编码和jpeg的编码逻辑一样,空间冗余,在其基础上添加了 IPB 帧的逻辑,在帧与帧之间做差运算,时间冗余。
视频文件格式: windows设置后缀名的目的是让相应的应用程序来打开相应的文件。可以随意更改后缀名,不会更改文件的内部数据格式。
视频封装格式: 一种存储视频信息的容器。视频封装格式不同,也不会影响视频数据,主要是一种对视频数据的组合。视频封装格式与视频文件格式一一对应。
视频编码方式: 对多帧图像数据进行压缩。
参考:
[1]: 图像和视频的主要格式与编码格式
[2]: H264系列(7):H.264与MPEG4区别
[3]: JPEG编码和H264
[4]: 视频编码与封装方式(整合)
1.3、AVI 文件结构
AVI 其音频数据采用 16 位线性 PCM 格式(未压缩),而视频数据,则采用MJPG 编码方式。
MJPG 是 MJPEG 的缩写,还可以文件格式扩展名。
MJPEG 不像 MPEG,不使用帧间编码。
MJPEG 的工作是将 RGB 格式的影像转换成 YCrCB 格式,目的是为了减少档案大小,一般约可减少 1/3 ~ 1/2 左右。
MJPEG 是视频,就是由系列 jpg 图片组成的视频。
AVI 视频封装格式,采用的是 RIFF 文件结构方式。构造 RIFF 文件的基本单元叫做数据块(Chunk),每个数据块至少包含 3 个部分,
- 4字节的数据块标记(又称数据块的ID,Chunk ID)
- 数据块大小
- 4 字节的形式类型或者列表类型( ID)(RIFF块和LIST块独有)
- 数据
整个 RIFF 文件可以看成一个数据块,其数据 ID 为 RIFF,称为 RIFF 块。一个 RIFF 文件中只允许存在一个 RIFF 块。RIFF 块中包含一系列的子块,其中有一种子块的 ID 为 “LIST”,称为 LIST 块。LIST 块包含一系列的子块,但是 LIST 块外的其他所有子块都不能再包含子块。
RIFF 块和 LIST 块比普通的数据块多了一个 形式类型(Form Type) 和 列表类型(List Type) 的数据域。 AVI 的 RIFF 块的形式类型是 AVI (注意:‘AVI ’,是带了一个空格的),它一般包含 3 个子块:
- 信息块(HeaderList):一个 ID 为
“hdrl”的 LIST 块,定义 AVI 文件的数据格式。 - 数据块(MovieList): 一个 ID 为
“movi”的 LIST 块,定义 AVI 文件的音视频序列数据格式。 - 索引块(Index Chunk):一个 ID 为
“idxl”的子块,定义 “movi” LIST 块的索引数据。
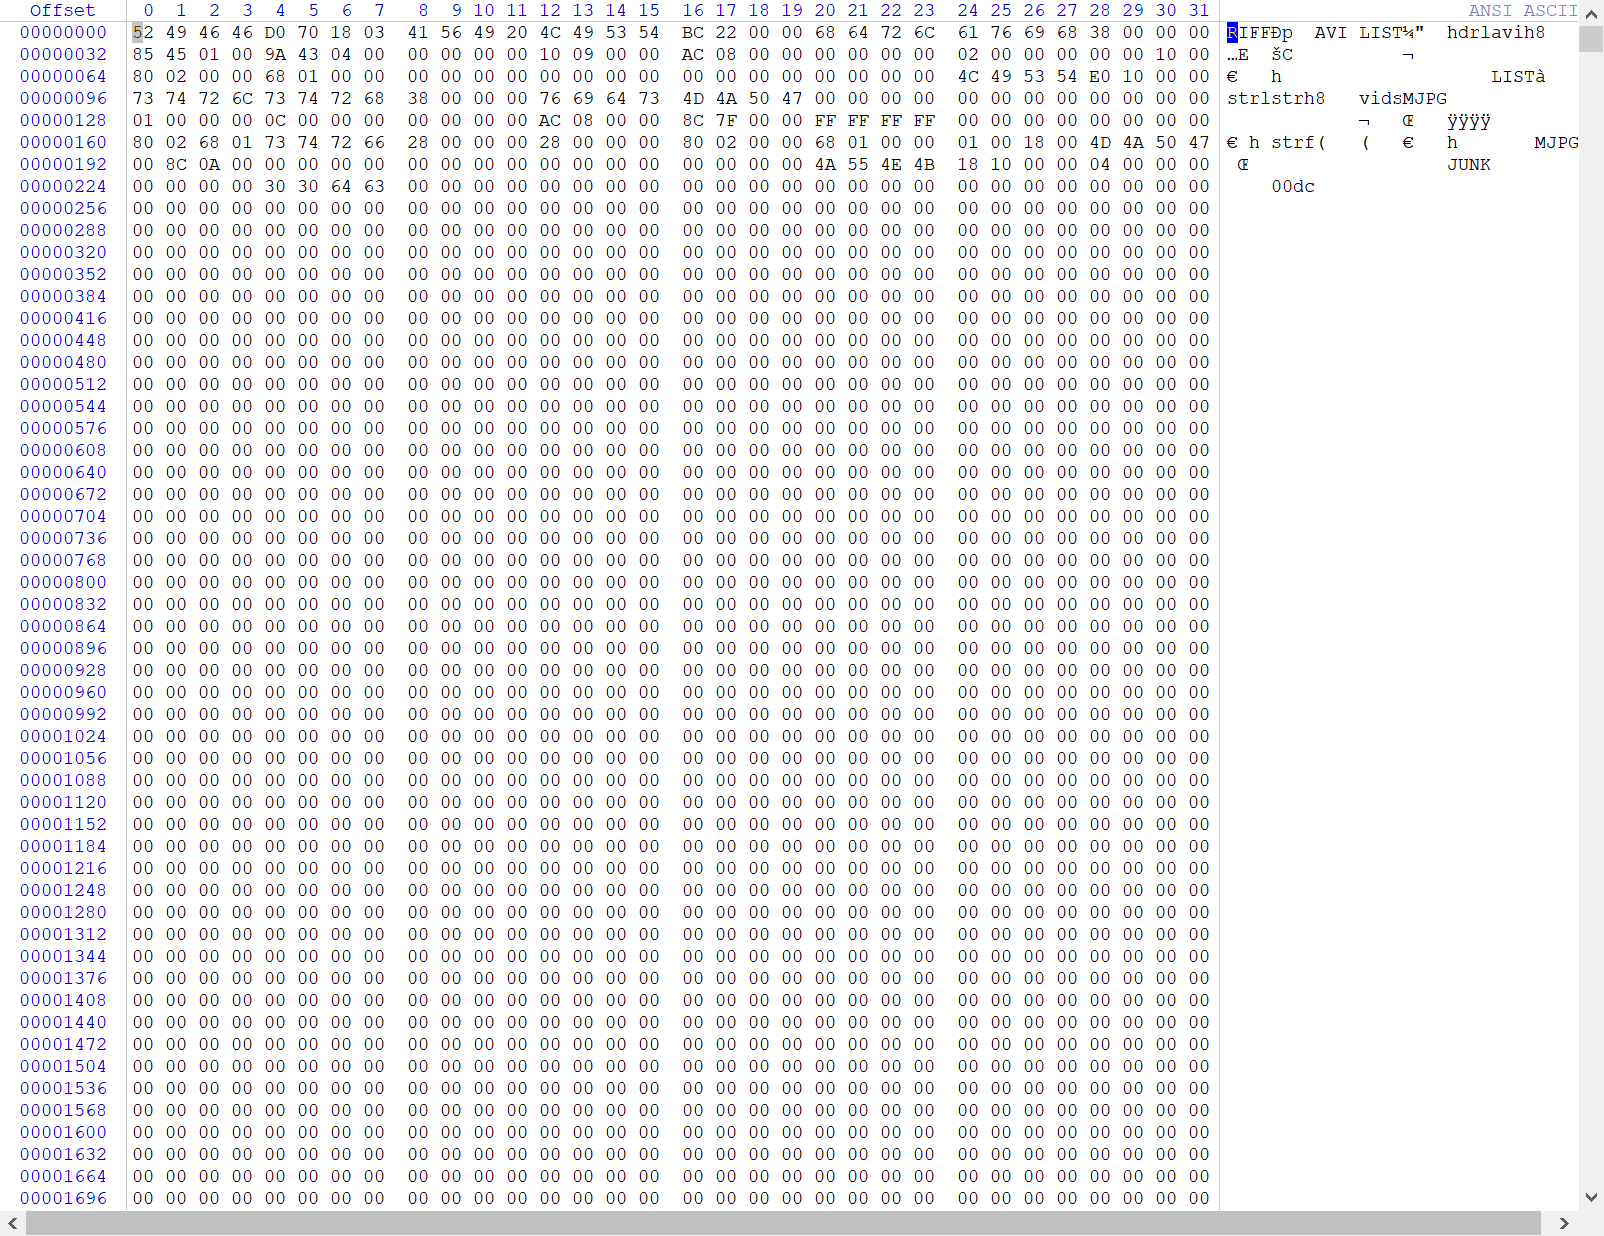
AVI 音视频文件的二进制内容可通过 WinHex 软件查看:
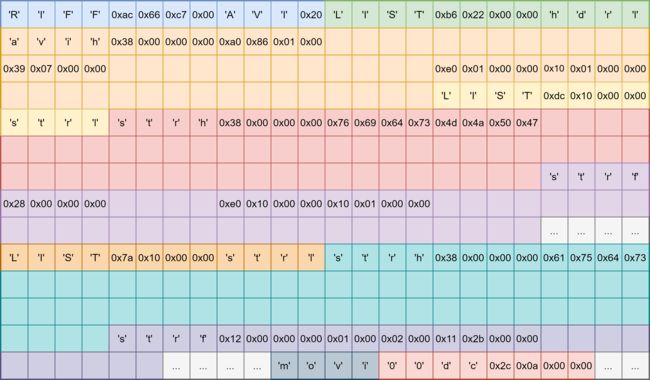
将上述数据按 AVI 文件结构划分:
- avih 块,用于记录 AVI 的全局信息,比如数据流的数量,视频图像的宽度和高度等信息,
AVIH_HEADER为数据保存结构。 - strl 子列表,文件中有多少种数据流(即前面的 Streams),就有多少个 strl 子列表。
- 每个 strl 中,至少包含一个
strh(Stream Header)和一个strf(Stream Formate),可选strn(Stream Name)。 - strf 的数据类型与strh相关,如果strh为视频流,那么 strf 对应视频流的结构保存信息。
- strl 子列表出现的顺序与后面数据块中的编号对应,假设 strl 子列表第一个是视频流,那么后面数据块视频帧的编号为
00dc,第二个是音频流,那么编号为01wb。
- 每个 strl 中,至少包含一个
- 数据块,图像数据和音频数据交错存储在数据块中,
##dc/##wb后面接当前一帧数据的大小值(不包含标准类型值和数据大小值,所以偏移需要加8),如果这个值为奇数,则加1,在读数据的时候一般一次性读完一帧,方便解码。 - 索引块, 为 AVI 文件中每一个媒体数据块进行索引,并且记录它们在文件中的偏移(可能相对于‘movi’列表,也可能相对于 AVI 文件开头)。
二、TF卡基础
控制器对 SD 卡进行读写通信操作一般有两种通信接口可选,一种是 SPI 接口,另外一种就是 SDIO 接口。
根据容量,SD 卡可划分为SDSC(<2GB)、SDHC(2~32GB)、SDXC(32GB~2TB)。
当前 SD 协议提供的 SD 卡规范版本最新是 8.0 版本(2020年),但是有些芯片(如stm32f4xx系列)控制器只支持 SD 卡规范版本 2.0,即只支持标准容量 SD 和高容量 SDHC 标准卡,不支持超大容量 SDXC 标准卡。
一张 SD 卡包括有存储单元、存储单元接口、电源检测、卡及接口控制器和接口驱动器 5 个部分。
- 存储单元是存储数据部件,存储单元通过存储单元接口与卡控制单元进行数据传输;
- 电源检测单元保证 SD 卡工作在合适的电压下,如出现掉电或上状态时,它会使控制单元和存储单元接口复位;
- 卡及接口控制单元控制 SD 卡的运行状态,它包括有 8 个寄存器;
- 接口驱动器控制 SD 卡引脚的输入输出。
转载自:[野火]STM32 库开发实战指南
三、Windows上播放音视频
libjpeg 是一个完全用 C 语言编写的库,包含功能有 JPEG 解码、JPEG 编码 和其它的JPEG功能的实现,这里使用的版本为 jpeg-9e。
开发平台:vs2019
3.1、在 Windows 下使用 vs2019 编译 libjpeg 库
win10 系统下没有这个文件,win7 系统可能会有。这里是在网站上下的文件。
win32.mdk:https://gitee.com/guangpengz/ms-sdk?_from=gitee_search
cmd 切换目录:Windows-cmd切换目录
1、下载 libjpeg,这里使用 jpegsr9e.zip,官网:http://www.ijg.org/
2、解压源码
3、进入解压后的目录,找到 makefile.vc 文件,修改下面语句:
!include <win32.mak>
所在行,并将 win32.mak 替换为实际位置, 我这边修改后的值为,修改为:
!include <C:\Users\user\Desktop\X\ms-sdk-master\win32.mak>
5、生成 sln 工程文件:在电脑的 “开始” 菜单中,找到 vs2019 的命令行工具,并打开,这里是:
x86 Native Tools Command Prompt for VS 2019
6、切换到 jpegsr9e 目录下,然后输入下面命令:
NMAKE /f makefile.vc setup-v16
7、打开 jpeg.sln 文件,然后在 vs2019 中,选择 Win32,之后点击生成解决方案,最后就会在 jpegsr9e 文件夹下多一个 Release 文件夹,里面有 jpeg.lib 静态库。
![]()
参考:
[1]: 在Windows下使用vs2019编译libjpeg库(静态库与动态库)
[2]: Windows10下利用VS2022编译JpegLib
3.2、创建 libjpeg 解码项目
创建项目过程同上一篇博客 的创建方式相似,这里创建项目的名称为:libjpeg_for_windows
1、头文件路径添加
libjpeg_for_windows 右键 ——> 属性 ——> C/C++ ——> 常规 ——> 附加库目录中输入
.\lib\jpeg-9e——> 确定
2、库文件路径添加
libjpeg_for_windows 右键 ——> 属性 ——> 链接器 ——> 常规 ——> 附加包含目录中输入
.\lib\jpeg-9e\Release\Win32——> 确定
3、附加依赖项添加
libjpeg_for_windows 右键 ——> 属性 ——> 链接器 ——> 输入 ——> 附加依赖项:点击右边向下箭头’ v ’ ——> 编辑 ——> 输入:jpeg.lib (之前编译的静态库) ——> 确定 ——> 应用 ——> 确定。
将 jpegsr9e 文件夹下的 example.c 添加到项目中,生成解决方案。这时候就会出现这些报错:
LNK2001 无法解析的外部符号 _image_buffer
LNK2001 无法解析的外部符号 _image_height
LNK2001 无法解析的外部符号 _image_width
LNK2001 无法解析的外部符号 _main
LNK2001 无法解析的外部符号 _put_scanline_someplace
这些符号都是没有定义的,需要通过外部链接,所以这里直接在 example.c 文件中定义就可以了。添加代码如下:
JSAMPLE* image_buffer;
int image_height;
int image_width;

int put_scanline_someplace(JSAMPROW buffer, int row_stride)
{
/* 根据需要自己完善 */
}

int main()
{
/* 根据需要自己完善 */
}
jpeglib.h头文件依赖于stdio.h和string.h头文件
错误:C4996 fopen(‘fscanf’、strcmp):This function or variable may be unsafe
解决:在程序最前面加#define _CRT_SECURE_NO_WARNINGS,编译还是报错,所以这里通过 右键项目 —> 预处理器 —> 预处理器定义 —> 点击 ‘v’ —> 编辑 —> 添加 _CRT_SECURE_NO_WARNINGS —> 确定,应用。
参考:
[1]: LIBJPEG 安装编译,读取jpeg图像数据
3.3、libjpeg 中 example.c 功能解析
/* example1.c */
#include 这里对 example.c 文件的框架没有改动,只是在程序中加入一些打印函数,测试输出结果。
这里加入了一条语句:
cinfo.out_color_space = JCS_RGB; // 以 RGB 为结果输出
程序的目的:
- 1、查看程序是否能正确获得图片信息。
- 2、row_stride 变量 = 图像宽度 x RGB(3字节)。
- 3、jpeg_read_scanlines 函数是一行一行解码,且解码后的 RGB 数据放到 buffer 中(第三个参数为1,设定一次解码行数)。
这里通过 PS 软件构造了一张 6x6 的红色图片。(如何构造请看下文 )

从打印的结果可知,正好是 6 行 6 列,且每个像素的 RGB 为(0xFE, 0x0,0x0),如果将数据发送给屏幕,那么就能显示一张完整的图片了。
参考:
[1]: libjpeg库的简单使用,rgb565与rgb888互转,以及色块的寻找
3.4、SDL2 库配置与使用
对于 RGB 数据在 Windows 系统显示方面,这里采用 SDL2 开源库。
SDL2 安装教程参考:VS2019配置SDL2库
开发基本流程:
- 【初始化SDL系统】
SDL_int()- 【创建窗口】
SDL_CreateWindows()- 【创建渲染器】
SDL_CreateRenderer()- 【渲染器中创建一个材质】
SDL_CreateTexture()- 【申请待显示RGB图像空间】
- 【为图像数据赋值】
- 【将内存中的RGB数据写入材质】
SDL_UpdateTexture()- 【清理渲染区(清理屏幕)】
SDL_RenderClear()- 【设定渲染的目标区域】
- 【复制材质到渲染器对象】
SDL_RenderCopy()- 【执行渲染操作】
SDL_RenderPresent()- 【销毁渲染器】
SDL_DestroyRenderer()- 【销毁窗口】
SDL_DestroyWindow()- 【退出SDL系统】
SDL_Quit()
#include 参考:
[1]: 音视频技术应用(7)-使用SDL渲染一幅指定的图像,并且动态修改图像数据
[2]: SDL渲染应用(1)
[3]: SDL 教程
3.5、音频部分程序移植
这里参考之前 mp3博客 ,这里需要添加 winmm.lib 库、将wave_out.c 与 wave_out.h 文件添加到项目中。
由于项目中为 C++ 的编译方式,这里加入 C 程序,需要做一点修改:
- 1、在 videoplayer.h 中加入
extern "C" { #include "wave_out.h" } - 2、在 wav_out.h 中加入一行语句:
#pragma comment(lib,"User32.lib")
参考:
[1]: C与C++混合编程
[2]: error LNK2019: 无法解析的外部符号_imp__MessageBoxA@16,该符号在函数 _WinMain@16 中被引用
3.6、音视频文件格式转换
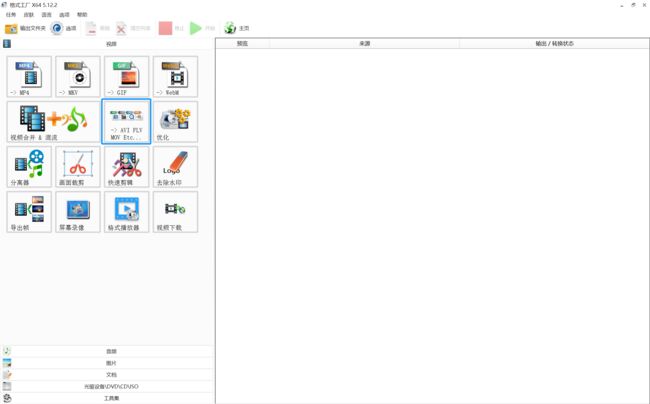
网上下载的视频多为 mp4 格式,这里通过 「 格式工厂 」 完成转码工作。
格式工厂下载:http://www.pcfreetime.com/formatfactory/CN/download.html
格式工厂安装后会自启动 brightdata.exe:如何彻底关闭Bright Data
1、点击 -> AVI FLV MOV Etc...
2、点击添加文件,将待转换的文件添加到其中 ——> 点击输出配置,设置导出格式
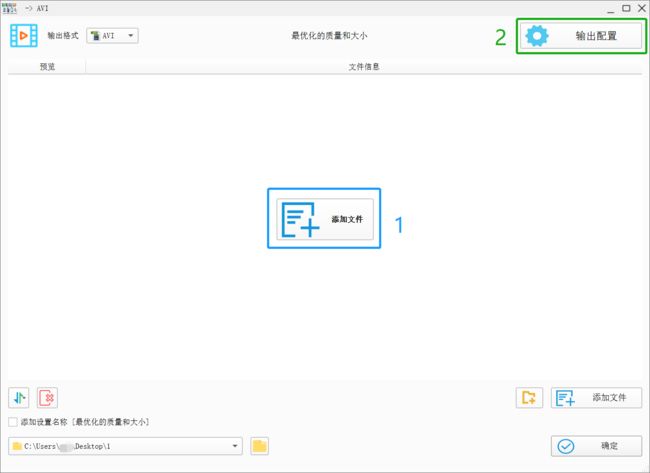
3、设置导出配置(屏幕大小、码率可以手动输入想要的值)
视频编码: 选择 MJPEG,解码库只支持 MJPG 视频解码。
视频尺寸: 这里需要根据屏幕的分辨率选择。(可以手动输入特殊的值)
比特率: 对于图像设置时,这里显示为“码率”,但是实际码率计算 = 文件大小(KB)*8/时间(s),所以格式工厂中的码率(图像)/比特率(音频)指的是什么,如果有知道的望不吝相告!
帧率: 每秒中播放多少张图片。
音频编码: 本例程只支持 PCM 音频,所以选这个,可以将数据直接输出到DAC播放,而不需要经过解码,这里默认为16位深。
采样率: 这里设置为 22050,即 22.05Khz 的采样率,音频文件大小(MB) = 采样率(kHz)*位深(bit)*通道数*时间(s)/8/1024。
3.7、程序的编写与说明
实现了图像显示和音频播放,那么接下来就是根据 1.3 节中 AVI 文件结构,编写程序解封装,解析音视频文件,获取相关信息,初始化图像显示和音频播放硬件资源,读取视频帧/音频帧,将数据发送到相关模块进行处理,处理完成后发送给显示器显示、扬声器/耳机播放。
具体步骤如下:
- 打开音视频文件;
- 解封装,查看当前文件信息,用于完成显示和声卡硬件的初始化;
- 显示初始化;
- 声卡初始化;
- 定时器初始化,用于实现指定的帧率;
- 读取一个完整的数据帧(视频帧/音频帧)+下一帧的标记和帧大小,视频帧读取后,开始解码然后显示,音频帧读取后直接播放;
- 获取窗口操作,当点击 “X” 时,退出程序;
- 将下一帧的标记和帧大小填充到avix全局变量;
- 6-8步骤循环,直到主动退出或读完文件;
- 释放硬件资源。
文件关系:

                                                  main.cpp
                                                     |
                                              videoplayer.cpp
                                                     |
                                   ---------------------------------------
                                   |            |            |           |
                               mjpeg.cpp     avi.cpp     timer.cpp   wave_out.c
关于 fopen(“xxx”, “rb”) 导致的问题
Windows 平台上,fopen(“xxxx”, “r”) 方式打开文件后,fread最多读取的字节数为10130,采用 fopen(“xxx”, “rb”) 方式打开文件后,fread 读取的字节数能达到所要求的60KB。
关于 avi_get_streaminfo(pbuf + offset + 4) 函数的说明
该函数的作用就是获取文件中的 stream 流信息,这里需要注意的点在于存储顺序问题,以流类型为例,假设地址 0 存储 0x00、地址 1 存储 0x00、地址 2 存储 0x64(‘d’)、地址 3 存储 0x63(‘c’),那么存储到 short 类型的数据中就需要调整一下位置,不然存储的就是 0xcd,这里就需要MAKEWORD(ptr)带参数的宏来实现。
#define MAKEWORD(ptr) (u16)(((u16)*((u8*)(ptr))<<8)|(u16)*(u8*)((ptr)+1))
MAKEDWORD(ptr)宏定义有相同的作用。
关于 Image_Init 函数不放到 mjpegdec_decode 函数中说明
mjpegdec_decode 函数的作用是读取一帧图像/音频数据后开始解码,如果将 Image_Init 则会重复创建宽口影响体验效果,其次创建完成后如果不将其删除完成资源回收,易造成内存溢出的情况,所以综合考虑将该 Image_Init 函数内容放到外部。
关于定时器选用说明
- 首先 SDL 提供了定时器功能,可以选用 SDL 的方案:timer 定时器
- CreateTimerQueueTimer 作为 Windows 提供的 API,虽然定时上不是最精确,但是相对更为灵活,且能满足视频播放所需要达到的 ms 级别。这个回调函数中执行内容尽可能短(在中断服务例程中也一样,不然会影响系统响应速度),不然如果前一个回调函数还没执行完,会启动另一个线程来调用该回调函数。
参考:① Windows精确定时(ms) ② CreateTimerQueueTimer定时器使用 ③ Windows 应用开发文档 ④ CreateTimerQueueTimer学习笔记
关于 SDL_PollEvent 函数的重要性
该函数的主要作用为检测事件,比如点击窗口右上角的“X”,如果没有这个函数,当 PC 界面上出现弹窗或者移动视频播放窗口会发生无法响应的情况;从应用的角度考虑,当点击最小化、最大化、关闭窗口都希望有对应的响应,就可通过该函数完成事件获取,程序中完成事件判断,并编写相应的程序完成对应的操作。
参考:SDL2教程(二):evevt driven programming
四、Esp32 上播放音视频
4.1、硬件选用及芯片引脚资源使用
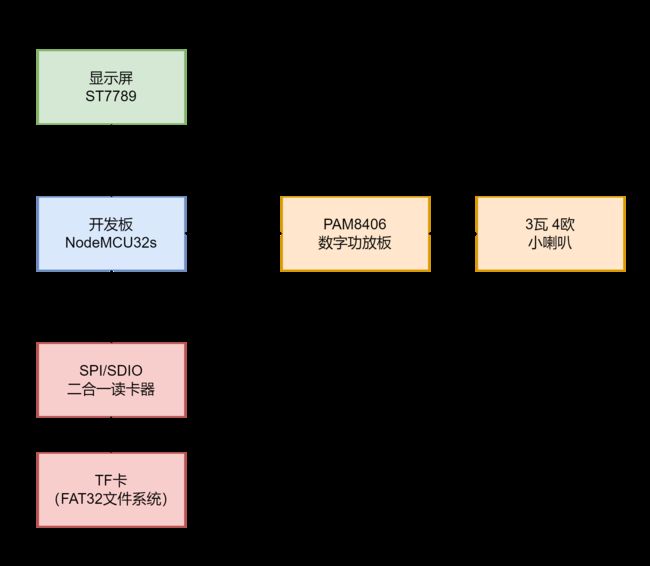
主要用到的硬件如下:
- 开发板:NodeMCU32s(Esp32)
- 显示屏: 240*240 中景圆 ST7789
- 功放板:PAM8406 数字功放板
- 扬声器:3 瓦 4 欧小喇叭
- TF卡:闪迪32G(这里格式化采用FAT32文件系统)
- TF读写模块:SPI 接口、SDIO 接口二合一TF卡读写模块
- 读卡器:TF 卡读卡器(用于将 PC 端转码完成的视频拷贝到TF卡)
- 电源模块:首先通过开发板提供的电源引脚有限,其次开发板供电不稳定。
- 杜邦线:若干
由于 LCD 屏幕的通信方式为 SPI,所以这里 SD 卡采用 SDMMC 通信方式。
Esp32虽然有两组SDMMC接口,但Arduino core for the ESP32中只用到了其中一组。
具体芯片引脚资源使用情况:
-----------------------------------------------
|  NodeMCU32s            |   SD Card          |
|  --------------------------------------------
|  GPIO12                |   D02(DAT2)        |
|  GPIO4                 |   D01(DAT1)        |
|  GPIO15                |   CMD              |
|  GPIO2                 |   D00(DAT0)        |
|  GPIO14                |   CLK              |
|  GPIO13                |   D03(DAT3)        |
|  GND                   |   GND              |
|  VCC(3.3v)             |   VCC              |
-----------------------------------------------
-----------------------------------------------
|  NodeMCU32s            |   LCD Screen       |
-----------------------------------------------
|  GND                   |   GND              |
|  VCC(3.3v)             |   VCC              |
|  GPIO18(VSPI SCK)      |   SCL              |
|  GPIO23(VSPI MOSI)     |   SDA              |
|  GPIO26                |   RES              |
|  GPIO27                |   DC               |
|  GPIO5                 |   CS               |
-----------------------------------------------
-----------------------------------------------
|  NodeMCU32s            |   Speaker          |
-----------------------------------------------
|  GPIO25(DAC_1)         |   RIN              |
|  GND                   |   GND              |
|  GPIO26(DAC_2)         |   LIN              |
-----------------------------------------------
4.2、libjpeg 编解码库移植
- 下载
libjpeg,这里使用jpegsr9e.zip,官网:http://www.ijg.org/ - 解压压缩包
- 在
VS Code项目中的lib目录下,新建一个文件夹,这里命名为jpeg-9e(想起啥就起啥,最好是英文) - 将压缩包中的文件复制到
VS Code项目中的lib\jpeg-9e目录下。
压缩包中待复制的文件:
jaricom.c、jcapimin.c、jcapistd.c、jccoefct.c、jccolor.c、jcdctmgr.c、jchuff.c、jcinit.c、jcmainct.c、jcmarker.c、jcmaster.c、jcomapi.c、jcparam.c、jcprepct.c、jcsample.c、jctrans.c、jdapimin.c、jdapistd.c、jdarith.c、jdatadst.c、jdatasrc.c、jdcoefct.c、jdcolor.c、jddctmgr.c、jdhuff.c、jdinput.c、jdmainct.c、jdmarker.c、jdmaster.c、jdmerge.c、jdpostct.c、jdsample.c、jdtrans.c、jerror.c、jfdctflt.c、jfdctfst.c、jfdctint.c、jidctflt.c、jidctfst.c、jidctint.c、jmemmgr.c、jmemnobs.c、jquant1.c、jquant2.c、 jutils.c
测试代码:(将 example.c 中 read_JPEG_file 函数部分的代码来测试编译链接是否通过)
/* example.c */
#include /* main.cpp */
#include 说明: Arduino.h 和 jmorecfg.h(libjpeg库)重复定义 boolean,这两个头文件在 main.cpp 文件中相遇,所以出现了编译错误。
头文件的作用范围为包含该头文件的文件范围内,jpeglib.h 的头文件包含 jmorecfg.h,main.cpp 文件通过包含 jpeglib.h 从而间接包含 jmorecfg.h,因此在 main.cpp 中采用宏定义的方式避免冲突:
#define boolean libjpeg_boolean
#include "jpeglib.h"
#undef boolean
头文件在预编译的时候,从上到下被顺序处理,这样的话,当 jpeglib.h 被包含时,该头文件中的 boolean 被替换成 libjpeg_boolean,当包含完后,取消宏定义,这样 main.cpp 之后的关于 boolean 都按照 Arduino.h 中的定义来。
说明:由于 Arduino 框架采用 C++ 方式编写,libjpeg 采用 C 方式编写,所以依然存在 C/C++ 混合编程,在链接的过程中,依然会存在无法链接成功的情况,这里参考上面的方式,在函数声明/头文件放到
extern "C" {}中。
如果将example.c文件重命名成example.cpp,不会存在这个问题。libjpeg 库本身是兼容 C++ 程序调用。
参考:MCU平台libjpeg9移植使用说明
4.3、LCD 库搬移
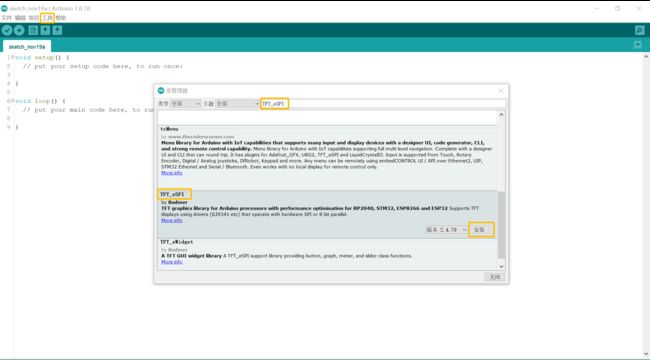
Arduino IDE 和 VSCode 配合使用:通过 IDE 获取各种库文件,然后在安装的目录下(C:\Users\<用户名>\Documents\Arduino\libraries),找到库文件,将TFT_eSPI文件夹整个复制到 VS Code 项目中的 lib 目录下。具体步骤如下:
- Arduino IDE 软件中,工具——>管理库…——>搜索框中输入
TFT_eSPI——> 安装
- 安装完成后,在
C:\Users\<用户名>\Documents\Arduino\libraries目录下,找到TFT_eSPI文件夹,将其复制到VS Code项目中的lib目录下。 - 打开
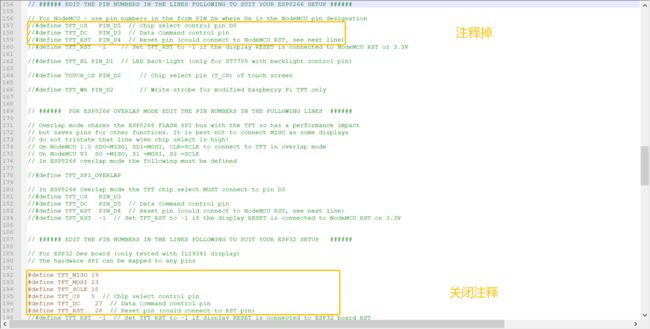
User_Setup.h文件,根据显示屏型号,选择对应的驱动,其余注释掉。
- 设置屏幕显示的颜色和屏幕尺寸大小
- 设置 NodeMCU32s 与显示屏通信引脚,默认使用的是Esp8266,所以这里需要将这部分引脚注释掉,将Esp32使用的引脚打开。
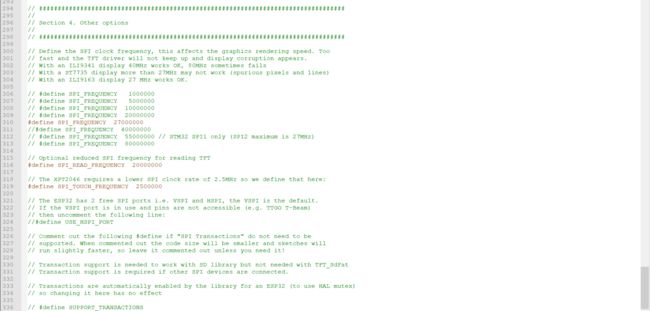
- SPI通信速率,这里使用ST7735推荐使用的 27MHz。
到这里,完成了对显示屏驱动的搬移,可通过下面的测试代码,测试当前库是否能正常工作。
#include 当通过 Arduino 框架实现某一个功能的时候,可以先打开Arduino软件,在文件 ——> 示例 ——> 寻找需要的范例,通过查看范例以及修改范例实现需要的功能。
4.4、LCD 显示说明
LCD 显示部分包含视频、图像、文字、视频时长、日期、跳跃音符以及一些边框,其中视频、视频时长、日期、跳跃音符是 动态变化 的,在程序设计时,视频和视频时长放在一个任务中,而日期、跳跃音符为单独的任务,这里就涉及到对 LCD 资源竞争 的情况,因此加入了 互斥锁。
说明: libjpeg 解码完成后为 RGB888 的数据类型,然而 LCD 显示为 RGB565 的数据类型,所以在发送给 LCD 之前,需要先完成 RGB888 转换为 RGB565。
uint16_t color565 = ((r & 0xF8) << 8) | ((g & 0xFC) << 3) | (b >> 3);
当然可以直接调用TFT_eSPI提供的函数color565。
这里还需要注意一点,关于 16 位数据存储顺序的问题,是高 8 位存储在高地址还是存储在低地址?
当刷新LCD显示时,通过调用TFT_eSPI提供的函数pushImage,这个函数有 5 个重载,这里使用该函数:
void TFT_eSPI::pushImage(int32_t x, int32_t y, int32_t w, int32_t h, uint16_t *data);
- 这个函数取 16 位数据,其认为高 8 位在低地址,低 8 位在高地址,然而 color565 转换后,存储在地址中是正好相反的,所以需要做以下数据调整。
- 若实参中传入 data 的数据类型为 uint8_t * 则调用另一个函数,所以在调用的时候需要强制类型转换。
4.5、视频时长计算
AVI 文件结构中的 Header List 信息块 中的 AVI Header 中的 Struct 里面有一个信息是 Total Frame(文件总帧数),这个指的就是 图像总的帧数。
相同的 Struct 中,有一个信息 SecPerFrame(视频帧间隔时间,单位us),通过这个信息可计算出视频的帧率,也就可以计算 视频总时长。之后按照当前的帧数,计算剩余时间。
// 视频时长计算公式(单位:ms)
totsec=(aviinfo->SecPerFrame/1000)*aviinfo->TotalFrame;
4.6、Unicode 字符集与 UTF-8 编码
国际标准化组织(ISO)给全球所有文化使用的字母和符号进行编号,对每个字符指定一个唯一的编号,号码从 0x000000 到 0x10FFFF,这只是对字符进行编号,但是具体怎么对每个字符进行编码没有指定。因此,衍生处了 UTF-32、UTF-16、UTF-8 等编码方案。
vs code 默认使用 UTF-8 编码格式。
UTF-8 采用变长的编码方式,它的编码有 1、2、3、4 字节长度的方式。
- 对于单字节的编码,字节的第一位设为 0(最高位),剩余的位用来写入字符的 Unicode 编号。
- 对于 N 字节的编码,第一个字节的前 N 位设为 1,第 N+1 位设为 0,后面字节的前两位都设为 10,这 N 个字节的其余空位填充该字符的 Unicode 编号。
这里采用的字库制作软件:
FontMaker-V1.2.0
通过这个软件导出的字模数量为65536,少于Unicode字符集,基本汉字在0x4E00-0x9FA5,基本汉字补充在0x9FA6-0x9FCB,符合基本需求。
/*
作用:根据 UTF-8 编码值转换为 Unicode 字符集偏移量
参数:编码值首地址
返回值:Unicode 字符集偏移量
*/
int utf8_to_unicode(char *parm)
{
	int res = 0;
	if((parm[0] & 0x80) == 0x00){
		res = parm[0] & 0x7F;
	}
	else if((parm[0] & 0xE0) == 0xC0){
		res = parm[1] & 0x3F;
		res |= ((parm[0] & 0x1F) << 6);
	}
	else if((parm[0] & 0xF0) == 0xE0){
		res = parm[2] & 0x3F;
		res |= ((parm[1] & 0x3F) << 6);
		res |= ((parm[0] & 0x0F) << 12);
	}
	else if((parm[0] & 0xF8) == 0xF0){
		res = parm[3] & 0x3F;
		res |= ((parm[2] & 0x3F) << 6);
		res |= ((parm[1] & 0x0F) << 12);
		res |= ((parm[0] & 0x7)  << 18);
	}
	else{
		res = -1;
	}

	return res;
}
4.7、日期获取
这里日期通过访问NTP服务器来获取,因此在使用之前需要完成无线网络连接。
Arduino 对于 NTP 的使用也有具体的示例,相关的编程可以参考示例。
具体使用步骤同 <4.3 LCD 库搬移> 一致:
- Arduino IDE 软件中,工具——>管理库…——>搜索框中输入
NTPClient——> 安装 - 安装完成后,在
C:\Users\<用户名>\Documents\Arduino\libraries目录下,找到NTPClient文件夹,将其复制到VS Code项目中的lib目录下。 - 参考示例程序,移植到本项目中。
说明
- NTP 服务器地址:pool.ntp.org
- 时间获取前需要先切换到东八区。
- 起始年份从1900年开始,所以在获得“年”后需要加上1900。
- 获得月份时,需要加1。
五、使用前注意事项
5.1、Windows 上播放音视频
由于 SDL2 库路径指向 x86 的目录下动态链接库(基于 x86 平台编辑的),所以项目编译的时候需要将平台设置成 x86 进行编译链接。
5.2、Esp32 上播放音视频
1、在程序下载前,需要断开 SD 卡供电(将读卡器模块的 VCC 引脚杜邦线拔掉),否则会出现报错。 【VSPI 除外】
2、打开串口终端 ——> 将读卡器模块的 VCC 引脚杜邦线拔掉 ——> 复位Esp32 ——> 串口终端上显示“请插入内存卡” ——> 插上读卡器模块的 VCC 引脚杜邦线
3、交互通过PC端串口进行:
ls—查看根目录下的文件play <文件名.avi>— 播放视频文件
Arduino IDE 提供的文件操作接口(open/read…)暂不支持中文操作,所以目录文件查询等操作都不支持中文,这里文件名采用中文拼音。所以SD卡中的文件不要用中文命名。
六、说明
6.1、PS 构造纯色图片
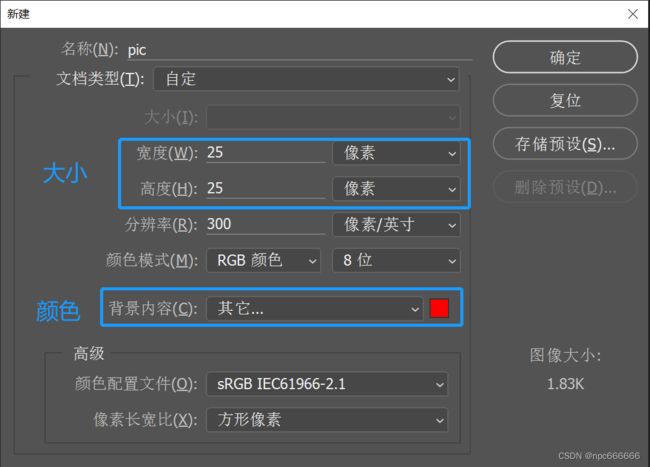
文件 ——> 新建 ——> 修改大小25x25 ——> 修改颜色:红色(255,0,0) ——> 确定
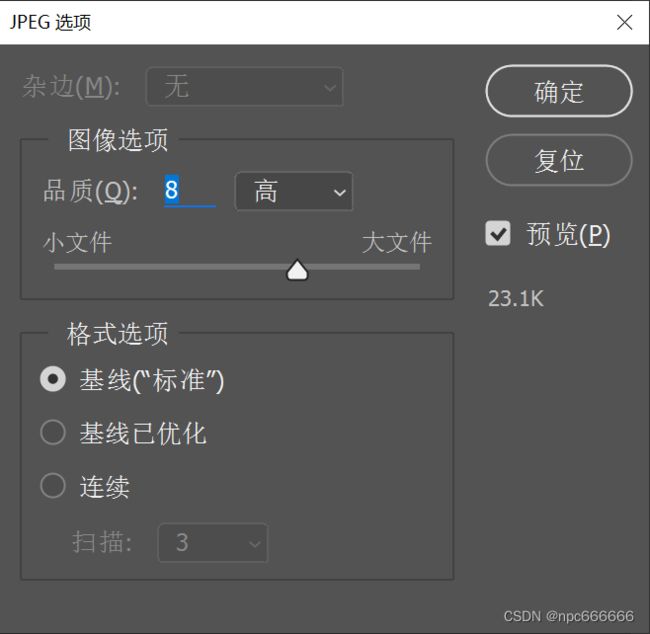
文件 ——> 存储为 ——> 选择:JPEG ——> 保存 ——> 这里选择默认选项 ——> 确定
参考:Photoshop如何新建指定像素大小的图片
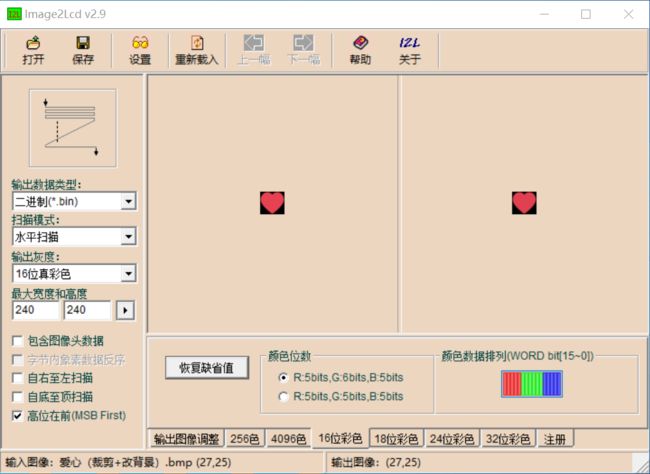
6.2、图片转为 LCD 显示数据类型
工具:Image2Lcd
6.3、UTF-8 字库获取
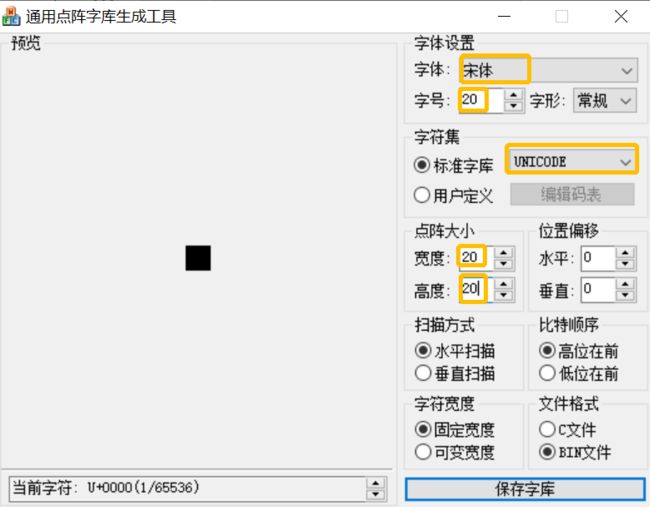
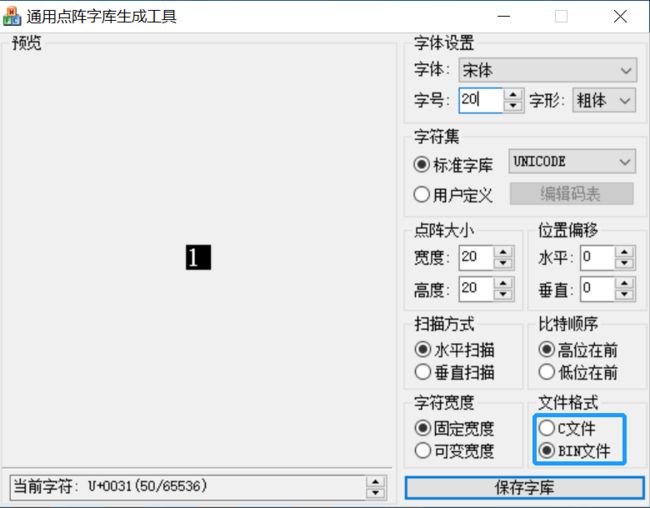
当文件格式为【C文件】时,可以查看每个字符所占用的字节数,这里字号为 20,点阵宽度为 20x20,一行像素点数量需要为8的倍数,不够自动补足,所以实际点阵宽度为 24x20,则一个字符占用的存储空间大小为 24x20/8 = 60 字节。
在制作字库文件时,这里使用【BIN文件】,生成的文件保存到 SD 卡中,通过文件读写的方式获取字符的字模。
6.4、数字字模获取
工具:PCtoLCD2002
由于音频的播放计时一直在跳转,所以这部分数据存储在 FLASH 中,方便读取。对于字号大小和字模占用字节数的关系同上面字库制作有同样的问题。
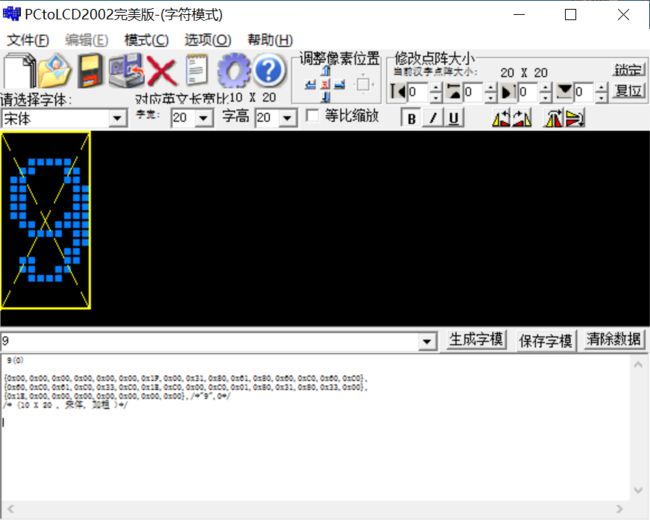
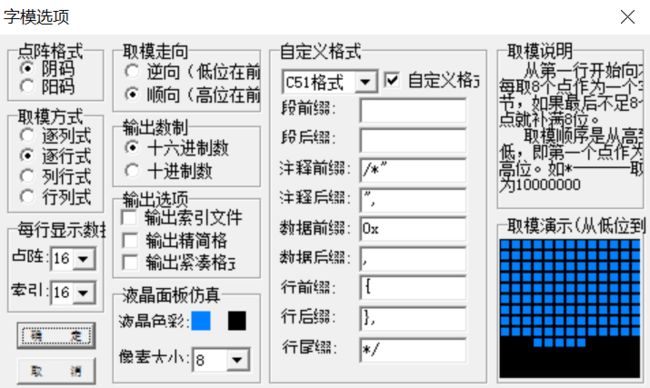
字号:20;点阵宽度:20x20;由于是数字,所以实际点阵大小为10x20,一行像素点数量需要为8的倍数,不够自动补足,所以点阵宽度为 16x20,则一个字符占用的存储空间大小为 16x20/8 = 40 字节。
/*字模显示函数,宽度为 8 的倍数,如果不够自动补足,所以下面两个函数的效果一致*/
tft.drawBitmap(138, 154, number_one, 16, 20, TFT_WHITE);
tft.drawBitmap(138, 154, number_one, 10, 20, TFT_WHITE);
6.5、关于 dma_buf_len 和 dma_buf_count 的设置
关于 dma_buf_len 和 dma_buf_count 的工作机制
i2S 通过 DMA 发送到 DAC 模块,在 i2s_driver_install 函数安装初始化的时候,通过这两个参数、通道数以及sample的位数,申请 DMA_buffer,这个是在片内 SRAM 空间里申请的,当通过 i2s_write 函数发送数据的时候,可能先看哪个 DMA_buffer 空着(没有空,就阻塞等待),将数据搬移到该 DMA_buffer 中,然后 DMA 控制器将数据从 DMA_buffer 搬运到 I2S 的数据寄存器,I2S 数据寄存器连接到 DAC,利用 I2S 的 CK 时钟线按照采样频率将数据由 I2S 数据寄存器发送到 DAC。
当前素材音频参数
- 采样频率:22050Hz
- 位深:16bit
- 通道:双通道
- 一帧音频数据:1816 字节左右,那么音频播放的时长约为20 ms(音频数据量/通道数/位深/8 = 单通道样本数,单通道样本数/采样频率 = 播放时长)
当前素材图像参数
- 分辨率:240x135
- 一帧图像处理+显示所需时间:45 ms
- 从 SD 卡读取到 RAM 中所需时间:3~5 ms
本程序设计的时候,图像数据帧和音频数据帧之间是交错存储的(测试所用的视频文件中,图像帧和音频帧之比为1:4),当dma_buf_len=256、dma_buf_count=4时,出现播放音视频时,出现音频播放很~~~~~~慢~~~~~~
当将【图像帧解码+显示】部分代码注释掉,只播放音频,发现音频能正常播放了。
(下图所示的时长没有将 SD 卡读到 RAM 中的时间以及一些零碎的时间)
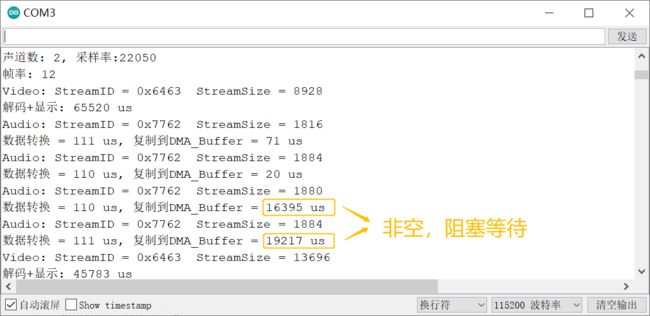
这样的话,上面的 dma_buf_len 和 dma_buf_count 设置可以存储 2 帧音频帧,假设这 4 帧音频数据发音为“等”。

除了 视频帧率控制 的时长为动态调整,其余部分所需的时间为固定,所以如果固定的时间超过了 音频播放时长 ,那么导致 4 帧音频数据 之间间距较大,导致出现音频播放很~~~~~~慢~~~~~~的情况。
当dma_buf_len=256、dma_buf_count=8时,视频和音频正常播放。
固定的时间小于 音频播放时长 ,加上动态时间,一组时间在83ms内,那么 4 帧音频数据 之间间距很小,不会出现音频播放很慢的情况。
如果内存比较紧张,可以尝试通过 提高主频的方式 ,减少视频解码所需要的时间,这样的话就能减小固定部分的时长。
素材视频文件中,根据帧率可知,一帧图像数据的时长为 83ms,图像帧与音频帧的数量比为1:4,而4帧音频帧的可播放时长约为80ms,83ms和80ms很接近,想必不是巧合。
