保存规则、nat、自定义链
目录
一、保存防火墙的规则
1、保存规则
二、nat
一、SNAT和DNAT
1.SNAT
2 DNAT
三、自定义链
1.添加自定义链
2.设置自定义链并生效
3.删除自定义链
一、保存防火墙的规则
1、保存规则
[root@localhost ~]# iptables -A INPUT -s 172.16.114.30 -p tcp -m multiport --dport 22,80 -j REJECT
[root@localhost ~]# iptables -nvL
Chain INPUT (policy ACCEPT 9 packets, 564 bytes)
 pkts bytes target     prot opt in     out     source               destination
    0     0 REJECT     tcp  --  *      *       172.16.114.30        0.0.0.0/0            multiport dports 22,80 reject-with icmp-port-unreachable

Chain FORWARD (policy ACCEPT 0 packets, 0 bytes)

[root@localhost opt]# iptables-save > /opt/iptables
[root@localhost opt]# vim ~/.bashrc
[root@localhost opt]# iptables -F
[root@localhost opt]# iptables -nvL
Chain INPUT (policy ACCEPT 11 packets, 688 bytes)
 pkts bytes target     prot opt in     out     source               destination

Chain FORWARD (policy ACCEPT 0 packets, 0 bytes)
pkts bytes target prot opt in out source destination 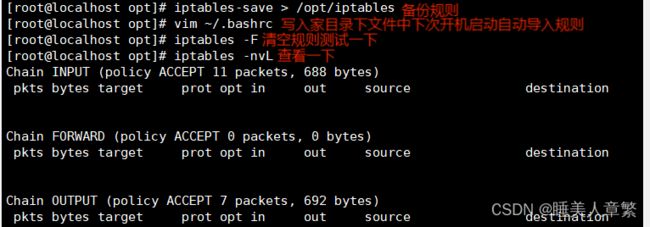
iptables-restore < /opt/iptables

[root@localhost ~]# iptables -nvL
Chain INPUT (policy ACCEPT 63 packets, 4008 bytes)
 pkts bytes target     prot opt in     out     source               destination
    0     0 REJECT     tcp  --  *      *       172.16.114.30        0.0.0.0/0            multiport dports 22,80 reject-with icmp-port-unreachable
二、nat
NAT: network address translation,支持PREROUTING,INPUT,OUTPUT,POSTROUTING四个链
请求报文:修改源/目标IP,
响应报文:修改源/目标IP,根据跟踪机制自动实现
NAT的实现分为下面类型:
SNAT:source NAT ,支持POSTROUTING, INPUT,让本地网络中的主机通过某一特定地址访问外部网络,实现地址伪装,请求报文:修改源IP
DNAT:destination NAT 支持PREROUTING , OUTPUT,把本地网络中的主机上的某服务开放给外部网络访问(发布服务和端口映射),但隐藏真实IP,请求报文:修改目标IP
PNAT: port nat,端口和IP都进行修改
一、SNAT和DNAT
1.SNAT
SNAT原理与应用:. SNAT 应用环境:局域网主机共享单个公网IP地址接入Internet (私有IP不能在Internet中正常路由) SNAT原理:源地址转换,根据指定条件修改数据包的源IP地址,通常被叫做源映谢
SNAT转换前提条件: 1.局域网各主机已正确设置IP地址、子网掩码、默认网关地址 2.Linux网关开启IP路由转发 linxu系统本身是没有转发功能 只有路由发送数据
vim /etc/sysctl.conf #使用vim修改配置文件可以永久打开
net.ipv4.ip_forward = 1 #将此行写入配置文件
sysctl -p #可以读取修改后的配置
SNAT转换1:固定的公网IP地址:
iptables -t nat -A POSTROUTING -s 172.16.114.0/24 -o ens36 -j SNAT --to 12.0.0.1
#指定源地址和网卡转换成外网段
2 DNAT
DNAT原理与应用: DNAT应用环境:在Internet中发布位于局域网内的服务器 DNAT原理:目的地址转换,根据指定条件修改数据包的目的IP地址,保证了内网服务器的安全,通常被叫做目的映谢。 DNAT转换前提条件:
1.局域网的服务器能够访问Internet
2.网关的外网地址有正确的DNS解析记录
3. Linux网关开启IP路由转发
DNAT转换1:固定的公网IP地址:
iptables -t nat -A PREROUTING -i ens36 -p tcp --dport 80 -d 12.0.0.1 -j DNAT --to 172.16.114.20
#指定网卡、tcp端口、目的地址转换成内网段
1.当我 172.16.114.20 私网地址去访问 外网时,由于公网上没有 172段,所以无法通信,
需要借助snat 技术 将 源地址172.16.114.20 转换成12.0.0.1 静态nat 需要 一一对应
服务器
systemctl stop firewalld
[root@localhost ~]# setenforce 0
[root@localhost ~]# yum install -y httpd
[root@localhost ~]# systemctl start httpd
[root@localhost ~]# cd /etc/sysconfig/network-scripts/
[root@localhost network-scripts]# cp ifcfg-ens33 ifcfg-ens36

vim ifcfg-ens33

TYPE=Ethernet
DEVICE=ens33
ONBOOT=yes
BOOTPROTO=static
IPADDR=172.16.114.10
NETMASK=255.255.255.0

vim ifcfg-ens36

TYPE=Ethernet
DEVICE=ens36
ONBOOT=yes
BOOTPROTO=static
IPADDR=12.0.0.1
NETMASK=255.255.255.0

systemctl restart network
[root@localhost network-scripts]# sysctl -a |grep ip_forward
net.ipv4.ip_forward = 0
net.ipv4.ip_forward_use_pmtu = 0
sysctl: reading key "net.ipv6.conf.all.stable_secret"
sysctl: reading key "net.ipv6.conf.default.stable_secret"
sysctl: reading key "net.ipv6.conf.ens33.stable_secret"
sysctl: reading key "net.ipv6.conf.ens36.stable_secret"
sysctl: reading key "net.ipv6.conf.lo.stable_secret"
sysctl: reading key "net.ipv6.conf.virbr0.stable_secret"
sysctl: reading key "net.ipv6.conf.virbr0-nic.stable_secret"

vim /etc/sysctl.conf
# sysctl settings are defined through files in
# /usr/lib/sysctl.d/, /run/sysctl.d/, and /etc/sysctl.d/.
#
# Vendors settings live in /usr/lib/sysctl.d/.
# To override a whole file, create a new file with the same in
# /etc/sysctl.d/ and put new settings there. To override
# only specific settings, add a file with a lexically later
# name in /etc/sysctl.d/ and put new settings there.
#
# For more information, see sysctl.conf(5) and sysctl.d(5).
net.ipv4.ip_forward = 1

sysctl -p
net.ipv4.ip_forward = 1
[root@localhost network-scripts]# iptables -t nat -A POSTROUTING -s 172.16.114.0/24 -o ens36 -j SNAT --to 12.0.0.1
iptables -vnL -t nat
Chain PREROUTING (policy ACCEPT 0 packets, 0 bytes)
 pkts bytes target     prot opt in     out     source               destination

Chain INPUT (policy ACCEPT 0 packets, 0 bytes)
 pkts bytes target     prot opt in     out     source               destination

Chain OUTPUT (policy ACCEPT 0 packets, 0 bytes)
 pkts bytes target     prot opt in     out     source               destination

Chain POSTROUTING (policy ACCEPT 0 packets, 0 bytes)
 pkts bytes target     prot opt in     out     source               destination
    0     0 SNAT       all  --  *      ens36   172.16.114.0/24      0.0.0.0/0            to:12.0.0.1
[root@localhost network-scripts]# iptables -t nat -A PREROUTING -i ens36 -p tcp --dport 80 -d 12.0.0.1 -j DNAT --to 172.16.114.20
[root@localhost network-scripts]# iptables -vnL -t nat
Chain PREROUTING (policy ACCEPT 2 packets, 152 bytes)
 pkts bytes target     prot opt in     out     source               destination
    0     0 DNAT       tcp  --  ens36  *       0.0.0.0/0            12.0.0.1             tcp dpt:80 to:172.16.114.20

Chain INPUT (policy ACCEPT 0 packets, 0 bytes)
 pkts bytes target     prot opt in     out     source               destination

Chain OUTPUT (policy ACCEPT 0 packets, 0 bytes)
 pkts bytes target     prot opt in     out     source               destination

Chain POSTROUTING (policy ACCEPT 0 packets, 0 bytes)
 pkts bytes target     prot opt in     out     source               destination
    2   120 SNAT       all  --  *      ens36   172.16.114.0/24      0.0.0.0/0            to:12.0.0.1
内网
[root@localhost ~]# systemctl stop firewalld
[root@localhost ~]# setenforce 0
[root@localhost ~]# yum install -y httpd
[root@localhost ~]# systemctl start httpd

[root@localhost ~]# vim /etc/sysconfig/network-scripts/ifcfg-ens33

TYPE=Ethernet
DEVICE=ens33
ONBOOT=yes
BOOTPROTO=static
IPADDR=172.16.114.20
NETMASK=255.255.255.0
GATEWAY=172.16.114.10
DNS1=218.2.135.1
DNS2=114.114.114.114
DNS3=8.8.8.8

[root@localhost ~]# systemctl restart network
[root@localhost ~]# ping 12.0.0.1
PING 12.0.0.1 (12.0.0.1) 56(84) bytes of data.
64 bytes from 12.0.0.1: icmp_seq=1 ttl=64 time=0.298 ms
64 bytes from 12.0.0.1: icmp_seq=2 ttl=64 time=1.32 ms
^C
--- 12.0.0.1 ping statistics ---
2 packets transmitted, 2 received, 0% packet loss, time 1006ms
rtt min/avg/max/mdev = 0.298/0.809/1.321/0.512 ms
[root@localhost ~]# curl 12.0.0.30

[root@localhost ~]# tail -f /var/log/httpd/access_log
12.0.0.30 - - [30/Nov/2023:17:25:12 +0800] "GET / HTTP/1.1" 403 4897 "-" "curl/7.29.0
外网
[root@localhost ~]# systemctl stop firewalld
[root@localhost ~]# setenforce 0
[root@localhost ~]# yum install -y httpd
[root@localhost ~]# systemctl start httpd

[root@localhost ~]# vim /etc/sysconfig/network-scripts/ifcfg-ens33

TYPE=Ethernet
DEVICE=ens33
ONBOOT=yes
BOOTPROTO=static
IPADDR=12.0.0.30
NETMASK=255.255.255.0
GATEWAY=12.0.0.1
DNS1=218.2.135.1

systemctl restart network
这时这台终端断开连接使用另一台服务器终端连接
ssh 12.0.0.30
The authenticity of host '12.0.0.30 (12.0.0.30)' can't be established.
ECDSA key fingerprint is SHA256:fa/T+eYHS0lGDbVLT6pItzJuIZ1XtLugQQAA5sf/Cv0.
ECDSA key fingerprint is MD5:59:77:c8:a3:16:3d:ea:89:bc:71:a5:05:80:78:ae:28.
Are you sure you want to continue connecting (yes/no)? yes
Warning: Permanently added '12.0.0.30' (ECDSA) to the list of known hosts.
[email protected]'s password:
Last login: Thu Nov 30 16:59:59 2023 from 172.16.114.1
[root@localhost ~]# ping 172.16.114.10
PING 172.16.114.10 (172.16.114.10) 56(84) bytes of data.
64 bytes from 172.16.114.10: icmp_seq=1 ttl=64 time=0.498 ms
64 bytes from 172.16.114.10: icmp_seq=2 ttl=64 time=1.04 ms
^C
--- 172.16.114.10 ping statistics ---
2 packets transmitted, 2 received, 0% packet loss, time 1000ms
rtt min/avg/max/mdev = 0.498/0.772/1.047/0.275 ms
[root@localhost ~]# tail -f /var/log/httpd/access_log
12.0.0.1 - - [30/Nov/2023:17:18:59 +0800] "GET / HTTP/1.1" 403 4897 "-" "curl/7.29.0"
12.0.0.1 - - [30/Nov/2023:17:19:15 +0800] "GET / HTTP/1.1" 403 4897 "-" "curl/7.29.0"
12.0.0.1 - - [30/Nov/2023:17:20:02 +0800] "GET / HTTP/1.1" 403 4897 "-" "curl/7.29.0"
^C
[root@localhost ~]# curl 172.16.114.20
内网出现这种访问成功日志就成功了
![]()
外网出现这种访问成功日志就成功了

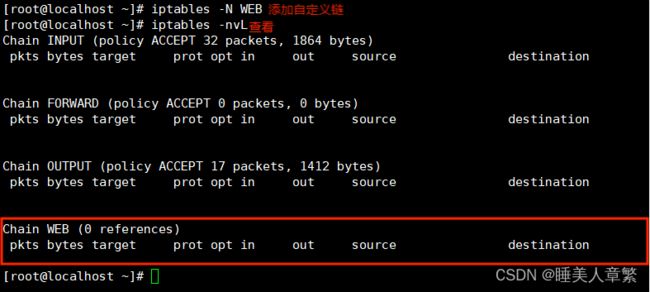
三、自定义链
1.添加自定义链
使用 iptables -N WEB 添加自定义链
2.设置自定义链并生效
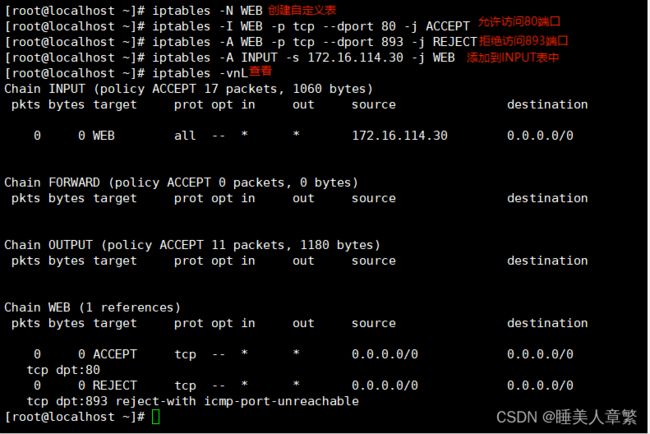
30主机


3.删除自定义链
