【Java笔记+踩坑】设计模式——原型模式
导航:
【Java笔记+踩坑汇总】Java基础+JavaWeb+SSM+SpringBoot+SpringCloud+瑞吉外卖/黑马旅游/谷粒商城/学成在线+设计模式+面试题汇总+性能调优/架构设计+源码-CSDN博客
目录
零、经典的克隆羊问题(复制10只属性相同的羊)
一、传统方案:循环new对象
1.1 实现方案
1.2 优缺点和改进思路
二、原型模式(Prototype模式)
2.1 基本介绍
2.2 原理
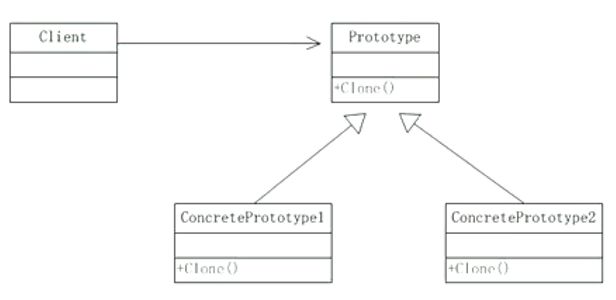
2.2.1 UML图:原型接口、具体原型类、客户端代码
2.2.2 代码演示
2.3 原型模式解决克隆羊问题
2.4 优缺点和使用场景
2.4.1 优点
2.4.2 缺点
2.4.3 适用场景
三、扩展
3.1 Spring源码中的原型模式:ApplicationContext类的getBean()方法
3.2 浅拷贝和深拷贝
3.2.1 浅拷贝:引用类型变量拷贝引用
3.2.2 深拷贝:引用类型变量拷贝值
零、经典的克隆羊问题(复制10只属性相同的羊)
问题描述:现在有一只羊,姓名为 Tom,年龄为 1,颜色为白色,请编写程序创建和 Tom 羊属性完全相同的 10 只羊。
一、传统方案:循环new对象
1.1 实现方案
羊类:
public class Sheep {
    private String name;
    private Integer age;

    public Sheep(String name, Integer age) {
        this.name = name;
        this.age = age;
    }

    public String getName() {
        return name;
    }

    public void setName(String name) {
        this.name = name;
    }

    public Integer getAge() {
        return age;
    }

    public void setAge(Integer age) {
        this.age = age;
    }
}
克隆羊:
public class Client {
    public static void main(String[] args) {
        for (int i = 0; i < 10; i++) {
            Sheep sheep = new Sheep("Tom", 1, "白色");
            System.out.println(sheep);
        }
    }
}
1.2 优缺点和改进思路
传统方法优点
- 好理解,简单易操作
缺点:
- 每次获取再复制效率低:在创建新的对象时,总是需要重新获取原始对象的属性,如果创建的对象比较复杂时,效率较低
- 不灵活:总是需要重新初始化对象,而不是动态地获得对象运行时的状态,不够灵活
改进的思路分析:Object 类的 clone() 方法
Object 类是所有类的根类,Object 类提供了一个 clone 方法,该方法可以将一个 Java 对象复制一份,但是对应的类必须实现Cloneable接口,该接口表示该类能够复制且具有复制的能力 ==> 原型模式
二、原型模式(Prototype模式)
2.1 基本介绍
原型模式(Prototype 模式):用原型实例指定创建对象种类,并通过拷贝原型创建新的对象
原型模式是一种创建型设计模式,允许一个对象再创建另外一个可定制的对象,无需知道如何创建的细节。
原理:将一个原型对象传给要发动创建的对象,这个要发动创建的对象通过请求原型对象拷贝它们自己来实施创建,即对象.clone()
形象的理解:孙大圣拔出猴毛,变出其它孙大圣
创建型设计模式:关注如何有效地创建对象,以满足不同的需求和情境。
包括:单例模式、抽象工厂模式、原型模式、建造者模式、工厂模式
2.2 原理
2.2.1 UML图:原型接口、具体原型类、客户端代码
- Prototype:原型类。包含一个用于复制对象的克隆方法。可以使用Cloneable接口作为原型接口。
- ConcretePrototype:具体原型类。实现原型接口、重写克隆方法clone()的具体类。
- Client:让一个原型对象克隆自己,创建一个属性相同的对象
2.2.2 代码演示
原型接口: 可以是Cloneable接口也可以是自定义带clone()方法的接口
// 步骤1:定义原型接口
interface Prototype extends Cloneable {
    Prototype clone();
}
具体原型类:
// 步骤2:实现具体原型类
class ConcretePrototype implements Prototype {
    @Override
    public Prototype clone() {
        try {
            return (Prototype) super.clone(); // 使用浅拷贝
        } catch (CloneNotSupportedException e) {
            e.printStackTrace();
            return null;
        }
    }
}
客户端代码: 通过clone()方法创建原型对象
// 步骤3:客户端代码
public class Client {
    public static void main(String[] args) {
//创建具体类对象
        ConcretePrototype prototype = new ConcretePrototype();
//通过clone方法创建对象
        ConcretePrototype clonedObject = (ConcretePrototype) prototype.clone();
    }
}
2.3 原型模式解决克隆羊问题
问题回顾:
现在有一只羊,姓名为 Tom,年龄为 1,颜色为白色,请编写程序创建和 Tom 羊属性完全相同的 10 只羊。
UML 类图
原型接口:Cloneable接口。
具体原型类:实现Cloneable接口
@Data
public class Sheep implements Cloneable {
    private String name;
    private Integer age;
    private String color;

    public Sheep(String name, Integer age, String color) {
        this.name = name;
        this.age = age;
        this.color = color;
    }


    @Override
    protected Object clone() {
        Sheep sheep = null;
        try {
            sheep = (Sheep) super.clone();
        } catch (Exception e) {
            e.printStackTrace();
        }
        return sheep;
    }
}
客户端: 调用具体原型类的clone()方法创建10个对象
public class Client {
    public static void main(String[] args) {
        Sheep sheep = new Sheep("Tom", 1, "白色");
        for (int i = 0; i < 10; i++) {
            Sheep sheep1 = (Sheep) sheep.clone();
            System.out.println(sheep1);
        }
    }
}
2.4 优缺点和使用场景
2.4.1 优点
- 构造方法复杂时开销小:如果构造函数的逻辑很复杂,此时通过new创建该对象会比较耗时,那么就可以尝试使用克隆来生成对象。
- 运行时动态创建对象:不用重新初始化对象,而是动态地获得对象运行时的状态
- 开闭原则(OCP原则):如果原始对象发生变化(增加或者减少属性),其它克隆对象的也会发生相应的变化,无需更改客户端代码。相反,如果使用new方式,就需要在客户端修改构造参数。这使得系统更加灵活和可维护。
- 对象封装性:原型模式可以帮助保护对象的封装性,因为客户端代码无需了解对象的内部结构,只需知道如何克隆对象。
- 多态性:原型模式支持多态性,因为克隆操作可以返回具体子类的对象,而客户端代码不需要关心对象的具体类。
扩展:
开闭原则(OCP原则):代码对修改关闭,对扩展开放。
2.4.2 缺点
- 构造方法简单时开销大:如果构造函数的逻辑很简单,原型模式的效率不如new,因为JVM对new做了相应的性能优化。
-
//验证构造方法简单时,原型模式开销大 long startTime = System.currentTimeMillis(); Student student = new Student(); //克隆循环十万次 for (int i = 0; i < 100000; i++) { student.clone(); } long midTime = System.currentTimeMillis(); //20ms System.out.println("克隆生成对象耗费的时间:" + (midTime - startTime) + "ms"); //new10万次 for (int i = 0; i < 100000; i++) { new Student(); } //5ms System.out.println("new生成对象耗费的时间:" + (System.currentTimeMillis() - midTime) + "ms"); - 要注意深拷贝和浅拷贝问题:实现Cloneable接口时,如果具体原型类直接返回super.clone(),则是浅拷贝。克隆的对象里,引用类型变量只拷贝引用,依然指向旧的地址。
- 代码复杂性:在实现深拷贝的时候可能需要比较复杂的代码。设计模式一般都是以代码复杂性为代价,提高可扩展性、可读性。
2.4.3 适用场景
- 构造方法复杂:要创建的对象构造方法逻辑很复杂,即创建新的对象比较复杂时,使用原型模式会比直接new效率更高;
- 经常需要克隆:经常要创建一个和原对象属性相同的对象时,可以考虑原型模式。
三、扩展
3.1 Spring源码中的原型模式:ApplicationContext类的getBean()方法
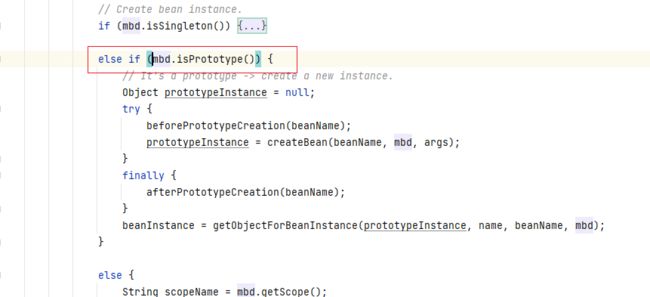
Spring 框架Bean的生命周期中,ApplicationContext类的getBean()方法中,有用到原型模式。
获取Bean时会判断配置的Bean是单例还是原型,如果是原型,则用原型模式创建Bean。
验证:bean指定原型模式后,getBean()获取到的多个Bean是不同对象。
@Component("id01")
@Scope("prototype")
public class Monster {
    private String name;
    private int health;

    public Monster() {
        // 默认构造函数
    }

    public Monster(String name, int health) {
        this.name = name;
        this.health = health;
    }

    // 添加其他属性和方法
}
也可以用xml形式注册Bean:
测试:
public class ProtoType {
    public static void main(String[] args) {
        // TODO Auto-generated method stub
        ApplicationContext applicationContext = new ClassPathXmlApplicationContext("beans.xml");
        // 通过ID获取Monster
        Object bean = applicationContext.getBean("id01");
        System.out.println("bean: " + bean); // 输出“牛魔王"....
        Object bean2 = applicationContext.getBean("id01");
        System.out.println("bean2: " + bean2); // 输出“牛魔王"....
        System.out.println(bean == bean2); // false
    }
}
注解方式是@Scope("prototype")。
回顾:
手写Spring源码(简化版)-CSDN博客
3.2 浅拷贝和深拷贝
3.2.1 浅拷贝:引用类型变量拷贝引用
- 浅拷贝:拷贝后对象是新地址,基本类型变量拷贝值,引用类型变量拷贝引用。只复制某个对象的引用,而不复制对象本身,新旧对象还是共享同一块内存。
- 深拷贝:拷贝后对象是新地址,基本类型变量拷贝值,引用类型变量拷贝克隆后的值。创造一个一摸一样的对象,新对象和原对象不共享内存,修改新对象不会改变原对对象。反序列化创建对象是深拷贝。
实现方案:具体原型类直接返回super.clone()
实现Cloneable 接口,重写 clone()方法, 直接返回super.clone()。
public class Person implements Cloneable {    //虽然clone()是Object类的方法,但Java规定必须得实现一下这个接口
    public int age;//基本类型变量拷贝值

    public Person(int age) {
        this.age = age;
    }

    @Override
    public Person clone() {
        try {
            return (Person) super.clone();
        } catch (CloneNotSupportedException e) {
            return null;
        }
    }
    public static void main(String[] args) {
        Person p1 = new Person(18);
        Person p2 = p1.clone();    //p2将是p1浅拷贝的对象
        p2.age = 20;

        System.out.println(p1 == p2); // false。拷贝后对象是新地址
        System.out.println(p1.age); // 18。基本类型变量拷贝值
    }
}
3.2.2 深拷贝:引用类型变量拷贝值
深拷贝:拷贝后对象是新地址,基本类型变量拷贝值,引用类型变量拷贝克隆后的值。创造一个一摸一样的对象,新对象和原对象不共享内存,修改新对象不会改变原对对象。反序列化创建对象是深拷贝。
实现方案:具体原型类专门克隆引用类型变量
实现Cloneable 接口,重写 clone()方法, 给super.clone()的引用类型成员变量也clone()一下,然后再返回克隆的对象。
public class Person implements Cloneable {
    public int age;//基本类型变量拷贝值
    public int[] arr = new int[] {1, 2, 3};

    public Person(int age) {
        this.age = age;
    }

    @Override
    public Person clone() {
        try {
            Person person = (Person) super.clone();
            person.arr = this.arr.clone(); // 用引用类型的 clone 方法,引用类型变量拷贝克隆后的值
            return person;
        } catch (CloneNotSupportedException e) {
            return null;
        }
    }
}

