springboot 集成spring security(二)
上一章的练习中,用户名和密码都是写在代码里的,这显然是不符合逻辑的。
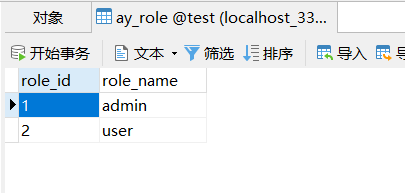
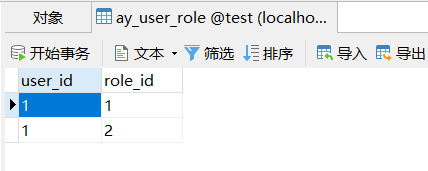
一、我们需要在数据库中建立角色表ay_role和用户角色关联表ay_user_rdle_rel
二、建立对应的实体类
package com.example.demo.model;


import org.springframework.security.crypto.bcrypt.BCryptPasswordEncoder;

import javax.persistence.Column;
import javax.persistence.Entity;
import javax.persistence.Id;
import javax.persistence.Table;
import java.io.Serializable;


@Entity
@Table(name = "ay_user")
public class AyUser implements Serializable {
    final static BCryptPasswordEncoder bcp = new BCryptPasswordEncoder();

    @Id
    @Column(name = "user_id")
    private String id;
    @Column(name = "user_name")
    private String name;
    @Column(name = "user_password")
    private String password;

    public String getId() {
        return id;
    }

    public void setId(String id) {
        this.id = id;
    }

    public String getName() {
        return name;
    }

    public void setName(String name) {
        this.name = name;
    }

    public String getPassword() {
        return password;
    }

    public void setPassword(String password) {
        this.password = bcp.encode(password);
    }
}
package com.example.demo.model;

import java.io.Serializable;

/**
 * 角色类
 */
public class AyRole implements Serializable {
    private String id;
    private String name;

    public String getId() {
        return id;
    }

    public void setId(String id) {
        this.id = id;
    }

    public String getName() {
        return name;
    }

    public void setName(String name) {
        this.name = name;
    }
}
package com.example.demo.model;

import java.io.Serializable;

/**
 * 用户角色关联类
 */
public class AyUserRole implements Serializable {
    private String userId;
    private String roleId;

    public String getUserId() {
        return userId;
    }

    public void setUserId(String userId) {
        this.userId = userId;
    }

    public String getRoleId() {
        return roleId;
    }

    public void setRoleId(String roleId) {
        this.roleId = roleId;
    }
}
三、创建对应的xml、dao、service
package com.example.demo.dao;

import com.example.demo.model.AyRole;
import org.apache.ibatis.annotations.Mapper;
import org.apache.ibatis.annotations.Param;

@Mapper
public interface AyRoleDao {
    /**
     *根据id查询
     */
    AyRole findById(@Param("roleId") String id);
}
package com.example.demo.service;


import com.example.demo.dao.AyRoleDao;
import com.example.demo.model.AyRole;
import org.springframework.stereotype.Service;
import javax.annotation.Resource;


@Service
public class AyRoleService {
    @Resource
    private AyRoleDao ayRoleDao;

    public AyRole findById(String id)
    {
        return ayRoleDao.findById(id);
    }
}
package com.example.demo.dao;

import com.example.demo.model.AyUserRole;
import org.apache.ibatis.annotations.Mapper;

import java.util.List;

@Mapper
public interface AyUserRoleDao {

     List findByUserId(String userId);

}
package com.example.demo.service;


import com.example.demo.dao.AyUserRoleDao;
import com.example.demo.model.AyUserRole;
import org.springframework.stereotype.Service;
import javax.annotation.Resource;
import java.util.List;


@Service
public class AyUserRoleService {
    @Resource
    private AyUserRoleDao ayUserRoleDao;

    public List findByUserId(String id)
    {
        return ayUserRoleDao.findByUserId(id);
    }
}
四、自定义用户服务类和权限配置类,这一步是核心
package com.example.common.security;

import com.example.common.error.BussinessException;
import com.example.demo.model.AyRole;
import com.example.demo.model.AyUser;
import com.example.demo.model.AyUserRole;
import com.example.demo.service.AyRoleService;
import com.example.demo.service.AyUserRoleService;
import com.example.demo.service.AyUserService;
import org.springframework.security.core.GrantedAuthority;
import org.springframework.security.core.authority.SimpleGrantedAuthority;
import org.springframework.security.core.userdetails.User;
import org.springframework.security.core.userdetails.UserDetails;
import org.springframework.security.core.userdetails.UserDetailsService;
import org.springframework.security.core.userdetails.UsernameNotFoundException;
import org.springframework.stereotype.Service;

import javax.annotation.Resource;
import java.util.ArrayList;
import java.util.List;

/**
 * UserDetailsService接口是spring security框架提供的
 * CustomUserService实现loadUserByUsername方法,用来加载用户的角色,并将角色放入一个集合
 * 最后把用户名,密码和角色放入User对象
 */
@Service
public class CustomUserService implements UserDetailsService {
    @Resource
    private AyUserService ayUserService;
    @Resource
    private AyRoleService ayRoleService;
    @Resource
    private AyUserRoleService ayUserRoleService;

    @Override
    public UserDetails loadUserByUsername(String name) throws UsernameNotFoundException {
        List byName = ayUserService.findByName(name);
        AyUser ayUser = byName.get(0);
        if (ayUser == null) {
            throw new BussinessException("用户不存在");
        }

        //获取用户所有的角色
        List ayUserRoleList = ayUserRoleService.findByUserId(ayUser.getId());
        List authList = new ArrayList<>();
        if (authList != null && ayUserRoleList.size() > 0) {
            for (AyUserRole ayUserRole : ayUserRoleList) {
                //获取用户关联角色名称
                String roleName = ayRoleService.findById(ayUserRole.getRoleId()).getName();
                authList.add(new SimpleGrantedAuthority(roleName));
            }
        }
        return new User(ayUser.getName(),ayUser.getPassword(),authList);
    }
}
package com.example.common.security;

import org.springframework.beans.factory.annotation.Autowired;
import org.springframework.context.annotation.Bean;
import org.springframework.context.annotation.Configuration;
import org.springframework.security.config.annotation.authentication.builders.AuthenticationManagerBuilder;
import org.springframework.security.config.annotation.web.builders.HttpSecurity;
import org.springframework.security.config.annotation.web.builders.WebSecurity;
import org.springframework.security.config.annotation.web.configuration.EnableWebSecurity;
import org.springframework.security.config.annotation.web.configuration.WebSecurityConfigurerAdapter;
import org.springframework.security.crypto.bcrypt.BCryptPasswordEncoder;
import org.springframework.security.crypto.password.PasswordEncoder;

/**
 * security配置类
 */
@Configuration
@EnableWebSecurity  //开启Security安全框架
public class WebSecurityConfig extends WebSecurityConfigurerAdapter {

    @Bean
    public PasswordEncoder passwordEncoder() {
        return new BCryptPasswordEncoder();
    }

    @Bean
    public CustomUserService customUserService()
    {
        return new CustomUserService();
    }

    /**
     * 访问权限的简单配置
     * 重写configure帆帆,通过formLogin方法配置启用默认页面
     * 通过failureUrl方法配置登陆失败返回的URL
     * 通过defaultSuccessUrl配置登陆成功的URL
     * 通过permitAll方法设置登陆页面全部权限可以访问
     * @param http
     * @throws Exception
     */
    @Override
    protected void configure(HttpSecurity http) throws Exception
    {
        http
                .formLogin()                          //启用默认登陆页面
                .failureUrl("/login?error")           //登陆失败的URL: /login?error
                .defaultSuccessUrl("/ayUser/test")   //登陆成功的URL
                .permitAll();
        super.configure(http);
    }

    /**
     * 配置内存用户
     * AuthenticationManagerBuilder类的方法inMemoryAuthentication可添加内存中的用户
     * 并可给用户指定角色权限
     * Security5默认要求密码使用加密,不加密的话就使用"{noop}123456"这样的写法,加密的话需要使用
     * PasswordEncoder的实现类进行加密
     * @param auth
     * @throws Exception
     */
    @Autowired
    public void configureGlobal(AuthenticationManagerBuilder auth) throws Exception
    {
        auth
                .userDetailsService(customUserService()).passwordEncoder(new BCryptPasswordEncoder());
//                .inMemoryAuthentication()
//                .withUser("小明").password("{noop}123456").roles("ADMIN")
//                .and()
//                .withUser("小花").password("{noop}123456").roles("USER");
    }

    /**
     * 如果使用springboot默认的静态资源路径,将不会生效
     * 必须在application.properties里面自定义静态资源路径之后才生效
     * spring.resources.static-locations=classpath:/static
     * spring.mvc.static-path-pattern=/static/**
     * @param web
     * @throws Exception
     */
    @Override
    public void configure(WebSecurity web) throws Exception {
        //设置静态资源不要拦截
        web.ignoring().antMatchers("/static/**");
    }
}
spring security在用户登陆时用BCrypt加密方式对用户密码进行处理。如果你用的是在数据库中存储用户名和密码,那么一般是要在用户注册时就使用BCrypt编码将用户密码加密处理后存储在数据库中。并且修改configure()方法,入".passwordEncoder(new BCryptPasswordEncoder())",保证用户登录时使用bcrypt对密码进行处理再与数据库中的密码比对,
所以我们保存用户密码时就对密码进行BCrypt加密
package com.example.demo.model;


import org.springframework.security.crypto.bcrypt.BCryptPasswordEncoder;

import javax.persistence.Column;
import javax.persistence.Entity;
import javax.persistence.Id;
import javax.persistence.Table;
import java.io.Serializable;


@Entity
@Table(name = "ay_user")
public class AyUser implements Serializable {
    final static BCryptPasswordEncoder bcp = new BCryptPasswordEncoder();

    @Id
    @Column(name = "user_id")
    private String id;
    @Column(name = "user_name")
    private String name;
    @Column(name = "user_password")
    private String password;

    public String getId() {
        return id;
    }

    public void setId(String id) {
        this.id = id;
    }

    public String getName() {
        return name;
    }

    public void setName(String name) {
        this.name = name;
    }

    public String getPassword() {
        return password;
    }

    public void setPassword(String password) {
        this.password = bcp.encode(password);
    }
}
五、我们开始测试
首先我们加入两个用户
再加入两个角色
给用户分配角色
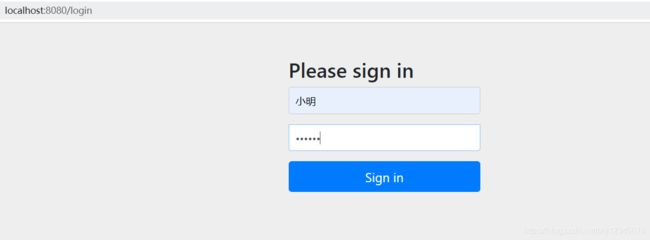
我们开始登陆,
登陆成功
当我们想关闭springboot security验证时
@Override
public void configure(WebSecurity web) throws Exception {
	// TODO 关闭spring security
	web.ignoring().antMatchers("/**");
}


