spring boot定时器实现定时同步数据
文章目录
目录
文章目录
前言
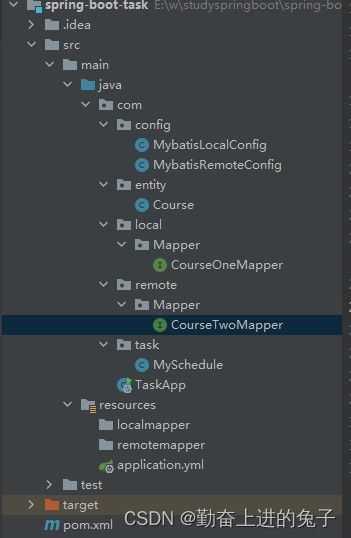
一、依赖和目录结构
二、使用步骤
2.1 两个数据源的不同引用配置
2.2 对应的mapper
2.3 定时任务处理
总结
前言
一、依赖和目录结构
        org.springframework.boot
        spring-boot-starter
        2.3.12.RELEASE


        org.springframework.boot
        spring-boot-starter-web
        2.3.12.RELEASE


        com.baomidou
        mybatis-plus-boot-starter
        3.5.1


        mysql
        mysql-connector-java
        5.1.49
配置文件
server:
  port: 8089

spring:
  datasource:
    remote :
      driver-class-name: com.mysql.jdbc.Driver
      jdbc-url: jdbc:mysql://192.168.31.2/student?useUnicode=true&characterEncoding=UTF-8&useSSL=false&serverTimezone=UTC
      username: root
      password: 111
    local :
      driver-class-name: com.mysql.jdbc.Driver
      jdbc-url: jdbc:mysql://192.168.31.1/student?useUnicode=true&characterEncoding=UTF-8&useSSL=false&serverTimezone=UTC
      username: root
      password: 111


mybatis-plus:
  configuration:
    log-impl: org.apache.ibatis.logging.stdout.StdOutImpl #开启sql日志
二、使用步骤
2.1 两个数据源的不同引用配置
package com.config;

import com.baomidou.mybatisplus.extension.spring.MybatisSqlSessionFactoryBean;
import org.apache.ibatis.session.SqlSessionFactory;
import org.mybatis.spring.SqlSessionFactoryBean;
import org.mybatis.spring.SqlSessionTemplate;
import org.mybatis.spring.annotation.MapperScan;
import org.springframework.beans.factory.annotation.Autowired;
import org.springframework.beans.factory.annotation.Qualifier;
import org.springframework.boot.context.properties.ConfigurationProperties;
import org.springframework.boot.jdbc.DataSourceBuilder;
import org.springframework.context.annotation.Bean;
import org.springframework.context.annotation.Configuration;
import org.springframework.context.annotation.Primary;
import org.springframework.core.io.support.PathMatchingResourcePatternResolver;

import javax.annotation.Resource;
import javax.sql.DataSource;

/**
 *
 * @date :Created in 2023/12/2 19:51
 * @description:本地数据源
 * @modified By:
 * @version:
 */
@Configuration
@MapperScan(basePackages = "com.local.Mapper", sqlSessionTemplateRef = "sqlSessionTemplate1")
public class MybatisLocalConfig {

    @Bean
    @ConfigurationProperties(prefix = "spring.datasource.local")
    public DataSource dataSource1() {
        return DataSourceBuilder.create().build();
    }

    @Bean
    public SqlSessionFactory sqlSessionFactory1(@Qualifier("dataSource1") DataSource dataSource) throws Exception {
        MybatisSqlSessionFactoryBean factoryBean = new MybatisSqlSessionFactoryBean();
        factoryBean.setDataSource(dataSource);
        // 设置mapper.xml文件的位置
        factoryBean.setMapperLocations(new PathMatchingResourcePatternResolver().getResources("classpath*:localmapper/*.xml"));
        return factoryBean.getObject();
    }

    @Bean
    public SqlSessionTemplate sqlSessionTemplate1(@Qualifier("sqlSessionFactory1") SqlSessionFactory sqlSessionFactory) {
        return new SqlSessionTemplate(sqlSessionFactory);
    }


}
@Configuration
@MapperScan(basePackages = "com.remote.Mapper", sqlSessionTemplateRef = "sqlSessionTemplate2")
public class MybatisRemoteConfig {
@Bean
@ConfigurationProperties(prefix = "spring.datasource.remote")
public DataSource dataSource2() {
return DataSourceBuilder.create().build();
}
@Bean
public SqlSessionFactory sqlSessionFactory2(@Qualifier("dataSource2") DataSource dataSource) throws Exception {
MybatisSqlSessionFactoryBean factoryBean = new MybatisSqlSessionFactoryBean();
factoryBean.setDataSource(dataSource);
// 设置mapper.xml文件的位置
factoryBean.setMapperLocations(new PathMatchingResourcePatternResolver().getResources("classpath*:mapper2/*.xml"));
return factoryBean.getObject();
}
@Bean
public SqlSessionTemplate sqlSessionTemplate2(@Qualifier("sqlSessionFactory2") SqlSessionFactory sqlSessionFactory) {
return new SqlSessionTemplate(sqlSessionFactory);
}
}2.2 对应的mapper
public interface CourseOneMapper extends BaseMapper {
}
public interface CourseTwoMapper extends BaseMapper {
/**
* 批量插入
* @param list
*/
@Insert("")
void batchInsert(@Param("list") List list);
}
@TableName("tbl_course")
public class Course {


    @TableId(type = IdType.AUTO)
    private Integer id;
    private String name;
    private String teacher;


    public Course() {
    }

    public Course(Integer id, String name, String teacher) {
        this.id = id;
        this.name = name;
        this.teacher = teacher;
    }

    /**
     * 获取
     * @return id
     */
    public Integer getId() {
        return id;
    }

    /**
     * 设置
     * @param id
     */
    public void setId(Integer id) {
        this.id = id;
    }

    /**
     * 获取
     * @return name
     */
    public String getName() {
        return name;
    }

    /**
     * 设置
     * @param name
     */
    public void setName(String name) {
        this.name = name;
    }

    /**
     * 获取
     * @return teacher
     */
    public String getTeacher() {
        return teacher;
    }

    /**
     * 设置
     * @param teacher
     */
    public void setTeacher(String teacher) {
        this.teacher = teacher;
    }

  @Override
    public String toString() {
        return "Course{id = " + id + ", name = " + name + ", teacher = " + teacher + "}";
    }
}
2.3 定时任务处理
@EnableScheduling //开启定时
@Component
public class MySchedule {


    @Resource
    private CourseOneMapper courseOneMapper;

    @Resource
    private CourseTwoMapper courseTwoMapper;


    /**
     * 每隔10秒执行一次
     */
    @Scheduled(fixedDelay = 1000000)
    public void test(){

        //查询到要同步的数据
        List coursesOne = courseOneMapper.selectList(null);

        //批量插入
        courseTwoMapper.batchInsert(coursesOne);


    }


}
总结
在Java中,@Scheduled注解是用于指定定时任务的执行规则的。它可以应用于方法或者类上面。
如果应用于方法上,该方法将被视为一个定时任务,并按照指定的时间规则进行调度执行。
如果应用于类上,该类中所有带有@Scheduled注解的方法都会被视为定时任务。
@Scheduled注解的参数可以用来指定任务的执行规则,包括以下几个方面:
fixedDelay:指定任务开始执行之后的延迟时间(毫秒数),任务执行完成后,再经过指定的延迟时间再次执行。例如:@Scheduled(fixedDelay = 5000)表示任务开始执行后,等待5秒后再次执行。
fixedRate:指定任务开始执行之后的间隔时间(毫秒数),任务执行完成后,立即开始下一次执行。例如:@Scheduled(fixedRate = 5000)表示任务开始执行后,每隔5秒执行一次。
initialDelay:指定任务首次执行的延迟时间(毫秒数)。例如:@Scheduled(initialDelay = 5000)表示任务首次执行延迟5秒。
cron:使用Cron表达式指定复杂的任务执行规则。Cron表达式由6个部分组成,分别表示秒、分钟、小时、日期、月份和星期几。例如:@Scheduled(cron = "0 0 12 * * ?")表示每天中午12点执行任务。
除了以上参数,@Scheduled注解还支持fixedDelayString、fixedRateString和zone等属性,可以使用字符串形式的时间间隔和指定时区。
需要注意的是,@Scheduled注解需要与@EnableScheduling注解一起使用,以启用定时任务的功能。
