Shopify二次开发之四:完成第一个section
目录
分析
schema配置
liquid html代码
liquid style代码
前面学习了关于目录结构分析、schema配置、liquid语法学习,模板渲染对象,到此就可以简单的开发一个section
完成第一个图文section,根据设计稿,分析需要配置的block和input settings
分析

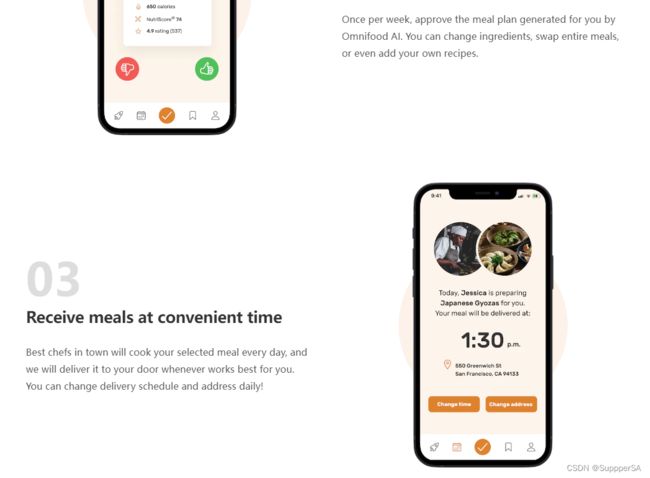
上面图文表达如何要选择"这个品牌",根据step一步步引导用户去阅读。
分析图文,得出这总体是一个section分3个block,block包括图片、标题、内容、图片位置(左、右)、图片占盒子的百分比。
schema配置
{% schema %}
{
  "name": "Next setp",
  "limit": 1,
  "max_blocks": 3,
  "blocks": [
     {
       "name": "Step",
       "type": "step",
       "settings": [
         {
           "type": "image_picker",  // 图片
           "id": "step_image",
           "label": "step image"
         },
        {
          "type": "range",         // 图片百分比
          "id": "image_width",
          "min": 25,
          "max": 100,
          "step": 1,
          "unit": "%",
          "label": "image width %",
          "default": 35
        },
        {
          "type": "radio",       // 图片位置
          "id": "image_position",
          "label": "image position",
          "options": [
            {
              "value": "left",
              "label": "Left"
            },
            {
              "value": "right",
              "label": "Right"
            }
          ],
          "default": "left"
        },
        {
          "type": "text",        // 图文标题
          "id": "step_title",
          "label": "step title"
        },
        {
          "type": "textarea",    // 图文描述
          "id": "step_content",
          "label": "step content"
        }
       ]
     }
   ],
  "presets": [
    {
      "name": "food step"
    }
  ]
}
{% endschema %}
商城后台Customize,以下是对应到schema配置的模型对象数据


至此,数据已经由商城后台配置完成,接下来就是编写liquid代码,进行模板数据渲染。
liquid html代码
  {% assign counter = 0 %}
  {% for block in section.blocks %}

      {% assign _settings = block.settings %}


        {% assign counter = counter | plus: 1 %}
        0{{ counter }}

          {{ _settings.step_title }}


          {{ _settings.step_content }}


  {% endfor %}
- 通过for循环blocks每一项为block,因为schema blocks里只配置了一种type的block,所以不需要通过if或者case判断block的type是否为step,直接渲染。
-
声明counter :{% assign counter = 0 %}每次循环+ 1,这样就得到了 1、2、3通过模板渲染01、02、03。
-
每一项循环得到block.settings: {% assign _settings = block.settings %},获取后台配置的block设置:_settings.step_title、 _settings.step_title、_settings.step_content ...
-
style="width: {{ _settings.image_width }}%;" src="{{ _settings.step_image | image_url}}" 通过filter “image_url”得到img的strc, 设置style对img进行百分比设置。
liquid style代码
{% style %}
  .shopify-section-{{ section.id }} {
    display: flex;
    flex-direction: column;
    gap: 90px;
    padding: 40px 32px;
  }

  .shopify-section-{{ section.id }} .step-item {
    display: flex;
    align-items: center;
    gap: 64px;
  }

  .shopify-section-{{ section.id }} .step-item div{
    flex: 1;
  }

  .shopify-section-{{ section.id }} .step-number{
    font-size: 86px;
    font-weight: 600;
    color: #ddd;
    margin-bottom: 12px;
  }

  .shopify-section-{{ section.id }} .step-heading{
    font-size: 30px;
    color: #333;
    letter-spacing: -0.5px;
    line-height: 1.2;
    margin-bottom: 32px;
  }

  .shopify-section-{{ section.id }} .step-content{
    font-size: 18px;
    line-height: 1.8;
  }

  .shopify-section-{{ section.id }} .step-img-box{
    position: relative;
    display: flex;
    align-items: center;
    justify-content: center;
  }

  .shopify-section-{{ section.id }} .step-img-box.right{
    order: 2;
  }

  .shopify-section-{{ section.id }} .step-img-box::after{
    position: relative;
    display: flex;
    align-items: center;
    justify-content: center;
  }

  .shopify-section-{{ section.id }} .step-img-box::after, .step-img-box::before {
    content: "";
    display: block;
    border-radius: 50%;
    position: absolute;
    top: 50%;
    left: 50%;
    transform: translate(-50%, -50%);
  }

  .shopify-section-{{ section.id }} .step-img-box::before{
    width: 60%;
    padding-bottom: 60%;
    background-color: #fdf2e9;
    z-index: -2;
  }

  .shopify-section-{{ section.id }} .step-img-box::after{
    width: 45%;
    padding-bottom: 45%;
    background-color: #fae5d3;
    z-index: -1;
  }

  @media (max-width: 75em) {
    .shopify-section-{{ section.id }} .step-heading {
      font-size: 22px;
    }

    .shopify-section-{{ section.id }} .step-content {
      font-size: 16px;
      line-height: 1.6;
    }

    .shopify-section-{{ section.id }} .step-item {
      gap: 32px;
    }
  }
  @media (max-width: 48em) {
    .shopify-section-{{ section.id }} .step-content {
      font-size: 14px;
      line-height: 1.6;
    }

    .shopify-section-{{ section.id }} .step-heading {
      font-size: 18px;
    }

    .shopify-section-{{ section.id }} .step-number {
      font-size: 60px;
    }

    .shopify-section-{{ section.id }} .step-item {
      flex-direction: column;
      flex: auto;
    }

    .shopify-section-{{ section.id }} .step-item .step-img-box {
      order: 1;
    }

    .shopify-section-{{ section.id }} .step-item .step-text-box {
      order: 2;
    }
  }
{% endstyle %}通过.shopify-section-{{ section.id }} 对本section设置其唯一的class与其他section做样式隔绝,当然这并不是唯一命名方式,也可以设置最外层的标签id 为 step-{{section.id}},随意,总之就是需要搭配其唯一id。
.shopify-section-{{ section.id }} .step-img-box.right{
order: 2;
} // 如果有right类通过flex order为2 设置flex内的盒子排序