搭建kendo-angular项目
参考原文:
- https://blog.csdn.net/qq_33964336/article/details/85104782
- https://www.cnblogs.com/shcrk/p/9215923.html
- https://www.javascriptcn.com/read-56632.html
- https://blog.csdn.net/weixin_33913332/article/details/93571421
- https://blog.csdn.net/Handsome_fan/article/details/82940875
- https://blog.csdn.net/yxf15732625262/article/details/87560563
一、根据官网教程搭建基本的kendo-angular项目
https://www.telerik.com/kendo-angular-ui/getting-started/
二、代理配置
https://blog.csdn.net/qq_33964336/article/details/85104782
1、根目录下添加proxy.conf.json
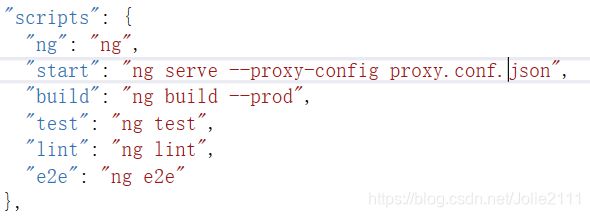
2、package.json中 "start": "ng serve --proxy-config proxy.conf.json",
三、修改build 方式
1、package.json中 "build": "ng build --prod",
四、添加Angular项目中的国际化配置ngx-translate。
https://www.cnblogs.com/shcrk/p/9215923.html
1、npm安装ngx-translate包
npm install @ngx-translate/core --save
npm install @ngx-translate/http-loader --save
2、引入TranslateModule模块
import { TranslateModule, TranslateLoader } from '@ngx-translate/core';
import { TranslateHttpLoader } from '@ngx-translate/http-loader';
3、配置ngx-translate
export function HttpLoaderFactory(hc: HttpClient) {
//HttpClient
return new TranslateHttpLoader(hc, './assets/globalization/', '.json');
}
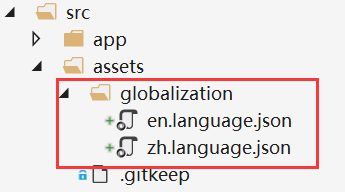
//在assets下添加globalization,在globalization 下放置语言配置文件
//在模块@NgModule中引入
imports: [
TranslateModule.forRoot({
loader: {
provide: TranslateLoader,
useFactory: HttpLoaderFactory,
deps: [HttpClient]
}
})
]
4、注入TranslateService 服务
//在头部import并在constructor中注入
import { TranslateService } from '@ngx-translate/core';
public translate: TranslateService
5、在ts和html中使用
//在html中使用
{{'title.contractManager' | translate}}
//在TS代码中获取双语
this.translate.get(["msg", "errorMsg", "common"]).subscribe(item => {
this.translator = item;
this.init();
})
五、添加Angular UI Bootstrap library 主题 ng-bootstrap.
https://ng-bootstrap.github.io/#/getting-started
1、安装包npm install --save @ng-bootstrap/ng-bootstrap
2、导入包含所需组件的模块
import {NgbPaginationModule, NgbAlertModule} from '@ng-bootstrap/ng-bootstrap';
@NgModule({
...
imports: [NgbPaginationModule, NgbAlertModule, ...],
...
})
export class YourAppModule {
}
六、添加图标 font-awesome。https://blog.csdn.net/xuehu837769474/article/details/79930323 注意本文使用scss
1、font-awesome图标:http://www.fontawesome.com.cn/faicons/
2、安装包npm install --save font-awesome
3、在style.scss文件中引入font-awesome样式
$fa-font-path: "../node_modules/font-awesome/fonts";
@import "~font-awesome/scss/font-awesome";
4、在需要的代码中直接引用class名称
七、添加classlist-polyfill(className 操作)
https://www.javascriptcn.com/read-56632.html
1、安装包npm install classlist-polyfill --save
八、添加classlist.js和babel-polyfills处理Angular项目IE兼容性
https://blog.csdn.net/weixin_33913332/article/details/93571421
1、安装包
npm install --save classlist.js
npm install --save babel-polyfill
2、修改 src 文件夹下的 polyfill.ts 文件:
/** IE9, IE10 and IE11 requires all of the following polyfills. **/
import 'core-js/es6/symbol';
import 'core-js/es6/object';
import 'core-js/es6/function';
import 'core-js/es6/parse-int';
import 'core-js/es6/parse-float';
import 'core-js/es6/number';
import 'core-js/es6/math';
import 'core-js/es6/string';
import 'core-js/es6/date';
import 'core-js/es6/array';
import 'core-js/es6/regexp';
import 'core-js/es6/map';
import 'core-js/es6/weak-map';
import 'core-js/es6/set';
/** IE10 and IE11 requires the following for the Reflect API. */
import 'core-js/es6/reflect';
/** Evergreen browsers require these. **/
// Used for reflect-metadata in JIT. If you use AOT (and only Angular decorators), you can remove.
import 'core-js/es7/reflect';
/** IE10 and IE11 requires the following for NgClass support on SVG elements */
import 'classlist.js'; // Run `npm install --save classlist.js`.
/**
* Web Animations `@angular/platform-browser/animations`
* Only required if AnimationBuilder is used within the application and using IE/Edge or Safari.
* Standard animation support in Angular DOES NOT require any polyfills (as of Angular 6.0).
*/
import 'web-animations-js'; // Run `npm install --save web-animations-js`.
/********************************************************************************
* Zone JS is required by default for Angular itself.
*/
import 'zone.js/dist/zone'; // Included with Angular CLI.
/********************************************************************************
* APPLICATION IMPORTS
*/
import 'babel-polyfill';
九、添加Angular项目的Cookie操作 CookieService.
https://www.npmjs.com/package/ngx-cookie-service
1. 安装包npm install ngx-cookie-service --save
2. 在app.module.ts 中添加providerimport { BrowserModule } from '@angular/platform-browser';
import { NgModule } from '@angular/core';
import { FormsModule } from '@angular/forms';
import { HttpModule } from '@angular/http';
import { AppComponent } from './app.component';
import { CookieService } from 'ngx-cookie-service';
@NgModule({
declarations: [ AppComponent ],
imports: [ BrowserModule, FormsModule, HttpModule ],
providers: [ CookieService ],
bootstrap: [ AppComponent ]
})
export class AppModule { }
3. Import并注入到组件中
import { Component, OnInit } from '@angular/core';
import { CookieService } from 'ngx-cookie-service';
@Component({
selector: 'demo-root',
templateUrl: './app.component.html',
styleUrls: [ './app.component.scss' ]
})
export class AppComponent implements OnInit {
cookieValue = 'UNKNOWN';
constructor( private cookieService: CookieService ) { }
ngOnInit(): void {
this.cookieService.set( 'Test', 'Hello World' );
this.cookieValue = this.cookieService.get('Test');
}
}
十. 添加jquery . https://www.npmjs.com/package/jquery
1. 安装包npm install --save jquery
2. 引入import * as $ from "jquery";
十一. 添加toastr提示https://www.npmjs.com/package/toastr
1. 安装包npm install --save toastr
2. 在style.scss中引入toastr样式
@import "~toastr/toastr";
3. 引入import * as toastr from "toastr";
十二. 添加Rxjs库,Rxjs是javascript的一个响应式编程库,它提供了很多api,可以很方便的处理和操作应用中的数据
https://blog.csdn.net/Handsome_fan/article/details/82940875
https://blog.csdn.net/yxf15732625262/article/details/87560563
1. 安装时需要注意rxjs-compat版本问题 @6.3.3
npm install [email protected] --save
十三. 添加bootstrap,kendo-theme-bootstrap主题
https://www.telerik.com/kendo-angular-ui/components/styling/theme-bootstrap/
https://www.npmjs.com/package/bootstrap
1. 安装包
npm install bootstrap –save
npm install --save @progress/kendo-theme-bootstrap
2.在style.scss中引入
@import "~@progress/kendo-theme-bootstrap/scss/all";
@import "~bootstrap/scss/bootstrap";
3. 为了兼容bootstrapv4.XX安装popper.js. https://www.npmjs.com/package/popper
npm install popper --save


