QML的使用
一、背景
为了适应手机移动应用开发, Qt5 将 QML 脚本编程提到与传统 C++ 部件编程相同的高度,力推 QML 界面编程,当然 QML 主要用于手机移动应用程序。 QML 包含大量使用手机移动设备的功能模块,比如基本部件(QtQuick 模块)、GPS 定位、渲染特效、蓝牙、NFC、WebkKit 等等。
QML(Qt Meta-Object Language,Qt元对象语言)是一种用于描述应用程序用户界面的声明式编程语言, 类似于网页设计的 HTML,是一种标记语言,我们可以借助 CSS 对它进行美化,也可以借助 JavaScript 进行交互。有 Web 开发经验的读者学习 QML 将非常轻松。
二、QML基础介绍
QML将界面分解为一个一个小的元素,通过使用QML描述各元素的排列以及对特定事件的响应来搭建一个动态的界面。QML中的元素是以层级的形式进行描述的,子元素继承父元素的坐标系统,子元素的坐标以父元素作为参考,父元素的左上角为子元素的坐标原点,子元素中可以使用parent关键字引用父元素。
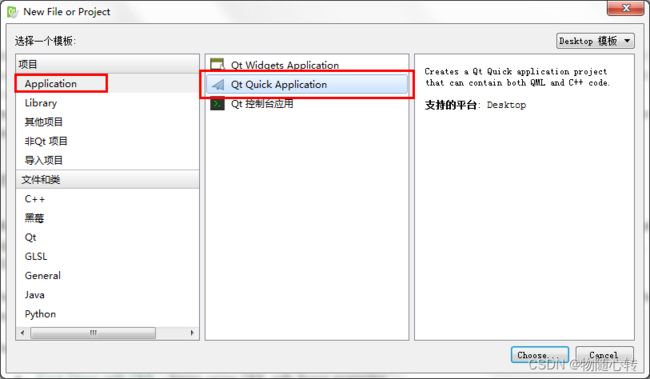
现在创建一个QML工程。打开Qt Creator,点击“文件→新建文件或项目”菜单项,然后选择创建“Qt QuickApplication”,如下图所示:
在一个QML文件中,每个元素都可以设定唯一的id,在其他元素中可以引用id来更改此元素的属性等。QML提供一系列内置的元素类型供开发中快速搭建界面,包括最常用的Rectangle、Image、Text、MouseArea、Item等。元素都有自己内置的属性,比如之前介绍的id,以及用于指定坐标的x、y,和width、height等,同时也支持使用property关键字自定义属性。
我们添加一个简单的QML文件:
import QtQuick 2.0

Rectangle {

    width: 100

    height: 200

    color: "red"

    radius: 50

}
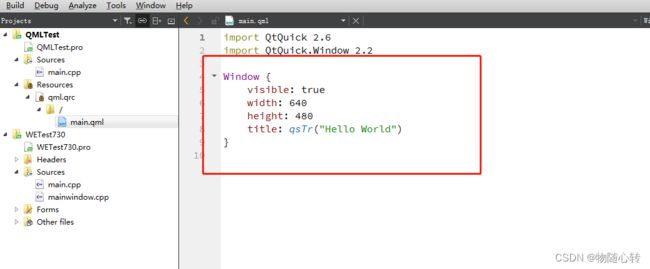
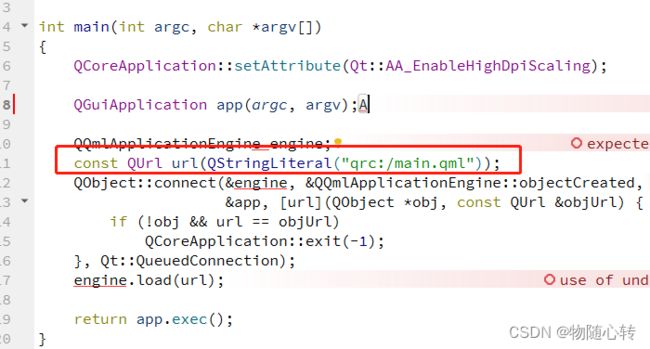
修改文件路径
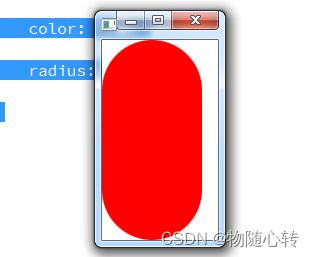
运行:
使用Rectangle就可以构建出消息展示框和按钮等大部分的界面元素了,而Text类型可以用于在Rectangle中增加文字信息,Image可以加载图片,MouseArea提供鼠标/触摸屏事件,组合使用这几个元素就能够快速的搭建基本的交互界面了。
三、动画效果
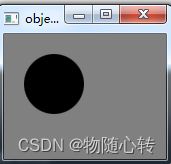
QML也内置了一些类型来描述显示元素的转变、动画效果,例如PropertyAnimation、NumberAnimation、ColorAnimation、RotationAnimation以及State、Transition等,使用这些类型能够快速实现界面的动画效果,比如下面展示一个绿灯闪烁的界面的QML代码:
import QtQuick 2.0


Rectangle {

    id: backgroud

    width: 100

    height: 100

    color: "grey"


  Rectangle {

    id: greenlight

    width: 60

    height: 60

    x: 20

    y: 20

    color: "green"

    radius: 30

    Component.onCompleted: flick.start()


    SequentialAnimation{

      id: flick

      ColorAnimation { target: greenlight; properties: "color"; to: "black"; duration: 1000 }

      ColorAnimation { target: greenlight; properties: "color"; to: "green"; duration: 1000 }

      ColorAnimation { target: greenlight; properties: "color"; to: "black"; duration: 1000 }

      ColorAnimation { target: greenlight; properties: "color"; to: "green"; duration: 1000 }

      ColorAnimation { target: greenlight; properties: "color"; to: "black"; duration: 1000 }

      }

  }

}
四、 Listview使用QML
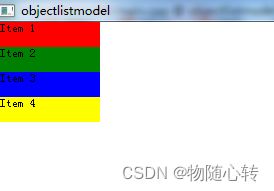
实际开发中,由于需要展示的数据往往会以数组等更复杂形式进行管理,这些数据具有相同的属性,需要展示的外形效果是一样的,而每个元素的需要展示的内容不一样,这时就可以使用Row、Column、ListView、GridView等更复杂的元素。这类元素的设计理念是将数据与展现效果分开,数据用model来存放,而展示效果用view来描述,model和view通过delegate联系起来,一个简单的ListView的用法示例如下,使用QT的demo——objectlistmodel:
目录
dataobject.h
#ifndef DATAOBJECT_H
#define DATAOBJECT_H

#include


class DataObject : public QObject
{
    Q_OBJECT
    // 设置name,color属性
    Q_PROPERTY(QString name READ name WRITE setName NOTIFY nameChanged)
    Q_PROPERTY(QString color READ color WRITE setColor NOTIFY colorChanged)

public:
    DataObject(QObject *parent=0);
    DataObject(const QString &name, const QString &color, QObject *parent=0);

    QString name() const;
    void setName(const QString &name);

    QString color() const;
    void setColor(const QString &color);

signals:
    void nameChanged();
    void colorChanged();

private:
    QString m_name;
    QString m_color;
]
};


#endif // DATAOBJECT_H
dataobject.cpp
#include
#include "dataobject.h"

DataObject::DataObject(QObject *parent)
    : QObject(parent)
{
}

DataObject::DataObject(const QString &name, const QString &color, QObject *parent)
    : QObject(parent), m_name(name), m_color(color)
{
}

QString DataObject::name() const
{
    return m_name;
}

void DataObject::setName(const QString &name)
{
    if (name != m_name) {
        m_name = name;
        emit nameChanged();
    }
}

QString DataObject::color() const
{
    return m_color;
}

void DataObject::setColor(const QString &color)
{
    if (color != m_color) {
        m_color = color;
        emit colorChanged();
    }
}
main.cpp
#include

#include
#include
#include
#include
#include

#include "dataobject.h"

/*
   This example illustrates exposing a QList as a
   model in QML
*/


int main(int argc, char ** argv)
{
    QGuiApplication app(argc, argv);

    QList dataList;
    dataList.append(new DataObject("Item 1", "red"));
    dataList.append(new DataObject("Item 2", "green"));
    dataList.append(new DataObject("Item 3", "blue"));
    dataList.append(new DataObject("Item 4", "yellow"));

    QQuickView view;
    view.setResizeMode(QQuickView::SizeRootObjectToView);// 此属性保存当视图调整大小时是否重新布局项

    QQmlContext *ctxt = view.rootContext();
    ctxt->setContextProperty("myModel", QVariant::fromValue(dataList));

    view.setSource(QUrl("qrc:view.qml"));

    view.show();

    return app.exec();
}
view.qml
import QtQuick 2.0

ListView {
    width: 100; height: 100

    model: myModel
    delegate: Rectangle {
        height: 25
        width: 100
        color: model.modelData.color
        Text { text: name }
    }
}
参考:
使用QML进行界面开发_cdemtronix的博客-CSDN博客_qml
QML学习(二)——
第52篇 Qt Quick简介 · Qt 快速入门系列教程
