C# Winform GDI+ 绘图
目录
一、概述
二、绘图
1.画直线
2.画矩形
3.画圆、圆弧
4.画扇形
5.画多边形
6.绘制字符串
7.填充图形
结束
一、概述
Graphics类是GDI+技术的一个基本类。GDI+(Graphics Device Interface)是.NET框架的重要组成部分,提供对二维图形图像和文字排版处理的支持。
GDI+相关的类分布在下列命名空间中:
System.Drawing:提供了最基本的绘图功能(比如画直线、矩形、椭圆等);
System.Drawing.Drawing2D: 提供了高级的二维和矢量绘图功能(比如渐变、 图案填充、- 轨迹等)
System.Drawing.Imaging: 提供图像处理功能
System.Drawing.Text: 提供排版功能
System.Drawing.Printing: 提供与打印相关的服务
坐标系
在 GDI 绘图中,水平轴 X 由左到右,垂直轴 Y 由上到下
画笔 Pen
定义用于绘制直线和曲线的对象。 此类不能被继承。
主要用来定义画笔的相关设置,比如直线,虚线,线条的颜色等,
//定义一个画笔,线条颜色是黑色,线条为虚线,虚线之间的间隔为3像素
Pen Pens1 = new Pen(new SolidBrush(Color.Black), 2);
Pens1.DashStyle = DashStyle.Custom;
Pens1.DashPattern = new float[] { 3, 3 };
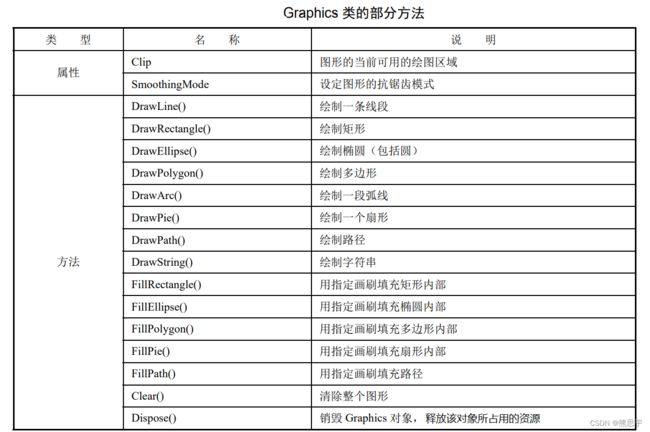
绘图类常用属性和方法
Graphics 常用的属性和方法下图,图片来源 链接 ,另外参考微软官方的文档:点击跳转
二、绘图
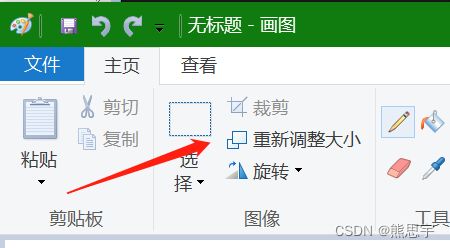
绘图我一般在 PictureBox 控件中进行,在此之前,我们需要先做一张背景图片,打开 Windows 自带的画图软件
点击调整大小,假设 PictureBox 控件的大小是 800 * 800,那么我们就将画图调整为 800 * 800
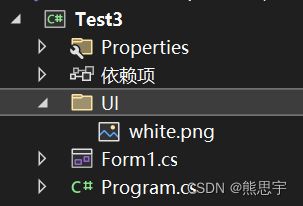
随后将图片保存到项目的文件夹中
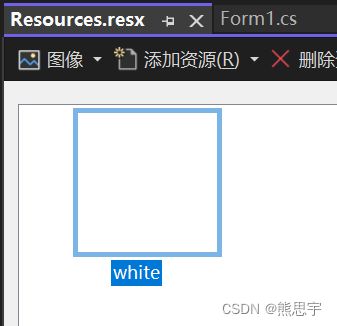
打开 Resources.resx
如果第一次打开,这里应该是字符串,手动切换到图片
将 UI 文件夹中的 white.png 图片直径拖过来就行了
在窗体中拖入一个 PictureBox 控件
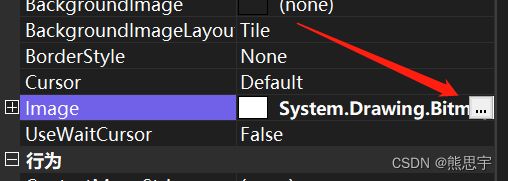
点击 PictureBox 组件,找到 Image 属性,选择图片
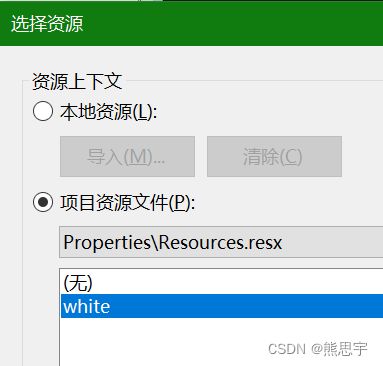
选中 white ,然后点击确定
这样图片就添加完成了,下面开始画图
1.画直线
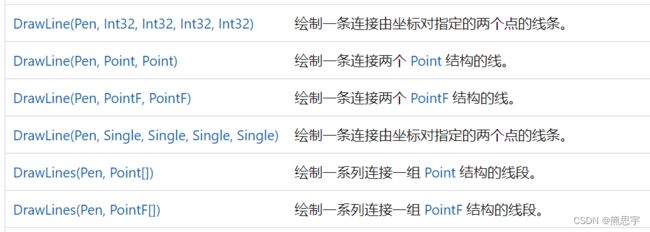
画一条直线只需要提供两个坐标。
函数重载
代码
using System.Drawing;
using System.Drawing.Drawing2D;

namespace Test3
{
    public partial class Form1 : Form
    {
        public Form1()
        {
            InitializeComponent();
        }

        private void Form1_Load(object sender, EventArgs e)
        {
            Pen pens = new Pen(new SolidBrush(Color.Red), 1);//线条的粗细
            pens.DashStyle = DashStyle.Solid;//线条的线型

            Bitmap bmp = (Bitmap)pictureBox1.Image.Clone();
            Graphics g = Graphics.FromImage(bmp);
            g.SmoothingMode = SmoothingMode.AntiAlias;//消除锯齿
            pictureBox1.Image.Dispose();

            Point start = new Point(300, 300);
            Point end = new Point(100, 100);
            g.DrawLine(pens, start, end);

            g.Dispose();

            pictureBox1.Image = bmp;
        }
    }
}
效果
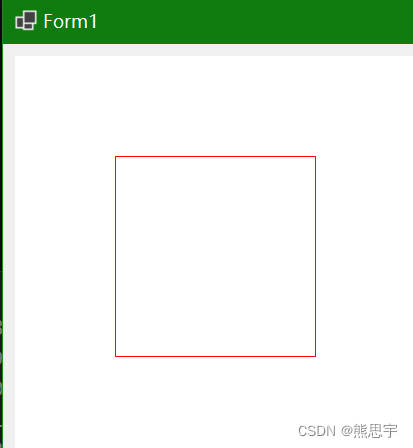
2.画矩形
绘制由坐标对、宽度和高度指定的矩形。(注意,x,y 的位置是矩形的左上角)
参数
pen
Pen
Pen,它确定矩形的颜色、宽度和样式。
x
Int32
要绘制的矩形的左上角的 x 坐标。
y
Int32
要绘制的矩形的左上角的 y 坐标。
width
Int32
要绘制的矩形的宽度。
height
Int32
要绘制的矩形的高度。
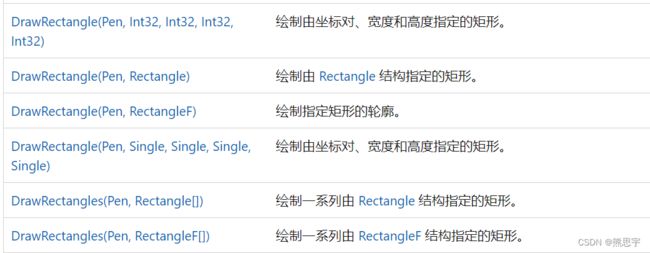
下面是函数的重载
代码
using System.Drawing;
using System.Drawing.Drawing2D;

namespace Test3
{
    public partial class Form1 : Form
    {
        public Form1()
        {
            InitializeComponent();
        }

        private void Form1_Load(object sender, EventArgs e)
        {
            Pen pens = new Pen(new SolidBrush(Color.Red), 1);//线条的粗细
            pens.DashStyle = DashStyle.Solid;//线条的线型

            Bitmap bmp = (Bitmap)pictureBox1.Image.Clone();
            Graphics g = Graphics.FromImage(bmp);
            g.SmoothingMode = SmoothingMode.AntiAlias;//消除锯齿
            pictureBox1.Image.Dispose();

            Rectangle rec = new Rectangle(100, 100, 200, 200);
            g.DrawRectangle(pens, rec);

            g.Dispose();

            pictureBox1.Image = bmp;
        }
    }
}
效果
3.画圆、圆弧
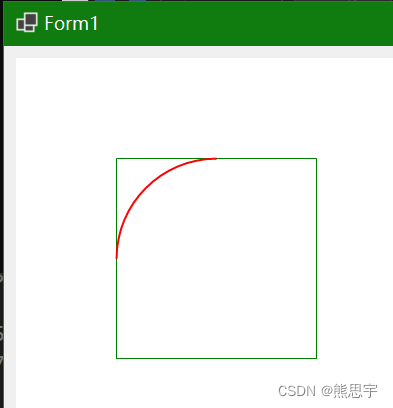
画圆稍微特殊一点,首先需要提供一个矩形的参数,矩形的坐标是在矩形的左上角,矩形的宽和高则决定了这个圆是一个标准的圆还是一个椭圆,另外需要提供两个参数,弧线的起始角和画多少度角为止
pen
Pen
Pen,它确定弧线的颜色、宽度和样式。
x
Int32
定义椭圆的矩形的左上角的 x 坐标。
y
Int32
定义椭圆的矩形的左上角的 y 坐标。
width
Int32
定义椭圆的矩形的宽度。
height
Int32
定义椭圆的矩形的高度。
startAngle
Int32
从 x 轴到弧线的起始点沿顺时针方向度量的角(以度为单位)。
sweepAngle
Int32
从 startAngle 参数到弧线的结束点沿顺时针方向度量的角(以度为单位)。
函数的重载
代码
using System.Drawing;
using System.Drawing.Drawing2D;

namespace Test3
{
    public partial class Form1 : Form
    {
        public Form1()
        {
            InitializeComponent();
        }

        private void Form1_Load(object sender, EventArgs e)
        {
            Pen pens = new Pen(new SolidBrush(Color.Red), 2);//线条的粗细
            pens.DashStyle = DashStyle.Solid;//线条的线型

            Pen pen2 = new Pen(new SolidBrush(Color.Green), 1);

            Bitmap bmp = (Bitmap)pictureBox1.Image.Clone();
            Graphics g = Graphics.FromImage(bmp);
            g.SmoothingMode = SmoothingMode.AntiAlias;//消除锯齿
            pictureBox1.Image.Dispose();

            Rectangle rectangle = new Rectangle(100, 100, 200, 200);
            g.DrawRectangle(pen2, rectangle);
            //画弧线
            g.DrawArc(pens, rectangle, 180, 90);

            g.Dispose();

            pictureBox1.Image = bmp;
        }
    }
}
效果(下图矩形是画的辅助线,不要注释掉 DrawRectangle 这行代码就行了)
4.画扇形
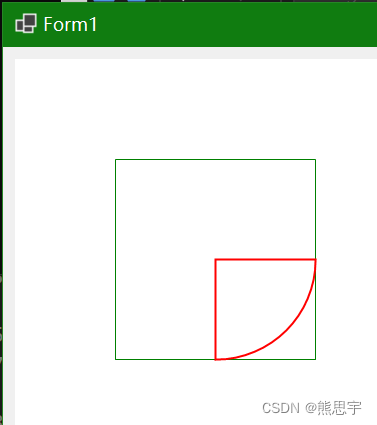
绘制一个扇形,该形状由一个坐标对、宽度、高度以及两条射线所指定的椭圆定义。
Pen
Pen,它确定扇形的颜色、宽度和样式。
x
Int32
边框的左上角的 x 坐标,该边框定义扇形所属的椭圆。
y
Int32
边框的左上角的 y 坐标,该边框定义扇形所属的椭圆。
width
Int32
边框的宽度,该边框定义扇形所属的椭圆。
height
Int32
边框的高度,该边框定义扇形所属的椭圆。
startAngle
Int32
从 x 轴到扇形的第一条边沿顺时针方向度量的角(以度为单位)。
sweepAngle
Int32
从 startAngle 参数到扇形的第二条边沿顺时针方向度量的角(以度为单位)。
函数的重载
代码
using System.Drawing;
using System.Drawing.Drawing2D;

namespace Test3
{
    public partial class Form1 : Form
    {
        public Form1()
        {
            InitializeComponent();
        }

        private void Form1_Load(object sender, EventArgs e)
        {
            Pen pens = new Pen(new SolidBrush(Color.Red), 2);//线条的粗细
            pens.DashStyle = DashStyle.Solid;//线条的线型

            Pen pen2 = new Pen(new SolidBrush(Color.Green), 1);

            Bitmap bmp = (Bitmap)pictureBox1.Image.Clone();
            Graphics g = Graphics.FromImage(bmp);
            g.SmoothingMode = SmoothingMode.AntiAlias;//消除锯齿
            pictureBox1.Image.Dispose();

            Rectangle rectangle = new Rectangle(100, 100, 200, 200);
            g.DrawRectangle(pen2, rectangle);
            //画扇形
            g.DrawPie(pens, rectangle, 0, 90);

            g.Dispose();

            pictureBox1.Image = bmp;
        }
    }
}
效果
5.画多边形
绘制由一组 Point 结构定义的多边形
Pen
Pen,它确定多边形的颜色、宽度和样式。
points
Point[]
Point 结构数组,这些结构表示多边形的顶点。
函数的重载
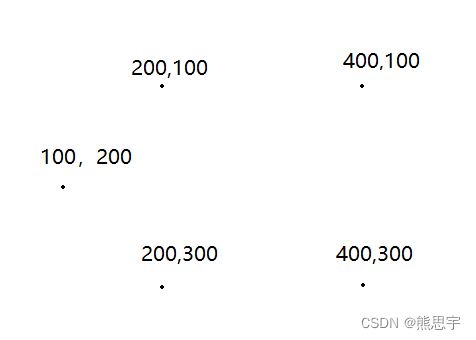
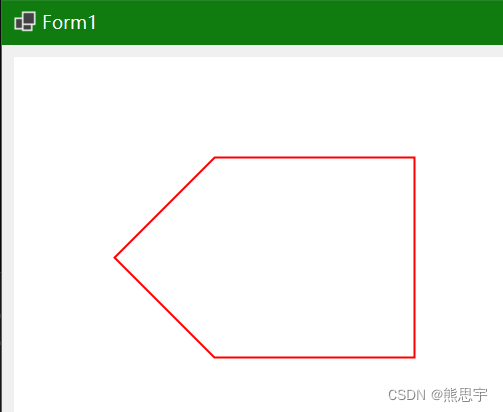
画多边形是由一组顶点组成的,如下图,把相邻的点连接在一起,无论从那个方向,最终的图形都是一样的,具体效果看下面的案例
代码
using System.Drawing;
using System.Drawing.Drawing2D;

namespace Test3
{
    public partial class Form1 : Form
    {
        public Form1()
        {
            InitializeComponent();
        }

        private void Form1_Load(object sender, EventArgs e)
        {
            Pen pens = new Pen(new SolidBrush(Color.Red), 2);//线条的粗细
            pens.DashStyle = DashStyle.Solid;//线条的线型

            Pen pen2 = new Pen(new SolidBrush(Color.Green), 1);

            Bitmap bmp = (Bitmap)pictureBox1.Image.Clone();
            Graphics g = Graphics.FromImage(bmp);
            g.SmoothingMode = SmoothingMode.AntiAlias;//消除锯齿
            pictureBox1.Image.Dispose();

            //画多边形
            Point[] points ={
                           new Point(100,200),
                           new Point(200,300),
                           new Point(400,300),
                           new Point(400,100),
                           new Point(200,100),
                           };
            g.DrawPolygon(pens, points);

            g.Dispose();

            pictureBox1.Image = bmp;
        }
    }
}
效果
6.绘制字符串
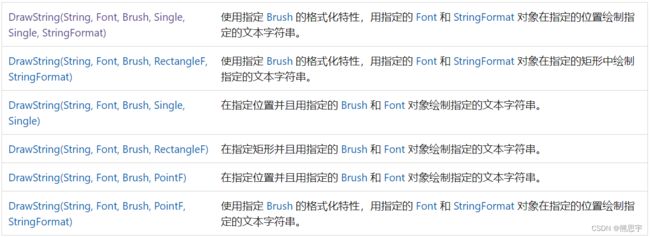
在指定位置并且用指定的 Brush 和 Font 对象绘制指定的文本字符串
String
要绘制的字符串。
font
Font
Font,它定义字符串的文本格式。
brush
Brush
Brush,它确定所绘制文本的颜色和纹理。
x
Single
所绘制文本的左上角的 x 坐标。
y
Single
所绘制文本的左上角的 y 坐标。
format
StringFormat
StringFormat,它指定应用于所绘制文本的格式化特性(如行距和对齐方式)。
函数的重载
代码
using System.Drawing.Drawing2D;

namespace Test3
{
    public partial class Form1 : Form
    {
        public Form1()
        {
            InitializeComponent();
        }

        private void Form1_Load(object sender, EventArgs e)
        {
            Pen pens = new Pen(new SolidBrush(Color.Red), 2);//线条的粗细
            pens.DashStyle = DashStyle.Solid;//线条的线型

            Bitmap bmp = (Bitmap)pictureBox1.Image.Clone();
            Graphics g = Graphics.FromImage(bmp);
            g.SmoothingMode = SmoothingMode.AntiAlias;//消除锯齿
            pictureBox1.Image.Dispose();

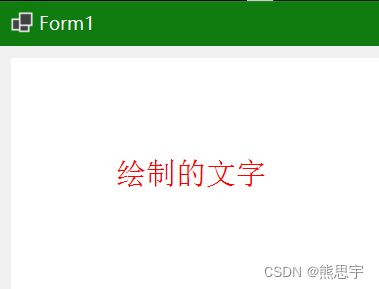
            string text = "绘制的文字";
            int fontSize = 15;
            Color lineColor = Color.Red;
            int fontPosX = 100;
            int fontPosY = 100;

            Font myFont = new Font("宋体", fontSize, FontStyle.Regular);
            Brush bush = new SolidBrush(lineColor);
            g.DrawString(text, myFont, bush, fontPosX, fontPosY);

            g.Dispose();

            pictureBox1.Image = bmp;
        }
    }
}
效果:
7.填充图形
填充图形的接口可以参考下图,当然,微软实际绘图和填充图形的方法和属性是要比下图多的多,但常用的功能我这里基本都做了介绍了
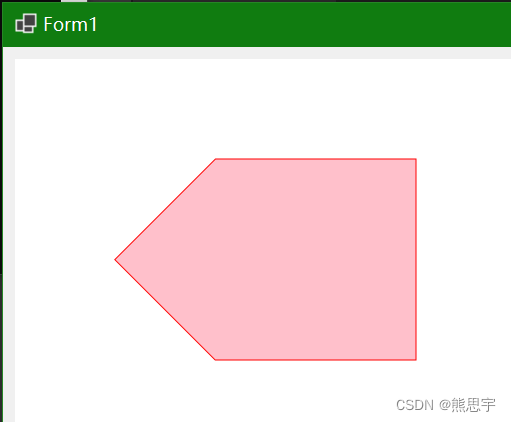
这里就用上面的多边形例子基础上做新的一个案例
using System.Drawing;
using System.Drawing.Drawing2D;

namespace Test3
{
    public partial class Form1 : Form
    {
        public Form1()
        {
            InitializeComponent();
        }

        private void Form1_Load(object sender, EventArgs e)
        {
            Pen pens = new Pen(new SolidBrush(Color.Red), 2);//线条的粗细
            pens.DashStyle = DashStyle.Solid;//线条的线型

            Pen pen2 = new Pen(new SolidBrush(Color.Green), 1);

            Bitmap bmp = (Bitmap)pictureBox1.Image.Clone();
            Graphics g = Graphics.FromImage(bmp);
            g.SmoothingMode = SmoothingMode.AntiAlias;//消除锯齿
            pictureBox1.Image.Dispose();

            //画多边形
            Point[] points ={
                           new Point(100,200),
                           new Point(200,300),
                           new Point(400,300),
                           new Point(400,100),
                           new Point(200,100),
                           };
            g.DrawPolygon(pens, points);
            //填充图形
            g.FillPolygon(Brushes.Pink, points);

            g.Dispose();

            pictureBox1.Image = bmp;
        }
    }
}
效果
结束
如果这个帖子对你有所帮助,欢迎 关注 + 点赞 + 留言
end

