Android入门之路 - shape保姆级手册
使用shape一般都是在实现效果简单且单一,或 公司内无设计师的场景下
最近在整合一些阴影的实现效果,故对此篇修整了一番
当然如果你比较懒的话,还是找设计要图吧,不过小心被藐视了…
-
-
- 基础认知
- 基础使用
-
- 画一个 shape
- 用一个 shape
- 开发实战(标签&效果)
-
- shape_rectangle.xml(长方形)
- shape_radius(圆角框)
- shape_oval.xml (椭圆形)
- shape_ring.xml (环形)
- shape_line.xml (删除线)
- shape_dotted_line.xml (虚线)
- 实战使用
-
基础认知
为什么要用 shape?
使用 shape 的好处在于其自身的便捷性和兼容性,否则针对新手你可能需要找设计师要多套尺寸的图;毕竟求人不如求己,多掌握一份技能多一份生成本领
shape 能做哪些事儿?
本质上我们就是用 shape 来给控件画边框效果,主要是为了满足UI设计的需求,以下是一些常见场景
各种颜色的边框线虚线边框边框圆角化(可自行定义四角的圆角效果)控件的渐变色背景
shape 要掌握哪些基础知识?
常见边框
- 长方形(默认)
- 圆形
- 环形
- 线条
shape 标签解析
<shape xmlns:android="http://schemas.android.com/apk/res/android"
    android:shape="rectangle">


    <solid android:color="#ff0" />


    <stroke
        android:width="1dp"
        android:color="@color/CustomColor7" />


    <corners android:radius="5dp" />


    <size
        android:width="15dp"
        android:height="5dp" />


    <padding
        android:left="10dp"
        android:right="10dp" />


    <gradient
        android:angle="45"
        android:centerColor="@color/CustomColor2"
        android:endColor="@color/CustomColor3"
        android:startColor="@color/CustomColor1" />

shape>
基础使用
如何从头到尾创建一个shape,到如何正确的使用shape效果
画一个 shape
- 在
res-drawable-创建shape_自命名.xml(一般为shape开头)

- 文件内部
shape为最外层标签,可设置当前的shape形状,有圆形,长方形,环形,线形(删除线)
<shape xmlns:android="http://schemas.android.com/apk/res/android"
    android:shape="rectangle"
    android:useLevel="false">


    <solid android:color="#fff" />


    <stroke
        android:width="1dp"
        android:color="#999999" />

shape>
- 在需要的控件中可设置
@drawable/shape效果
 <ImageView
     android:layout_width="wrap_content"
     android:layout_height="wrap_content"
     android:background="@drawable/shape_自命名.xml"
     android:scaleType="centerCrop"
  />
用一个 shape
关于shape的使用有很多种,但是更多时候我们会将shape作为background进行设置;
例如我们在TextView、LinearLayout这样的View、ViewGroup控件设置背景
- 呈现效果

- 引用方式
     <TextView
        android:layout_width="100dp"
        android:layout_height="50dp"
        android:layout_gravity="center_horizontal"
        android:layout_marginBottom="10dp"
        android:background="@drawable/shape_first"
        android:gravity="center"
        android:text="边框" />

    <LinearLayout
        android:layout_width="100dp"
        android:layout_height="50dp"
        android:layout_gravity="center_horizontal"
        android:layout_marginBottom="10dp"
        android:background="@drawable/shape_first" />
不知道有的人会不会和我一样无聊,试一试ImageView使用shape的效果
我们可以给ImageView设置src属性或background;但是一般好像没人给ImageView设置src属性!
- 呈现效果
你可能感觉这个shape效果看起来区别不大

但是看完这个是不是感觉src属性用shape的不靠谱了?(该渐变后后面有详细使用介绍)

- 引用方式
    <ImageView
        android:layout_width="100dp"
        android:layout_height="100dp"
        android:layout_marginBottom="10dp"
        android:layout_gravity="center"
        android:src="@drawable/shape_first" />

    <ImageView
        android:layout_width="100dp"
        android:layout_height="100dp"
        android:layout_gravity="center"
        android:background="@drawable/shape_first" />
开发实战(标签&效果)
Shape - Demo下载地址
之前的gif图被网站转存废了... 静态图看不出效果,故修整后加入单体效果
- Demo内包含6种效果
- 各种效果,需熟悉掌握,
长方形同时可实现圆化 - 第三,第四种效果设置TextView的背景均是高度被限制的原因
shape_rectangle.xml(长方形)
- 呈现效果

- 引用方式
    <TextView
        android:layout_width="100dp"
        android:layout_height="50dp"
        android:layout_gravity="center_horizontal"
        android:background="@drawable/shape_rectangle"
        android:gravity="center"
        android:text="长方形" />
- shape标签
<shape xmlns:android="http://schemas.android.com/apk/res/android"
    android:shape="rectangle"
    android:useLevel="false">


    <solid android:color="#ffffff" />


    <stroke
        android:width="1dp"
        android:color="#999999" />


    <size
        android:width="15dp"
        android:height="5dp" />


    <corners android:radius="5dp" />


    <padding
        android:left="10dp"
        android:right="10dp" />


    <gradient
        android:angle="45"
        android:centerColor="#fff"
        android:endColor="#f23"
        android:startColor="#fe3" />
shape>
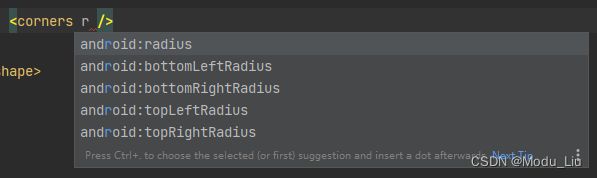
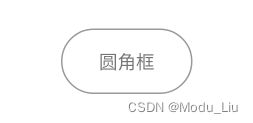
shape_radius(圆角框)
长方形的圆角化主要在corners属性,我们可以统一设置圆角,也可以针对不同位置设置圆角效果(很常用)
- 呈现效果
全圆角
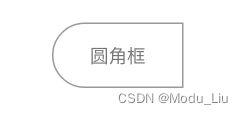
指定圆角
- 引用方式
    <TextView
        android:layout_width="100dp"
        android:layout_height="50dp"
        android:layout_gravity="center_horizontal"
        android:background="@drawable/shape_radius"
        android:gravity="center"
        android:text="圆角框" />
- shape标签
全圆角
指定圆角
<shape xmlns:android="http://schemas.android.com/apk/res/android"
    android:shape="rectangle"
    android:useLevel="false">


    <solid android:color="#fff" />


    <stroke
        android:width="1dp"
        android:color="#999999" />


    <corners
        android:bottomLeftRadius="50dp"
        android:topLeftRadius="50dp" />

shape>
shape_oval.xml (椭圆形)
Hint:这种 shape 样式,我在开发中很少用到 …
-
呈现效果

-
引用方式
    <TextView
        android:layout_width="100dp"
        android:layout_height="50dp"
        android:layout_gravity="center_horizontal"
        android:background="@drawable/shape_oval"
        android:gravity="center"
        android:text="椭圆形?" />
- shape标签
<shape xmlns:android="http://schemas.android.com/apk/res/android"
    android:shape="oval"
    android:useLevel="false">


    <solid android:color="#fff" />


    <stroke
        android:width="1dp"
        android:color="#f00" />


    <size
        android:width="5dp"
        android:height="5dp" />


    <corners />

    <padding />
shape>
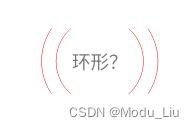
shape_ring.xml (环形)
Hint:这种 shape 样式,我在开发中很少用到 …
- 呈现效果
我尝试了当无 gradient 时,内部颜色会透到中间区域会

当有 gradient 时,效果反之
- 引用方式
    <TextView
        android:layout_width="100dp"
        android:layout_height="50dp"
        android:layout_gravity="center_horizontal"
        android:background="@drawable/shape_ring"
        android:gravity="center"
        android:text="环形?" />
- shape标签
<shape xmlns:android="http://schemas.android.com/apk/res/android"
    android:shape="ring"
    android:useLevel="false">


    <solid android:color="#ffe" />


    <stroke
        android:width="0.1dp"
        android:color="#f00" />


    <size
        android:width="5dp"
        android:height="5dp" />


    <corners />

    <padding />

    <gradient />
shape>
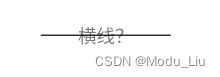
shape_line.xml (删除线)
- 呈现效果
- 引用方式
    <TextView
        android:layout_width="100dp"
        android:layout_height="50dp"
        android:layout_gravity="center_horizontal"
        android:background="@drawable/shape_line"
        android:gravity="center"
        android:text="横线?" />
- shape标签
<shape xmlns:android="http://schemas.android.com/apk/res/android"
    android:shape="line"
    android:useLevel="false">


    <solid android:color="#fff" />


    <stroke
        android:width="1dp"
        android:color="#333333" />


    <size
        android:width="5dp"
        android:height="5dp" />


    <corners android:radius="5dp" />

    <padding />


    <gradient
        android:angle="45"
        android:centerColor="#fff"
        android:endColor="#f23"
        android:startColor="#fe3" />

shape>
shape_dotted_line.xml (虚线)
- 呈现效果

- 引用方式
    <TextView
        android:layout_width="100dp"
        android:layout_height="50dp"
        android:layout_gravity="center_horizontal"
        android:background="@drawable/shape_line"
        android:gravity="center"
        android:text="虚线?" />
- shape标签
方式一:shape方式 - 横直虚线
<shape xmlns:android="http://schemas.android.com/apk/res/android"
    android:shape="line">


    <stroke
        android:width="1dp"
        android:color="#ff6677"
        android:dashGap="5dp"
        android:dashWidth="5dp" />

shape>
方式二:DottedLine 自定义控件 - 竖直的虚线
public class DottedLine extends View {

    private Paint mDotPaint;

    public DottedLine (Context context) {
        super(context);
        initView();
    }

    public DottedLine (Context context, @Nullable AttributeSet attrs) {
        super(context, attrs);
        initView();
    }

    public DottedLine (Context context, @Nullable AttributeSet attrs, int defStyleAttr) {
        super(context, attrs, defStyleAttr);
        initView();
    }

    private void initView() {
        mDotPaint = new Paint();
        mDotPaint.setColor(Color.parseColor("#FF6677")); //画笔颜色
        mDotPaint.setStrokeWidth(2); //画笔宽度
        // 1、STROKE 描边
        // 2、FILL_AND_STROKE 填充内部和描边
        // 3、FILL:填充内部
        mDotPaint.setStyle(Paint.Style.STROKE);
        //1、Cap.BUTT 这条路径结束,而不是超越它。
        //2、Cap.ROUND 结束是个半圆
        //3、Cap.SQUARE 结束是个方形
        mDotPaint.setStrokeCap(Paint.Cap.ROUND);//
        //设置抗锯齿
        mDotPaint.setAntiAlias(true);
        //设置是否抖动
        mDotPaint.setDither(true);
    }

    @Override
    protected void onDraw(Canvas canvas) {
        super.onDraw(canvas);
        float startY = getHeight();
        float startX = getWidth() / 2;
        DashPathEffect dashPathEffect =
                new DashPathEffect(new float[]{8, 10, 8, 10}, 0);
        mDotPaint.setPathEffect(dashPathEffect);
        Path path = new Path();
        path.moveTo(startX,0);
        path.lineTo(startX,startY);
        canvas.drawPath(path,mDotPaint);
    }
}
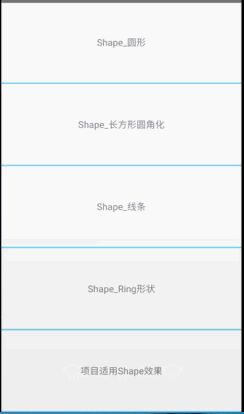
实战使用
此处讲明了多种效果的调用方式,简单方便,没必要看下方的Demo代码 ~
AllEffectActivity (项目实用 - 项目主要使用AllEffectActivity的代码)
package com.yl.shape.shapedemo;

import android.support.v7.app.AppCompatActivity;
import android.os.Bundle;

public class AllEffectActivity extends AppCompatActivity {

    @Override
    protected void onCreate(Bundle savedInstanceState) {
        super.onCreate(savedInstanceState);
        setContentView(R.layout.activity_all_effect);
    }
}
activity_all_effect
<LinearLayout xmlns:android="http://schemas.android.com/apk/res/android"
    xmlns:tools="http://schemas.android.com/tools"
    android:id="@+id/activity_all_effect"
    android:layout_width="match_parent"
    android:layout_height="match_parent"
    android:orientation="vertical"
    tools:context="com.yl.shape.shapedemo.AllEffectActivity">

    <TextView
        android:layout_marginTop="40dp"
        android:layout_width="wrap_content"
        android:layout_height="25dp"
        android:text="圆形"
        android:gravity="center"
        android:layout_gravity="center"
        android:background="@drawable/shape_oval"
        />

    <TextView
        android:layout_marginTop="20dp"
        android:layout_width="wrap_content"
        android:layout_height="25dp"
        android:text="长方形"
        android:gravity="center"
        android:layout_gravity="center"
        android:background="@drawable/shape_rectangle"
        />

    <TextView
        android:layout_marginTop="20dp"
        android:layout_width="wrap_content"
        android:layout_height="25dp"
        android:text="删除线"
        android:gravity="center"
        android:layout_gravity="center"
        android:background="@drawable/shape_line"
        />

    <TextView
        android:layout_marginTop="20dp"
        android:layout_width="wrap_content"
        android:layout_height="25dp"
        android:text="环形"
        android:gravity="center"
        android:layout_gravity="center"
        android:background="@drawable/shape_ring"
        />
LinearLayout>
以下代码可忽略 - 此处代码多而臃肿,完全是为了给新手细化每种效果,建议直接看上方的开发使用即可 ~
MainActivity
package com.yl.shape.shapedemo;

import android.content.Intent;
import android.support.v7.app.AppCompatActivity;
import android.os.Bundle;
import android.view.View;
import android.widget.TextView;

public class MainActivity extends AppCompatActivity implements View.OnClickListener {

    private TextView mOver;
    private TextView mRectangle;
    private TextView mLine;
    private TextView mRing;
    private TextView mAll;
    @Override
    protected void onCreate(Bundle savedInstanceState) {
        super.onCreate(savedInstanceState);
        setContentView(R.layout.activity_main);

        mOver = (TextView) findViewById(R.id.over);
        mRectangle = (TextView) findViewById(R.id.rectangle);
        mLine = (TextView) findViewById(R.id.line);
        mRing = (TextView) findViewById(R.id.ring);
        mAll = (TextView)findViewById(R.id.all);

        mOver.setOnClickListener(this);
        mRectangle.setOnClickListener(this);
        mLine.setOnClickListener(this);
        mRing.setOnClickListener(this);
        mAll.setOnClickListener(this);
    }

    @Override
    public void onClick(View v) {
        switch (v.getId()){
            case R.id.over:
                startActivity(new Intent(this,OverActivity.class));
            	break;
            case R.id.rectangle:
                startActivity(new Intent(this,RectangleActivity.class));
            	break;
            case R.id.line:
                startActivity(new Intent(this,LineActivity.class));
            	break;
            case R.id.ring:
                startActivity(new Intent(this,RingActivity.class));
            	break;
            case R.id.all:
                startActivity(new Intent(this,AllEffectActivity.class));
                break;
        }
    }
}
activity.xml
<LinearLayout xmlns:android="http://schemas.android.com/apk/res/android"
    xmlns:tools="http://schemas.android.com/tools"
    android:id="@+id/activity_main"
    android:layout_width="match_parent"
    android:layout_height="match_parent"
    android:orientation="vertical"
    tools:context="com.yl.shape.shapedemo.MainActivity">

    <TextView
        android:id="@+id/over"
        android:layout_width="match_parent"
        android:layout_height="0dp"
        android:layout_weight="1"
        android:gravity="center"
        android:padding="5dp"
        android:text="Shape_圆形" />

    <View
        android:layout_width="match_parent"
        android:layout_height="2dp"
        android:background="#64CDFF" />

    <TextView
        android:id="@+id/rectangle"
        android:layout_width="match_parent"
        android:layout_height="0dp"
        android:layout_weight="1"
        android:gravity="center"
        android:padding="5dp"
        android:text="Shape_长方形圆角化" />

    <View
        android:layout_width="match_parent"
        android:layout_height="2dp"
        android:background="#64CDFF" />

    <TextView
        android:id="@+id/line"
        android:layout_width="match_parent"
        android:layout_height="0dp"
        android:layout_weight="1"
        android:gravity="center"
        android:padding="5dp"
        android:text="Shape_线条" />

    <View
        android:layout_width="match_parent"
        android:layout_height="2dp"
        android:background="#64CDFF" />

    <TextView
        android:id="@+id/ring"
        android:layout_width="match_parent"
        android:layout_height="0dp"
        android:layout_weight="1"
        android:gravity="center"
        android:padding="5dp"
        android:text="Shape_Ring形状" />

    <View
        android:layout_width="match_parent"
        android:layout_height="2dp"
        android:background="#64CDFF" />

    <TextView
        android:id="@+id/all"
        android:layout_width="match_parent"
        android:layout_height="0dp"
        android:layout_weight="1"
        android:gravity="center"
        android:padding="5dp"
        android:text="项目适用Shape效果" />

    <View
        android:layout_width="match_parent"
        android:layout_height="2dp"
        android:background="#64CDFF" />

LinearLayout>
OverActivity(圆形)
package com.yl.shape.shapedemo;

import android.os.Bundle;
import android.support.v7.app.AppCompatActivity;

/**
 * Created by YongLiu on 2017/8/3.
 */

public class OverActivity extends AppCompatActivity {
    @Override
    protected void onCreate(Bundle savedInstanceState) {
        super.onCreate(savedInstanceState);
        setContentView(R.layout.activity_over);
    }
}
activity_over
<RelativeLayout xmlns:android="http://schemas.android.com/apk/res/android"
    android:layout_width="match_parent"
    android:layout_height="match_parent">

    <ImageView
        android:layout_gravity="center"
        android:layout_width="match_parent"
        android:layout_height="match_parent"
        android:src="@drawable/shape_oval"
         />
RelativeLayout>
RectangleActivity(长方形)
package com.yl.shape.shapedemo;

import android.support.v7.app.AppCompatActivity;
import android.os.Bundle;

public class RectangleActivity extends AppCompatActivity {

    @Override
    protected void onCreate(Bundle savedInstanceState) {
        super.onCreate(savedInstanceState);
        setContentView(R.layout.activity_rectangle);
    }
}
activity_rectangle
<RelativeLayout xmlns:android="http://schemas.android.com/apk/res/android"
    xmlns:tools="http://schemas.android.com/tools"
    android:id="@+id/activity_rectangle"
    android:layout_width="match_parent"
    android:layout_height="match_parent"
    tools:context="com.yl.shape.shapedemo.RectangleActivity">

    <ImageView
        android:layout_width="match_parent"
        android:layout_height="match_parent"
        android:src="@drawable/shape_rectangle"
        />
RelativeLayout>
RingActivity(环形)
package com.yl.shape.shapedemo;

import android.support.v7.app.AppCompatActivity;
import android.os.Bundle;

public class RingActivity extends AppCompatActivity {

    @Override
    protected void onCreate(Bundle savedInstanceState) {
        super.onCreate(savedInstanceState);
        setContentView(R.layout.activity_ring);
    }
}
activity_ring
<LinearLayout xmlns:android="http://schemas.android.com/apk/res/android"
    xmlns:tools="http://schemas.android.com/tools"
    android:id="@+id/activity_ring"
    android:layout_width="match_parent"
    android:layout_height="match_parent"
    android:orientation="vertical"
    tools:context="com.yl.shape.shapedemo.RingActivity">

    <TextView
        android:layout_marginTop="20dp"
        android:layout_width="match_parent"
        android:layout_height="20dp"
        android:text="ImageView设置的src"
        android:gravity="center"
        />

    <ImageView
        android:layout_marginTop="10dp"
        android:layout_width="match_parent"
        android:layout_height="20dp"
        android:src="@drawable/shape_ring"
        />

    <TextView
        android:layout_marginTop="20dp"
        android:layout_width="match_parent"
        android:layout_height="20dp"
        android:text="Text设置的背景Ring"
        android:gravity="center"
        />

    <TextView
        android:layout_marginTop="20dp"
        android:layout_width="match_parent"
        android:layout_height="20dp"
        android:background="@drawable/shape_ring"
        />
LinearLayout>
LineActivity (线形)
package com.yl.shape.shapedemo;

import android.support.v7.app.AppCompatActivity;
import android.os.Bundle;

public class LineActivity extends AppCompatActivity {

    @Override
    protected void onCreate(Bundle savedInstanceState) {
        super.onCreate(savedInstanceState);
        setContentView(R.layout.activity_line);
    }
}
activity_line
<LinearLayout xmlns:android="http://schemas.android.com/apk/res/android"
    xmlns:tools="http://schemas.android.com/tools"
    android:id="@+id/activity_line"
    android:layout_width="match_parent"
    android:layout_height="match_parent"
    android:orientation="vertical"
    tools:context="com.yl.shape.shapedemo.LineActivity">

    <TextView
        android:layout_marginTop="20dp"
        android:layout_width="match_parent"
        android:layout_height="20dp"
        android:text="Text设置的背景Ring"
        android:gravity="center"
        />

    <TextView
        android:layout_width="match_parent"
        android:layout_height="20dp"
        android:layout_centerInParent="true"
        android:background="@drawable/shape_line"
        android:id="@+id/textView" />

    <TextView
        android:layout_marginTop="20dp"
        android:layout_width="match_parent"
        android:layout_height="20dp"
        android:text="ImageView设置的src"
        android:gravity="center"
        />

    <ImageView
        android:layout_width="match_parent"
        android:layout_height="100dp"
        android:src="@drawable/shape_line"
        />
LinearLayout>