HarmonyOS应用开发——页面
我们将对于多页面以及更多有趣的功能展开叙述,这次我们对于 HarmonyOS 的很多有趣常用组件并引出一些其他概念以及解决方案、页面跳转传值、生命周期、启动模式(UiAbility),样式的书写、状态管理以及动画等方面进行探讨
页面之间的跳转以及数据传递
页面之间的跳转需要用到 router 模块的 pushUrl 方法,所以第一步是要导入 router 模块,然后在用户交互 API 中使用该方法进行页面的跳转(我这里使用的是按钮点击)
import router from '@ohos.router'
router.pushUrl({
  url: 'pages/Second'
})
然后我们需要将要跳转的到的目标页面进行一个页面路由配置(main_pages.json),忽略掉这一步的话页面跳转时会报错的,报错会提示让你去查看日志,而日志是说路由有问题,没办法跳转,如果你的路径书写的没问题的话,那么就是没有配置了
- 路由配置
{
  "src": [
    "pages/Index",
    "pages/Second"
  ]
}
完整代码如下:
- 主页面
// 导入 router 路由模块
import router from '@ohos.router'
@Entry
@Component
struct Index {
  build() {
    Row() {
      Column() {
        Text("主页面")
          .fontSize(32)
          .fontColor('#404040')
          .fontWeight(FontWeight.Bold)
        Button("点击去往第二个页面")
          .margin(32)
          .padding(12)
          .backgroundColor('#ff21b88d')
          .onClick(()=> {
            // 路由跳转指定页面
            router.pushUrl({
              url: 'pages/Second'
            })
          })
      }.width('100%')
    }.height('100%')
  }
}
- 目标页面
@Entry
@Component
struct Second {
  build() {
  Row() {
    Column() {
      Text("Hello ArkTs")
        .fontWeight(FontWeight.Bold)
    }.width('100%')
  }.height('100%')
  }
}
页面之间传值
页面之间的传值还是靠 pushUrl 方法的 params 参数来传值
router.pushUrl({
  url: 'pages/Second',
  params: {title:'页面之间的传值'}
})
接收方需要使用 router 实例的 getParams 方法来进行接收
@State message:string = router.getParams()?.["title"]
tip: PI9及以上,router.pushUrl()方法新增了mode参数,可以将mode参数配置为router.RouterMode.Single单实例模式和router.RouterMode.Standard多实例模式。
 router.pushUrl({
     url: 'pages/Second',
     params: {
         src: '数据',
     }
 }, router.RouterMode.Single)
除了我们上面所说的 pushUrl 方法,其实还有一种方法可以进行页面跳转:router.replaceUrl(),该方法新增了mode参数,可以将mode参数配置为router.RouterMode.Single单实例模式和router.RouterMode.Standard多实例模式。在单实例模式下:如果目标页面的url在页面栈中已经存在同url页面,离栈顶最近同url页面会被移动到栈顶,替换当前页面,并销毁被替换的当前页面,移动后的页面为新建页,页面栈的元素数量会减1;如果目标页面的url在页面栈中不存在同url页面,按多实例模式跳转,页面栈的元素数量不变。
还是那句话,具体问题具体方案,因为应用是有一个页面栈的,如果用户在进入目标页面之后通过一些途径再次重复进入页面,而页面栈或者说我们开发者不进行分辨以及预知的话,就会出现重复跳转、找不到跳转前页面,页面将会出现无法返回或者陷入一个页面的死循环等问题
router.replaceUrl({
  url: 'pages/Second',
  params: {
    src: 'Index页面传来的数据',
  }
}, router.RouterMode.Single)
UIAbilIty - 应用程序入口
uiability 就是我们的应用程序入口,是系统调度单元,可以有多个也可以在一个入口中进行所有操作,具体情况具体方案,就比如我们经常使用的聊天工具,里面会内置小游戏等,如果我们通过该聊天工具进入了小游戏,那么该小游戏会重新开一个 uiability,这样我们通过任务管理器即可进行两个应用的互相切换而不影响用户的体验
它的意思相当于 Vue 或者 Uniapp中的 main 程序入口文件,是一个应用程序入口
在这个入口文件中,我们可以通过它的生命周期来做很多的事情,当应用程序打开创建、当他进入了后台、退出后台等等,但WindowStageCreate和WindowStageDestroy也就是使用虚线标明的两个只能算是状态,uiability生命周期只有四个
Create:Create状态为在应用加载过程中,UIAbility实例创建完成时触发,系统会调用onCreate()回调。可以在该回调中进行应用初始化操作,例如变量定义资源加载等,用于后续的UI界面展示。WindowStageCreate、WindowStageDestroy:UIAbility实例创建完成之后,在进入Foreground之前,系统会创建一个WindowStage。WindowStage创建完成后会进入onWindowStageCreate()回调,可以在该回调中设置UI界面加载、设置WindowStage的事件订阅。官网给我们提供了这样一张生命周期图
Foreground、Background:Foreground和Background状态分别在UIAbility实例切换至前台和切换至后台时触发,对应于onForeground()回调和onBackground()回调Destroy:Destroy状态在UIAbility实例销毁时触发。可以在onDestroy()回调中进行系统资源的释放、数据的保存等操作。
我们可以打开应用入口文件查看这些生命周期:
import UIAbility from '@ohos.app.ability.UIAbility';
import hilog from '@ohos.hilog';
import window from '@ohos.window';

export default class EntryAbility extends UIAbility {
  onCreate(want, launchParam) {
    hilog.info(0x0000, 'testTag', '%{public}s', 'Ability onCreate');
  }

  onDestroy() {
    hilog.info(0x0000, 'testTag', '%{public}s', 'Ability onDestroy');
  }

  onWindowStageCreate(windowStage: window.WindowStage) {
    // Main window is created, set main page for this ability
    hilog.info(0x0000, 'testTag', '%{public}s', 'Ability onWindowStageCreate');

    windowStage.loadContent('pages/Index', (err, data) => {
      if (err.code) {
        hilog.error(0x0000, 'testTag', 'Failed to load the content. Cause: %{public}s', JSON.stringify(err) ?? '');
        return;
      }
      hilog.info(0x0000, 'testTag', 'Succeeded in loading the content. Data: %{public}s', JSON.stringify(data) ?? '');
    });
  }

  onWindowStageDestroy() {
    // Main window is destroyed, release UI related resources
    hilog.info(0x0000, 'testTag', '%{public}s', 'Ability onWindowStageDestroy');
  }

  onForeground() {
    // Ability has brought to foreground
    hilog.info(0x0000, 'testTag', '%{public}s', 'Ability onForeground');
  }

  onBackground() {
    // Ability has back to background
    hilog.info(0x0000, 'testTag', '%{public}s', 'Ability onBackground');
  }
}
UIAbility启动模式
UIAbility当前支持singleton(单实例模式)、multiton(多实例模式)和specified(指定实例模式)3种启动模式
- 在单例模式中,每次调用startAbility()方法时,如果应用进程中该类型的UIAbility实例已经存在,则复用系统中的UIAbility实例,系统中只存在唯一一个该UIAbility实例。即在最近任务列表中只存在一个该类型的UIAbility实例
- 在多实例模式中,每次调用startAbility()方法时,都会在应用进程中创建一个该类型的UIAbility实例。即在最近任务列表中可以看到有多个该类型的UIAbility实例
- 在指定实例模式中,UIAbility实例新创建之前,允许开发者为该实例创建一个字符串Key,新创建的UIAbility实例绑定Key之后,后续每次调用startAbility方法时,都会询问应用使用哪个Key对应的UIAbility实例来响应startAbility请求。如果匹配有该UIAbility实例的Key,则直接拉起与之绑定的UIAbility实例,否则创建一个新的UIAbility实例。运行时由UIAbility内部业务决定是否创建多实例。
然后我们在module.json5文件中的“launchType”字段配置为对应实例模式即可。
如多实例模式:
{
   "module": {
     "abilities": [
       {
         "launchType": "multiton"
       }
     ]
  }
}
image
单独介绍这个图片的用意就是想要说它的资源引用特点以及和常见前端开发的不同之处
- 网络图片引用
Image("https://ts1.cn.mm.bing.net/th/id/R-C.66d7b796377883a92aad65b283ef1f84?rik=sQ%2fKoYAcr%2bOwsw&riu=http%3a%2f%2fwww.quazero.com%2fuploads%2fallimg%2f140305%2f1-140305131415.jpg&ehk=Hxl%2fQ9pbEiuuybrGWTEPJOhvrFK9C3vyCcWicooXfNE%3d&risl=&pid=ImgRaw&r=0")
  .alt($r('app.media.icon'))// 使用alt,在网络图片加载成功前使用占位图
  .width("264vp")
 // 像素单位有4中表示单位 vp、px、fp、lpx
网络图片引用官网说是要在module.json5中配置访问网络权限,我就在网上随便找了一张图片,然后我发现没有配置也可以用,这个的话,能用就用,不能用就配置上,后续慢慢了解这个小东西
"requestPermissions": [{
  "name": "ohos.permission.INTERNET"
}],
2.第二种是使用PixelMap数据加载图片,读取写入图像数据以及获取图像信息
大多用于图形解码等需求的,这个我也不是很懂,我就不阐述了
3.第三种是使用Resource数据加载图片,这个需要将图片放在指定目录下
Image($r("app.media.todolist"))
  .width(64)
resource 可以新建引用资源文件,我们右击 resource 文件夹新建引用资源json文件
这样我们可以写一些常用宽度高度等来提高复用性,便于修改维护
Image($r("app.media.todolist"))
  .width($r("app.float.image"))
harmonyOS的样式怎么使用
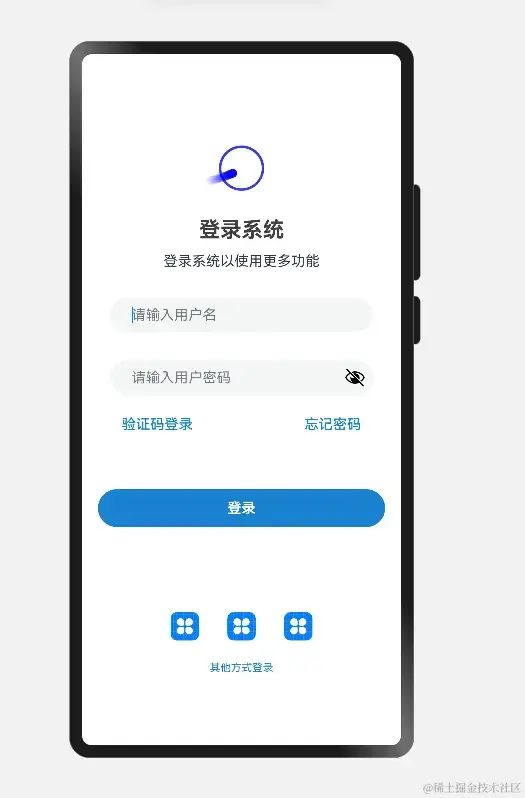
对于习惯组件式开发且逻辑层、样式层、架构层分离开发的我来说,这个样式的绘画有点不习惯,写个样式还真得看看官网,所以针对样式的使用我写了一个登陆页面来练习,开发起来倒也是方便,没用多少代码,一个视觉上过的去的页面就开发出来了,尤其是它的 Row 和 Column 容器,掌握了真的很好用,用来做横向竖向布局很舒服
下面的代码没有写注释,但是不难理解,一定可以帮你解决一些样式上的困扰
import router from '@ohos.router'

@Builder function ImageBuilder(src) {
  Image(src)
    .width(32)
    .height(32)
}
@Entry
@Component
struct Index {
  @State username:string = ''
  @State password:string = ''
  build() {
    Row() {
      Column() {
        Image($r("app.media.icon"))
          .width($r("app.float.image_size"))
          .height($r("app.float.image_size"))
          .margin(32)
        Text("登录系统")
          .fontSize(24)
          .fontColor('#404040')
          .fontWeight(700)
          .margin(12)
        Text("登录系统以使用更多功能")
        TextInput({text:this.username,placeholder:'请输入用户名'})
          .margin(32)
          .padding({top:12,left:24})
        TextInput({text:this.password,placeholder:'请输入用户密码'})
          .type(InputType.Password)
          .margin({top:0,left:32,right:32})
          .padding({top:12,left:24})

        Row() {
          Text("验证码登录")
            .fontColor("#ff1a81d0")
            .fontWeight(500)

          Text("忘记密码")
            .fontColor("#ff1a81d0")
            .fontWeight(500)
        }.width("75%")
        .margin({top:24})
        .justifyContent(FlexAlign.SpaceBetween)

        Button("登录")
          .width("90%")
          .margin(64)
          .padding(12)
          .backgroundColor('#ff1a81d0')
          .fontWeight(700)
          .onClick(()=> {
            // 路由跳转指定页面
            router.pushUrl({
              url: 'pages/Second',
              params: {title:'页面之间的传值'}
            })
          })

        Row({space: 32}) {
          ImageBuilder($r("app.media.icon"))
          ImageBuilder($r("app.media.icon"))
          ImageBuilder($r("app.media.icon"))
        }.margin({top:32})

        Text("其他方式登录")
          .margin({top:24})
          .fontSize(12)
          .fontColor("#ff1a81d0")
      }.width('100%')
    }.height('100%')
  }
}
获取 input 的用户输入字符可以使用 Input 内置的 onChange 方法,该方法会自己接受 value 也就是用户输入值,然后相应的对其进行操作即可
.onChange((value: string) => {

})
顺便说个有趣的加载组件 :
LoadingProgress:
LoadingProgress()
  .color(Color.Blue)
  .height(60)
  .width(60)
我们把刚才页面的logo图标使用这个加载logo替换一下
这是一个动态的加载图标,我截图所以看不出来,挺好看的,我们可以在登录等待时间使用它撑一段时间,让用户不那么尴尬
harmonyOS的组件还是很多很棒的,其他有趣的组件我们可以去其官网学习
List
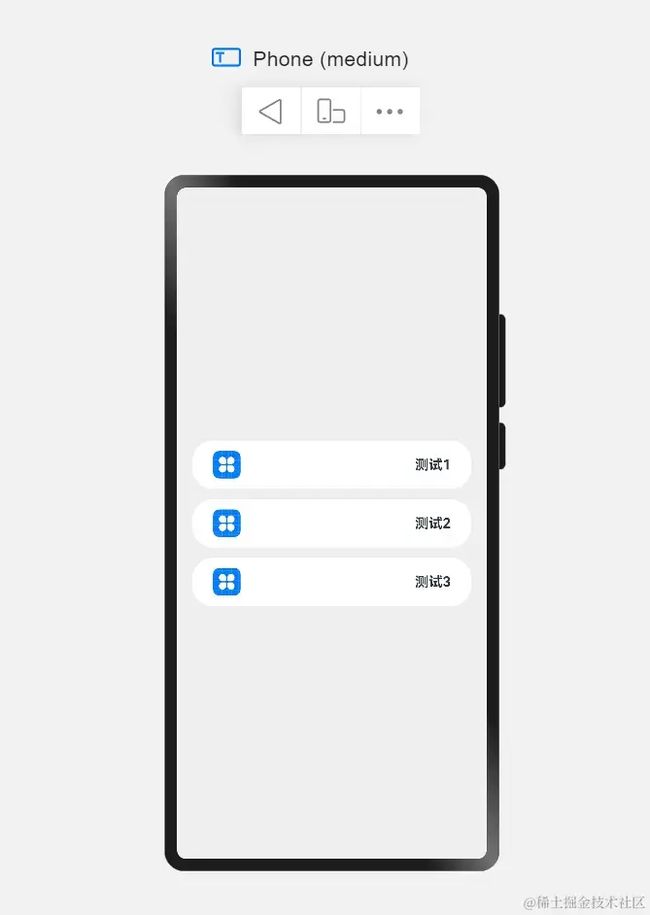
HarmonyOS同样也有 list 滚动列表组件便于我们开发
该组件有三个重要可选参数:
- space:列表间距
- scroller:控制列表滚动
- initiallndex:初次加载 list 所显示的 item
@Entry
@Component
struct Second {
@Builder listItemComponent(item:string) {
Row({space:12}) {
Image($r("app.media.icon"))
.width(32)
Text(item).fontWeight(FontWeight.Bold)
}.width("100%")
.justifyContent(FlexAlign.SpaceBetween)
}
@State list:ArrayGrid
grid 只有一个可选参数 scroller 来控制 grid 的滚动
以上图可滚动 Grid 为例我们查看其示例代码,想要实现滚动效果,我们只需要给宽高任意一方限定即可八,并配置相应属性,例如仅设置columnsTemplate属性,不设置rowsTemplate属性,就可以实现Grid列表的滚动
- 组件页面
import GridModel from './grid';
import { GridData } from './gridData';
@Component
export struct GridAssembly {
  build() {
    Grid() {
      ForEach(GridModel.getGridModel(),(item:GridData) => {
        GridItem() {
          Column() {
            Image(item.img)
              .height(52)
              .width(52)
              .margin({bottom:12})
            Text(item.title)
              .fontWeight(FontWeight.Bold)
          }
        }
      },item => JSON.stringify(item))
    }.height(124)
    .columnsTemplate('1fr 1fr 1fr')
    .rowsGap(12)
    .columnsGap(12)
    .backgroundColor('#fff')
    .width("90%")
    .borderRadius(24)
    .padding(24)
  }
}
- 数据构建
import { GridData } from './gridData';
export default class GridModel {
  public static getGridModel():Array {
    let data:Array = [
      new GridData("测试文字01",$r("app.media.we_chat")),
      new GridData("测试文字02",$r("app.media.we_chat")),
      new GridData("测试文字03",$r("app.media.we_chat")),
      new GridData("测试文字04",$r("app.media.we_chat")),
      new GridData("测试文字05",$r("app.media.we_chat")),
      new GridData("测试文字06",$r("app.media.we_chat")),
      new GridData("测试文字07",$r("app.media.we_chat"))
    ]
    return data;
  }
}
- 参数类型定义
export class GridData {
  title:string;
  img?:Resource;

  constructor(title:string,img?:Resource) {
    this.title = title;
    this.img = img;
  }
}
无论是 Grid 组件还是 List 组件,我们都可以使用 onScrollIndex 来监听列表的滚动,还有更多 API 我们可以前往其官网查看学习 例如:onScrollStop 等
tabbar
不得不说,harmonyOS 的tabbar 和 uniapp的不同点在于uniapp是统一配置,全局唯一,默认的底部栏不是很灵活多变,uniapp支持的平台太多了,也难怪,不怪它
而 harmonyOS 可以定义其超出滚动、侧边tabbar等等功能,且 tabbar 是一个组件,这样的话,我们即可以无限创建
此组件有三个参数:
- barPosition:指定页签位置来创建Tabs容器组件
- index:指定初次初始页签索引
- controller:设置Tabs控制器
属性:
且需要 TabContent 组件来配合
这是一个最简 tabbar,我试了一下…不好看,不过倒也适合那种顶部 navbar 的
所以我决定使用 @Builder 来构建一个稍微好看点的 tabbar
我一开始不了解这个 tabbar 的逻辑,结果配的一塌糊涂了,因为tabbar要跳转页面,跳转页面就要把页面写到 TabContent 里面,这就需要导入其他页面,而我创建的页面需要使用 @Entry 装饰器来声明,这两个直接冲突了,不能导出使用 @Entry 声明的页面
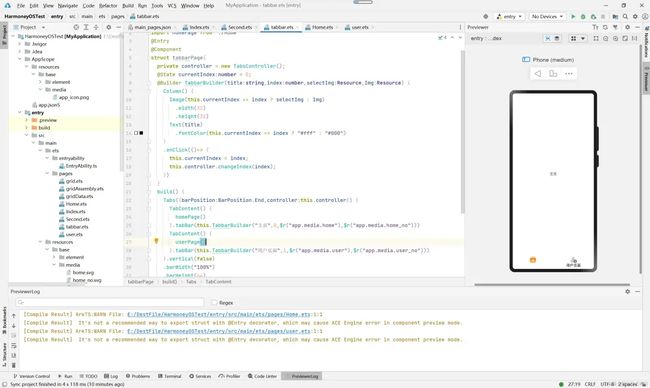
…而且在当前一个页面写 tabbar,本页面跳转本页面且其他页面没有和 tabbar 直接联系,感觉有点不合逻辑,所以我想了一个办法,要不我写一个 专门的 tabbar 页面,然后跳转其他页面,我去试了试,用到是可以用,可是…
是个警告,并且这个警告告诉我这是有安全问题的,可能引起引擎错误…(请不必在意我的项目很乱,我是用来练习的)
想必也不是这样写的,随后我把两个页面的 @Entry 装饰器删了,不警告了…
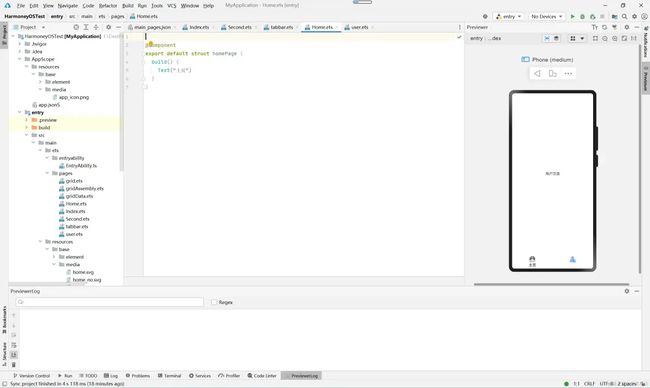
我百度出来的一大批都是(包括官网)都是使用一个普通组件来充当页面进行示例的,所以目前就这样写吧,逻辑上也是比较完美的,如果后续了解到了我会回来评论,大家也可以在评论区评论一起探讨,代码我也贴到下面
- tabbar.ets
import userPage from './user'
import homePage from './Home'
@Entry
@Component
struct tabbarPage{
  private controller = new TabsController();
  @State currentIndex:number = 0;
  @Builder TabbarBuilder(title:string,index:number,selectImg:Resource,Img:Resource) {
    Column() {
      Image(this.currentIndex == index ? selectImg : Img)
        .width(32)
        .height(32)
      Text(title)
        .fontColor(this.currentIndex == index ? "#fff" : "#000")
    }
    .onClick(()=> {
      this.currentIndex = index;
      this.controller.changeIndex(index);
    })
  }
  build() {
    Tabs({barPosition:BarPosition.End,controller:this.controller}) {
      TabContent() {
        homePage()
      }.tabBar(this.TabbarBuilder("主页",0,$r("app.media.home"),$r("app.media.home_no")))
      TabContent() {
        userPage()
      }.tabBar(this.TabbarBuilder("用户页面",1,$r("app.media.user"),$r("app.media.user_no")))
    }.vertical(false)
    .barWidth("100%")
    .barHeight(64)
    .barMode(BarMode.Fixed)
    .onChange((index:number)=> {
      this.currentIndex = index;
    })
  }
}
- HOME
@Component
export default struct homePage {
  build() {
    Text("主页")
  }
}
- User
@Component
export default struct userPage {
  build() {
    Text("用户页面")
  }
}
@Watch
这也是一个装饰器,我们在上一章说过 @State、@Prop、@Link、@Component等等
因为要通过组件状态来引出 @Watch ,所以我再大体阐述一下:
- @State:单个组件中的数据驱动试图
- @Prop:父组件单向控制子组件数据驱动试图,且该装饰器子组件来使用
- @Link:父子组件之间的双向数据传递或者说绑定,且该装饰器子组件来使用
而 @Watch 的作用是监听状态值的变化,如果状态值发生变化,那么会触发执行我们定义好的回调函数,实现当前监听数据改变牵动其他状态的改变
以下代码我没有使用组件间的数据传递来配合 @Watch 使用,但是足够描述该装饰器功能,我们通过监听数据的变化,如果数据大于等于5,那么会触发 numMaxFunc 函数来改变其他变量或者状态,且可以与其他装饰器相配合在一起使用
@Component
export default struct homePage {
  @State flag:boolean = true;
  @State @Watch("numMaxFunc") num:number = 0;
  @State text:string = "+ 1";

  numMaxFunc() {
    if(this.num >= 5) {
      this.num--;
      this.text = "-1";
      this.flag = !this.flag;
    }
  }

  build() {
    Column({space:12}) {
      Text(`${ this.num }`)
      Button(this.text)
      .onClick(()=> {
        if(this.flag) {
          this.num++;
        } else {
          this.num--;
        }
      })

      Button("点击切换按钮功能")
        .onClick(()=> {
          this.flag = !this.flag;
          if (this.text == "+ 1") {
            this.text = "- 1";
          } else {
            this.text = "+ 1";
          }
        })
    }
  }
}
跨组件层级双向同步状态:@Provide和@Consume
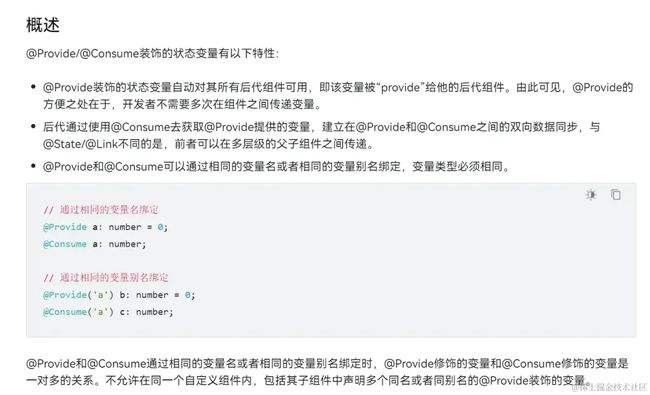
@Provide和@Consume,应用于与后代组件的双向数据同步,应用于状态数据在多个层级之间传递的场景。不同于上文提到的父子组件之间通过命名参数机制传递,@Provide和@Consume摆脱参数传递机制的束缚,实现跨层级传递
这是官网给出的定义。不过也确实该有,否则业务需求繁琐的话,需要多页面互相数据共享,一个数据传十来个组件先不说,能乱死
我依稀记得在当初学习 React 的时候,虽然也有对应的传值方法,但是感觉有点BT了,兄弟组件传个值搞得什么状态提升、发布订阅模式、context 状态数传参,不过有时候还是很喜欢 React 的…
这个效果不演示了,很简单,我从官网截了一张图,一看便知
弹窗
警告弹窗
我们可以使用内置 API AlterDialog 的 show 方法来显示警告框,具体配置如下面的代码,效果如上图,和我们在 Uniapp 中使用的方式差不多,一个内置 API,配置即可
@Component
export default struct userPage {
  // 警告弹框
  alterFunc() {
    AlertDialog.show({
      title:"标题",
      message:"内容",
      primaryButton: {
        value:"关闭操作",
        action:()=> {
          // 点击调用回调
        }},
      secondaryButton:{
        value:"确认操作",
        fontColor:'red',
        action:()=> {
          // 点击调用回调
        }
      }
    })
  }

  build() {
    Button("点击出现弹框")
      .onClick(()=> {
        this.alterFunc();
      })
  }
}
这是一个基本的弹框,我们可以根据它的属性来设置不一样的效果,比如显示在底部而不是正中央:
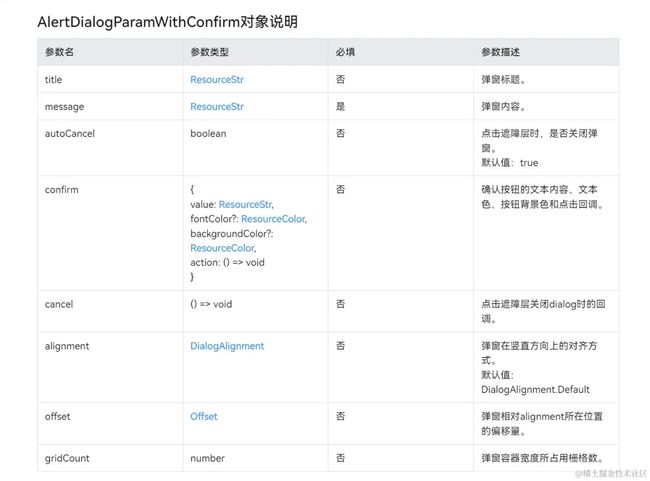
以下是弹框的其他配置,比如我们点击弹框以外的遮罩层是否关闭弹窗
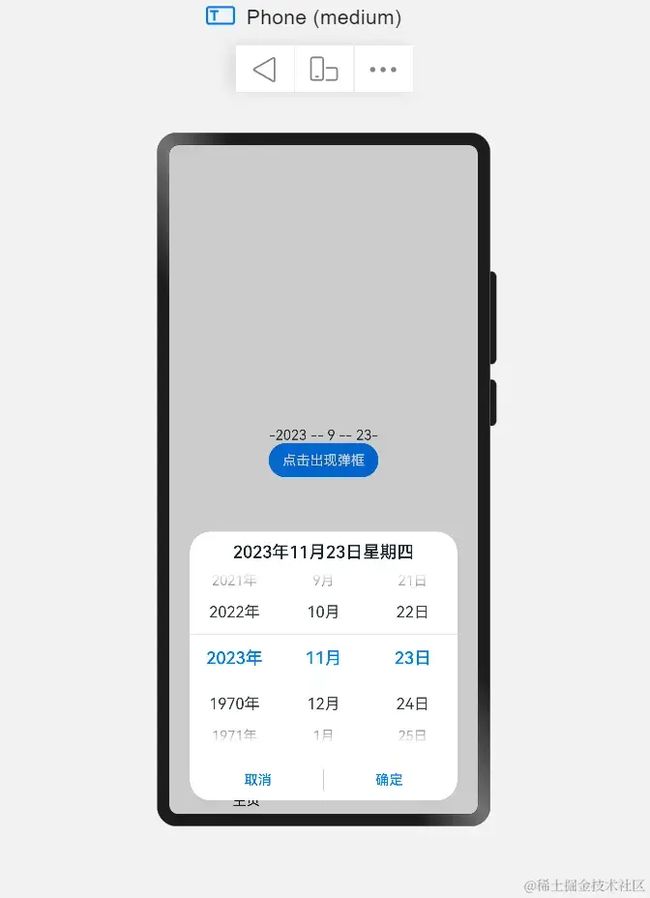
日期弹框
@Component
export default struct userPage {
  @State dateStr:string = '';

  // 警告弹框
  alterFunc() {
    DatePickerDialog.show({
      start: new Date('1970-01-01'), // 开始日期
      end: new Date(), // 结束日期
      selected: new Date(), // 默认选中日期
      lunar:false, // 是否为农历
      // 选中后点击确定
      onAccept:(val:DatePickerResult)=> {
        this.dateStr = `-${val.year} -- ${val.month + 1} -- ${val.day}-`
      }
    })
  }

  build() {
    Column() {
      Text(this.dateStr)
      Button("点击出现弹框")
        .onClick(()=> {
          this.alterFunc();
        })
    }
  }
}
还有剩下几个弹框样式,我就不一一赘述了,我们可以去官网查看
- 列表选择弹框
- 时间滑动选择器弹框
- 文本滑动选择器弹框
主要写一下自定义弹框,如果这些样式无法满足我们的需求,那么我们可以使用装饰器 @CustomDialog 自定义自己的弹框
- 创建自定义弹窗
import { HobbyBean } from './dataObj';
@CustomDialog
@Component
export default struct CustomDialogWidget {
  @State hobbyBeans:Array = [];
  @Link hobbies: string;
  private controller: CustomDialogController;

  // 这是一个生命周期方法,当对话框即将出现时会被调用 (该生命周期被用来初始化数据)
  aboutToAppear() {
    // 获取当前弹框组件的上下文
    // let context: Context = getContext(this);
    // // 从上下文中获取资源管理器
    // let manager = context.resourceManager;
    // // 从资源管理器中获取一个字符串数组,这个字符串数组包含了关于各种爱好的数据
    // manager.getStringArrayValue($r('app.strarray.hobbies_data'), (error, hobbyResult) => {
    //   // 字符串数组进行遍历,为每个业余爱好项创建一个新的 HobbyBean 对象
    //   hobbyResult.forEach((hobbyItem: string) => {
    //     let hobbyBean:HobbyBean = new HobbyBean();
    //     hobbyBean.title = hobbyItem;
    //     hobbyBean.isCheck = false;
    //     this.hobbyBeans.push(hobbyBean);
    //   });
    // });
    this.hobbyBeans = [
      {
        "id":0,
        "title":"写代码",
        "isCheck": false
      },
      {
        "id":1,
        "title":"打篮球",
        "isCheck": false
      },
      {
        "id":2,
        "title":"跑步",
        "isCheck": false
      }
    ]
  }

  // 将数组中所有选中项的标题连接成一个字符串,并将其赋值给hobbies变量
  setHobbiesValue(hobbyBeans: HobbyBean[]) {
    let hobbiesText: string = '';
    hobbiesText = hobbyBeans.filter((isCheckItem: HobbyBean) =>
    isCheckItem?.isCheck)
      .map((checkedItem: HobbyBean) => {
        return checkedItem.title;
      }).join(',');
    this.hobbies = hobbiesText;
  }

  build() {
    Column({space:12}) {
      Text("兴趣爱好选择")
      List() {
        ForEach(this.hobbyBeans, (item: HobbyBean) => {
          ListItem() {
            Row() {
              Text(item.title)
              Toggle({ type: ToggleType.Checkbox, isOn: false })
              .onChange((isCheck) => {
                item.isCheck = isCheck;
              })
            }
          }
        }, item => item.id)
      }

      Row() {
        Button("取消")
        .onClick(() => {
          this.controller.close();
        })
        Button("确认")
        .onClick(() => {
          this.setHobbiesValue(this.hobbyBeans);
          this.controller.close();
        })
      }.width("100%")
      .justifyContent(FlexAlign.SpaceBetween)
    }.backgroundColor('#fff')
    .padding(32)
    .width('90%')
    .borderRadius(24)
  }
}
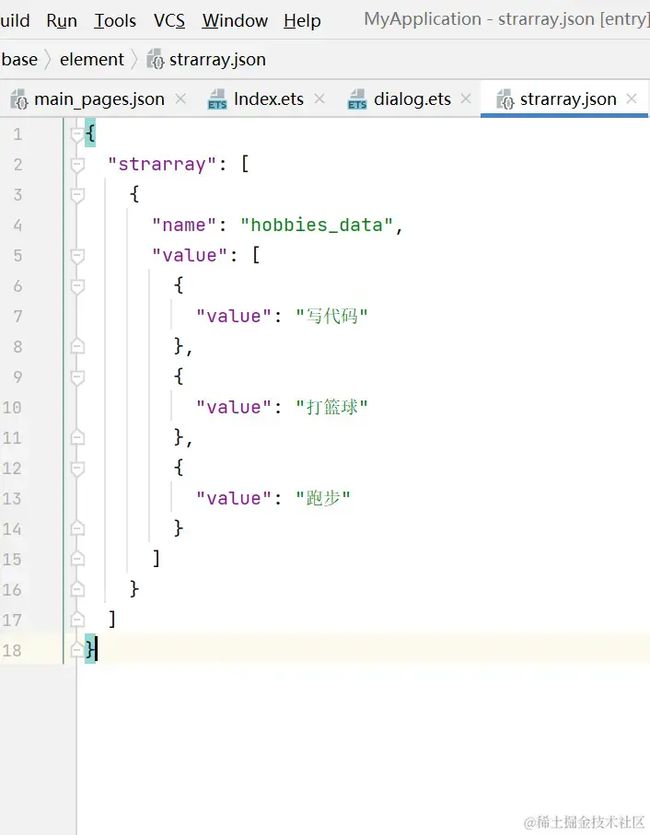
可以看到我注释了一段代码,我本来是写好了数据打算在弹框生命周期中将引用类型数据进行一个处理,然后使用 foreach 遍历一下,结果死活获取不到上下文(应该就是这样获取吧,有朋友知道可以在评论区评论,我们一起探讨研究),先用死数据代替一下将功能写出来
关于上面代码的 hobbyBean 数据类型是我自己定义的,上面也有相关引用
export class  HobbyBean {
  id:number;
  title:string;
  isCheck:boolean;
}
然后我们就可以在页面中使用我们定义好的弹框了
import CustomDialogWidget from './dialog';
@Component
export default struct userPage {
  @State hobbies:string = '';
  customDialogController: CustomDialogController = new CustomDialogController({
    // 弹窗内容构造器
    builder: CustomDialogWidget({
      hobbies:$hobbies
    }),
    alignment: DialogAlignment.Bottom,
    customStyle: true,
    offset: { dx: 0,dy: -20 }
  });
  build() {
    Column({space:12}) {
      Text(this.hobbies)
      Button("点击选择你的爱好")
        .onClick(()=> {
          this.customDialogController.open();
        })
    }
  }
}
Video
视频播放组件,通过 VideoController 对象可以控制一个或多个video的状态或者他们的属性,其他属性、事件、配置以及刚才提到的 VideoController 对象请前往官网学习查阅
我们使用真机模拟吧,我发现 预览模式 不支持…视频组件
这字也是真小,我以为哪里写错了我调试了半天,真服了,真机运行如下:
Video({
  src:"http://clips.vorwaerts-gmbh.de/big_buck_bunny.mp4",
  // 预览图片
  previewUri:$r("app.media.app_icon")
})
  .width("90%")
  .height(240)
  .objectFit(ImageFit.Contain)
动画
属性动画
这是基础页面开发的最后一个内容了,首先我们通过元素属性来实现动画效果
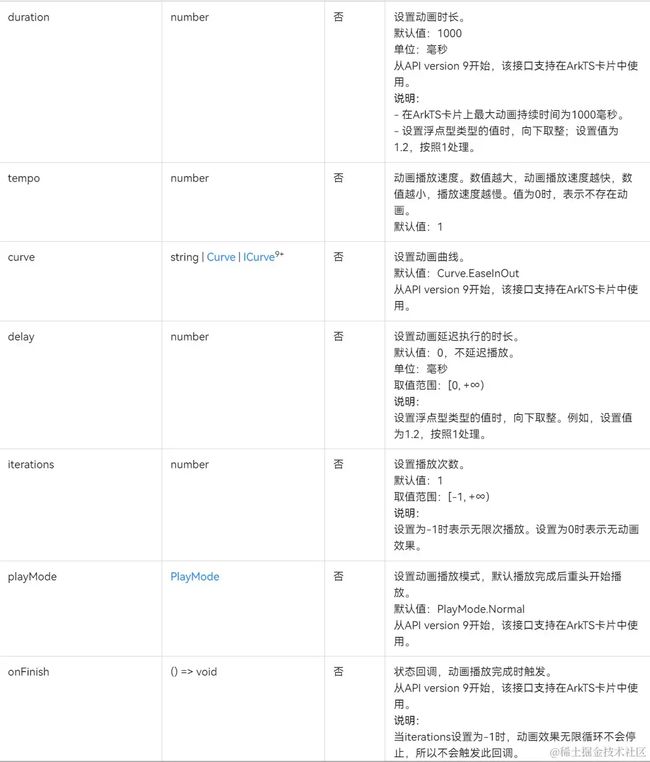
我们给元素组件添加 animation 动画属性即可实现动画效果,下图是 animation 的具体参数配置
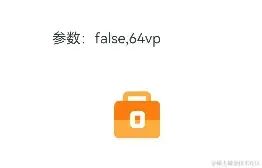
@Component
export default struct userPage {
  @State flag:boolean = false;
  @State imgWidth:string = "64vp";
  @State imgUrl:Resource  = $r("app.media.home");

  build() {
    Column() {
      Text(`参数:${this.flag},${this.imgWidth}`)
      Image(this.imgUrl)
        .width(this.imgWidth)
        .position({x:this.imgWidth,y:this.imgWidth})
        .animation({
          duration:1000,
          tempo:0.8,
          curve:Curve.LinearOutSlowIn,
          delay:0,
          // iterations:-1,
          playMode:PlayMode.Normal
        })
        .onClick(()=> {
          if(!this.flag) {
            this.imgWidth = "92vp";
            this.imgUrl = $r("app.media.we_chat");
            this.flag = !this.flag;
          } else {
            this.imgWidth = "64vp";
            this.imgUrl = $r("app.media.home");
            this.flag = !this.flag;
          }
        })
    }
  }
}
其他动画
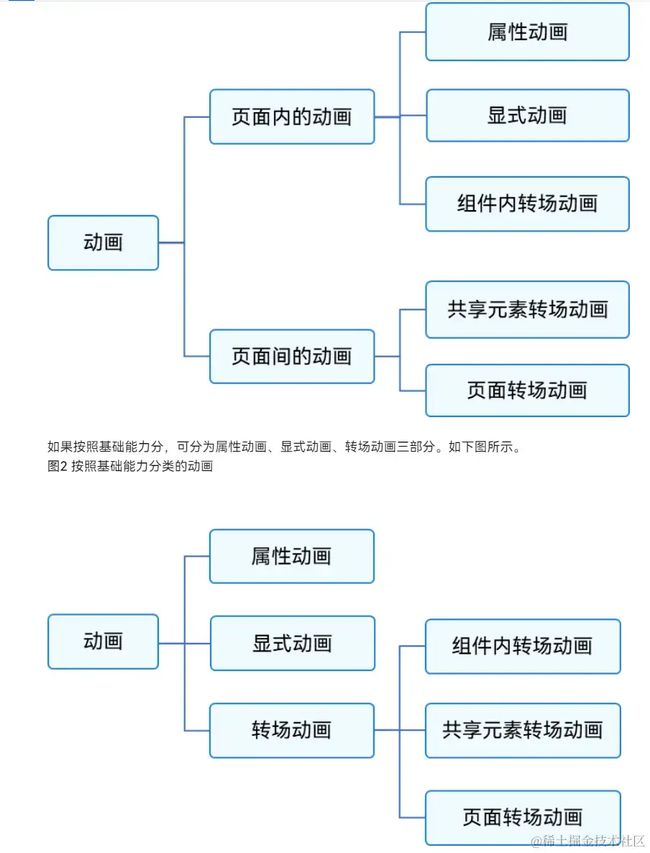
除了属性动画,HarmonyOS 还提供了很多的动画,例如 sharedTransition 不同页面同元素的过渡转场动画,transition 组件内转场动画,PageTransitionEnter 页面间转场动画等等
官网根据不同动画的性质做了区分,有兴趣可以查寻对应关键字在官网实现更多有趣的动画,在这里我就不赘诉了,感觉这篇文章稍微有点长了
ArkTs API 文档还有很多功能待我们发现,推荐阅读一遍官方文档,我相信会有一些奇妙的感悟,页面的构建和书写基础篇就先写到这里
为了能让大家更好的学习鸿蒙 (Harmony OS) 开发技术,这边特意整理了《鸿蒙 (Harmony OS)开发学习手册》(共计890页),希望对大家有所帮助:https://qr21.cn/FV7h05
《鸿蒙 (Harmony OS)开发学习手册》
入门必看:https://qr21.cn/FV7h05
- 应用开发导读(ArkTS)
- 应用开发导读(Java)
![]()
HarmonyOS 概念:https://qr21.cn/FV7h05
- 系统定义
- 技术架构
- 技术特性
- 系统安全
![]()
如何快速入门:https://qr21.cn/FV7h05
- 基本概念
- 构建第一个ArkTS应用
- 构建第一个JS应用
- ……
![]()
开发基础知识:https://qr21.cn/FV7h05
- 应用基础知识
- 配置文件
- 应用数据管理
- 应用安全管理
- 应用隐私保护
- 三方应用调用管控机制
- 资源分类与访问
- 学习ArkTS语言
- ……
![]()
基于ArkTS 开发:https://qr21.cn/FV7h05
- Ability开发
- UI开发
- 公共事件与通知
- 窗口管理
- 媒体
- 安全
- 网络与链接
- 电话服务
- 数据管理
- 后台任务(Background Task)管理
- 设备管理
- 设备使用信息统计
- DFX
- 国际化开发
- 折叠屏系列
- ……
![]()


