CentOS 7.6 离线安装zabbix 5.0.11
一、安装前准备
系统版本:CentOS 7.6
zabbix版本:5.0.11
1.Linux服务器要关闭防火墙(如果开启防火墙可以将zabbix常用端口加入防火墙规则中)。关闭selinux。如果服务器里已安装MySQL,建议卸载干净,因为本次安装使用MariaDB作为zabbix的使用库。
配置本地yum源。方法可参考(7和6版本可通用):https://blog.csdn.net/qq_32838955/article/details/104285779
2.zabbix版本使用的5.0,官方网站建议使用 LTS版本(长期支持)。本次是离线安装需要预先下载zabbix的rpm包和相关依赖包。本次安装包已放置与百度云盘(阿里云盘能分享的话早就不用百度的了):链接:https://pan.baidu.com/s/1q6HjlrJoV4ZoLQBfz7l7Rw
提取码:wd9n
离线包的下载方法:
虚拟机安装服务器相同版本的Linux系统,并且可以联网。下载参考以下命令
1.安装zabbix的yum源:
rpm -Uvh https://repo.zabbix.com/zabbix/5.0/rhel/7/x86_64/zabbix-release-5.0-1.el7.noarch.rpm
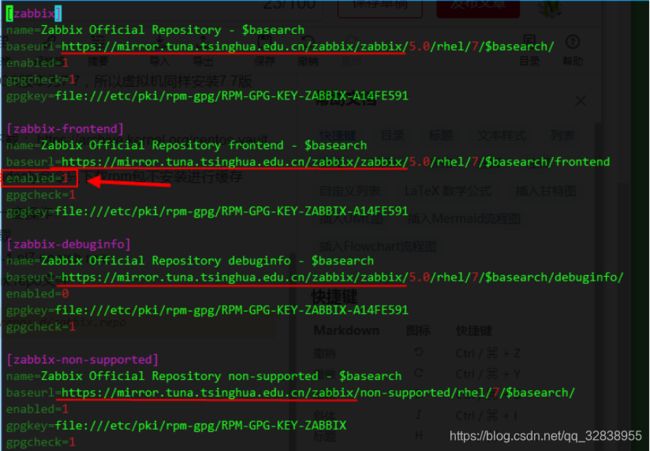
执行后在/etc/yum.repo.d/下生成了zabbix.repo文件。
修改zabbix.repo中为清华镜像源,不建议使用自带,下载较慢。
注意更改zabbix-frontend 下面的 enabled = 1
参考截图示例:
2.然后本机配置阿里或者其他类似的yum源:
wget -O /etc/yum.repos.d/CentOS-Base.repo http://mirrors.aliyun.com/repo/Centos-7.repo
yum clean all
yum repolist3.下载rpm包
(1)下载MySQL数据库:
yum install mariadb-server.x86_64 --downloadonly --downloaddir=/tmp/zabbix5.0
(2)下载zabbix服务(server、agent):
yum install zabbix-server-mysql zabbix-agent --downloadonly --downloaddir=/tmp/zabbix5.0
(3)下载Enable Red Hat Software Collections:
yum install centos-release-scl --downloadonly --downloaddir=/tmp/zabbix5.0
(4)下载zabbix的web服务:
yum install zabbix-web-mysql-scl zabbix-apache-conf-scl --downloadonly --downloaddir=/tmp/zabbix5.0
以上命令即可将zabbix所需安装包下载到本地。
其中(4)下载时如果有提示所需依赖包没有,可以去清华镜像站单独下载,至于需要下载那些包可以参考命令执行时的提示进行下载。其中rn-php72相关包可以去此网站搜索下载:http://rpm.pbone.net/
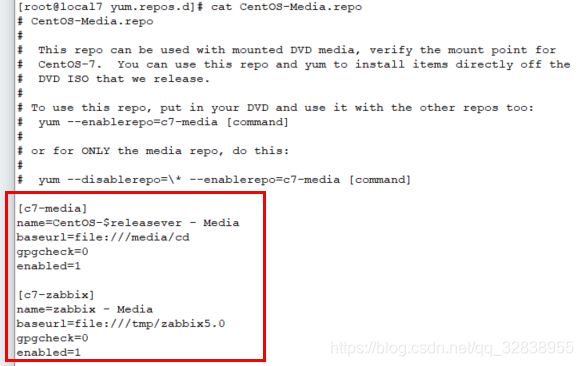
3.将下载后的所有rpm包上传至离线部署zabbix的服务器上,然后创建自定义yum源:
[root@local7 ~]# createrepo /tmp/zabbix5.0/
Spawning worker 0 with 11 pkgs
Spawning worker 1 with 11 pkgs
Spawning worker 2 with 11 pkgs
Spawning worker 3 with 11 pkgs
Workers Finished
Saving Primary metadata
Saving file lists metadata
Saving other metadata
Generating sqlite DBs
Sqlite DBs complete

[root@local7 ~]# ls /tmp/zabbix5.0/
apr-1.4.8-7.el7.x86_64.rpm                       perl-Compress-Raw-Zlib-2.061-4.el7.x86_64.rpm  rh-php72-php-ldap-7.2.24-1.el7.x86_64.rpm
apr-util-1.5.2-6.el7.x86_64.rpm                  perl-DBD-MySQL-4.023-6.el7.x86_64.rpm          rh-php72-php-mbstring-7.2.24-1.el7.x86_64.rpm
centos-release-scl-2-3.el7.centos.noarch.rpm     perl-DBI-1.627-4.el7.x86_64.rpm                rh-php72-php-mysqlnd-7.2.24-1.el7.x86_64.rpm
centos-release-scl-rh-2-3.el7.centos.noarch.rpm  perl-IO-Compress-2.061-2.el7.noarch.rpm        rh-php72-php-pdo-7.2.24-1.el7.x86_64.rpm
fping-3.16-1.el7.x86_64.rpm                      perl-Net-Daemon-0.48-5.el7.noarch.rpm          rh-php72-php-pear-1.10.5-1.el7.noarch.rpm
httpd-2.4.6-97.el7.centos.x86_64.rpm             perl-PlRPC-0.2020-14.el7.noarch.rpm            rh-php72-php-process-7.2.24-1.el7.x86_64.rpm
httpd-tools-2.4.6-97.el7.centos.x86_64.rpm       repodata                                       rh-php72-php-xml-7.2.24-1.el7.x86_64.rpm
mailcap-2.1.41-2.el7.noarch.rpm                  rh-php72-1-2.el7.x86_64.rpm                    rh-php72-php-zip-7.2.24-1.el7.x86_64.rpm
mariadb-5.5.68-1.el7.x86_64.rpm                  rh-php72-php-7.2.10-3.el7.x86_64.rpm           rh-php72-runtime-1-2.el7.x86_64.rpm
mariadb-libs-5.5.68-1.el7.x86_64.rpm             rh-php72-php-bcmath-7.2.24-1.el7.x86_64.rpm    zabbix-agent-5.0.11-1.el7.x86_64.rpm
mariadb-server-5.5.68-1.el7.x86_64.rpm           rh-php72-php-cli-7.2.24-1.el7.x86_64.rpm       zabbix-apache-conf-scl-5.0.11-1.el7.noarch.rpm
OpenIPMI-2.0.27-1.el7.x86_64.rpm                 rh-php72-php-common-7.2.24-1.el7.x86_64.rpm    zabbix-server-mysql-5.0.11-1.el7.x86_64.rpm
OpenIPMI-libs-2.0.27-1.el7.x86_64.rpm            rh-php72-php-fpm-7.2.24-1.el7.x86_64.rpm       zabbix-web-5.0.11-1.el7.noarch.rpm
OpenIPMI-modalias-2.0.27-1.el7.x86_64.rpm        rh-php72-php-gd-7.2.24-1.el7.x86_64.rpm        zabbix-web-deps-scl-5.0.11-1.el7.noarch.rpm
perl-Compress-Raw-Bzip2-2.061-3.el7.x86_64.rpm   rh-php72-php-json-7.2.24-1.el7.x86_64.rpm      zabbix-web-mysql-scl-5.0.11-1.el7.noarch.rpm
注意:如果服务器中没有createrepo命令,可以使用yum安装:yum -y install createrepo,并且命令执行成功后会在/tmp/zabbix5.0目录下生成一个名字为repodate的目录。
配置自定义zabbix相关yum源。离线安装的服务器已经配置了本地yum源,所以只需要将自定义的yum源信息添加到所在的配置文件中即可,例如:
查看是否配置成功:
[root@local7 ~]# yum clean all
[root@local7 ~]# yum repolist
Loaded plugins: fastestmirror
Loading mirror speeds from cached hostfile
repo id                                                                repo name                                                                     status
!c7-media                                                              CentOS-7 - Media                                                              4,021
!c7-zabbix                                                             zabbix - Media                                                                   44
repolist: 4,065
安装的前期准备工作已经完成。
二、安装zabbix
1.安装 Zabbix server 和 agent
[root@local7 ~]# yum -y install zabbix-server-mysql zabbix-agent
本次同时安装了zabbix的server和agent,分别使用10051和10050端口,zabbix server所在的服务器会自动监控本身,所以需要安装agent,由于agent在server本地所以基本不用修改agent的配置文件,但是如果是其他服务器安装agent,其配置文件还需要做修改,此处注意。
2.安装mysql数据库
[root@local7 ~]# yum -y install mariadb-server.x86_64
3.安装RHEL Software collections(SCLs)
Software collections是一个Linux软件多版本共存的解决方案。
[root@local7 ~]# yum -y install centos-release-scl
4.安装web前端组件
[root@local7 ~]# yum install zabbix-web-mysql-scl zabbix-apache-conf-scl
5.配置数据库
(1)启动MariaDB,并配置自启动:
[root@local7 ~]# systemctl enable mariadb.service
[root@local7 ~]# systemctl start mariadb.service
(2)mysql安全配置向导,主要包含以下操作:
–为root用户设置密码
–删除匿名账号
–取消root用户远程登录
–删除test库和对test库的访问权限
–刷新授权表使修改生效
[root@local7 ~]# mysql_secure_installation
注意按照提示操作,第一个是提示输入数据库root密码,刚安装所以没有,回车跳过,后面提示是否设置root密码,输入Y后数据密码即可,后面提示可以全部输入Y回车,一直到结束。
(3)创建数据库zabbix和用户zabbix并授权(也可以设置其他名称,为了便于修改配置文件,所以参考官网设置。)
[root@local7 ~]# mysql -uroot -proot123
Welcome to the MariaDB monitor.  Commands end with ; or \g.
Your MariaDB connection id is 1536
Server version: 5.5.68-MariaDB MariaDB Server

Copyright (c) 2000, 2018, Oracle, MariaDB Corporation Ab and others.

Type 'help;' or '\h' for help. Type '\c' to clear the current input statement.

MariaDB [(none)]> create database zabbix character set utf8 collate utf8_bin;

MariaDB [(none)]> create user zabbix@localhost identified by 'zabbix';

MariaDB [(none)]> grant all privileges on zabbix.* to zabbix@localhost;

MariaDB [(none)]> flush privileges;

MariaDB [(none)]> quit;
(4)导入初始架构和数据,查看zabbix自带sql文件路径:
[root@local7 ~]# rpm -ql zabbix-server-mysql
/etc/logrotate.d/zabbix-server
/etc/zabbix/zabbix_server.conf
/usr/lib/systemd/system/zabbix-server.service
/usr/lib/tmpfiles.d/zabbix-server.conf
/usr/lib/zabbix/alertscripts
/usr/lib/zabbix/externalscripts
/usr/sbin/zabbix_server_mysql
/usr/share/doc/zabbix-server-mysql-5.0.11
/usr/share/doc/zabbix-server-mysql-5.0.11/AUTHORS
/usr/share/doc/zabbix-server-mysql-5.0.11/COPYING
/usr/share/doc/zabbix-server-mysql-5.0.11/ChangeLog
/usr/share/doc/zabbix-server-mysql-5.0.11/NEWS
/usr/share/doc/zabbix-server-mysql-5.0.11/README
/usr/share/doc/zabbix-server-mysql-5.0.11/create.sql.gz
/usr/share/doc/zabbix-server-mysql-5.0.11/double.sql
/usr/share/man/man8/zabbix_server.8.gz
/var/log/zabbix
/var/run/zabbix
其中create.sql.gz就是要导入数据库zabbix的结构和数据。切换目录并解压缩
[root@local7 ~]# cd /usr/share/doc/zabbix-server-mysql-5.0.11/
[root@local7 zabbix-server-mysql-5.0.11]# gzip -d create.sql.gz
[root@local7 zabbix-server-mysql-5.0.11]# ls
AUTHORS  ChangeLog  COPYING  create.sql  double.sql  NEWS  README
[root@local7 zabbix-server-mysql-5.0.11]# mysql -uzabbix -pzabbix  zabbix < create.sql
6.修改 zabbix-server 和 php配置文件
(1)编辑 zabbix_server.conf
[root@local7 ~]#  vim /etc/zabbix/zabbix_server.conf
找到对应项有注释则取消:
DBHost= localhost
DBName = zabbix
DBuser= zabbix
DBpassword = zabbix
(2)编辑php配置文件,更改时区 取消下面配置项前面注释“;” 更改为Asia/Shanghai
[root@local7 ~]#  vim /etc/opt/rh/rh-php72/php-fpm.d/zabbix.conf
......
php_value[date.timezone] = Asia/Shanghai
......
注意:修改的时区要与你服务器本地配置的时区相同!
另外温馨提示,编辑时区时很可能看到的是这样的:
;php_value[date.timezone] = Asia/Shanghai
也就是前面多了个分号,要记得删除,不然会不识别时区参数。
三、启动zabbix并访问
1.启动 zabbix服务和进程!
(1)启动服务
[root@local7 ~]# systemctl restart zabbix-server zabbix-agent httpd rh-php72-php-fpm
设置开机自启
[root@local7 ~]# systemctl enable zabbix-server zabbix-agent httpd rh-php72-php-fpm
如果存在问题请检查日志,查看zabbix服务器日志
[root@local7 ~]# vim /var/log/zabbix_server.log
2.访问zabbix的web页面进行初始化配置:
打开浏览器访问 http://
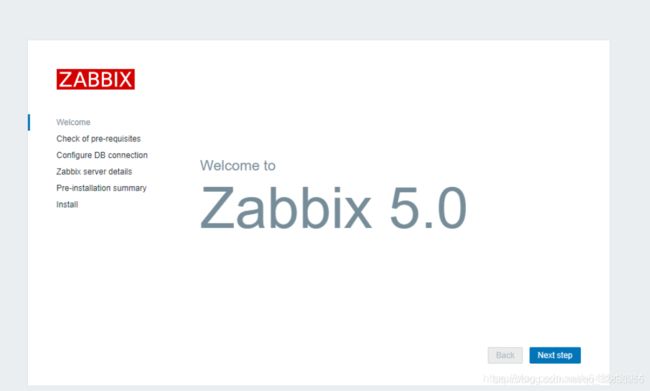
按照提示操作即可,具体可参考官方文件中的提示:WEB界面安装
至此zabbix离线安装完成。本次安装记录仅供参考!
附录:
此二进制包安装方式,相关配置文件位置:
zabbix server:/etc/zabbix/zabbix_server.conf
zabbix agent:/etc/zabbix/zabbix_agent.conf
http:/etc/httpd/
php:/etc/opt/rh/rh-php72/php-fpm.d/zabbix.conf
MariaDB:/etc/my.cnf